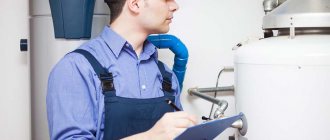
Cylinders are universal equipment for storing and transporting gaseous substances for domestic and industrial purposes. The shut-off valves in them do not last forever, so over time the valve on the gas cylinder needs to be replaced. You can do it yourself, following a number of safety rules.
We will tell you how to choose the right valve for equipping a gas cylinder. For independent craftsmen, we provide detailed instructions on how to change a worn-out device. Here you will learn what safety measures must be observed when installing a shut-off device on a gas tank.
Components of a gas cylinder
Requirements for production processes and technical characteristics of gas cylinders are regulated by rather old GOSTs 949-73 and 15860-84.
The maximum operating pressure in the devices ranges from 1.6 MPa to 19.6 MPa, and the wall thickness can vary from 1.5 to 8.9 mm.
A standard gas cylinder assembly consists of the following elements:
- Cylinder body.
- Valve with shut-off valves.
- Valve closing cap.
- Backing rings for fixation and transportation.
- Support shoe.
An important element of the cylinder is also the technical information stamped on it.
The bottom of the cylinders is shaped like a hemisphere for uniform distribution of internal pressure. For better stability of the body, a shoe is welded on the outside, on the lower edges of which there are often holes for attaching the cylinder to horizontal surfaces.
You will learn about the types of gas cylinders and the features of their markings in this article, which we recommend viewing and reading.
Types of gas valves
Before examining shut-off valves in detail, it is necessary to clarify that they are just a part of a container for transporting and storing various gases under pressure. Cylinders are manufactured from carbon or alloy steel in accordance with GOST 949-72. They differ from each other in color and volume, but the device is the same. Thus, a gas cylinder consists of a valve, a seal, a thread and a seamless tank with the passport data assigned by the manufacturer stamped on it.
Valves are divided into several types, depending on what the cylinders are filled with: liquefied gas, oxygen or propane-butane. At the same time, there are practically no distinctive design features; only the valve markings differ according to GOST standards:
Types and design of valves
The threads of valves for gas cylinders are standardized, but they themselves can have a variety of designs. The choice of valve model is influenced by the type of chemical substance being stored, production features of operation and the amount of money.
Before purchasing new equipment, you should familiarize yourself with the design options and the internal structure of the valves.
Classification of shut-off valves for cylinders
The design features of gas cylinder valves are determined not by the whims of engineers, but by safety considerations.
Depending on the material used, shut-off valves are divided into brass and steel . The choice of metal for the manufacture of the valve body is determined by the type of gases contained in the cylinder.
There are the following types of shut-off valves, depending on the type of chemicals stored:
- Acetylene. The body of such cylinders is painted white. Special valves are used in cylinders containing acetylene, chlorine, ammonia and other aggressive substances.
- Oxygen . The cylinders are painted blue and are intended for storing oxygen, argon, hydrogen, nitrogen, carbon dioxide and other inert gases.
- Propane-butane . They are painted red and are intended for storing substances corresponding to the name and other gaseous hydrocarbons. The most common valve type model for such a cylinder is VB-2.
Valves for acetylene cylinders are not made of brass because the substances they contain may react chemically with copper. Typically, carbon or alloy steel is used to manufacture shut-off valves of this type.
Gas valve device
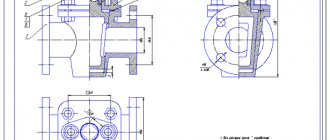
A standard gas valve has the form of a tee, each fitting of which has an external thread. More advanced models may have an additional protrusion - a safety valve. Its purpose is to relieve excess pressure in the event of a full cylinder heating up or in case of incorrect filling.
The lower fitting of the valve is used to connect to the gas cylinder, the upper one is used to attach the flywheel, and the side one is used to connect communications for gas outlet and injection. The arrangement of the gas cylinder tap is quite simple.
Shut-off valves usually consist of the following general elements:
- Brass or steel body.
- A stuffing box valve or flywheel connected to the body with a union nut.
- Internal locking mechanism with valve and stem.
- Sealing gaskets.
- Plug for the outlet.
You can examine in detail the design of valves on gas cylinders of each type in the presented images.
Worn valves can leak small amounts of gas, which can lead to unpredictable consequences in enclosed spaces. To prevent such situations, a plug is used on the side fitting, which serves for additional sealing of the cylinder during transportation and long-term storage.
The direction of the threads on the outlet holes depends on the chemicals contained in the cylinders: the right is used for non-flammable gases (oxygen, nitrogen, argon, etc.), and the left is used for flammable gases (hydrogen, acetylene, propane, etc.)
The principle of operation of the assembled gas valve is unremarkable. To supply gas and shut it off, simply slowly turn the flywheel in the appropriate direction.
Independent work
What to do if the gas cylinder is leaking gas? The following manipulations will be required (only suitable for VK-94 models).
Take a 2.7 cm wrench. Tighten the nut (marked in the image). The motion vector is clockwise (CW).
When the flywheel opens and the valve of the propane tank is released, unscrew the flywheel in the opposite direction to the very limit.
If these options do not produce an effect, then you must:
- Unscrew the nut located under the flywheel. The movement is against the emergency. It is then removed from the tank.
- Using a wrench, unscrew the nut at the top of the flywheel by 1 cm.
- The rod is removed from it. There is a sealing gasket there.
It should have two holes:
- internal - maximum 8.5 mm.
- external – identical to the internal parameter of the nut (diameter).
After installing a new product, the rod should be placed very tightly. He will need to be hammered. You can do this with a hammer or the flat side of a key. After which the flywheel returns to its position and is screwed with a nut. It should not be screwed all the way. There is no need to clamp the spring here. It should be taut. Otherwise, the flywheel will not rotate.
Such measures often become a solution to a dilemma - what to do if a gas cylinder leaks? It is important at the end of the operation to put the assembly back on the cylinder and screw it with a nut. Vector - according to emergencies
You need a 2.7 cm key. Force: 5-7 kg. Don't screw it all the way.
If you have a VKB faucet, you cannot disassemble it yourself. If there is still gas in the container and even a small percentage of residual pressure, opening the nut is life-threatening! After all, only it holds back the pressure in this unit. It can only be repaired in a devastated state.
There is a small hole at the back of this valve. If the diaphragms are breached, gas escapes.
The VKB modification is usually mounted on a helium tank. For other gases use VK-94.
Mandatory Precautions
Before replacing the gas cylinder valve, precautions must be taken. Work must be carried out in such a way as to protect people from potential hazards and keep the equipment in working condition.
The following precautions are used when preparing to replace a gas valve:
- The remaining contents of the cylinder can only be vented in an open space. An exception can be made only for nitrogen, air and argon.
- The work area should be well ventilated, although it is advisable to carry out work outside.
- There should only be one closed gas cylinder within the workplace.
- The flywheel must be unscrewed slowly to prevent electrification.
- You can begin replacing the valve only after the pressure in the cylinder and outside has been completely equalized.
When screwing the valve into the cylinder, fum tape or special lubricants are used, which provide increased tightness and strength of the connection. When replacing a faucet, such seals greatly complicate the process of dismantling it. To solve this problem, you can heat the valve with a hairdryer.
You can heat the shut-off valves only after bleeding the gas from the cylinder and closing the tap. In this case, the procedure is safe and will not lead to unpredictable situations.
An alternative to a hairdryer is to wrap a cloth around the valve and then pour boiling water over it. With this heating method, any suitable plug should be screwed onto the outlet fitting to prevent water from entering there.
After taking all precautions and warming up the shut-off valves, you can begin to unscrew the valve, which can be a difficult task at home.
If, in addition to replacing the cylinder shut-off device, you also need to replace the valve installed on the gas pipeline, we advise you to study the procedure and rules for performing this work.
Indications for replacement
In order to send the cylinder in time for repair work and performance testing, perform an external inspection and pay attention to the following:
- Is the shut-off valve flywheel spinning?
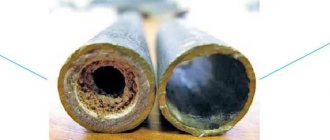
- on the body and valve of the cylinder, whether mechanical deformation is visible in the form of abrasions, cracks and traces of corrosion damage;
- validity of technical inspection data;
- feeling the smell of the gas-air environment next to the cylinder;
- skewed or damaged shoe at the base;
- absence of a plug on the fitting.
Before replacing the valve of a gas cylinder with your own hands, the user needs to be able to not only externally determine the malfunction of the cylinders, but also identify counterfeit products. All cylinders that are permitted for use in Russia must be produced in a certified production facility and comply with GOST requirements. This can be easily determined by examining a metal plate on which the main text is located on 2/3 of its area, and all letters must be the same height, equal to 6 mm.
Data on the cylinder:
- Permissible pressure in MPa;
- test pressure in MPa; volume in liters;
- factory number;
- date of issue “MM.YY.AA”, where M is the month, G is the year of manufacture, A is the year of the next inspection;
- empty tank weight in kg;
- mass of container with gas in kg;
- the next check is in the “R-AA” format, where “R” is the stamp of the state verifier, A is the year of validity of the certification.
To replace the valve you need a gas wrench
Guide to unscrewing the valve
An additional supply of tightness is never superfluous, but when replacing shut-off valves on a gas cylinder, the strength of its fastening can become a big problem. The difficulty lies in fixing the cylinder body so that it does not rotate when the valve is unscrewed with a key.
It is with this problem in mind that further step-by-step actions for replacing shut-off valves will be considered. There are many ways to secure the body of a gas cylinder; let’s look at some of them.
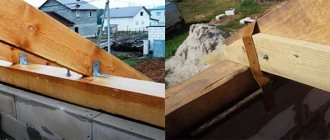
Method 1: Attaching the limit bar
You will need the following tools and materials: a pipe wrench, two bolts at least 20 mm long with two nuts and a metal corner profile at least a meter long. Instead of a corner, you can use any other product in which you don’t mind drilling two small holes.
Next, you need to measure the distance between the two nearest holes on the cylinder shoe and drill the corresponding holes from one edge of the metal profile. After this, screw the iron bar to the cylinder body using bolts and lay it on its side. This design will not allow the cylinder to rotate.
Then you need to place your foot on the metal profile, and using your hand, using a key, carefully unscrew the valve.
Step-by-step photo instructions for the process are presented below.
Method 2: welding the cylinder to a metal base
This method is quite dangerous and should only be used by a professional welder with extreme caution. The shoe is grabbed in two places so that after unscrewing the valve, you can easily tear the cylinder off the base.
After welding the body, the fittings are carefully unscrewed using a pipe wrench. Then the internal thread of the cylinder should be cleaned of any remaining sealant.
Methods for fixing a gas cylinder are not limited to the described options. Many alternative methods can be used to secure it. Liquid water condensation sometimes accumulates at the bottom of the container, so after removing the valve, be sure to turn the container over so that water can flow out of it.
What's happened?
Car owners understand that the process of tightening the nuts on a wheel is quite complicated in itself. It is much easier to unscrew them using a tool. It is precisely in order to cope with such a problem that different types of wheel wrenches are provided, which help solve a task that requires great strength and skill.
Balloon rotary wrench
It is especially difficult to do this if the nuts have begun to become covered with a layer of corrosion, which connects them “tightly” with the studs. This problem is encountered due to the threaded connection, where moisture or other liquid can leak.
The fact is that there is a small gap inside the bolt where a layer of rust can form. After this, the nut will not give in easily if you try to remove it by hand. Another problem that a car owner may face is the destruction of studs during such operations.
After this, you will have to comprehensively solve the problem. If we talk about those who most often face this need, then we cannot fail to mention trucks - here corrosion forms at a higher rate.
To solve this problem, car owners purchase wheel cylinder rotary keys. With such a tool, the whole process is much faster and easier, and the risk of breaking the studs becomes minimal. Not long ago, a specific type of such wrenches appeared - impact wrenches, which help solve more complex problems.
Now they are used even in passenger cars. If we talk about the traditional type of tool, then the gearbox key is a plate with side parts (notches), as well as internal perforations. At the same time, it is manufactured to the dimensions of specific valve areas.
Different types of gear wrenches are used for different areas. Most often they can be seen when working on a car, if it is necessary to unscrew the nuts from the wheel. Moreover, all keys have a similar function - they are aimed at connecting and removing parts where great effort is required.
Planetary gear wrench
Screwing in new shut-off valves
Before tightening the valve, all connected parts must be degreased to prevent clogging of the locking mechanism. To do this, you can use a cloth with regular detergent or moistened with white alcohol. After this, rinse the surfaces with plain water and allow them to dry.
A new valve is never screwed to a cylinder with bare threads. It is imperative to use a sealant: special thread compound or fluoroplastic fum tape. They are applied to the lower fitting and only after that the valve is tightened.
The thickness of the gas fum tape is greater than sanitary tape and is 0.1 - 0.25 mm, and its reel should be yellow. The tape is wound with tension in 3-4 layers. It is better to twist it once again when it breaks than to make the seal loose.
It is advisable to tighten the valve with a torque wrench. Steel shut-off valves are screwed with a maximum force of 480 Nm, and brass valves - 250 Nm. After clamping the valve, you can proceed to subsequent steps to test the tightness of the resulting connection.
What is propane used for?
It can be used for the following:
- cooking food;
- water heating;
- home heating;
- as a source of energy for lighting;
- the gas can be used to weld or cut metal.
Propane is usually used where there is no possibility of using a centralized gas supply.
Composite polypropylene cylinders Source sovet-ingenera.com
Checking tightness and completing work
When checking the tightness of the valve connection, you will need to pump gas under pressure into the gas cylinder.
This can be done in two ways:
- Pump gas using compressor equipment or a car pump.
- Connect two cylinders with a hose, the first of which is empty (tested), and the second is filled with gas.
First, under the control of a pressure gauge, you need to fill the test cylinder with gas with a pressure of 1.5-2 atmospheres. After this, soap foam is applied to the connection and the tap is opened slightly.
If soap bubbles are not inflated anywhere, then the connection is sealed. But if even slight swelling of foam appears, you will have to re-tighten the valve.
If the cylinder is small, then you can immerse its valve in a small bowl of water and see for bubbles.
After replacing the shut-off valves, the corresponding mark must be placed in the gas cylinder passport.
It should be remembered that the methods described above for replacing a used valve are applicable only to metal tanks. If you have a composite gas storage cylinder, you cannot act this way because of the possibility of damaging the flask and breaking its seal.
Safety rules when working with valves
If you have never worked on unscrewing a tap, then it would be a good idea to familiarize yourself with the safety rules before starting such work.
The operation of the valve is regulated by documents such as PB 12-368-00 “Safety Rules in the Gas Industry”, Resolution No. 91 of June 11, 2003 “Rules for the Construction and Safe Operation of Pressure Vessels” and GOST 12.2.008-75.
Disassembly, repair and replacement of the valve should only be carried out by persons authorized to repair gas equipment. Repairing a device under pressure is strictly prohibited. Therefore, if you notice that the valve is leaking or faulty, then the right decision would be to contact a gas service representative, rather than carry out repairs at your own peril and risk.
If you want to disassemble an old cylinder in order to make a useful homemade product from it, such as a potbelly stove, smokehouse or gas grill, then it is worth remembering that these actions cannot be called safe. And you will have to bear the consequences.
Home craftsmen are rich in ideas for constructing interesting and functional homemade products from old gas cylinders. Thus, a home grill will become not only a useful device, but also a very stylish addition to the interior of the gazebo.
All actions to unwind the cylinder should be carried out outdoors or in a well-ventilated garage or other room. But this is strictly forbidden to do in an apartment - such an experience could end in an explosion.
Next, let's look at the basic safety rules that are important to follow:
- To release the remaining gas, you should smoothly and slowly unscrew the valve flywheel.
- Do not disassemble or cut a pressure cylinder under any circumstances.
- There should be no other cylinders near the vessel being disassembled.
If you are just about to unscrew the valve and have not had time to do anything yet, and the smell of gas is clearly audible in the garage where the cylinder was located, you should ensure that this room is ventilated as much as possible. Why open the gates, windows, doors (if any), and immediately leave.
Conclusions and useful video on the topic
The presented video materials allow you to see with your own eyes all the details and difficulties when replacing valves on gas cylinders.
Video #1. Unscrewing the valve from the gas cylinder:
Video #2. Screwing in a new valve with an original method of fixing a gas cylinder:
Video #3. How to replace the valve on a gas cylinder:
When performing work to replace a gas valve, you need to take your time and think about each subsequent action and its consequences.
Even if all precautions are taken, the described manipulations with gas equipment are quite dangerous for a beginner. It is best to entrust this work to professionals who will carry it out at a specialized stand.
If you have any questions while reading the article, you can ask them in the block below. Here you can leave comments and share useful information. Please comment on the material, we are interested in your opinion.
It is unlikely that at least one modern person can imagine his life without a stove. But there are situations when gasification of a home is impractical or impossible. The reasons are different, but the result is the same: people have to use liquefied propane in cylinders. When equipping a point yourself, many questions may arise, from choosing a location for the device to connecting to an energy source. Mistakes and errors made during the installation and connection of the gas stove to the cylinder can lead to irreversible tragic consequences.
p, blockquote 2,0,0,0,0 –>
p, blockquote 3,0,0,0,0 –>
Important! Gas equipment that will be used for cooking must be in good condition.
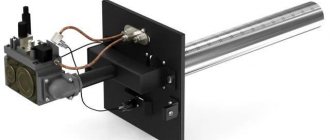
How does a cylinder reducer work:
1 Direct gearbox
An ordinary simple gas pressure reducing device consists of two chambers with an area of high and low pressure, separated by a rubber membrane. In addition, the “reducer” is equipped with an inlet and outlet fitting. Modern devices are designed in such a way that the bellows connection is screwed directly into the gearbox. Increasingly, you can find a gas reducer with a third fitting intended for mounting the monomer.
After gas is supplied through the hose and then through the fitting, it enters the chamber. The created gas pressure tends to open the valve. On the reverse side, a shut-off spring presses on the valve, returning it back to a special seat, popularly called a “saddle.” Returning to its place, the valve prevents the uncontrolled flow of high-pressure gas from the cylinder.
Membrane
The second acting force inside the gearbox is a rubber membrane that divides the device into high and low pressure areas. The membrane acts as an “assistant” to high pressure and, in turn, tends to lift the valve from the seat, opening the passage. Thus, the membrane is between two opposing forces. One surface is pressed by a pressure spring (not to be confused with the return spring of the valve), which wants to open the valve, on the other hand, the gas that has already passed into the low pressure zone presses on it.
The compression spring has manual adjustment of the pressure applied to the valve. We advise you to buy a gas reducer with a seat for a pressure gauge, this way it will be easier for you to adjust the spring pressure to the desired output pressure values.
As the gas leaves the reducer to the source of consumption, the pressure in the working space chamber decreases, allowing the pressure spring to straighten. She then begins to push the valve out of the seat, again allowing the device to be filled with gas. Accordingly, the pressure creeps up, pressing on the membrane and reducing the size of the pressure spring. The valve moves back into the seat, narrowing the gap, reducing the gas filling of the reducer. The process is then repeated until the pressure equalizes to the set value.
It should be recognized that gearboxes for direct type gas cylinders, due to their complex design, are not in high demand; reverse type gearboxes are much more widespread; by the way, they are considered devices with a high degree of safety.
2 Reverse gearbox
The operation of the device consists of the opposite action described above. Liquefied blue fuel is supplied to a chamber where high pressure is created. The bottled gas accumulates and prevents the valve from opening. To ensure gas flow into the household appliance, you need to turn the regulator in the direction of the right-hand thread.
On the back of the regulator handle there is a long screw, which, when screwed, presses on the pressure spring. As it contracts, it begins to bend the elastic membrane to the upper position. Thus, the transfer disk, through the rod, exerts pressure on the return spring. The valve begins to move and begins to open slightly, increasing the gap. Blue fuel rushes into the gap and fills the working chamber with low pressure.
In the working chamber, in the gas hose and in the cylinder, the pressure begins to increase. Under the influence of pressure, the membrane is straightened, assisted in this by a constantly compressed spring. As a result of mechanical interactions, the transfer disk lowers, weakening the return spring, which tends to return the valve to its seat. By closing the gap, the flow of gas from the cylinder into the working chamber is naturally limited. Then, with a decrease in pressure in the bellows liner, the reverse process starts.
In a word, as a result of checks and balances, the swing can be balanced and the gas reducer automatically maintains balanced pressure, without sudden jumps and drops.
Materials and tools required for work
When connecting a gas cylinder to the stove you will need:
- 2 clamps;
- a fitting with a spout to attach a hose and internal thread (must be included with the gas appliance);
- the stove is new or old, but in good condition;
- reducer with inlet pressure 30 mbar;
- gas cylinder made of metal-composite, polymer-composite or other special materials with a capacity of 5–50 liters;
- rubber or rubber-polymer connecting hose, which can maintain room temperature and does not heat above 30 degrees;
- sealing tape;
- special gas key.
Where to buy a propane tank
Our company provides you with the opportunity to buy propane at a competitive price.
Our region has a wide network of certified companies selling and refilling cylinders. The most common are tanks with a capacity of 27 and 50 liters, but upon pre-order, you will be supplied with products of 5 or 12 liters in the shortest possible time.
When refueling, of course, it’s faster to exchange your cylinder for an already filled one. However, many people prefer to wait a little to get theirs back. After all, it definitely does not allow gas to pass through and passed the necessary tests on time. The operator himself ensures that the amount of liquid propane does not exceed 85% of the geometric capacity of the vessel. This is necessary so that when heated, the internal pressure does not exceed the permissible threshold. If there are residual contents at the bottom (so-called condensate), the refiller must drain it into a special container.
Gas is a high-quality and inexpensive source of energy that people have been using for a very long time. There are several types of such substances that can be used either separately or in mixed form.
One of the ways to use gas is to refill household cylinders, which can be connected to the stove. You can learn more about such products on the website https://safegas.com.ua/.
Jets for bottled gas
One important point must be taken into account: the stoves, originally designed to operate on mains natural gas, have jets (nozzles) that are not suitable for operation on bottled propane.
p, blockquote 8,0,0,0,0 –>
The jet is like a bolt with a hole in the top through which fuel flows to the burner. Bottled gas injectors have a smaller hole diameter because the pressure of liquefied propane is higher than that of natural fuel. Consequently, to connect such a stove to a liquefied gas cylinder, you will need to purchase and replace the entire set of nozzles.
p, blockquote 9,0,0,0,0 –>
A new set will cost an average of 200 rubles. (the cost depends on the brand of the stove), it can be bought at a gas equipment spare parts store or ordered from the manufacturer.
p, blockquote 10,0,0,0,0 –>
p, blockquote 11,0,0,0,0 –>
If the jets need to be replaced, do the following:
- The burners and the burner table cover are removed.
- Using a hex wrench, the old injectors are removed and the new ones are screwed in.
p, blockquote 12,0,0,0,0 –>
You can understand all the nuances of the process of replacing jets by watching the video.
p, blockquote 13,1,0,0,0 –>
p, blockquote 14,0,0,0,0 –>
Safety precautions
Even if you are sure that the cylinder is empty, there may be residual liquefied gas at the bottom. Therefore, in order not to take risks, you need to get rid of it. To do this, leave the structure open for 12 hours. In this case, it is necessary to make sure that there are no sources of ignition nearby.
After this time, it is necessary to rinse the inside of the cylinder with clean water, which will remove any remaining gas. In addition, it is allowed to use lime with water or chlorine to clean the structure. True, after such manipulations an unpleasant odor may remain, which quickly disappears.
Features of equipment selection
Several recommendations for choosing gas equipment:
- Plate. If you are using an old unit, before connecting it is necessary to check that the fastenings and burners are not damaged and are working.
- Gas reducer. The main part when connecting bottled gas. It regulates the propane pressure at the outlet and lowers it to the required level. Must be equipped with threaded connections with brass nuts. For a cylinder with a valve, model RDSG 1-1.2 is used, for a container with a valve RDSG 2-1.2 is suitable.
p, blockquote 16,0,0,0,0 –>
- Hose for connecting the plate and cylinder. Purchased at specialized sales points, it must be intended specifically for gas. Its length must exceed the distance between the connected equipment by 150 cm, since it is prohibited to use it in a tense state.
p, blockquote 17,0,0,0,0 –>
Important! Do not use old hoses, as the integrity of their internal surface may be damaged.
Conversion to a different pressure
Sometimes it becomes necessary to obtain non-standard pressure at the outlet. For example, having bought a stove for natural gas, I wanted to convert it to a bottled one. The usual way is to replace the injectors and low gas flow screws, but there is another way - to use a 12 mbar reducer. Such reducers are commercially available, but they are rare and difficult to buy. You can remake the usual one.
I will say right away that not every reducer can be converted to any pressure. There are the following restrictions. The ratio of the areas of the membrane and the inlet port, multiplied by the rocker arm, should be one and a half times greater than the ratio of the maximum inlet pressure and outlet pressure. Otherwise, the force developed by the membrane under gas pressure will not be enough to reliably close the inlet valve. In practice, it is usually easier not to carry out these calculations, but to configure the gearbox experimentally. All the same, to carry out calculations it needs to be disassembled in order to measure the area and lever of the rocker arm.
For remodeling, it makes sense to buy a gearbox in which the mounting screws are accessible and not covered in paint. The modification comes down to changing the elasticity of the spring. Let's disassemble the gearbox. If the pressure needs to be made less than it was, then shorten the spring a little (by half a turn), if more pressure is needed, then place a spacer between the gearbox housing and the spring. When installing the gasket, be careful not to block the hole in the housing. We assemble and check the gas pressure at the outlet. Repeat until the desired pressure is achieved. If after the next shortening the pressure turns out to be less than necessary, then the spring can be stretched a little or a gasket can be placed.
If it turns out that the outlet pressure is too high, even in the complete absence of a spring, then the relationship described above is not observed. The selected reducer cannot be converted to the required pressure.
When the elasticity is selected, you need to finally assemble the gearbox by applying silicone sealant between the bottom of the housing and the membrane.
Unfortunately, errors are periodically found in articles; they are corrected, articles are supplemented, developed, and new ones are prepared. Subscribe to the news to stay informed.
Hello. For a household gas stove, I bought a 27 liter reserve cylinder and filled it with 20 liters of propane. I connected it to try, turned on the burner, and after about 10 - 20 seconds a smooth, rather loud hum of the gearbox began. This never happened with the old cylinder. Question: is this dangerous, can the stove be used? Is this a gearbox or cylinder problem? Read the answer.
Hello. I have a similar question (Should gas come out of the upper chamber through the holes in RDSG 1-1.2?), I get it when the cylinder valve is opened (it’s like zilch). When the valve is closed, no bubbling is observed on the cylinder, but when the valve is open and the stove is burning, bubbles constantly come from the hole in the top cover. Is this normal? During disassembly I found a leak Read the answer.
Choosing a place to install the cylinder
Before connecting the gas stove to the cylinder, you need to choose the place where the devices will be installed, since the distance between them must be at least 100 cm. Safety instructions require that there be a window in the room with connected gas equipment.
p, blockquote 19,0,0,1,0 –>
When using a shielded cylinder, the distance between it and the stove can be reduced to 50 cm.
- If the gas container will be in the same room as the kitchen appliance, it is advisable to place it in a metal cabinet or make a wooden mount.
- The cylinder may be located in the pantry located behind the kitchen wall. In this case, you will need to make a hole for the hose.
- The best option in terms of safety is to install the cylinder in a special metal box located outside and locked with a padlock.
p, blockquote 20,0,0,0,0 –>
p, blockquote 21,0,0,0,0 –>
Important! You can place a cylinder in an apartment only if the building has no more than 2 floors.
Advantages and disadvantages
Due to the special design of gearbox keys, they can transform low speeds into more powerful ones that can cope with even the most harmful design. Of the main advantages of such equipment, it is worth noting the following:
- The threaded element can be unscrewed without additional effort. The levers and handles used here allow the equipment to move evenly, unlike conventional wrenches. In this case, the risk of destruction of other parts is reduced. The gear key allows you to work without unnecessary jerks and maintain the integrity of the structure.
- Less time is spent on tightening and unscrewing. With this tool you don't have to worry about downtime.
- Small size and long service life. High quality material, proper care and small dimensions allow you to use the tool for a long time. At the same time, the efficiency of the unit is at its best.
- Does not require special skills to use. The principle of operation is quite simple, so even a beginner can handle the key.
The disadvantage that some types of key may have is that they are too heavy. This is typical for a wrench. However, there are no more significant disadvantages, which allows us to talk about the ergonomics and efficiency of the tool.
Sequencing
Once everything is ready to connect the gas stove with your own hands, you can begin installation work.
- The fitting is connected to the inlet pipe of the plate. For sealing, special gaskets or FUM tape are used.
- Connect the hose to the fitting. To do this, a sealing tape is wound around the threaded connection, the presence of a sealing ring inside the nut is checked, the nut is screwed on and tightened to the end.
- A reducer is connected to the gas cylinder, which is fixed on the adapter. Sealing is done with a special gasket or FUM tape.
- The rubber hose is connected to the gearbox on one side, and the mount is tightly secured with a clamp.
p, blockquote 24,0,0,0,0 –>
After completing the installation work, you need to make sure that the connections are tight and the elements are functioning safely. The simplest method is to apply a strongly foaming soap solution to the joints before supplying propane from the cylinder to the stove. Problems with gas leaks in places of poor-quality fastening will manifest themselves in the appearance of soap bubbles. In this case, it is necessary to disassemble the connection in which the leak occurs and reconnect the parts.
p, blockquote 25,0,0,0,0 –>
Note! Many modern stoves must be connected to the mains. Therefore, it is necessary that the circuit corresponds to the parameters specified in the instructions, and that the outlet is grounded.
The video will help you clearly understand how to properly connect the stove to the cylinder. If some points remain unclear, for your own safety you should not carry out the installation yourself; it is better to invite a gas specialist.
Every person knows that gas equipment must be treated with extreme caution, because incorrect handling or connection leads to irreversible consequences. Any incorrect action during installation may create a gas leak, and therefore there is a risk of explosion.
Why shouldn’t you fill up at regular gas stations?
The question of whether it is possible to refill household gas cylinders at a gas filling station is worth considering in more detail. According to the law, liquefied gas can only be sold in specially equipped points. But many gas stations are trying to make money by circumventing the law.
When purchasing gas at such a gas station, consumers should remember not only legal liability, but also the danger that an incorrectly filled cylinder poses.
Household cylinders can only be refilled at points where there is special equipment and a license. Compliance with the rules indicated in the poster is a mandatory condition that guarantees safety
And the risks are great if:
- the container is not checked for leaks;
- inspection control, and therefore serviceability, is not carried out;
- but the most important thing is that at car gas stations there is no way to check the filling capacity required by the approved standards (85% of the volume).
The free zone creates a “vapor cap” that prevents gas expansion. For example, when heated under the sun. How much liquid substance is needed can be easily calculated by dividing the nominal volume by 1.43. For example, for a cylinder designed for 22 liters, it is enough to add 15.38 liters of liquefied gas.
If there is no cut-off valve, the work is carried out literally “by eye”, so there is a high possibility of overfilling the container, which means increasing the possibility of a catastrophic risk.
Therefore, before filling an empty gas cylinder at a gas station, make sure that the station has special equipment for this, including weighing scales. But it is better to fill containers at special gas filling stations to ensure weight control.
Before refueling, the cylinder is weighed so as not to exceed the permissible weight parameters after refueling.Connecting the cylinder to a gas stove
If a person does not know the rules for connecting a gas cylinder, it is better to contact a qualified specialist. But there are times when it is impossible to call a specialist; most likely, such cases occur in summer cottages. If you follow the installation rules, then anyone can connect the cylinder.
Preparation of materials
Preparation for connecting the cylinder must have the following required elements:
- A special stove for a country house, designed for installing a cylinder.
- An appropriate container, that is, a propane gas cylinder.
- Special mechanism for normalized gas use, reducer.
- The gas hose must be at least a meter long, this is in accordance with the correct distance between the stove and the gas container. In this case, the hose should not be taut. The best length option is 2 meters.
- For a rubber hose, you must have fittings and screw clamps that connect to each other. If the hose is bellows, you need adapters with threads.
- To check the connections between the hose and the cylinder, you must have a soap-based solution. After installation, it is used as a testing tool; if there is a leak, soap bubbles appear. Then you need to carefully reconsider the connection.
Recommendations
Comments 51
The speed switch should open after screwing/unscrewing the valve on the multivalve.
You just need to supply Kent with a beer.))) And with his blog blessing, start wrangling out.
I experienced it personally, I thought the cylinder was empty! I wanted to coat the rubber under the fittings with sealant before installing it. The cylinder was lying in the garage at a temperature of -5. I unscrewed the fittings, naturally there was a slight puff, and then I gasped. Ate, the tank is full of gas! It’s okay, I poured the contents onto the street, at this moment the main thing is not to freeze your hands. There is no big fear
But why was there any need to fish it out? All he needs to do is return the valve to its place in the cartoon, but you can still drive on gas!
put the *Greek* hand into the river... it turned out to be liquid gas (O! O) NO SMOKING !
No need to drain anything! There is already a correct answer here. You need to take an ordinary car compressor, unscrew the tube through which gas is supplied to the reducer, pump air into the inlet of the cylinder so that the speedster jumps into place, that's all.
One asshole with a screwdriver unscrewed it! And the car completely burned out!