Lining is a unique material. If previously these were narrow, processed boards that fit tightly together, now you can find lining made of metal or PVC. According to the rules, the thickness of the material used is 22 mm. Lining is used both for interior decoration of the house and outside it. A clapboard fence has become a very popular phenomenon. However, it may be difficult to choose the material.
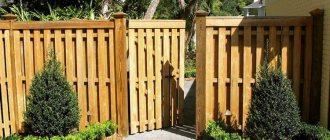
Colorful clapboard fence design
Return to contents
Required materials and tools
To build a fence you will need a lining made of coniferous wood. It is not advisable for this purpose to purchase high-class material, much less expensive wood. The usual standard length of boards is 3 m, and it is better to choose a width of no more than 10 cm to make work more convenient. When purchasing raw materials, you need to pay attention to its quality and try to choose a lining that does not have knots in its structure.
Before you start building a fence, you must treat the boards with an antiseptic compound.
Scheme for installing a wooden fence with a gap.
This will prevent rotting of the wood, the formation of mold and protect it from the influence of atmospheric phenomena and bark beetles.
You will also need to prepare a wooden beam with a section of 50x50, pillars that will serve as support for the future fence, and self-tapping screws. Support pillars can also be metal, but if the installation of wooden supports is planned, then their processing must be taken seriously. Since these elements are in contact with the soil and are constantly exposed to moisture, they need to be impregnated with a primer especially carefully.
For the final stage, you will need a primer and paint of the selected color, which will finally refine the clapboard fence and make it a full member of the yard interior. The set of tools for making a clapboard fence with your own hands is simple and usually every practical owner has any of these items at home:
- shovel;
- ax and saw;
- screwdriver or screwdriver;
- brushes for applying primer and paint.
Fence and PVC lining.
I ask your opinion:
and if you use PVC lining on the fence. 1.5 m (i.e. in half) vertically. panels, which are for external cladding, their walls are thick, about 1 mm,
as horizontal jumpers - galvanized profiles for gypsum boards - at the very top, at the very bottom and two every half meter. the top and bottom will not dangle, the screws are not hidden, but with caps, you can put washers, or you can put some decorative strip through them (from the same PVC, for example).
pillars - 50-60 mm pipe without concrete, to a depth of more than a meter, in increments of 1.5 m. Fasten the lintels to the pillars and PVC to the profile with galvanized self-tapping screws.
Pros (kind of)
- durability of PVC
- no need to paint PVC
- ease of construction
- easy and quick to assemble
- you can combine colors
- initial costs are comparable to a fence made of good wood, then savings on operation (impregnation, paint).
Please tell me the cons:
Yes, this is not a dacha, this is a permanent residence house within the city, to the sidewalk from the fence 7 meters and the slope from the fence to the sidewalk is 0.7 m.
I see one downside for sure: paint and impregnation are not needed - this is good, but what if someone writes something bad on the fence, the house is within the city limits? You won’t be able to paint over it; or rather, your fence will look very bad after that! Vandals will be able to ruin your fence in 5 seconds with a lighter - paint it again. There is no need to talk about strength - a kick and there is no part of the fence. By the way, I’m not even talking about the fact that I personally don’t understand how the lining will behave in relation to dirt? I just don’t know, but I don’t exclude the possibility that it will be absorbed into the plastic. If you neglect all this, then the fence promises to be beautiful (by the way, colored lining is much more expensive than white, if I’m not mistaken).
The dirt washes off easily. and the vandals of the fighter are hit with a slab of sheathing, but they can burn the slab.
In the cold it is easy to break the panel, push it through, etc.
NetIgorS wrote: In the cold it is easy to break the panel, push it through, etc.
And besides deliberately causing harm to such a fence, what are the disadvantages?
As a result of additional thoughts, I am more and more inclined towards the white color of the panels.
We sell fairly inexpensive colored lining (width 100 mm), the colors are not bright, the strip costs 35 rubles, white can be found for 28 rubles, and the idea is good, but in Russia we have a lot of BUT.
Sergey11 wrote: We sell fairly inexpensive colored lining (width 100 mm), the colors are not bright, the strip costs 35 rubles, white can be found for 28 rubles, and the idea is good, but in Russia we have a lot of BUT.
That's exactly what I mean. and our place is quiet, calm, the people are respectful, the youth are well-mannered.
A friend of mine has a fence like this. White.Horizontal. Dirt is washed with Karcher and shampoo, just like at home, once a year. If there are vandals with spray cans, I saw an anti-graffiti coating for them, a colorless grease that washes off. In my case, kicks are not considered. Minuses:
- Siding, like the façade shell of a house, is light—like a sail in the wind. Won't the sail blow away?
- According to science, its fastening is not rigid, so it should walk on the walls of the house and knock on its own. If you grab it tightly, then at the first frost it will shrink and come apart, or even crack. I've seen this more than once. At 3 meters in length, the corner shrank by 1.5 - 2 cm. In the summer there was 0 gap.
- From the inside, both the siding itself and all the cross members look sloppy. Ideally, you'll want two-sided. And the cost will be comparable to a polymer-coated profiled sheet.
Now I’m thinking about how to protect myself from my neighbors.
Mekhnet Ravshanovich wrote: A friend of mine has a fence like this. White.Horizontal. Dirt is washed with Karcher and shampoo, just like at home, once a year. If there are vandals with spray cans, I saw an anti-graffiti coating for them, a colorless grease that washes off. In my case, kicks are not considered. Minuses:
- Siding, like the façade shell of a house, is light—like a sail in the wind. Won't the sail blow away?
- According to science, its fastening is not rigid, so it should walk on the walls of the house and knock on its own. If you grab it tightly, then at the first frost it will shrink and come apart, or even crack. I've seen this more than once. At 3 meters in length, the corner shrank by 1.5 - 2 cm. In the summer there was 0 gap.
- From the inside, both the siding itself and all the cross members look sloppy. Ideally, you'll want two-sided. And the cost will be comparable to a polymer-coated profiled sheet.
Now I’m thinking about how to protect myself from my neighbors.
As I understand it, your neighbor’s fence is made of siding, but I want PVC lining. and not horizontally, but vertically. This lining also shrinks along its length in winter, but at a length of one and a half meters it is less than a centimeter, and the fasteners to the profiles for gypsum boards will allow them to walk a little.
You can attach the vertical planks alternately to the horizontal one, either from the inside or from the outside. Near one of our cafes it’s done this way, it looks beautiful and you can hardly see what’s going on behind the fence, and during strong winds it doesn’t flutter.
000000000000000000000000000000000000000000000000 1111111 1111111 1111111
Top view of this fence:
1111111 – Lining. 000000000 – Horizontal bar.
Strange, the drawing has shrunk. In short, if you look from above, the lining is arranged in a checkerboard pattern.
Well, with a crosswind, there will still be windage. Yes, and I want a solid fence.
If vandals damage at least one panel, it can be replaced in 5 seconds, but how to change it in a solid one? There will be even more pressure on the continuous wind. And so at least small gaps remain for him to escape.
magn wrote: If vandals damage at least one socket, it can be replaced in 5 seconds, but how to change it completely? There will be even more pressure on the continuous wind. And so at least small gaps remain for him to escape.
I don’t expect vandalism: our place is quiet, calm, the people are respectful, the youth are well-mannered.
Let the wind jump over the fence, there is no point in climbing into the cracks.
But how is it in terms of ultraviolet radiation? If it's for interior work, then probably not very good.
Vic wrote: how is it in terms of ultraviolet radiation? If it's for interior work, then probably not very good.
I'm talking about the one for cladding facades.
magn wrote: You can attach the vertical planks alternately to the horizontal one, either from the inside or from the outside. Near one of our cafes it’s done this way, it looks beautiful and you can hardly see what’s going on behind the fence, and during strong winds it doesn’t flutter.
000000000000000000000000000000000000000000000000 1111111 1111111 1111111
Top view of this fence:
1111111 – Lining. 000000000 – Horizontal bar.
Great way! I myself, apparently, will make a fence at the dacha in this way, only, of course, from wood, as from a material proven for the construction of fences. But in relation to the lining - how will it look? The lining has technological seams and seals on the side for fastening to the wall. As I understand it, all this is proposed to be “exhibited” for everyone to see, both inside and outside? It seems to me that it will look like a cellophane greenhouse next to a greenhouse (a normal fence).
The would-be electrician wrote: Excellent method! I myself, apparently, will make a fence at the dacha in this way, only, of course, from wood,
There is one drawback to this method, which is especially relevant with a wooden (but not only) crossbar; snow will be well retained on top, and water too (if you can make a bevel on one side of the crossbar, in the direction opposite to the pickets).
The would-be electrician wrote: Excellent method! I myself, apparently, will make a fence at the dacha in this way, only, of course, from wood, as from a material proven for the construction of fences.
It will be difficult to organize a good drainage system. This means it will start to rot faster.
The best option is corrugated galvanized sheet or painted tin. You can make a fence from panels when you get them for free, but it’s a waste of money; the panel won’t last longer than 3-5 years; it will be full of holes and darken; and these panels also spread fire
sergeydubrovin wrote: The best option is a corrugated galvanized sheet or painted tin. You can make a fence from panels when you get them for free, but it’s a waste of money; the panel won’t last longer than 3-5 years; it will be full of holes and darken; and these panels also spread fire
I don’t want corrugation - galvanized corrugated sheets. tired of it. ugly. Who told you that PVC lasts so little? I’ve had my Masandra sheathed with it for five years now – and there are no holes, fragility or crumbling. PVC does not spread fire. So that it burns, it must be burned. When you take it out of the fire, it goes out. I checked it on scraps in the fire.
Dear Patsak+, your arguments are ironclad and very convincing! But try to take, for example, a chair. It can also be made from different materials: wood, plastic, etc. You've probably seen very comfortable plastic chairs that are used in outdoor cafes. Yes? Do you want such a chair for home? I don’t and I can’t tell you why, apparently because the person is moderately conservative. You want a beautiful “screen”, not a fence! Your clapboard version of the screen is very good, but there is no fence, this is what people are trying to tell you. If you don’t have bad people, vandals and crazy drunken youth, then probably this symbolic will be enough for you. and a beautiful (I admit) fence! Go ahead, you don’t want to see objective and non-technical disadvantages. I personally don’t find any technical disadvantages that may not meet your requirements. I would be glad to see a photo of the masterpiece!
The unfortunate electrician wrote: Dear Patsak+, Your arguments are ironclad and very convincing! But try to take, for example, a chair. It can also be made from different materials: wood, plastic, etc. You've probably seen very comfortable plastic chairs that are used in outdoor cafes. Yes? Do you want such a chair for home? I don’t and I can’t tell you why, apparently because the person is moderately conservative. You want a beautiful “screen”, not a fence! Your clapboard version of the screen is very good, but there is no fence, this is what people are trying to tell you. If you don’t have bad people, vandals and crazy drunken youth, then probably this symbolic will be enough for you. and a beautiful (I admit) fence! Go ahead, you don’t want to see objective and non-technical disadvantages. I personally don’t find any technical disadvantages that may not meet your requirements. I would be glad to see a photo of the masterpiece!
I agree with the definition of “screen”. it suits me. Indeed, the main purpose of the structure I am planning is to shield ourselves from prying eyes, and not to resist military operations using armored vehicles and flamethrowers.
The photos will be taken after the idea is completed, and will be carried out after the ground has thawed, I think in May, not earlier, especially since most of the “screen” route is shaded.
Installing a wooden picket fence with your own hands
Installing the fence is not very difficult - it will take up to one week, since you first need to mark the area and prepare a cushion for supports. During installation, measurements should be taken periodically using a level. To adjust the height, simply pull the rope between the supports.
Preparing the site
Installing a wooden picket fence with your own hands begins with preparing the site. To do this you need:
- Go around the perimeter with a shovel and remove the turf.
- Uproot all roots along with cuttings that may germinate over time.
- If necessary, level the area by making artificial embankments in the lowlands. For reliability, measurements are carried out using a building level.
- Hammer pegs around the perimeter and string string around them.
- Mark places for support posts - the optimal interval is 2.5-3 m. This is enough to support the entire span of a wooden picket fence.
Tools for working with lining
Before you start building a fence with your own hands, make sure that all the necessary tools are at hand:
- Tape measure for measurements.
- Drill and shovel for earthworks.
- Fasteners: self-tapping screws (nails) or welding.
- Large metal scissors or any other metal cutting tool.
- Lining.
- Primer or paint to apply a protective layer.
Only after this can you safely begin to work.
DIY fence installation
Return to content
Normal installation
Probably everyone has encountered the most ordinary picket fence. Creating one using lining is practically the same technologically. But there are also a number of nuances that you must know.
The procedure consists of initially cutting the lamellas to length. Then everything is done in the following sequence:
- The land plot where the pillars will be located is being marked. The distance between them should be no more than 3 meters, since in the future the entire fence may be damaged by a strong gust of wind.
- At the marked places, holes are dug with a depth of at least 50 cm. Pre-processed pillars are installed in them and filled with concrete.
- The treated beams are fastened between the pillars.
- Prepared picket fences are fixed onto the beams, primed and painted.
Simple option
- Places for pits are marked along the perimeter of the site. The distance between the support pillars should not exceed 3 m, otherwise the structure will acquire high windage and may be damaged by a strong gust of wind.
- Support posts are installed in pits. Filling with concrete rather than backfilling with soil is recommended.
- Wooden beams are attached to the posts with self-tapping screws. The minimum distance from the ground is 30 cm.
- Pickets are fixed to the crossbars on the outside of the fence (from the street). If regular lining without grooves is used, the slats are attached at a certain distance from each other, depending on personal preferences. If a European profile with grooves is used, then the lamellas can be joined in the same way as is done when covering the surface. In this way you can make a solid fence.
- The fence is treated with a primer and painted after drying. It is recommended not to skip this stage of work, since painting creates a protective film on the surface of the lamellas and helps to increase the service life of the product.
The photo shows a clapboard fence.
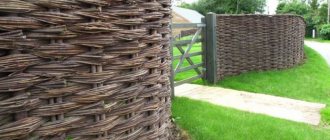
Wicker fence
This option does not require great height and is more suitable for fencing flower beds or lawns. The fence looks very decorative.
In addition to the timber, you will need a narrow board or a round pole - a handle. It is better to choose a lining that is small in width - 100 mm, and quite thin, otherwise it will be difficult to implement your plan. The pillars in this option are installed after the span is constructed.
- U-shaped structures are made from lining: a narrow one is placed between two wider lamellas. Along one edge, the connection is aligned and fastened together with self-tapping screws. The finished product looks like a thick beam with a groove inside. The structures serve as fastening elements for the lining.
- The slats are fixed and fastened into the groove of one design. At a distance of 1 meter between the boards, a handle is installed so that each subsequent lamella is on the other side of the handle.
- The ends of the boards are fixed into a second U-shaped structure. Fence made from glass bottles photos? A weaving effect is created on the fence segment. The photo shows a sample.
- Then, along the length of the span, holes are marked along the perimeter of the site, and support pillars are installed.
- The segments are secured to the supports with self-tapping screws.
The video explains in more detail how to make a fence with your own hands.
How to treat the surface → Room decoration → How to choose the right paint → Surface treatment technologies → Leveling and finishing the walls → Selecting and applying a primer → Removal from the surface → Stretch ceilings and technologies → Reviews and testimonials
Preparation
Whether a metal fence is used or a regular one, it must first be prepared. Let's talk about the wooden version.
If you use wood for external purposes, increased requirements are placed on the preparatory work.
Harmful environmental influences leave their mark on life expectancy.
To increase service life, you need to carefully prepare the surface. The panel can be purchased either impregnated in an industrial environment or processed at home.
To do this, the surface must be cleaned of dirt and sanded. For protection, compounds against rotting, mold, mildew and water-repellent composition are used. It is important to treat the surface against bark beetles.
After we have prepared the surface, we need to go over it with a primer and impregnation. Pillars are also subject to coating. Since they constantly have to be in the soil, it is better to initially concrete them. They are also coated with a protective compound.
The pillars are strongly influenced by external factors. In summer there is heat and strong ultraviolet radiation. In autumn and spring there is high humidity. In winter it is frosty. Under these influences, the tree has to either shrink or, on the contrary, expand. A special coating will protect the material from this.
Making a fence with weaving
The wattle fence is an original solution to the device. It primarily performs decorative functions. It usually serves as a small fence or front garden.
For this we need a narrow board (mostly 10 cm wide). It is better to take a length of 3 m. This option is perfect for our idea. The support pillars are placed last in this option.
Manufacturing begins with the creation of a U-shaped structure. It consists of two wide elements on the outside and a narrow one on the inside. All this is held together with self-tapping screws. The length of this workpiece must correspond to the desired height of the fence.
To make the weaving “fold”, we insert additional elements (cuttings) every meter. When you have finished “decorating” one structure, let’s move on to another. When the required length is ready, you can immediately see where the support pillars will be located.
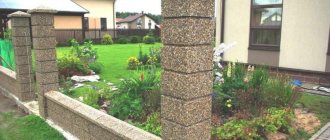
Material for horizontal fences
The pillars are selected in accordance with the overall design of the site. They must be strong and well secured to support the weight of the fence. It is desirable that their service life exceeds the durability of wooden elements. Then, during the next renovation, you simply change the filling of the spans - and here you have a different design style.
In any case, lumber is chosen of good quality, otherwise, with any care, it will become unusable in a couple of years. Boards can be:
- Unedged.
- Planed and polished.
- Decorative (let's call them that).
- Artificially aged.
All boards must undergo additional processing before installation. In unedged trees, the remaining bark is removed, the areas affected by the bug are removed, and treated with a solution to prevent rotting. When unedged boards are used in decorative fencing (it becomes stylish), they are treated with sandpaper, impregnated with stain and varnished. This is one of the options, you may have your own.
The better the boards are processed, the longer they last. When planing and sanding, the pores of the wood become clogged and moisture does not get inside. Additional impregnation and painting complete the protection process. It is advisable to carry out all operations before installation after cutting to size. Carefully read the instructions for using paints and varnishes; do not write anything unnecessary there.
We will call boards, the shape of which has been changed according to the designer’s plan, decorative. Holes, curly cutouts, rounded or pointed ends, overlay elements - these and other changes in appearance give the wooden fence originality. After mechanical processing, treatment with paints and varnishes follows.
Artificially aged boards are the result of special processing. Using a wire brush, then sanding, staining or painting, a beautiful effect of old wood with well-defined annual rings and structure is achieved.
Prices for wooden fences
Prices for wooden fences in standard configurations without additional elements are fixed. Typical fencing consists of:
- from metal supports (section - 60*60 mm, wall thickness - 2);
- log (beam planed on four sides 100*50 mm);
- picket fence (edged board 100*18 mm).
The final cost of installing a standard fence will be affected by the area of the site, as well as the number of additional structures (wickets, gates and canopies).
Non-standard types of wooden fences we offer
Prices per meter for non-standard fences made of wooden picket fences and other materials are calculated individually.
You can order from us:
Fence with horizontal gap
Wooden fence “Herringbone”
Wooden fence “Wicket”
Wooden fence “Chess”
Services for installation of additional structures
Additional elements include wickets, gates and canopies. To find out the cost of standard designs, read in detail one of the offers (“Economy”, “Standard” or “Premium”). The cost of manufacturing and installation of non-standard models is calculated individually.
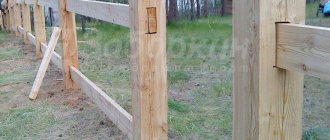
Fastening methods
To build a fence at your dacha with your own hands, you don’t have to be a builder. The basic principles of installation are quite simple, so by choosing a not very complicated option, you can be sure that everything will work out. The simplest type, which is easy to install with your own hands, is a wooden fence on metal (stone) pillars. Step-by-step installation and fastening instructions:
- Mark the area where the fence will be erected, mark the places where the columns will be driven in.
- Drill holes about half a meter deep.
- Pour a layer of sand (about 10 cm) and compact it.
- Drive columns into the holes, pour fine crushed stone on top or concrete them.
- Weld the logs to the supports (if metal veins are chosen) or, if the logs are made of wood, attach them using self-tapping screws.
- Attach wood strips to metal or wooden joists with self-tapping screws.
Ceiling finishing
Iron cladding panels are often used for ceiling cladding. This is a quick, inexpensive and practical way to decorate the ceiling surface. In order to carry out installation, it is necessary to first clean the ceiling of old coating and dust. If there are irregularities, they are eliminated using plaster. If necessary, update the electrical wiring by placing the wires in a special plastic braid. Next, the level of the ceiling structure is determined and an edging profile is installed to avoid gaps around the perimeter. To fasten the lining, a frame is installed. Then they begin the installation of the cladding, which is presented in the video.
Advantages and disadvantages of the material
- Due to the nature of production, iron panels have high environmental properties and a long service life.
- Does not require special skills for installation and maintenance.
- Metal cladding is presented in a wide decorative variety.
- This is an inexpensive material.
- Does not require additional costs for installation and maintenance.
- It perfectly insulates the building, which allows you to save on space heating.
Unfortunately, iron lining also has the disadvantage of poor protection against mechanical damage.
The main advantages of structures made from fence boards
WPC fences (fence boards and other elements) are reliable structures that have an optimal set of performance characteristics. Made of wood and plastic, they combine the advantages of these two materials and at the same time are devoid of their disadvantages. Compared to other products, WPC is perfectly adapted to Russian climatic conditions.
The main advantages of WPC boards are:
- High reliability.
- Moisture resistant.
- Stability of sizes and shapes.
- Long service life.
- Resistant to temperature changes.
In addition, boards and other elements made of composite material have an attractive appearance. The designs are made in various colors, which makes it possible to create fences that fully correspond to any style of architecture and landscape design.
Preparatory work
Such a fence is built in order to protect against both intruders and stray animals. For this reason, it must necessarily have high levels of stability and strength. We can also say that the material used (in our case, wood) is highly susceptible to environmental influences. For this reason, it is imperative to take special measures, which include the following:
- Treatment of pillars with a special primer, which has deep impregnation properties. This is necessary not so much for protection from the effects of rain and snow, but because these elements are located in damp soil, where rotting can begin within a few weeks.
Self-installation
- To begin with, you will need to purchase the required amount of material. There are usually 13 or 80 boards in one cube. The completeness of the quantity directly depends on the width and length of the elements.
- Then the poles are purchased. As described above, the choice is up to the owner of the future fence.
- Marking the territory. For simplicity and convenience, it is better to use pegs and rope. The distance is within 1.5-2 meters between each measured section.
- Wood processing (sanding, antiseptics).
- Drill holes for installing posts using a shovel or drill. A post is placed in each hole and concreted or filled with crushed stone for strength.
- Tie the pillars together using bolts and self-tapping screws.
Installation of "braid"
With this method of erecting a fence, the procedure at the initial stage is the same as with the usual one.
The differences lie in the requirement for the distance between the posts - it ranges from 2.5 to 3 m and the attachment of 2 vertical slats to the crossbars. Then entire lining boards are woven between them and the supports.
To create such a fence, take wet boards so that they do not burst during the weaving process. Finally, the ends of the boards are attached to the pickets installed between the supports.
kak_eto_sdelano
How it's made, how it works, how it works
The most educational LiveJournal community
My friend and I decided to install a new section of the front fence at his dacha. Approximately 30 meters long. A Euro picket fence costs from 25 to 35 thousand rubles, but we decided to take the trouble for a couple of weeks and make it ourselves. We are going to make it from burnt boards 10cm wide and 1.5 meters high.
A cube of boards costs 7 thousand rubles, a cube of firewood for burning is around 2 thousand + 10 liters of tung oil + 6 liters of turpentine. All together approximately 22 thousand rubles. only for the board, not counting the metal posts, crossbars between them and cement for pouring. The result should look something like this (only it’s not oil, it’s just moistened with water to simulate impregnation with oil)
At the back of the site we lay out a barbecue made of refractory bricks to put 3 logs of firewood in 2 layers (in height). In width, it can fire 4 boards at a time.
To make the boards burn out faster, they need to be dried; they are usually damp. Place it under a canopy and in the sun. If you don’t dry the boards (you can use a fan, by the way, if there’s no wind), you’ll get tired of burning them normally.
You have to burn it very hard so that they are completely charred. Don't be afraid to burn it out... It will only get better. When fired, excess moisture comes out of the board, and the resins contained in the wood turn into a good “preservative” for the board. In Rus', the lower crowns of houses were burned so that they would not rot from below. The boards receive good protection from ultraviolet radiation, bugs, mold and precipitation (but you still need to soak them in oil). This is how we burn it:
To burn 12-15 boards this way, you only need 6-7 logs of firewood. Since there is a lot of smoke (especially if they are damp or frankly damp), it is better to do this away from home. Then we drag them to the place where we will brush them (in our case, remove the coal). But you can just leave them on the ground, nothing will happen to them.
They decided to assemble a workspace from stumps: they sawed up a fallen birch tree with a chainsaw, put stands on the bottom for the stumps so they wouldn’t fall over, and on top there were stops to match the dimensions of the board.
There is a lot of dust and dirt flying. Before brushing the boards, you need to pour them from a watering can or, as we did, dip them in a barrel of water. In general, you need to work in a respirator. Better yet, wear a chemical protective suit
You can brush manually with metal and then nylon brushes, or you can use a special tool (there is a photo above). We used a machine with a nylon attachment. The result of the treatment (furrows, pattern contrast, etc.) will greatly depend on the nozzle. This is how it works for us (the boards are dusty, they need to be washed with running water and dried):
As you can see, the boards are not entirely uniform; flaws appear, which, in fact, only decorate the board.
Photo gallery
Choose fence boards based on your own preferences and budget. You can make either a wooden fence or a fence from PVC lining or a block house.
When choosing a particular class of lining, consider the purposes for which you plan to use it. Do not buy extra-class or class A boards if you plan to paint the fence rather than varnish it.
Both wooden and metal supports are suitable for poles. To ensure that the fence lasts for a long time, carry out special treatment of the materials with protective compounds.
Advantages
A fence made of PVC lining is environmentally friendly, easy to install, and is built from a small set of materials and tools.
It is not afraid of temperature changes, it has an aesthetic, smooth appearance, is fireproof, durable - its service life is about 90 years .
To make a clapboard fence with your own hands, prepare tools and materials. This way you will save time, because you won’t have to look for them, and the work will go faster.
So, you will need:
| Materials | Tools |
| lining, | shovel, |
| support pillars, | saw, |
| timber for crossbars, | axe, |
| screws or nails, | hammer, |
| impregnation, | screwdriver (screwdriver), |
| primer, | brushes |
| compositions against the appearance of fungus and mold, against rotting. |
To build an original clapboard fence with your own hands, you only need a little imagination, and photos of finished structures will serve as a hint and help you in choosing a design.