Plumbing in the bathroom breaks down quite often. There may be many reasons for this, but the outcome is always the same - the equipment must be replaced. This is where the main question arises: how to replace a toilet with your own hands efficiently and without unnecessary movements?
Good preparation is the key to successful work. Get the necessary set of tools, related materials and detailed instructions for beginners. By following the recommendations outlined in the article and taking into account possible mistakes, you will be able to cope with replacing the toilet yourself.
Dismantling the toilet
What removing an old toilet looks like depends on how it was installed and whether you want the old set intact.
Screw installation
The simplest dismantling operation is when the compact was installed on standard fasteners, and the outlet is connected to the sewer socket with a rubber seal or cuff.
- Remove the decorative caps on the top of the sole. Under them you will find screw heads for a screwdriver or open-end wrench.
The fastening screws are hidden under the caps on the sole.
- Unscrew the screws (there are 2 or 4).
- We pull the outlet out of the socket. It is done.
Installation on taffeta
In post-war construction, it was widely practiced to install kits with an upper tank on taffeta - a thick board laid in a recess in the ceiling.
The main problem is that the outlet is usually caulked into the sewer socket.
How to dismantle a toilet intact?
- Armed with a strong screwdriver and a small hammer, break up the cement putty around the outlet.
- Using the same screwdriver, we try to extract the maximum amount of bonding from the socket - the oiled organic fiber with which the joints were minted.
- Then we unscrew the screws (or simply pull them out of the rotten board) and, slightly shaking, pull the outlet out of the socket.
Before installing a new set, the taffeta is removed and the excavation is concreted.
Installation on cement
Installing and dismantling a toilet with cement mortar leaves little chance of reusing it. Covered with solution to the entire depth of the socket, the outlet usually splits when trying to remove it.
If you still want to try, go ahead.
- Use a screwdriver and hammer to knock out as much cement as possible from the socket.
- Then, with moderate force, we kick (with shoes on, of course) from the bottom up under the bowl in front. After one or two blows, the sole will be released. Whether the issue will survive depends entirely on luck.
A particularly difficult case: the base is completely concreted. It will have to be cut out of concrete.
Valve or drain pipe
Now let's decide whether a vacuum valve can completely replace a drain pipe. We will also break this question into two:
Is it possible to equip the sewerage system in a private house with a valve instead of ventilation? Is it possible to dismantle the sewer riser on the top floor of an apartment building above the cross or tee with your own hands and install a vent valve instead?
A private house
Installing a valve instead of ventilation is possible, but not advisable. Why?
- There is no escape from the draft created in the risers. The slightest violation of the tightness of the sewer - and the smells of sewage will begin to saturate the kitchen and bathroom. When ventilation is running, any gap between the plumbing fittings and the pipe socket will, on the contrary, draw air out of the corresponding rooms;
- When connected to a central sewer, the drain pipe facilitates ventilation of the manhole through the outlet. In particular, the methane content drops under the lid. The argument is not far-fetched: every year several people die from suffocation in a well;
- If you use a septic tank, its ventilation through the septic pipe will promote the activation of aerobic bacteria and, therefore, better processing of wastewater with a reduction in solid sediment and odors.
Apartment house
I strongly do not recommend disassembling the riser outlet onto the roof. Even with replacing the drain pipe with a vacuum valve. You see, the benefit from such a solution will only be the opportunity to make the cabinet above the toilet a little more spacious; but the righteous anger of the neighbors below, the housing organization and representatives of the municipality will fall on your head.
Why?
The mechanism in brief is:
- After dismantling the drain pipe and installing the valve, the ventilation of the riser will stop, but the draft in it will not go away. Meanwhile, the connections between washbasins and combs in most apartments are leaky. The sudden appearance of amber will arouse the interest of residents on the floors below you and a bunch of complaints to the housing office or management company;
- When a mechanic comes to a call, the first thing he does is inspect the outlet of the vent pipe to the roof. After making sure that it is missing or cut off at the attic level, he will pay a visit to the top floor - to you;
- Based on the results of the inspection of the riser, an act will be drawn up on the unauthorized reconstruction of utilities, affecting the interests of other residents;
- The consequence will be an order to restore the original configuration of the riser with the possible imposition of an administrative penalty.
Tips for removing an old toilet
If your plans do not include a major renovation of the room, changing the flooring, and you want to leave the toilet itself intact, then you will need to remove it extremely carefully. Toilets, especially in older houses, stay very firmly in place. After all, due to the passage of time, the fasteners are all rusted and it is simply impossible to twist them. Whatever one may say, you will have to remove several tiles.
If the joint and the pipe are filled with cement, then you need to use a crowbar or a chisel with a hammer.
Carefully chip off the cement composition near the base and outlet.
If the toilet is on a wooden base, then it needs to be knocked away from the bowl. Once the base is removed, the remaining fasteners should be removed.
As you can see, there is nothing difficult about dismantling the toilet yourself. Prepare everything you need and you will certainly succeed.
What is important to consider during installation
In old houses where there are cast iron pipes in the sewer system, connecting a toilet with an oblique flush is done in the following ways:
- put the outlet of the device into the sewer hole, and cover the remaining gap between them with a cement composition so that it does not fall into the riser;
- you can use a cuff used in a connection with an oblique outlet. They use it like this: put it on the outlet, which is then immersed in the hole of the sewer pipe, previously cleaned of cement and other dirt, cover the unevenness with sealant;
- A corrugated pipe is used when the toilet bowl is turned at an angle relative to the socket, but water will stagnate in it due to the resulting slight slope. It is also used if, after repair, the toilet is mounted high and its outlet does not enter the sewer hole;
- To avoid smell from the upper floors of an apartment building, when installing a toilet with a direct outlet, you need to put a rubber cuff on the outlet and then place it on the socket.
general information
Removing the toilet is a quick and easy process. The main thing is to be aware of what and how to do. Before dealing with the question of how to remove a toilet, you need to clarify how it can be installed. Today, a huge variety of types and types of toilets are produced in terms of shape, material, size, design and type of fasteners in place.
There are three types of toilets depending on the installation method:
- Floor.
- Suspension.
- Added.
In private apartments and residential buildings, the overwhelming majority use models of the first type. Therefore, this article will discuss in detail the option of how to dismantle a floor-standing toilet. New homes often use attached and suspended structures. They are also popular in office and other commercial buildings.
In addition to the type of plumbing fixture itself, other important factors can affect the nature of the work:
- location of the cistern;
- finishing the floor in the toilet;
- bathroom area node;
- the nature of the drain and the location of the sewer pipes;
- type of water supply to the cistern.
Do-it-yourself toilet dismantling can be divided into four stages:
- Preparatory – inspection, selection of tools and new plumbing equipment.
- Working with the water supply system.
- Direct dismantling, separation from the sewer.
- The final stage is the installation of a new toilet or temporary “preservation” of the network.
To carry out the work you will need the following tool:
- small crowbar;
- narrow chisel;
- hammer;
- wrenches of various diameters;
- pliers;
- fabric rags or sponges;
- latex gloves;
- disinfectant;
- plug (diameter must match the size of the sewer pipe) or fabric gag.
If you change the device yourself, you must wear rubber gloves to carry out all work, since when installing the toilet you can get damaged and get infected. It is better to protect yourself from such troubles.
It is imperative to wear rubber gloves when dismantling the toilet.
Methods for cleaning and preventing sewer blockages
A clogged sewer pipe is a plug made up of particles of grease, dirt, and foreign objects (large or small) that prevents free drainage. In many cases, you can clean the sewer yourself, but to do this you need to know how and what products are best to use. Action should be taken in direct proportion to the cause and location of the sewer blockage.
Dismantling the old structure
Before starting work, you should prepare buckets and a large amount of rags. We start by disconnecting the water pipe from the drain tank from the device. Drain as much water as possible and unscrew the tank. The toilet is ready for dismantling. If it is very old, then most likely it was installed with mortar. In this case, you need to prepare for the fact that it will not be possible to remove the device intact. Especially if its neck is packed with rags with paint.
Among the recommendations on how to remove the toilet more easily, you can find advice to start work from the drain neck. This is true. It is best to hit the neck hard and, after splitting it, disconnect the device from the pipe. In addition, the vibration from the impact will somewhat rock the base of the structure, fixed in the solution, which will facilitate further work.
Important note: Do not hit directly on the drain pipe. If it is cast iron, which is the case in most cases, it is very easy to split, which will lead to additional problems
Shards of the old toilet should be carefully removed. We clean the neck of the waste pipe from contaminants, otherwise it will be impossible to carry out a high-quality sealing of the new device
Having broken the neck, we begin to disconnect the device from the floor. If it cannot be rocked and does not move, take a hammer and use a chisel to start chipping the structure away from the base. It is quite possible that as a result of this work, water will flow from the broken device. It needs to be collected with a rag in a bucket. We break off the fragments of the toilet bowl, remove the remains of the mortar in which it was fixed and, if possible, level the floor. We clean the edge of the drain pipe from fragments of the neck. It is best to do this with old screwdrivers or use a chisel. We perform the operation very carefully so as not to damage the pipe.
Device
Let's figure out how to plan the design and installation of a fan riser. The installation should be planned at the stage of developing the internal sewerage scheme. It is desirable that the diagram be as simple as possible; it should have a minimum number of corners and bends.
The ideal position of the vent pipe is vertical, the pipe is discharged through the ceilings and roof. However, in practice, sometimes it is not possible to maintain a perfectly vertical shape; it is often necessary to attach additional elements.
For example, it is not always possible to connect all outlets from plumbing fixtures to one riser. Sometimes it is necessary to install an additional riser, which can be connected to a common waste pipe.
It is possible to install one vent pipe at an equal distance from two risers and connect them to this air duct. This connection method allows you to evenly distribute the pressure in the system. One of the rules for creating a fan riser is the correct selection of diameter. It must match the diameter of the main riser.
Material selection
Since the sewer riser is a continuation of the sewer system, it makes sense to make it from the same material as the sewer riser itself. However, if necessary, it is also possible to use a combination of materials, although experts argue that the efficiency of such a heterogeneous system will be lower.
What types of pipes are used? In most cases, cast iron or plastic is used.
- Cast iron. This is a durable and strong option, but it has significant drawbacks. The most significant disadvantage is the significant weight of the structure, which significantly complicates their installation.
- Plastic. Nowadays, plastic pipes are used in most cases. They are lightweight, durable, strong, and are resistant to corrosion processes.
The choice of pipe diameter depends on the characteristics of the system. In most cases, in private houses, a pipe with a diameter of 110 mm is used to assemble the riser.
Installation features
The installation of a fan riser is not particularly difficult. Intensive removal of gases from the system is facilitated by temperature changes, since the initial section of the sewer system is located in a heated room, and the drain pipe is located on the street.
The main part of the fan riser is a vertical section; care must be taken to securely fix the pipe. It is attached to the walls using metal clamps. The most difficult moment is removing the element through the roof.
Exiting the pipe into the attic is unacceptable, and placing the outlet under the roof overhang is irrational, since the structure may be damaged when snow falls from the roof. For the system to work effectively, the following rules must be observed:
- sections of the sewerage pipeline laid horizontally must be located at a slope of 0.02% towards the riser;
- it is prohibited to change the direction of the riser above the level of connection of the extreme outlet from the plumbing equipment;
- when connecting some pipeline branches, it is necessary to use bends with an inclination angle of 135 and 45 degrees;
- The height of the pipe above the roof depends on the roof structure. If this is an unused flat roof, then the height should be at least 30 cm. On a pitched roof, the pipe should rise half a meter or higher. If the vent riser is discharged through a flat roof in use, then you will need to use a pipe at least three meters high;
- if several pipes are installed on the roof (chimney, ventilation, etc.), then you need to ensure that the vent riser is higher than all the others. Otherwise, unpleasant odors may enter the house;
- the outlet of the waste pipe should be located away from the windows, the minimum distance is 4 meters;
- You should not install visors or other decorations on the fan riser. These parts will interfere with the movement of air, in addition, this will contribute to the accumulation of condensation, which will lead to the formation of a layer of ice and a decrease in the diameter of the passage. To prevent birds or debris from entering the system, simply cover the top of the pipe with a grill.
Insulation and sound insulation
Let's figure out whether it is necessary to insulate the fan pipe and use sound insulation. There is no point in insulating a riser passing through living quarters. But the part that runs through the cold attic and above the roof must be insulated. Otherwise, ice will form inside in the cold.
But sound insulation, on the contrary, is necessary in residential premises. Previously, no one thought about sound insulation of fan pipes, since the sound insulation properties of cast iron are much better than those of plastic.
Nowadays, when cast iron elements of the sewerage system are practically not used, it is worth using sound insulation to increase the comfort of living. Various types of noise occur in plastic pipes:
- Shock. Noise occurs when water flows hit the walls of pipes.
- Atmospheric. Sounds are created by air flows entering the system.
- Resonant. Noise occurs when the sewerage pipeline interacts with the walls, floors and other structures of the building.
- Vibrating. This type of sound occurs if the pipe comes into contact with any operating equipment (most often, pumps).
High-quality sound insulation can be achieved if you start building engineering systems at the house design stage. Then the installation of risers is carried out in specially created shafts, which will restrain the spread of sounds.
In the event that the pipe is laid openly through living quarters, sound insulation is carried out by wrapping it with foamed polyethylene material in two or three layers.
Self-installation of plumbing “step by step”
For normal operation, the toilet needs a flat, tiled or specially prepared surface of the walls and floor.
First, we connect the toilet flush with a corrugated pipe to the outlet of the sewer riser pipe. You can also use a rigid pipe. The best option is if the toilet flush enters the riser without extension corrugations, etc. To seal the drain, we use a ring with a rubber edge
It is important to take into account that rubber does not tolerate cement and similar coatings on its surface. But the sealant is quite suitable.
To inject water, you need a flexible, fairly long hose that connects the tap that supplies liquid from the water supply to the tank of your plumbing. Pay attention to both inlet diameters in order to select a hose with two suitable fasteners
Obviously, there is no way to screw a 3/4” thread onto a pipe with a diameter of 1/8”.
If the drain is securely connected, you can begin securing the plumbing.
We fix it to the floor: 3 types of fasteners
- The first option for floor installation is anchors embedded in the screed. While pouring the floor, long anchors are secured at the place where the toilet and its mountings will be located. After the screed has dried and the floor has been finished, the toilet is attached to the anchors. This is the most difficult method of fastening, since it is difficult to install the anchors so evenly that the toilet sits on them without problems. It often happens that inexperienced builders choose anchors that are too short, and then they cannot screw the nuts onto them. The anchor embedded in the floor must be at least 7 cm above the finishing surface in order to screw the toilet to it. Spacers are required under all nuts to prevent the surface of the toilet from cracking.
- The second option for securely fixing the toilet to a surface during a toilet overhaul is installation on a wooden base. The main thing is that the board strictly matches the size of the toilet base. When pouring the floor, the board is prepared by driving nails into it. Then it is placed in the solution with the nails down. After the screed has dried and the room has been finished, the toilet, previously placed on a layer of epoxy resin, is screwed to the board using ordinary screws. They also need rubber or polymer gaskets under them.
- Fastening to the floor when anchors and boards are not provided. To install plumbing fixtures on a finished surface, say, on tiles, it is convenient to use dowels. The toilet is placed in the place where it needs to be installed. Its attachment points are marked on the floor. Then they need to be drilled deep enough, but without touching the waterproofing layer in the screed. Before installing the toilet, you need to increase the security of the installation with epoxy resin/sealant. It would be a good idea to pour a drop of sealant into the holes drilled for the screws. On an epoxy cushion the toilet will stand like a glove. Spacers for screws are also needed.
You can fix a toilet with a wall cistern without screws, just using resin. However, with this method of fastening, you must first clean the surface of the tile so that the glue sticks better.
When using epoxy, it is important to allow the newly installed plumbing fixtures to dry thoroughly and adhere to the floor surface.
Mounting the toilet to the wall
How to install the installation
Wall-hung toilets are being used more and more often. Their installation is not much more complicated than usual (by the way, you can read about installing a toilet bowl with your own hands on our website). A wall-mounted toilet, as its name implies, will not have contact with the floor surface. It is suspended using a metal frame, which is attached to the load-bearing wall itself. In this case, the toilet tank and pipes are located behind a false plasterboard wall. If the wall-hung plumbing fixture has an open tank, then you can fix it on the wall itself, but then the sewer pipe must be inside the wall. The structure will be held in place by the same anchors embedded in the wall or supporting frame.
Installing a toilet on a pedestal
After fixing the toilet bowl to the wall or floor, all that remains is to assemble the toilet. A tank is placed on the base, already securely fastened, or a pipe from a tank hung on the wall is connected to it.
Installing a toilet on a pedestal
All that remains is to check if the toilet works and if there are any leaks. Turn on the cold water, wait until the tank is filled, adjusting the filling level. We set up the locking mechanism according to the instructions. We wash it off and see if there is any leakage from the drain.
The last step is to screw the toilet seat. But here you can probably handle it yourself.
Tools and materials
To install on tile floors, you will need the following tools:
- a marker, pencil or chalk to mark the outline of the base on the tile or floor;
- a drill designed for ceramics and a drill for plastic dowels;
- product - sealant to ensure waterproofing;
- standard set of screwdrivers;
- drill or hammer drill;
- core for cleaning the top layer of tiles;
- wrench and adjustable wrench;
- bolts for attaching the toilet to the floor;
- pliers;
- grinding machine with diamond wheel;
- connecting hose;
- tap;
- an adhesive (for example, liquid nails), if you plan to use method No. 3 to attach plumbing fixtures to a heated tiled floor;
- plastic dowels;
- plastic spacers for bolts;
- spatula to remove any remaining sealant or adhesive.
Preparatory work before removing the toilet
Removing a toilet and attaching a temporary plumbing fixture is not as difficult a task as it might seem. In order to dismantle the toilet before its subsequent replacement, you need to stock up on the following materials and tools:
- crowbar;
- wrenches of different sizes;
- pliers;
- rags needed to get rid of residual water;
- latex gloves;
- disinfectant.
When dismantling the toilet, be sure to wear rubber gloves; this will help you avoid microtraumas and infections. Before starting work, the plumbing fixture must be thoroughly washed and treated with a disinfectant, for example, a chlorine solution. It can be rinsed with water with an antiseptic dissolved in it - ordinary chlorine-containing bleach.
Removal of plumbing should begin by shutting off the cold water in the supply pipeline. The remaining water in the tank must be drained and the sewer system rendered inactive. You should not use water yourself, and you should also warn your neighbors above so that they refrain from water procedures for a while. After making sure that the supply valve is shut off securely, you can begin work.
Types and standards
The plumbing equipment market keeps up with the times, constantly offering customers new toilet configurations. This should not be alarmed, because, despite the wide variety, all equipment is manufactured on the basis of certain norms and standards. When dividing toilets into general groups, the following are distinguished:
- funnel-shaped design;
- toilets with shelf;
- toilets with a sloped back wall;
- equipment with horizontal drainage;
- equipment with a circular drain.
funnel-shaped
Funnel-shaped structures are considered one of the most common on the market, and their high demand is achieved due to the simplicity of the design and its hygiene.
With shelf
Toilets with a shelf are considered to be old designs that are gradually going out of use. The shelf prevents the formation of a splash during operation, but has low hygiene. Waste is washed away only under the influence of high water pressure.
With a sloped rear wall
Toilets with a sloped back wall are replacing similar products with a shelf due to a well-chosen ratio of hygiene and splash protection. Such designs are recommended for use by both professional plumbers and ordinary citizens.
Horizontal drain
Toilets with horizontal flush belong to the budget category of plumbing. In this modification, water washes only one wall, which reduces hygiene. The advantages include:
- durability;
- low cost.
The disadvantages include:
- noise during draining;
- strong splashing of water.
Circular drain
In toilets with a circular flush, water is directed in several directions of the bowl, which allows you to treat almost its entire area. The design is less noisy and more practical for horizontal models.
Types of waterproofing materials
Modern materials that can provide good waterproofing of bathroom floors and walls are distinguished by application method and composition:
- Coating compositions - the most widely used materials are those based on bitumen (bitumen-rubber, bitumen-polymer) and cement-based (cement-polymer mastics), others, for example, acrylic ones, are used less frequently.
- Pasting or roll materials are made on a polymer or fiberglass base.
Coating waterproofing composition
Installation of a hanging bowl and a hidden tank
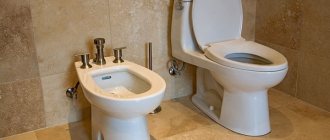
It should be noted that the work on how to change a toilet of a conventional design to a wall-hung product with a hidden drain container yourself differs from the previous option in greater complexity. In this case, it will be necessary not only to replace the plumbing equipment, but also to repair the floor covering, build a false wall with its further finishing with tiles or other modern materials.
You have to attach the hanging bowl to a durable installation. After finishing the walls, the fixed metal frame will not be visible. When carrying out renovations in a combined bathroom, when decorating the interior, it is advisable to install a wall-mounted washbasin and a bidet of a similar design.
A detailed description of how to change a regular toilet to a wall-mounted one is as follows:
- Mark the location of the plumbing fixture. A sewer pipe with a diameter of 110 millimeters and an inlet is connected to it.
- Try on the purchased installation, which is a rigid frame for installation. You need to decide on the height. The standard placement is 450 millimeters from the floor to the seat and 100 millimeters from the floor covering to the bottom edge of the seat.
- Using a marker, mark the places of fixation to the floor and wall of the bathroom so that they exactly coincide with the mounting holes.
- They are prepared using a hammer drill and the frame is installed. Using a level, check the correctness of the installation work.
- Water is connected to the drain tank.
- The installation kit includes a diagram for cutting plasterboard sheets to cover the installation site. GCR is attached to the metal profile and to the installation. It is better if they are moisture resistant.
- Finishing is carried out taking into account the personal preferences of residents.
- When replacing a toilet bowl, it is connected to a corrugated sewer pipe and a drainage system, not forgetting the need for sealing.
- The bowl is screwed directly to the installation frame through drywall and tile using pins.
- The device is connected to the sewer system and the drain tank.
Despite the fact that the process of replacing an old toilet with a wall-mounted product takes a lot of time, the result of such a repair looks stylish and expensive. The work of installing an electronic plumbing fixture with the addition of automatic hygiene functions has much in common with fastening and connecting a conventional product, but there are still some nuances.
The fact is that to connect a smart wall-hung toilet, you need to provide it with power. For this purpose, a separate line is usually laid, since smart equipment is sensitive to voltage drops in the network.
Installation
Installation should be done only after finishing work has been completed, that is, on tiles or on a flat, cemented surface. Installation begins by connecting the device to the sewer. For this purpose, a corrugated outlet is used.
It is better to purchase a new element - it is unlikely to work with the old toilet. Next, a rubber seal is put on the toilet outlet pipe. The latter is pre-moistened in water. Then the toilet is installed in the chosen place and the second end of the corrugation is attached to the sewer pipe.
At the base of any modern toilet there are mounting lugs. Through them, using a marker or pencil, marks are made on the floor. Disconnect the corrugation from the sewer outlet and move the toilet to the side. This will free up space for drilling holes in the marked places. During the work we will need a hammer drill. The diameter of the hole must correspond to the plugs that come with the toilet mounting kit. You will also need special drills with pobedit tips. They are suitable for working with concrete and tiles.
Next, the toilet is returned to its original place. It is necessary to align the holes made with the factory ears. Fastening is carried out with bolts or using long screws with a hex head.
Pay attention to the tightening torque
It is important not to overdo it so as not to deform the ceramic floor tiles.
The final stage of installation is to seal all joints where the toilet comes into contact with the floor.
Title "Seven Boyars"
When describing boyar commissions by contemporary sources of the Time of Troubles, references to “seven-numbered boyars” are encountered. The word formation “Seven Boyars” occurs later, in the 19th century. In the story of AA Bestuzhev-Marlinsky “Incursions, the story of 1613” (1831), the term “Seven Boyars” appears for the first time.
How to dismantle a cast iron pipe
If a pipe is “welded” to a wall or floor using sulfur or aluminum, it will be very, very difficult to destroy such a coating.
To get started, you must first turn off the water supply to the apartment. Then you need to free the bathroom from unnecessary items that you can damage during work. This includes the sink, washing machine, laundry basket, etc.
Next, you need to disconnect the flush tank from the water supply and dismantle the toilet itself. Problems may also arise here, since Soviet toilets were screwed to the floor conscientiously, in other words, tightly.
Try to unscrew the bolts that attach the toilet to the floor and remove it from its place. If you succeed, consider yourself half done.
Now comes the turn of the pipes themselves. Cast iron, as you know, is not particularly strong, so at some distance from the riser you can simply break the old pipe with a hammer. It is much more difficult to remove the remains of pipes from the old riser and clean them before installing new ones.
To dismantle pipes, you may need:
- A hammer with a rubber or plastic tip.
- Chisel
- Torch or blowtorch
- Mask
Quite a strange combination, isn't it? However, a gas mask is necessary to comply with safety precautions if the joints of sewer pipes in your bathroom are filled with sulfur.
The easiest way to remove sulfur is by heating it. However, when heated, the sulfur mass releases toxic substances into the air, which are extremely harmful for humans to inhale. That is why it is better to protect yourself with a gas mask in advance.
So, dismantling must begin at the point of greatest distance from the riser. Here, most craftsmen do not bother with the torch, but simply break the pipe with a hammer. This is much simpler, but can cause some complications.
Make sure that when broken, pieces of pipe do not fall into the sewer passage. They can cause serious clogs in the drain, which will be much more difficult to get rid of than getting rid of old pipes.
With a hammer, you can destroy the pipe up to the crosspiece inserted into the riser. Here it is somewhat different and filled with much more sulfur.
To free the pipe and cross from the layer of sulfur, you need to heat it. The impact of a burner or blowtorch can last for several hours, while harmful substances will be constantly released.
Before you start heating, isolate animals and household members, cover furniture or other furnishings located in the immediate vicinity of the riser, and put on a gas mask.
During the heating process, you can easily chip off pieces of sulfur until the pipe is sufficiently clean. Now, the cross inserted into the riser must be loosened if possible and removed from the riser.
The dismantling of the old pipeline is carried out as much as possible. That is, all possible pipes are removed, and others are installed in their place.
Connecting a new PVC pipe to an old cast iron riser will require certain operating skills. Please note that you must clean the connection area as much as possible from the same sulfur and rust.
To make the job easier, use a special coupling that is specifically designed to connect cast iron pipe and PVC pipe.
If you still have questions, take a look at ours and ask them there. Our experts will help you understand the intricacies of good construction and renovation.
How to install a toilet with your own hands. Step-by-step instruction
The process of installing a floor-mounted toilet is not particularly difficult.
It’s just important to carry out all operations without unnecessary haste and with maximum care.
Work begins with unpacking the delivered toilet and assembling it. First of all, drain fittings are inserted into the opening of the tank. Don't forget to install a rubber seal under it. The fittings are secured in place with a washer, which is first tightened by hand and then with a wrench. The plastic can easily be broken by rough actions, so you need to tighten the connection very carefully, without getting carried away.
Next, fixing screws are inserted into the tank, which will attach it to the shelf. Rubber gaskets and washers are put on them, then nuts. A gasket is placed between the tank and the shelf. Everything is coated with sealant to prevent the development of leaks and the seepage of sewer odors. The tank is put in place, fixed with screws, controlling the verticality of its position.
Next, a float pipe is attached to the hole on the side of the water supply to the tank. The connection is sealed with linen winding and a special paste.
The assembled toilet is connected to the entrance to the sewer system. The easiest way is if the riser is made of polymer pipes. Then the corrugation is simply put on for connection. You will have to tinker with a cast iron pipe to clean it from layers to metal. Then the dried metal is coated with sealant, the corrugation is placed and, for reliability, it is also treated with sealing paste on the outside. Without this treatment, leaks due to small cracks in the metal are possible. The corrugation is stretched and placed over the toilet outlet.
Next, the assembled toilet is moved to the side, holes are drilled in the base for mounting screws and supplied with plastic plugs. The toilet is placed on a dust-free base, hardware is inserted and carefully tightened, making 2-3 turns on each edge. The toilet should stand in place strictly vertically and not wobble.
Installation is almost complete. All that remains is to connect the tank to the water supply. The liner is equipped with a union nut with a rubber seal, so it is easy to achieve a reliable tight connection. All that remains is to adjust the fittings, put the lid and release button in place. Do a test water supply and drain. If necessary, tighten the leaking connection or adjust the drain fittings.
How to dismantle an old toilet
We seem to have sorted out the choice of new plumbing fixtures, now let’s slowly move on to the process of installing it, which will begin with dismantling the old product.
If you need to remove a modern toilet that was fixed only with bolts, then you should not have any difficulties, but if it was attached using glue, you will have to approach the matter wisely.
So, if the toilet is mounted on silicone, then you just need to carefully cut it on all sides with a sharp stationery knife, slowly loosening the product. If it’s on cement, then we proceed like this.
Table 2. Dismantling the old toilet
| Steps, photo | Description |
| Step 1 - turn off the water | First, the tank must be disconnected from the water supply. To do this, turn off the corresponding tap at the water supply outlet and unscrew the nut at the base of the tank manually or using a wrench. If you don’t see a tap, you may have to turn off the water in the entire apartment or even the entire riser - such situations often happen in old houses where there are no taps at all or they simply cannot hold water. Advice! In this case, after shutting off, the outlet can be plugged for a while so that there is water in the house. Drain all the water from the tank. |
| Step 2 - disassembling the toilet | Next, the toilet needs to be disassembled. We remove the toilet seat from it, then the tank cover, which is usually held in place by a screw at the base of the button. Dismantle the fittings by disconnecting all fastening screws. Unscrew the two bolts that hold the tank, remove it and put it aside. This completes the easy part. Tip! When carrying out all these manipulations, a lot of cold water will fall on the floor and on you, so prepare in advance - dry rags, buckets, and so on. |
| Step 3 - releasing the neck | Previously, not only the base, but also the neck was covered with cement. It won't be easy to get her out. You will need to hit it with a hammer near the connection to the sewer pipe. We beat until the neck breaks off. Hit only the ceramics, do not touch the pipe, as it may crack, which will add hassle. |
| Step 4 - knocking down the cement at the base | Next, take a chisel and a hammer and begin to free the base of the toilet from the cement mortar. Try to loosen the toilet from side to side - if you're lucky, it will move. If it does not give in, then we intensify the blows and try to go deeper under it, chipping off the adjacent tile. If you have a hammer drill, then do the job with it. |
| Step 5 - drain the water | Once the bowl is free, carefully lift it and drain the water into a bucket. To avoid accidental injury, clean the room. Look at the photo - it shows that there is a piece of the neck left in the sewer that needs to be removed. |
| Step 6 - clearing the sewer inlet | The sewer tee is cleaned with a screwdriver or chisel. Do this carefully so as not to damage the pipes, unless, of course, you plan to replace them with new ones. |
Indications for use of the fan pipe
Based on the current regulatory construction documentation, the construction of sewerage without the use of waste pipes is applicable in the case when a residential building is being erected no higher than two floors. This is primarily due to the small amount of disposable sewage water.
But often in one-story buildings there is a need to install vent pipes. This need arises when large volumes of wastewater are drained one-time, if the cross-section of the vertical risers is completely blocked by the flow of wastewater. This can often happen if, for example, a sink and toilet are used at the same time.
I would like to note that in most cases the toilet is mounted on a sewer pipe with a diameter of 110 mm, and the cross-section of the cistern pipe does not exceed 70 mm. In turn, all other systems requiring wastewater disposal are connected using siphons with a pipe diameter of no more than 50 mm. Therefore, when using only one device, it will not be possible to cover the diameter of the riser.
Any household appliances that use water are also connected to the sewer with small-diameter pipes and therefore they cannot greatly influence the volume of disposable discharges. Based on this, the installation of a vent pipe in such a situation is carried out at the personal request of the house owner.
Today, the installation of sewer systems with a waste pipe is recommended in the following situations:
- installation of small diameter risers in country houses that do not exceed 50 mm;
- the presence of more than several floors, if a bathroom is used on each of them;
- if the building has a swimming pool or other plumbing equipment that generates large volumes of wastewater.
Also, if there is more than one bathroom in the house, which is used by different family members at the same time, the installation of a drain pipe is mandatory.
Basic requirements for the installation of vent pipes
The installation of a drain pipe must always be carried out in strict compliance with the rules for carrying out work of this kind.
- The cross-sectional diameter of the sewer pipes should not be less than the parameters of the central riser to which the sewerage system will be connected. The standard sizes of such pipes are 110 millimeters or more.
- The upper or outer part of the drain pipe is located in places where sewer odors are freely removed by air currents.
In practice, installation or replacement of a vent pipe is carried out by inserting it into a special ventilation duct, which is installed during the construction of the building. If a ventilation duct has not been provided or its volume is not enough, the sewerage pipes are mounted horizontally and led through the wall to the street.
Also, vent pipes in country houses allow us to solve another side problem, which in most cases is associated with the long absence of the owners of the house. As a result of non-use of the sewer system, even if all plumbing fixtures are installed in accordance with current regulations, an unpleasant aroma of sewage may appear.
This is due to the small volumes of siphons connecting sinks, bathtubs, washbasins and risers. If they are not used for a long time, the water in them simply dries up and allows sewer odors to enter the house. Using a drain pipe can correct this problem and this happens due to the following physical properties:
- warm air creates a certain vacuum in the system, and allows odors to rise up the riser;
- if the water in the siphon dries out, the air flows will not move from the sewer into the building, but, on the contrary, from the room to the sewer riser and then to the street.
Consequently, even if the water in the siphon completely dries out, there will be no unpleasant odor in the room, and the air will still remain fresh and clean.
Almost all professional builders advise equipping any sewer system with effective ventilation, even if a building is being erected with a height of no more than two floors.
And in some cases, a ventilation system will not be superfluous in a one-story building. Thanks to this, the house will be completely protected from any unpleasant odors of wastewater.
Toilet installation
When the toilet is removed, odors come out of the sewer. So that they do not distract from work, the sewer hole must be covered with something, for example, plugged with rags.
Do-it-yourself toilet installation continues with markings for dowels. To do this, the bowl is placed in the place where it is to be installed, and the holes are marked. Drill holes according to this marking and insert dowels into the holes.
In some models, the holes are drilled at an angle. In this case, to install the toilet in the holes, you need to drill at the same angle.
When the dowels are inserted, the bowl is placed in its place and connected to the cuff from the sewer socket. Then screws are tightened, onto which plastic washers are put.
It is not correct to immediately tighten the screws too much. First you need to lightly bait it and evaluate whether the installation was done smoothly. If not, then level it by placing plastic pads under it. Only after this can you tighten it.
The bowl is installed according to the markings
To install the toilet, you need to assemble the barrel yourself if it is delivered disassembled. Here everything should be done according to the instructions supplied by the manufacturer.
All moving parts must not come into contact with each other or the walls of the drain tank.
The next step is installing the drain tank on the bowl. Fastening is usually done using bolts, which should be tightened evenly. When installation is complete, a lid is placed on the tank and a drain button or lever is installed.
It is recommended to place a gasket between the bowl and the barrel. To prevent the gasket from moving, it is better to glue it with sealant.
The final moment of self-installation of the toilet is connecting the water supply.
When the water supply is connected, do not rush to turn on the water. First you need to check all structural components visually for damage. And only if you are sure that everything looks normal, you can open the water, fill the reservoir and try to rinse. If leaks occur, they must be repaired.
Video:
What causes clogs in the toilet?
Among the problematic factors should be noted:
- 1. Violations of sewerage operating conditions. For example, you should not flush large amounts of toilet paper down the toilet. Moreover, the toilet needs to be protected from flushed toys or rags.
- 2.When installing plumbing equipment, numerous technological requirements must be taken into account. Therefore, the ideal option is to contact specialists who are ready to take into account all the intricacies of installation.
- 3. The absence of a drain pipe or decompression valves to equalize the pressure in the pipe during drainage also leads to undesirable consequences.
- 4. Features of the toilet design. Not all manufacturers take into account the nuances of the configuration of their products to successfully prevent blockages in the toilet.
What difficulties may arise?
The above instructions describe the easiest way to remove old plumbing fixtures. However, it is often impossible to use it, because if the corrugation and the tank, as a rule, can be removed without problems, then the toilet itself can not always be detached from the floor quickly and without hassle. After all, plumbing fixtures are usually replaced after 15-25 years of use. As a result, the nuts on which it is fixed, which served faithfully due to high humidity, may not unscrew at all. There are also cases when the toilet is literally cemented to the floor. Here, of course, dismantling it causes a lot of trouble. But with the right approach they can be minimized.
So, if the old plumbing fixture cannot be unscrewed, then its base will need to be destroyed. Here you will need to arm yourself with a hammer, a crowbar and a hacksaw. But first you will need to literally soak all the water from the toilet siphon, because if this is not done, then after dismantling you will have an unpleasant and long cleaning.
It is imperative to wear gloves and safety glasses when breaking down the toilet. Before starting this work, remove the tank and disconnect the corrugation. Next you need to make several strong blows to the base of the plumbing. After this, you will notice how cracks have appeared in the lower part of the toilet. Hit them a few more times, and then start knocking out the part that turned out to be more stable. Use a chisel and crowbar during this process. With their help, even a secure fixation will be detached. After that, all that remains is to clean the surface on which the new toilet will be installed in the future, and the old plumbing can be safely taken outside and thrown into the trash can.
Useful tips for dismantling a toilet
To ensure that the removal of your old toilet goes as quickly as possible, you should follow these recommendations:
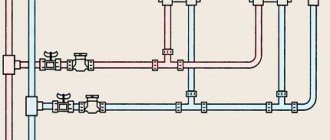
Scheme of connecting the toilet to the sewer.
Often, the tank of a sanitary product can simply be installed on a special stand, which is mounted on the wall. Here its dismantling will be very simple. After all, you only need to disconnect it from the pipes supplying water, and then remove it from the stand and take it out of the room. Soviet ones are mainly based on a tank, which is attached to the main body of the plumbing fixtures. In this case, its removal already occurs according to a different scheme. You will first need to remove the tank cap, and then remove all the mechanisms from it
Then pay attention to the fasteners (bolts) holding it at the base of the toilet. They will need to be unscrewed
If this cannot be done, then you will need to use a hacksaw to disconnect the tank. If you plan to change all sewer connections, you can simply cut the corrugation. Then you won’t need to waste time dismantling it. Indeed, often the corrugation can be fixed too tightly. During dismantling work, make sure that fragments and pieces of mortar do not fall into the sewer socket. After all, this can cause it to become clogged. Moreover, it may occur after you completely remove the old plumbing product and install a new one in its place. If you manage to dismantle the toilet without damaging its base or sewer line, you can reuse it. For example, you can put it in your dacha. At the same time, you should not worry that such plumbing fixtures will not last long, because older models have a very long service life. And since you will not use it at your dacha very often, it will not need to be replaced for many years. Therefore, feel free to buy corrugation, sockets and install old plumbing fixtures in your dacha. Remember that the toilet is a product with significant mass. Therefore, it will be very problematic to remove it alone, which means you will need to find an assistant.
By following the instructions presented and taking into account useful tips, you will be able to dismantle the toilet without unnecessary hassle and problems. This means that nothing will stop you from quickly installing a new plumbing product
Safety precautions before starting work
When you plan to replace a toilet, doubts arise whether to do all the work yourself. In fact, you can manage the removal of the old and installation of the new device yourself. The main thing is to do everything consistently, following the manufacturer’s recommendations and following the advice of experienced craftsmen.
Image galleryPhotos from An old bathroom installed on floor tiles will require less hassle, dirt, and effort. In this case, it is enough to disconnect the water supply from the communications and unscrew the fastening screws at the base of the container. The device will have to be broken, pulled apart and secured to the floor. The easiest way is to disconnect the toilet connected to the outlet with a corrugated pipe from the sewer. Detaches quickly and easily, without any effort. Disconnecting a toilet from a sewer connected to it by an old cast iron drain is much more difficult. It is often necessary not only to clean it of deposits and damaged sealant, but also to replace the drain itself. Disassembling the toilet when installing it on tiles. Installation on concrete taffeta. Connection to the sewer using a corrugated pipe. Connection to sewerage using a cast iron outlet
There are 3 options for doing the job:
- invite a plumber;
- invite a coven;
- do it yourself.
The first option is suitable when scheduled repair work is underway and there is no time limit. Sometimes a plumber has to wait weeks because unforeseen circumstances constantly arise.
An invitation to a party can result in even greater expenses - it’s nice if you meet an experienced master whose hands grow from the right place. Otherwise, it can destroy the entire bathroom.
Some hackers like to dismantle the toilet with a sledgehammer. It's quick and doesn't require much work - a couple of swings and no toilets
The last option of self-employment is the most profitable - you can gain practical experience and save money. Yes, and great destruction can be avoided.
If you have decided to gain practical experience in dismantling a toilet, then you should not forget about safety measures, because various tools may come in handy during the work process.
Care should be taken to protect eyes, hands and other important organs and body parts. To do this, you need to wear special safety glasses, thick gloves, and a mask to protect your respiratory system. Clothing should completely cover your arms and legs to prevent sharp fragments from accidentally damaging your skin.
You may need an angle grinder, so glasses and gloves are a must
Preparatory stage
Preparing to remove a dilapidated toilet will not take you a lot of time. The most important thing that every owner may like is that there is no need to shut off a non-specialized water riser. In most cases, water is supplied to the drain tank through a separate hose equipped with a tap. It is enough to close the shut-off valves and work can begin. In addition, if there is no tap, then there is a shut-off valve at the entrance of the water supply to the apartment or house.
First, you should take care of preparing all the necessary tools and materials. For work related to removing a dilapidated toilet, you may find the following useful:
- set of wrenches;
- hammer and chisel;
- scrap;
- hacksaw for metal;
- pliers;
- rubber or woven gloves and safety glasses;
- a basin (or other suitable container) and rags (worn rags).
The first step will be preparing the workplace. Often the toilet is installed in rooms with a small area. In order not to break all the shelves and other devices hung on the walls, it is better to remove them in advance.
Free up as much free space as possible. This is especially true if the toilet has not been changed since the house was built. If the building is old, then the plumbing units were installed firmly, using cement mortar. In this case, in addition, a small shelf can significantly complicate the work.
Now it is necessary to shut off the flow of water into the drain tank. This is done, as mentioned above, using a tap installed on the outlet running from the water supply to the toilet, or by turning off the water supply to the entire apartment. Once the water flow is stopped, drain the entire contents of the tank. Only then is it possible to begin the main work.
What should you prepare in advance?
Before you replace an old toilet with your own hands, you need to prepare for the work. You need to think through everything especially carefully if the replacement is carried out in a toilet that continues to be used. In this situation, you need to replace the plumbing quickly, and without proper organization this is impossible.
Choose the appropriate model, prepare all the necessary tools and supplies, and then you can get to work.
Choosing the type of new toilet
The most important thing is to buy a new toilet. Then, depending on your choice, a set of tools and materials for replacement will be selected.
The following types are distinguished:
- floor;
- hanging.
Floor models . Such bowls are more common and their choice is very wide. Replacing an old floor-standing toilet with a new one is the most common story. There are floor-standing models such as “monoblock”, “compact”, separate bowl and tank, as well as with a hidden drain system.
The monoblock toilet is stylish, but not practical. If the tank fails, the entire system will have to be replaced. This won't happen with a compact.
A monoblock is a product that combines both a bowl and a tank. A compact toilet is when the tank and bowl are supplied as a set and are connected during installation. This is the most popular option in our plumbing products market.
The retro model, when the tank is located under the ceiling and connected to the toilet by a pipeline, and to flush it you need to “pull the string,” is becoming less and less common. It looks good in an interior of the appropriate style.
A modern option is a hidden drain system. To replace a regular toilet with this one, you will need to build a false wall, behind which the cistern with the installation system will be hidden. Externally, such models look very neat; only the drain button is located on the wall, and all communications are hidden.
Thanks to its placement on the wall, the toilet appears to float in the air. But it is not attached to the wall, but to a steel frame that is hidden in the wall. Withstands weight up to 400 kg
Hanging bowls . Such toilets are not installed on the floor; they are hung on special anchor bolts on the wall. This leaves free space under the bowl that can be put to good use.
And from a hygienic point of view, this design wins. Cleaning the floor under a wall-mounted toilet is easy, but dirt often collects around the floor-mounted toilet.
Another detail that is important to consider when replacing a toilet with your own hands is the direction of release.
There are 3 varieties:
- release at an angle;
- straight;
- vertical.
A popular option is direct horizontal release. The toilet is connected to the sewer pipe at the same level. Oblique release was used in Soviet multi-story construction, but is still found today.
Externally, toilets may look exactly the same, but due to the different location of the outlet, you need to be careful when choosing
But devices with vertical drainage are installed more often in America and China. The convenience lies in the fact that the toilet can be placed at any point; communications are provided inside the interfloor ceiling. With us this is possible in private homes.
Practical tips for choosing a toilet are outlined in this article.
A set of necessary tools for work
The set of plumbing tools for replacing an old toilet is standard. Depending on the condition of the old equipment that will have to be dismantled and the sewer pipes, as well as the chosen method of attaching the new plumbing fixture, the set of tools needed may vary slightly.
Prepare the following necessary items:
- perforator;
- adjustable wrench;
- screwdriver;
- a hacksaw or grinder;
- sealant gun;
- hammer and chisel;
- rubber spatula;
- building level;
- personal protective equipment - goggles, gloves.
A hammer drill will be needed to knock out holes in the concrete for the dowels on which the new toilet will be attached. Work on connecting the water supply is carried out using an adjustable wrench. To tighten the screws, you will need a flat-head or Phillips screwdriver, and to seal the joints, you will need a gun for a can of sealant.
When disassembled, a modern compact toilet looks like this. A set of fasteners, rubber O-rings and a tank drain mechanism can be packaged separately. No need to be scared, it all comes together like a construction set
A hammer and chisel may come in handy if the equipment was connected to an old Soviet cast iron sewer riser. To ensure that the bowl is level, use a building level.
List of required materials
In addition to a set of tools for replacing a toilet with your own hands, you need to purchase additional materials that will be needed during installation:
- sealant;
- corrugation for connection to the riser;
- pipe for connecting to the water supply;
- FUM tape;
- tap;
- mounting kit
In any plumbing issue, the moment of sealing is the most important. Any gap or loose connection threatens leakage.
Silicone sealant in a bottle is your best friend when replacing a toilet. They fill all the cracks and gaps, process connections
To connect a plumbing fixture to the sewer, you need to buy a special plastic corrugated pipe. This is convenient because the pipe is flexible and fits in most cases. It can be bent to any position, stretched and compressed.
The corrugated pipe for connecting the toilet to the sewer is universal. It is suitable for both horizontal and angled release. Bowls with vertical drainage are connected in a special way - using a special elastic cuff
To seal the joints, use sealing tape or tow - the old fashioned way. The mounting kit for replacing a toilet includes dowels, screws, bolts, washers, nuts, plugs for connecting all components and installation. Don't be alarmed if something is missing, you can buy it all separately.
Operational period of cast iron pipes
Cast iron pipes are often used for the construction of external networks and the distribution of wastewater disposal systems. Elements of sewer networks are manufactured using centrifugal casting. The raw material that is used for this is #8211 gray cast iron.
When installing sewer networks, cast iron pipes are often used. They are excellent for laying external pipelines.
A bitumen-based coating is applied to the inner and outer surface of the pipe, which protects them from corrosion and increases the service life of cast iron sewer pipes. But such a coating serves not only to protect the metal from corrosion processes, but also to make the inner surface smooth. This helps improve throughput.
Advantages and disadvantages of cast iron sewer pipes
Let's start with the advantages. Today, cast iron pipes made using modern technologies are distinguished by their high strength and reliability of use. They can withstand long-term exposure to high temperatures, are immune to frequent temperature changes and are more resistant to corrosion. An undoubted and important advantage of cast iron sewers is that they are more affordable than steel ones. At the same time, they are more durable to use, their service life is approximately 80-100 years. The operation of cast iron pipes is environmentally friendly.
Diagram of the installation of cast iron pipes.
Cast iron pipes are most often used if it is necessary to install a sewerage system that must operate under constant high load.
Due to their heaviness, cast iron pipes are transported using special equipment.
Disadvantages of use include the complexity and cost of installation. Transporting cast iron pipes #8211 is not an easy task. This material is heavy and can only be transferred using special construction equipment. Connecting parts made of cast iron #8211 is a rather complex and labor-intensive task, on which their effective service depends.
There are two main methods for connecting sewer pipes. The first #8211 is caulking joints. To caulk the joints, heel or other materials are used. In this case, the joints are connected with a cable impregnated with self-expanding cement mortar. The second method #8211 is to pour molten sulfur into the joint, but you need to be extremely careful when using this method.
Requirements for a ventilated valve (aerator)
The installation of ventilated valves to allow air into the system (Figure 5), which guarantees normal operation of the sewer system, is carried out on the basis of appropriate calculations.
The throughput of the aerator must correspond to the specified design parameters for the throughput of the riser. In turn, the fluid flow through the riser depends on its diameter, type (ventilated/non-ventilated) and height. The calculations also take into account the diameter of the dictating floor drain (with the highest waste flow), the angle of liquid entry through it, the height of the water seals and other initial data. Figure 5. Operating principle of an aerator - air valve for sewerage: 1. In the operating position, the valve is closed - air from the sewer does not enter the room.2. When a vacuum occurs in the sewer riser, the aerator valve opens, the missing amount of air comes from the room, preventing the water seal from breaking.
In a simplified form, you can coordinate the flow parameters of the aerator and ventilated riser using tabular selections. Initially, you should refer to Appendix “B” of SP 40-107-2003 for the installation of internal sewerage from polypropylene pipes. It is to this that SP 30.13330.2012 refers to determine the characteristics of the aerator.
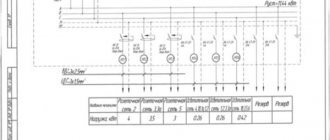
Table 1. Capacity of a riser made of polypropylene pipes ∅110 mm, equipped with a ventilation valve with a clear cross-sectional area of the air flow of 3170 mm2 and 1650 mm2.
| Diameter of floor outlet, mm | Angle of liquid entry into the riser, ° | Riser capacity, l/s | |
| 1650 mm2 | 3170 mm2 | ||
| 50 | 45.0 60.0 87.5 | 5.85 5.10 3.75 | 7.7 6.8 4.54 |
| 110 | 45.0 60.0 87.5 | 4.14 3.64 2.53 | 5.44 4.8 3.2 |
Next, you should find out the flow parameters of the sewerage system with similar initial data. For ventilated risers, they can be gleaned from tables 6-9 (SP 30.13330.2012).
Table 2. Capacity of ventilated risers made of polyvinyl chloride (PVC) pipes (SP 30.13330.2012 (Table 7)).
| Outer diameter of floor bends, mm | Angle of connection of floor branches to the riser, ° | Throughput, l/s, risers with pipe diameter, mm | |
| 50 | 110 | ||
| 50 | 45 60 87.5 | 1,10 1.03 0.69 | 8.22 7.24 4.83 |
| 110 | 45 60 87.5 | 1,10 1.03 0.69 | 5,85 5.37 3.58 |
This also takes into account the diameter of the floor outlet and the angle of its connection. From the tables it becomes clear that, for example, for some of the most popular PVC pipes today, Ø 110 mm with an outlet Ø 110mm/45 (outlet for connecting a toilet), the second throughput of the riser will be 5.85 l/s. This figure turns out to be slightly higher than with similar geometric parameters of a sewer system with an air valve (5.44 l/s (Table 1)).