Features of the material
A photo of mosaic tiles in the interior always looks advantageous. This is due to the fact that with the help of such finishing material you can create a unique and inimitable interior. This type of tile has the following advantages:
- Easy to install, since you no longer need to glue each mosaic element separately - they are assembled into small sections on a mesh or paper base.
- Easy to care for. Mosaics are chosen for finishing rooms with high humidity, which means that the tiles are not afraid of water and are easy to clean.
- The finishing material is not afraid of sudden changes in temperature and is not prone to cracking.
- Sections can be cut using an ordinary mounting knife. This is much easier than cutting ordinary tiles.
- The materials from which the tiles are made are completely environmentally friendly, and therefore safe for humans.
Just like other types of ceramic tiles, mosaic has a long service life.
Advantages and disadvantages
Mosaic paintings stand out:
- Long service life;
- Practicality;
- Economical;
- The ability to translate any ideas into reality;
- Harmonious compatibility with the surroundings.
Disadvantages include the complexity of the technology in compliance with all recommendations and the manufacturing time.
Such creativity can be compared to painting; sometimes fantastic sketches are created from unclaimed waste, which become a source of pride for the owners and the highlight of the surrounding space.
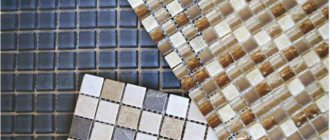
Kinds
Today there are a large number of finishing materials that can satisfy every taste and budget. Among the mosaics, the following varieties are distinguished:
- Ceramic tiles are the most affordable and also come in many shade variations.
- Stone tiles, which are made from materials such as granite, marble. The sizes of mosaic tiles made of natural stone can be very diverse.
- Glass finishing materials are made from heat-resistant glass, which has characteristics similar to ceramic tiles. In addition, glass mosaic has an unusual appearance.
- Metal mosaic is made of stainless steel. May also have a bronze or gold color.
The choice of material depends on the features of the future interior of the room, as well as on financial capabilities, since prices have a fairly wide range.
General properties
An excellent decoration option would be a mosaic for the kitchen apron. The mosaic canvas consists of individual bright fragments, which is a significant advantage over ordinary tiles.
Various materials are used in production, from mother-of-pearl to natural stone. Therefore, mosaics are easy to match to any style of kitchen - from country to high-tech.
All kinds of shades, interspersed in abundance in the mosaic, allow you to combine together all the colors present in the kitchen. At the same time, it produces a hard and fire-resistant fabric, as a result the kitchen apron area is completely protected. There are no abrasions or minor scratches on it.
Size chart
For ease of installation, the mosaic is assembled into sections similar to the size of ordinary ceramic tiles. The size of one square of mosaic tiles can vary from 10 to 50 mm. The most popular tiles are those measuring 20x20 mm. It is easy to assemble and has a universal appearance. There are also mosaic tiles with a chip size of 15 mm. Ceramics most often have a classic rectangular shape, and its small size allows you to lay out interesting panels or decorate curved surfaces.
In some variations of designer mosaics, different dimensions of mosaic elements can be successfully arranged on one wall. This technique can achieve the effect of depth. The size of the tiles and the width of the mosaic in the composition may also vary. Thus, from small tiles assembled in sections measuring 30x30 centimeters, it is easy to assemble a beautiful composition.
Tiles with mirror fragments
The mosaic consists of individual mirror parts 0.5 cm thick. The tiles have high wear-resistant properties, but require more frequent maintenance. Mirror particles are produced in the form of squares or rectangles.
As a rule, they have a mirror finish, but sometimes manufacturers produce mosaics with tinted mirror fragments in small series.
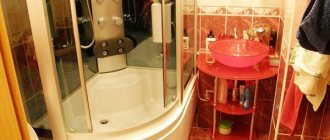
Where is mosaic appropriate?
Many people, seeing beautiful mosaic panels in building materials stores, admire the beauty of the elements. This involuntarily prompts them to think: where could such decoration be carried out in their own home? Most often, mosaic tiles are chosen for finishing rooms that have high humidity and are characterized by serious temperature changes, such as the kitchen or bathroom.
In this case, an unusual finishing element can be used as a floor covering to highlight individual zones. In the bathroom, tiles can be used to highlight an area with a washbasin and mirror; in the kitchen, a mosaic is often used to lay out the apron behind the work area or the wall near the dining table.
Additional items
The following are used as additions to the paintings:
- Smooth pebbles.
- Seashells and shells.
- Bottle and regular glass.
- Wood cuts.
- Buttons.
- Mirror fragments.
They use broken dishes, beads, unnecessary jewelry, etc. They rely on their vision and purpose of the creation for the interior or exterior of the building.
Glue selection
In order for mosaic tiles to last a long time, you need to pay some attention to the materials that are used to adhere them to the wall or floor. Most often, special adhesive mixtures are used for laying tiles. They may differ and depend on the type of tile and the room for which it is intended:
- The most common ceramic mosaic tiles use white or gray adhesive based on cement. These types of building mixtures can be elastic or stable.
- Reactive adhesive should be used to install natural stone mosaics. In addition, marble is susceptible to high humidity, so it is recommended to carefully seal the joints between the tiles.
- For the glass version, exclusively white polyurethane-based glue is used.
You should also remember that if you plan to lay mosaic tiles in a room with high humidity, then you should give preference to moisture-resistant adhesives.
Countertop update
After sorting the fragments, the wooden table is cleaned of paint using acetone. They are sanded twice, first with a coarse and then with a fine abrasive. This is required to improve traction.
The further algorithm of actions is as follows:
- Start from the edges, moving towards the center.
- Compact the material to the maximum.
- If there is excess adhesive, remove immediately.
To clean the canvases, do not use abrasive cleaning compounds, acidic and phosphorus substances, or solvents; a soft brush and soapy water are sufficient indoors. Street figures are simply washed with water from a hose.
Preparatory work
After the final determination of the dimensions of the mosaic tiles and the selection of an adhesive that corresponds to the parameters of the finishing material, preparatory work should begin. They consist of the following manipulations:
- When laying mosaics, it is recommended to check the evenness of the surface, since any differences can negatively affect the appearance of the final finishing result. To do this you need to use a building level. If the differences are insignificant, then leveling can be done with tile adhesive; otherwise, it is recommended to use plaster to pre-level the walls or sheets of drywall.
- The surface must be thoroughly cleaned of debris, dust, previous finishing material and other contaminants. Oil stains, if there are any on the surface, require special cleaning. It is also important to eliminate raised bulges.
- The final stage of preparation is the application of primers. They are necessary for strong adhesion of the glue and the surface of the wall or floor. Using a roller or wide brush, apply two coats of primer and allow each coat to dry completely before applying subsequent coats.
It is important that the walls are smooth and even, otherwise the mosaic canvas will follow all the curves and irregularities.
Partial mosaic finishing
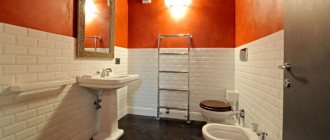
A bathroom completely tiled with mosaics looks very impressive. However, this finish is not suitable for every room. You can create the right atmosphere only in a spacious bathroom, and in hygienic rooms in typical apartments you can hardly get a masterpiece.
Therefore, the combination of mosaics and tiles in the bathroom becomes an ideal solution for a cramped bathroom or bathroom. Moreover, small rooms dictate their own rules. Using mosaics, you can veneer some elements or highlight different zones.
Frame for mirror, door, window opening
If you plan to use a mirror canvas mounted flush with the wall, then a frame made of mosaic will help to decorate it beautifully. And so that such a design does not seem lonely, you can put the same frame around the doorway for company. In such cases, the mosaic is selected in shades that contrast with the main tile.
As companions to the mosaic frame, you can also make small inserts on the wall, or line niches, if any, with mosaic elements.
Washbasin countertop
We have already said that mosaic is an ideal material for designing complex and curved shapes. If you decide to install a countertop sink-washbasin in the bathroom, then you will need a countertop under it. The material used for it is very different - from moisture-resistant laminated chipboards to artificial or natural stone. One of the budget options is to make a tabletop from a metal profile, cover it with plasterboard and finish it with mosaics. In addition, the shape for such a countertop under a washbasin can be very different - from a strict rectangular to a curved one, smoothly flowing onto the wall. At the same time as the tabletop, you can also veneer the apron above it, since this surface requires special care. And the practicality of mosaics is perfect for such a purpose.
Screen for bathtub or tray
The space under the bathtub or shower tray can become a decorative feature rather than a gaping hole. Very often the screen is covered with the same ceramic tiles that were used in the decoration. But who’s stopping you from making a beautiful mosaic screen for your bathtub? This is especially true if the bowl itself has beautiful curved shapes. To create a full-fledged beautiful interior with mosaics, in combination with the screen, you can decorate the wall above the bathroom with the same mosaic or lay out separate inserts.
Niches, shelves, columns...
There are a lot of options for combining tiles with mosaics. If the bathroom has engineered boxes, niches, racks and shelves for cosmetics and towels, then they can also be highlighted or decorated with mosaics. Usually, when covering complex elements with tiles, you have to spend a lot of time and effort on fitting and cutting them. And mosaics are perfect for decorating difficult places.
It is also quite difficult to veneer round or curved interior elements, such as columns. To decorate such structures, it is better to select mosaics with small elements.
Plumbing cladding
A rather rare, but very successful move is to line the bathtub itself or the washing bowl with a mosaic. It’s rare that a craftsman manages to do everything neatly and aesthetically, however, such use of mosaics also has the right to exist. In addition, if a shower is constructed in the bathroom, then it is more practical to lay out the shower tray with mosaic. To design complex geometric shapes, the elements should be the smallest - such modules are easier to size and glue.
Performing markup
This stage marks the beginning of the installation of mosaic tiles. It is very important, since the evenness of the subsequent coating depends on it. Mosaic tiles with cage dimensions of 30 by 30 mm are the most common among this type of finishing materials. Using an ordinary stationery pencil, you need to mark the outline of the tile on the walls or floor according to its size. To do this, it is also recommended to use a ruler, tape measure, or attach the mosaic section to the wall.
If there is a pattern on the tile, then it is important to draw up a drawing on paper marking the main elements on the wall. This way you will be able to create a perfectly even and correct pattern. You should also remember that if the room has corners that will be finished with mosaic tiles, then work should begin with them.
Color options
As with any other materials, you can play with tile colors endlessly. The good news is that there are many different solutions on sale.
Designers create:
- Monochrome interiors. Everything here is done in the same color. They don’t always use a single shade, but the tones are as similar as possible and belong to the same range.
- Background. Tiles on the walls should not stand out. Bright colors are not suitable for this purpose. Use neutral tones, often light options.
- Gradient design. One color blends smoothly into another. Variants of a single range or well-combined shades can be used.
- A game of contrast. There is no need to give up sharp color transitions. Such solutions can be stylish and provide functional benefits.
Mosaic tiles can be painted in a single color or contain different shades, patterns, or entire finished paintings.
Sometimes it doesn't take much effort to create a unique, professional design. Everything is thought out in advance by the designers of this finishing material.
Preparing tools and glue
Regardless of the size of the mosaic tiles for the bathroom or kitchen, it is important to have the following construction tools before starting installation:
- notched spatula for applying glue;
- rubber spatula for grouting joints;
- roller for applying the primer mixture;
- mixer for preparing glue;
- construction knife;
- hard sponge;
- bucket for stirring.
You also need to purchase special mosaic glue, primer and grout mixture of the appropriate color.
Most often, adhesive mixtures are sold in dry form. Before starting work, you need to prepare the mixture that will be used for laying the tiles. To do this, you need to follow the following rules:
- First, you need to pour the required amount of water into the container and only then, stirring constantly, gradually add the dry mixture. Violation of this order can lead to the formation of lumps and uneven mixing, which will significantly affect the durability of the mosaic masonry.
- The amount of glue should correspond to the size of the mosaic tile on the grid, as well as its quantity. Otherwise, there may not be enough material to complete the work.
- According to the rules, the glue must be mixed twice. After the first stirring with a mixer, you need to let the mixture rest for 10 minutes, then stir again.
- The mixer speed should be medium, since the main goal is to stir and not beat the adhesive composition.
The rules for preparing tile adhesive should be indicated on the packaging. Depending on the manufacturer, they may differ slightly.
Popular design models
Most often, mosaic tiles are used to highlight a certain area. Considering that the material does not require special care, people like to use it in “dirty” places. Mosaics are used to decorate the area of a bathtub, shower stall, washbasin or other plumbing fixtures.
With the help of such tiles you can give the room a spectacular look or play with the visual perception of the area. Therefore, such material is often used to decorate an accent wall, the area opposite the bathtub or window.
Covering a room completely with mosaics can create an uncomfortable impression. Such design risks straining the eye, seeming pretentious and inappropriate.
Laying tiles
For ease of installation, the dimensions of the mosaic tiles on the grid correspond to the size of the standard ceramic finishing material, therefore the installation process is quite similar:
- Apply glue to the pre-primed surface using a notched trowel. It leaves grooves on the mixture, which contribute to good adhesion of the tiles to the adhesive composition. It is important that at one time you need to apply the mixture only to that part of the surface that will be covered in 30 minutes, otherwise the glue may lose its properties.
After this, you can begin laying the mosaic. It should be remembered that the distances between sections must be the same, otherwise the end result may be unsuccessful. You also need to make sure that the glue does not get on the mosaic, since after drying it is quite problematic to remove it.
Once installation is complete, allow the tiles to dry for two days.
If it is necessary to cut mosaics, it is recommended to use a construction knife.
Preparation of pieces
If there are broken residues, the issue resolves itself. Whole damaged tiles are cut into the required segments; a tile cutter is used for these purposes; if the chosen tool is a hammer, then it is used after wrapping the samples in a rag, preventing the fragments from scattering to the sides.
Do not overdo it with the power of blows, so as not to end up with crumbs. It is better to start selecting material in advance, gradually collecting it in sufficient quantities. Single-color combat is good on garden paths.
Grouting joints
Mosaic tiles laid in a bathtub can significantly transform the interior. However, in order for its appearance to be complete, the seams need to be sanded. This is done as follows:
- The grout mixture must be diluted with water in the proportions specified in the instructions.
- Experienced professionals use a protective spray to make it easier to remove excess mixture from the tiles.
- Grouting is done using a rubber spatula. A grout mixture is applied to it, which is evenly distributed over the entire surface of the mosaic, filling all the seams.
- After application, the mixture should be slightly moistened with a spray bottle.
After 20 minutes, the seams will begin to dry. At this time, use a hard sponge to remove any excess mixture that has fallen on the tiles. The seams will finally harden only after two days.
Mosaic for a kitchen apron: advantages and disadvantages
The advantages of finishing the work area with this material:
- Modern mosaic tiles on the kitchen backsplash provide a tidy, visually clean wall. The advantage of using contrasting compositions with small fragments is that the surface splashed as a result of cooking is not “conspicuous” (in comparison with large light patterns).
- Environmentally friendly material, free of components harmful to humans.
- The wall has good heat and wear resistance. The material is not afraid not only of high temperatures and open fire, but also of aggressive detergents.
- The ability to create an original, non-trivial style. The variety of shapes, colors, textures, grouting materials - all this opens up great possibilities. First of all, they concern the riot of imagination and the implementation of the most original design solutions.
- Versatility and the ability to combine with most existing interior styles.
Healthy! Mosaic produces the expected effect when used in large spaces and rooms. In a small kitchen, a rectangular ornament will most likely turn out sketchy.
Disadvantages of mosaics in the kitchen:
- The main disadvantages of the material are related to the complexity of installation. Laying a mosaic with your own hands without experience is problematic. Installation of small fragments is one of the most complex and time-consuming finishing options. The following follows from this nuance: paying for the services of a master will become an expensive pleasure.
- The second drawback that you will encounter already at the stage of choosing a material is the high price of the mosaic.
- The disadvantage that will appear during the execution of the work is the need to verify the design technique with the actual masonry. The specificity of the mosaic is that it is laid in combination with several shades. As a result, the stylistic design of the work surface can turn out to be catchy and colorful. This effect can only be avoided by using a standard technique: creating a space with a maximum of three primary colors. The rest (if present) play an accentuating, secondary role.
- The surface with many seams makes an impressive impression. But they need to be covered with a special grout, which is very difficult to work with without practice. Therefore, you will again have to pay for the work of the master.
- Savings using cheap grouting compounds will be reflected in functionality - after 1-2 years, the seams will fade. Price 1 kg. high-quality material is around 1,000 rubles. How much is needed depends on the volume of the surface being treated.
Mosaic care
Regardless of the type of tile, care is carried out according to the same principles:
- Periodically it is necessary to treat the seams with antifungal drugs to prevent the formation of mold. This is especially true in the bathroom, as it is in a state of high humidity.
- It is strictly forbidden to use abrasive products for cleaning, as they can remove the beautiful gloss from the mosaic. It is necessary to use substances exclusively with a gel texture.
- Dirt must be removed with a soft sponge.
- It is not recommended to rub the tiles with products that contain wax, oils, or phosphoric acid.
It is also recommended to wipe the tiles with a dry sponge after each wash to remove excess moisture.
How to choose the right mosaic for the bathroom
The material is selected according to the following criteria: type of wood, purpose, resistance to chemical influences.
Variety
In accordance with international standards, mosaic is divided into three grades, designated by colors:
- red: 1st grade modules, the most durable;
- blue: 2nd grade, strength - medium;
- green: 3rd grade, least durable.
Complex drawing
Mosaics marked in red will last longer than others, while maintaining an attractive appearance.
Purpose
According to their purpose, mosaics are divided into floor and wall.
Main characteristics of floor tiles:
- significant thickness;
- high wear resistance;
- surface with anti-slip effect;
- There is an icon with a picture of a foot on the packaging.
Wall-mounted is a thin, slippery and less durable option. There is a palm icon on the packaging.
Chemical resistance
Based on this criterion, tiles are divided into 5 classes: AA, A, B, C, D. Modules of class “AA” are the most stable. They are purchased for rooms where cleaning is often carried out using detergents, for example, for the kitchen and toilet. On the packaging with such a mosaic there is an icon with the image of a flask.
Quantity
To determine the amount of mosaic, the area of the surface to be finished is calculated. Next, 15% of the reserve is added to this value.
Wall cladding with broken tiles
You can also use the method of folding mosaics on the wall and floor. Especially if you are tired of the usual look of ordinary things. Treat yourself and update your interior.
This is not all that can be made from broken glass and tiles. This is where your imagination comes into play. And if you don’t stop it, you will be surprised how many unique interior displays you can create with your own hands.
Tip: You don't have to limit yourself to just broken glass; you can also use a variety of decorative stones and shells. In general, everything that may suit you to create a composition.
Photo of mosaic in the kitchen
Sources
- https://m-strana.ru/design/mozaika-na-kukhonnom-fartuke-vybor-plitki-tsveta-i-uzora/
- https://stroitelstvo.expert/plitka-mozaika-dlya-kuxni-na-fartuk/
- https://dizajnintererov.com/mozaika-dlya-kuxonnogo-fartuka-plyusy-raznovidnosti-realnye-foto-primery.html
- https://keramikashop.ru/kuhonnij-fartuk-iz-mozaiki
- https://kyhni.guru/mozaika-na-kuxne/
- https://zen.yandex.ru/media/dizajnhome/mozaika-dlia-kuhni-stilnye-idei-preimuscestva-ispolzovaniia-i-varianty-otdelki-95-foto-5bf7d296b602cf00aa6a0c7e
- https://design-homes.ru/komnaty/kukhnya-i-stolovaya/kukhonnyj-fartuk-iz-mozaiki-foto-dizajn-obzor-materialov
How do you like the article?
No. 4. Types of mosaics by material of manufacture
Ceramic mosaic
Ceramic mosaic is the most popular and most versatile option. This is actually the same ceramic tile we are used to, only smaller in size, so all the operational features of such a mosaic will be identical to tiles. The surface of the material can be glazed (the simplest option), rough, have inclusions of other colors, stains, small cracks (craquelures), etc.
The main advantages of ceramic mosaic include:
- a chic variety of colors and textures, so turning any design idea into reality is not a problem;
- resistance to moisture, temperature changes, detergents, wear, ease of maintenance;
- high strength, fire resistance and durability.
Ceramic mosaics go well with tiles and can be used together with them to focus attention on specific areas. The shape of the individual elements can be any, but square tiles are predominantly found.
Glass mosaic
Glass mosaic is not far behind in popularity. It appeared earlier than other types and is considered one of the most ancient finishing methods . Once upon a time, only the most influential and wealthy people could afford such decor. Today, although such finishing is not considered the cheapest, it is still much more accessible.
Glass mosaic is identical in composition to ordinary glass, but is many times stronger. The material is made from quartz sand, feldspar and metal oxides, which are responsible for color. All components are fused at 14000C and above, and then stamped at high temperatures. Strength is achieved by firing glass melt poured into molds, as well as by the small size of the elements.
Main advantages:
- excellent appearance and a wide variety of shapes and colors. Elements can be transparent, matte, translucent, glossy , and beautiful colors are achieved by adding natural dyes. In addition to standard square ones, you can find elements of round, diamond-shaped and other shapes;
- hygiene and inertness to bacteria and microorganisms - mold will definitely not appear on this material;
- resistance to temperature changes and high humidity, so glass mosaic is suitable for the bathroom and kitchen;
- easy to maintain, but you should not rub the material with detergents containing abrasive particles - scratches may appear;
- high strength. Despite the fact that glass mosaics are somewhat inferior to ceramic ones in this regard, they can still be used for floor finishing. True, in this case it is better to take a material with maximum slip resistance ; an additional anti-slip effect will be created by rough grout seams;
- heat resistance;
- frost resistance, so the material is suitable for lining outdoor pools;
- Among all types of mosaics, glass is the cheapest.
To install transparent and translucent mosaics, it is better to use only white glue. The material can be used in bathrooms and kitchens, to decorate swimming pools, fountains, fireplaces, as well as to decorate walls, floors and ceilings in residential areas.
Smalt mosaic
Smalt mosaic is obtained by pressing and sintering colored glass particles with the addition of dyes. The result is a densely colored opaque material with unique properties :
- increased strength, frost resistance and abrasion resistance compared to conventional glass mosaic. The material can be safely used for finishing areas with maximum load;
- resistance to moisture, high and low temperatures, aggressive substances;
- unique appearance. Despite the fact that the elements of such a mosaic are opaque, they seem to emit light from within. Manufacturers have learned to make smalt in ten thousand different shades, but individual elements always differ slightly in tone, which allows you to achieve amazing decorative effects when designing large mosaic panels. Elements are available in different shapes.
The main disadvantage is the high price. Since the technology for producing smalt is more complex than that of conventional glass mosaic, the final cost is higher.
By the way, it is smalt mosaics that are used by professional mosaicists to create decorative panels. A single sheet of smalt is divided into elements of the required shape and size using a smalt splitter. This process is dangerous and should therefore only be performed by professionals.
Stone mosaic
Stone mosaic is obtained from different rocks, usually jasper, slate, tuff, marble, granite, travertine, malachite, lapis lazuli, tuff, amethyst and others are used. Natural material is processed and eventually mosaic elements of various shapes are obtained. Tiles can be sanded, polished, or artificially aged . The natural shades of the stone are unique, which is why the finishing is unique.
Stone mosaics replicate all the properties of natural materials: they are resistant to moisture, fire and temperature changes, strong and durable. The material can be used for cladding floors and walls, fireplaces, facades, as well as for arranging garden paths, decorating countertops, and for accenting various decorative elements (mirrors, bar counters, window sills).
Marble mosaics are held in special esteem , but they are also very expensive. A mosaic made of pebbles shows itself quite well , and pebbles can be collected completely free of charge on the river bank and used to cover individual elements in the bathroom or kitchen.
Metal mosaic
Let us note right away that this is an option for everyone. Metal mosaic appeared relatively recently and is made mainly from steel and brass . Metal elements are attached to a base made of rubber or rubber, thanks to which the necessary flexibility is maintained. The shape of the elements can be absolutely any: from triangles and hexagons to irregular geometric shapes. The surface can be polished or matte, or have notches. This type of finish is used in interiors in high-tech and loft styles.
The material requires special care , as it is afraid of some chemicals and will not withstand the effects of abrasive particles, so using metal mosaic for a backsplash in the kitchen is not recommended. However, some manufacturers produce special collections of stainless steel mosaics for use in bathrooms .
A special chic is mosaic made of precious metals . If we are talking about gold, then a thin 585-karat foil is placed between two layers of transparent glass. Naturally, such finishing is very expensive and is considered exclusive.
Wooden mosaic
Another novelty in the modern finishing materials market. Mosaic elements are made from valuable wood; they can have any shape, and the decorative effect is achieved through a combination of tiles of different shades and textures. This material, like all wood, is afraid of moisture, fire, pests and requires specific care.
No. 6. What else to consider when choosing a mosaic?
When choosing mosaics for bathrooms, kitchens and other rooms, also pay attention to the following factors:
- grade . The mosaic of the first grade will be more durable and durable; it is indicated in red in international markings. The second grade is indicated in blue; it is cheaper, but in terms of strength it is quite good. The third grade is marked in green;
- for the floor it is necessary to take a more wear-resistant mosaic , which is indicated in the marking by the pattern of the foot. Also, the material must be durable and non-slip;
- resistance to aggressive environments is marked on the packaging with a bulb design;
- the amount of material is calculated based on the surface area that needs to be decorated. It is better to take material with a margin of 10-15%;
- The color is selected based on your own preferences and features of the interior design.
Laying mosaic flooring in the bathroom
Any mosaic covering can be laid out independently. In order for it to look properly and last as long as possible, you need to adhere to some rules and listen to the recommendations shared by experienced craftsmen.
- The base for laying the mosaic must be perfectly level.
- If the mosaic is formed from individual fragments, for example, cut or broken tiles, or natural stone, then they should all have the same thickness.
- When laying an artistic panel on the floor surface, you first need to apply a schematic drawing, which is gradually filled with mosaic elements.
- Tile adhesive, as well as grout, must be prepared for work strictly according to the instructions provided by the manufacturer. Any amateur activity in these matters is not welcome. And for the process of hardening and strength gain, optimal conditions must be created, without any simplifications.
- You should not ignore the step-by-step technological instructions for laying out the mosaic covering.
Preparatory processes
Any floor covering begins with preliminary work, which consists of selecting tools and preparing the surface for finishing.
The usual set of tools for a tiler
The list of tools that will be required to prepare the surface and lay the decorative mosaic covering includes:
- Electric drill and mixer attachment.
- Spatulas - with a smooth and serrated blade.
- Needle roller.
- Trowel.
- Rubber hammer.
- Building level.
- Scissors.
- Yardstick.
- Containers for mixing solutions.
- Microfiber cloths.
Surface preparation is, in principle, the same for any type of mosaic tile. The process, it must be said, is not so fast (if the “start” is taken from a completely unprepared, uneven foundation), but it must be completed in full.
| Illustration | Brief description of the operations performed |
| The surface cleared of old coating is inspected for damage. During operation, as well as during dismantling of used cladding, cracks, chips, and areas of instability could appear in the concrete surface (subject to unconditional removal). All major defects must be repaired. | |
| To do this, the identified cracks must be widened, then primed and filled with concrete mortar, polymer or epoxy repair compounds (they harden faster). The repair material must be leveled flush with the floor surface. The same applies to large potholes. | |
| Next, the floors in the bathroom, as well as the walls around the entire perimeter of the room to a height of 100÷150 mm, must be primed with a deep penetration solution. If the work will be carried out on a smooth reinforced concrete floor slab that does not absorb water, then it is better to use “Concrete Contact” type soil. | |
| Additionally, it is recommended to first insulate the joints of the vertical surfaces of the walls and floor by applying one of the waterproofing materials to this area (for example, by gluing a special tape), and then its entire surface. This layer will not allow water to leak to lower neighbors in the event of an emergency. More detailed information about this process, as well as the materials that are used for this purpose, is given in the article “Waterproofing bathroom floors” . | |
| After the waterproofing layer has dried, a damper tape is glued to the walls, designed to compensate for the thermal expansion of the next preparatory layer. | |
| A self-leveling floor solution is poured onto the prepared surface in portions, which is distributed over the base, first with a wide spatula, and then with a needle roller on a long handle. The leveled surface must be thoroughly dried. The result should be a perfectly flat, horizontally aligned base for subsequent finishing. You can read about self-leveling compounds and the technology of their use in a special publication on our portal “Unis self-leveling floors” . |
Laying flexible mosaic tiles
Installation of flexible mosaic tiles on a mesh base can be divided into three stages, which can be carried out even by a beginner in finishing matters. This is applying glue, laying cut tiles and filling the seams with grout.
Even without experience in tiling work, with diligence, it is quite possible to cope with laying mosaic tiles.
The table below describes the workflow in more detail:
| Illustration | Brief description of the operations performed |
| The first step when tiling floors with mosaic tiles, after cutting and adjusting the material, is to mix the adhesive solution. Cement-based adhesive is quite simple to make and easy to work with, as it has a relatively long pot life after mixing. The solution is prepared strictly in the proportions specified by the manufacturer. In this case, the dry mixture is poured into water, and not vice versa. To obtain a homogeneous mass, mixing should not be done manually, but using an electric drill with a mixer attachment. | |
| Two-component epoxy-based adhesive is diluted differently. You don’t need water to mix it, but in order for the solution to be of high quality, it is necessary to strictly observe the proportions of the two components that react with each other. Due to the fact that this material has a very short shelf life after manufacturing (the manufacturer must indicate it on the packaging), mixing must be done in small portions in order to have time to process it within the specified period. The reagent is poured into the main adhesive mass and mixed with a mixer until the mixture is homogeneous. | |
| Apply the adhesive to the floor surface using a spatula with a straight blade, and then spread it with a serrated tool. The thickness of the adhesive layer should not exceed 5 mm, otherwise it will be difficult to level the surface of the tile. The adhesive should be applied only to one row of tiles being laid, otherwise it will lose its adhesive properties and the cladding will not stick well. | |
| Next, the tile is laid on the glue (a cut fragment of the mosaic is dense), leveled, and pressed well to the surface. The next tile is aligned with the first, and a joint must be created between them, equal in size to the gaps between the fragments inside the tile. It is important to combine well the horizontal gaps, which should ultimately form a single line. Otherwise, the mosaic will look ugly. | |
| The laid tiles must be additionally pressed using a trowel. When carrying out this process, special attention must be paid to the joints between the individual sheets of such flexible cladding. | |
| The leveling process should be constantly monitored using a building level, placing it on nearby glued phrases. | |
| In some cases, it is necessary to use a rubber hammer (mallet) to level the coating. They are used to gently tap the mosaic areas protruding from the overall area. | |
| Stone mosaic tiles have a fairly large thickness, sometimes reaching up to 10÷12 mm. Therefore, when laying it, the gaps between the fragments may become deformed. To solve this problem, special plastic spacer wedges are installed in the “stubborn” seams, which are removed only after the glue has hardened. | |
| When the surface is completely covered, it is left until the glue dries completely. Only after this can you proceed to the final stage of work. | |
| The next step is grouting the seams of the mosaic surface. If the floors are tiled with ceramic or glass mosaic tiles, the joints are usually filled using an elastic rubber spatula, onto which the grout mixture is collected. To fill the joints of natural stone tiles, which are thicker, the grout is made more liquid. It is poured onto the surface of the cladding, then spread with the same elastic spatula or just a trowel so that the gaps between the tile fragments, as well as the seams between them, are filled with a fugue. As a rule, the solution shrinks slightly when it dries. | |
| After the grout in the joints has set (usually 25-30 minutes is enough for this process), the cladding surface must be immediately cleaned of any mortar that has fallen on it without delay. This work must be done very carefully, since the aesthetic appearance of the coating depends on the quality of its execution. A damp microfiber cloth is good for cleaning, since, unlike a sponge, it will not lubricate the solution in the seams. In addition, the napkin covers a larger surface area at once, so cleaning it will be much faster. The grout dries quite quickly, but it is not recommended to use the lined surface before the period specified by the manufacturer. |
Natural stone mosaic floor
A more complex process is to cover the entire bathroom floor or just the surface of the shower stall with pebbles. But the result is an original, foot-massaging coating that, with high-quality installation, will last for decades.
Prices for flexible mosaic tiles
flexible mosaic tiles
A neat mosaic lining of the floor made of smooth pebbles looks impressive and has a good massaging healing effect on bare feet.
Mosaics made from natural pebbles can be laid out from individual stones or from specially prepared tiles consisting of a mesh, which is their base, and polished stone fragments glued to it. Naturally, laying the coating in such sheets is much easier and faster than selecting each stone separately. But sometimes the last option is the only possible one. For example, if you plan to fill a stone mosaic with a transparent epoxy mortar, giving the coating a 3D effect. Or when you conceive your own composition, which cannot be found in finished form.
| Illustration | Brief description of the operation performed |
| So, the first stage, as in the previous version of the masonry, is to apply an adhesive mass to the prepared surface, which is distributed over the base using a notched trowel. If cement-based adhesive is used for installation, it is applied under a whole row of tiles. If an epoxy composition is used, it is necessary to focus on its hardening time specified by the manufacturer. The thickness of the adhesive layer should not exceed 5 mm. | |
| A stone mosaic on a grid is laid on a distributed layer of glue. This grid usually allows some stones to be moved to the desired position if necessary. One of the tiles should be disassembled in advance into separate stones, which can be used to fill the remaining free space along the walls, as well as between two adjacent fragments. | |
| The laid tile must be pressed against the adhesive layer using a trowel so that the mesh goes deeper into the solution. The process must be controlled at the construction level. | |
| It is more difficult to place individual stones into a single composition, since they can go deeper into the glue to different depths, and this moment must be constantly kept under control. But if this particular installation option is chosen, then the glue is applied to the surface in a thicker layer so that the stones being laid can be slightly pressed into it. A thickness of 6÷7 mm will be sufficient. | |
| Having laid an area approximately 300×300 mm in size, the stones additionally need to be pressed with a trowel so that they are in the same plane. In the same way, the entire surface of the floor or shower tray is filled. | |
| After the tile adhesive has set, the gaps between the stones must be filled with epoxy grout. Since this material sets and dries quickly, the surface of the stones must be immediately cleaned of any solution that has fallen on them. | |
| In addition to the usual two-component grout, to fill the space between the stones, you can also use a transparent epoxy mixture, which is used to create 3D self-leveling floors. This option for arranging the surface will not be cheap, but it will significantly enliven the design of the room and will last for many years, as it is resistant to mechanical stress. In addition, it will perfectly cope with the function of a waterproofing layer, which, one way or another, is necessary for the bathroom. | |
| If you use tiles on a grid with colored stones to decorate the floor, which are subsequently filled with a transparent epoxy compound, you can get an aesthetically pleasing exclusive coating. |
* * * * * * *
Having studied the installation technique of different options for mosaic tiles, you can see that this process is not as complicated as it might initially seem. Therefore, it is quite possible to cover the floor with mosaics on your own, while saving quite a decent amount, which would go out of the family budget to pay for the work of an invited master.
At the end of the publication, watch the video, which demonstrates the process of laying a mosaic floor from start to finish with all the details.
Review of popular mosaic installation options
There are several ways to lay mosaic tiles. Some are more traditional, while others are used on rare occasions. Let us consider the installation options for this facing material in more detail.
Basic (mesh). This method is popular because it is the simplest. In this case, the mosaic wall tiles are laid parallel to the plane of the wall itself. It is also worth noting that the seams between the individual elements with this installation take on the shape of a mesh. This installation method allows you to use not only classic tiles.
The basic method of laying mosaics in the bathroom is the simplest and most common.
Helpful information! For laying with mesh, it is best to choose cladding of one shade. The use of multi-colored elements is not recommended, as they distract attention from the seams.
Basic (angular). This method is also common and involves laying individual mosaic elements in a diamond pattern. They are glued to the wall at a certain angle, which is 45°. This arrangement of the mosaic allows you to visually align the walls if they are curved.
The basic (corner) method involves laying individual mosaic elements in diamond shapes
It is also worth noting that corner laying contributes to the visual expansion of the room. However, there are some disadvantages to this installation. The main one is the need to cut the material to fit it. Designers recommend using one or two shades when covering walls in this way. There are other bathroom renovation ideas, but in any case you cannot combine more than three colors.
Chess. Laying mosaics in this way is similar to the first option (basic). The difference in this case lies in the location of the seams and the colors of the individual facing elements. With this installation, two mosaic colors are used, which must be contrasting with each other. And the seams are arranged sequentially, without displacement. The checkerboard version is often used for laying relief tiles that have notches. Alternating horizontal and vertical stripes create a stylish and interesting finish.
The linear method of laying tiles involves installation in rows that differ in texture and shade from the main background
Linear. The technology for such installation is carried out in the same way as in the first case. It differs from the basic method only in that it involves the installation of rows that differ in texture and shade from the main background. This installation is most often used to decorate bathrooms in a modern style (for example, high-tech).
Take a running start. Used when laying mosaic tiles on the floor or wall. It is another variation of the traditional basic style. In this case, the mosaic is laid with a mixture of exactly half of one facing element. The effect that is achieved when installed staggered gives the cladding the appearance of a brick wall.
The method of laying mosaics in a staggered manner gives the cladding the appearance of brickwork
In some cases, other technologies are also used for laying mosaics: modular, parquet, relief, etc. However, the most common options for laying such tiles today are listed above. You can buy mosaics for the bathroom in a specialized store, a construction hypermarket, or order online.
Colors and shades of mosaic apron elements
The variety of colors and shades of the elements from which the mosaic is laid out is very large. You can find several dozen shades of the same color, different in saturation and tone.
Monochrome, that is, one-color mosaics assembled from tiles of the same color, of varying degrees of saturation, are used in the form of “stretch marks” - stripes of the same color, gradually changing intensity. More often they lay out multicolor mosaics, the creation of which uses tiles of different colors, shades, and sometimes even textures and sizes.
Quite often you can find on sale ready-made sets of elements applied to a substrate and forming various patterns; this is a fairly budget option. It will be more expensive to assemble a custom mosaic panel according to your wishes or a designer’s sketch.
Important: The cost of a mosaic can be calculated per square meter, but it can also be indicated for one individual fragment, for example, for one matrix (usually 30x30 cm in size) or one “stretch” strip (usually 260x32 cm in size).