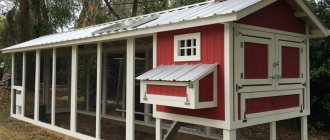
Household project - visualization
Both designers and independent developers often provide one or another type of concrete stones as a building material for outbuildings. They are supported by sufficient strength, low price, and the fact that thanks to the enlarged format, you can quickly and without special mason skills build walls with your own hands.
In particular, we will look at how to build a utility block from foam blocks. Although, the information we provide may be useful in other cases.
Why foam block
Of course, there is a huge temptation to simply ignore this point, because we just have a barn, and in fact we should not be interested in what we will build it from.
However, this is a room in which you can arrange a warehouse for certain food products, tools, and equipment. That is, we can still make certain demands on the internal atmosphere.
So, building a shed from foam blocks allows us to talk about the following features of the material:
Thermal insulation, how important it is for a shed, depends on its purpose.
Easy to use. We will consider this point especially carefully below.
Relatively low cost.. Foam blocks for construction
Foam blocks for construction
Where to begin
Of course, we are not talking about any project here, but we still need to do some sketches and calculations.
Our building will not stand on the ground; we need a simple foundation - pour it, calculate the amount of material. Decide on the construction site.
It’s quite easy to calculate the material, for this:
- Selecting foam block parameters. Let the standard size be 200x300x600 mm.
- We calculate the perimeter of the barn. For us it is 4x3, that is, 14 meters.
- The wall area will be, at a height of 2.5 meters, 35 square meters.
- The standard amount of material per square is approximately 5.6 blocks, which means we need 196 blocks.
- Next, we subtract the area of the door and window, if there is one, and we get a completely accurate version of the number of foam block products.
Preparing the foundation
Next, we will calculate the amount of glue based on the fact that given our dimensions we will need approximately 5 kg of glue per 1 square meter, and that is 175 kg or 8.75, rounded to 9, bags.
From the point of view of masonry, we are almost ready, but we will still need reinforcement for laying into the walls and a set of simple tools:
- Roulette and corner.
- A pair of trowels and a hammer.
- Twine for guides and a weight for a vertical plumb line.
- Wood saw.
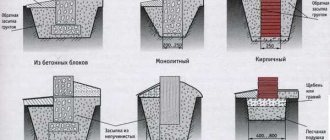
Foundation
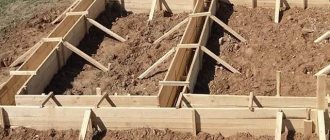
There is absolutely no point in making a powerful foundation - we’ll just fill in a simple strip foundation (see also the article Foundation foam blocks 300 by 600 by 600).
For this:
- We dig trenches 30 cm wide and 30-40 cm deep.
- According to technology, we pour sand to the bottom and tamp it tightly.
- We install reinforcement, it can be metal with a cross-section of 8 mm.
- We install the formwork, 15-20 centimeters above the ground level, the shed made of foam blocks with your own hands should rise slightly above the soil, since foam concrete easily absorbs moisture.
We also mix concrete in standard proportions, one portion of cement to four portions of sand and gravel. In total, we will get 1.8 cubic meters of concrete, and we can pour this ourselves. That is, there is no question of a mixer.
Ready foundation
A small volume will allow us to fill everything in one go, therefore, this will only add strength to the entire base.
In a few days we will remove the formwork and carry out waterproofing. This is a mandatory condition; foam blocks should not constantly gain moisture from the foundation. For waterproofing, we use a simple mastic, with which we prime the base in several layers and cover the top with roofing felt.
Masonry
Principle of masonry
The principle of laying a foam block structure is not much different from a brick one, however, of course, there are some differences:
- Seam size. This is the first thing that immediately catches your eye. Such a small thickness of the seam is achieved because we have glue, and it allows us to make masonry with a joint of 3 mm.
- The rows, as in the masonry of a house, are necessarily connected with metal mortgages. In any case, the barn must have strong walls.
- We work with the level and along the guides, trying not to deviate.
The simplicity of masonry and convenient material parameters allow even one person to build a shed within one day, at least the walls can definitely be erected.
The question of how to build a shed from cinder blocks can practically be closed: however, we have at least a few more things to do.
First, constructing a lintel over the doorway. This can be done in several ways, but if we still have concrete, we can simply pour it with reinforcement. There is no concrete left, you can put a lintel in the form of two steel corners or buy a cast concrete column.
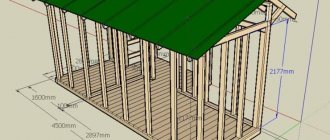
Example of a pitched roof
The roof remains. But here we will do everything very simply:
- We waterproof the top row of masonry and install a block on it, possibly with a cross-section of 100 mm.
- We make the second parallel wall one row higher and also lay the throw.
- Now we make the sheathing, installing a beam with a cross-section of 50 mm perpendicularly, in increments of a meter.
- Cover everything with plain plywood.
- Cover the plywood with roofing felt.
- We install slate sheets as the simplest, inexpensive option, and the price will be minimal.
Conclusion
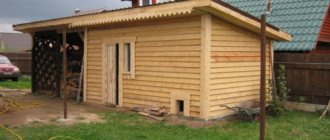
Almost finished building
There is absolutely nothing complicated in the construction of a non-residential structure, as we have seen. The recommendations are simple, the advice is rational, and all the work will take at most a few days (also find out how to build a garage from cinder blocks yourself).
If you are interested in this and are ready to get started, then in the video presented in this article you will find additional information on this topic.
Rules for choosing a place
The choice of location for a utility facility is regulated by a document such as SNiP 30-02-97. In this case, you should definitely take into account its purpose and the placement of neighboring buildings.
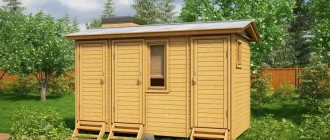
In order to save space, combine all the utility rooms under one roof, forming something like a multifunctional block. Externally, it will look like an ordinary house, differing from a residential one in the degree of insulation and size.
A utility block with a toilet and shower, and even without these amenities, will never be out of place in your country house.
Therefore, take its construction as seriously as possible, because it is desirable that it serves faithfully for many years and is not just a functional object, but a decoration of the site.
Flaws
Disadvantages of houses made of expanded clay concrete:
- Low building height. This is due to the lack of strength of the elements, which is only enough to build a maximum of a three-story house. In this case, the thickness of the walls must be at least 40 cm.
- Need for finishing. It is impossible to leave a house without external cladding for longer than 2 years.
- Unattractive appearance. Unfinished houses look gray and unkempt.
- The need to insulate the wall if its thickness is less than 40 cm. Although this factor is largely determined by the regional climate.
- High moisture absorption rate. The material is porous, so it quickly absorbs water. If it does not have time to weather and freezes, this will lead to gradual destruction of the structure.
- Difficulty of processing. Cutting expanded clay concrete blocks requires special equipment. Considering that the material is fragile, this process is fraught with a number of difficulties.
What's inside?
Pleasant appearance, of course, wonderful
But no less important is what the shed looks like from the inside! After all, we see it more than once a day, so it is very desirable that it be as good inside as it is outside. A window, even a small one, will create the feeling of a living room, and not a warehouse for shovels and rakes. Can you imagine how pleasant it will be to sit by the window, writing down the date of planting seedlings or calculating the deadline for the next feeding of tomatoes?
A garden shed with a window will be more comfortable
For the arrangement, improvised materials will do: several boards and drawers will provide us with a work desk.
Desk made of boards and drawers
You can continue to sort through successful design options for garden sheds ad infinitum) Perhaps it’s time to return to reality.
Svetlana, Krasnodar region, 7dach.ru
Foundation arrangement
The type of base is selected taking into account the characteristics of the soil. On sandy or marshy soil, it is recommended to install a slab foundation. Columnar - acceptable on soil with a high gravel content. The universal option is tape, it is used most often.
The strip base must be deepened below the freezing point of the soil. In different climatic zones, it can reach from 30 to 100 cm. Under the cement foundation, you need to equip a cushion of compacted sand with a layer of 10 cm, and fill it with the same amount of crushed stone.
When installing the formwork, it is important to take into account that the base should rise above the ground level by about 40 cm. In order for the foundation to be strong, you need to build a reinforcing frame from metal rods and install it inside the formwork.
It is recommended to fill the trench with concrete at a time, in dry, warm weather. It may take from several days to 2-3 weeks for the composition to reach brand strength, depending on air temperature and humidity.
Original ideas for improving cabins
Just building a shed is not enough. Turning your new premises into a dumping ground for dirty equipment is not the best solution. Ergonomic arrangement of the utility room will help you quickly find the necessary things and save your equipment from possible damage.
- Storage of long equipment. It is recommended to divide garden tools into groups according to shape and purpose and arrange separate storage for each group. You can also make individual clamps for each tool. A piece of plastic pipe makes an ideal holder for rakes, forks and shovels.
For lazy gardeners, there is a solution that does not require any expenses. An upside-down wooden pallet nailed to the wall with a couple of nails makes a great organizer for long tools.
- Ideas for storing small equipment and supplies. For small-sized tools, hanging or rack storage systems are usually installed, allowing the equipment to be distributed according to its intended purpose. Plastic containers fixed to the ceiling will free up useful space for a pump, walk-behind tractor and other consumables.
- Storage of various small items. For housekeepers who always have everything at hand, there is a great idea for storing screws, nails, nuts and other small items that are sometimes so difficult to find. A screw cap from a transparent plastic container is attached with a self-tapping screw to a horizontal beam - and the system is ready for use.
How to make a project?
To prepare a project for a future sauna, you can contact a special company, where they will develop a plan for the owner. You can also search for ready-made projects on the Internet or purchase from friends. What to consider when drawing up such a plan:
- The area of the plot, its boundaries, allocated for the construction of the sauna.
- Condition of the soil in the selected location.
- Necessary communications that will be connected to the sauna.
- How will communications be entered into the bathhouse?
- Dimensions of the building itself.
- Interior layout.
It is favorable to place a green area around the steam room: trees, bushes
To prevent the foundation from subsiding later, it is important to know the condition of the soil. To do this, samples are taken and examined.
The type and depth of the foundation, as well as the arrangement of pits for drainage and sewerage, depend on the condition of the soil. Electricity and water will be supplied to the building; all this is provided for in the project.
It is important to immediately think about the number of rooms and their sizes - this will determine how much cinder block stone is needed for internal walls and partitions. Premises that are most often located in a bathhouse: steam room, locker room, waiting room, shower room, cooling area, relaxation room, toilet
Finishing and landscaping of the barn after completion of the construction process
When the most difficult part of building the barn is already behind you, you can begin finishing and insulating the walls, as well as the general improvement of the barn. First of all, it is advisable to place a table inside the room; it will be useful not only in the future, when the barn is completely ready, but will also become your assistant and a useful addition in the process of interior decoration.
All utility structures and shelving inside the barn can be built from any available materials suitable for these purposes. The walls in sheds are usually not insulated, since this is a non-residential space and there is no special need to retain heat inside it.
Materials and necessary tools
To build a gazebo from foam concrete blocks you will need a set of tools, as well as consumables:
- glue;
- cement-sand mortar;
- foam blocks.
The amount of material should be calculated before the start of work and purchased with a small reserve, so that in case of overconsumption, damage or loss, work does not have to be stopped.
Basic tools that will be needed when building foam concrete walls:
- Hand saw for foam blocks. To build one gazebo, it is quite enough, however, for large volumes of work, it is better to purchase a band saw;
- “Angle” device – required when sawing blocks manually, increases cutting accuracy;
- Drill and special attachments for it;
- Wall chaser or electric cutter - necessary when creating grooves for laying fittings or electrical cables;
- A special blade mixer or drill with a stirrer attachment is necessary to create an adhesive solution;
- Notched spatulas, trowels, and trowels are used for laying the mortar;
- A rubber hammer is necessary for casing and adjusting foam blocks when laying them;
- A special sanding board used to smooth out walls and eliminate irregularities and protrusions on them.
DIY gable roof installation
The shed was made of foam blocks. The roof is erected after the cement adhesive mortar has hardened in the following sequence:
- On the top row of the foam block wall we place a waterproofing material - roofing felt, folded in 2 layers. We fasten the mauerlat on top - wooden blocks 50x150 mm.
- We assemble the rafters on the ground, having previously cut out a gap for fastening to the Mauerlat, then lift them and mount them with metal fasteners.
- We lay under-roof insulation on top of the rafter system - a hydrobarrier film membrane. The layers of waterproofing overlap one another by 7 cm and are fastened with a stapler.
- The counter-batten is mounted with self-tapping screws, then the sheathing, after which the roofing material can also be overlapped.
We are putting out the outer trusses. We level them, strengthen them with the help of temporary stops (a board that is nailed to the wall during the construction of the house), and attach them to the mauerlat. We stretch the twine between the gables, creating a direction for installing the next trusses.
After completing the main work, you can begin to insulate the outer walls of the constructed barn, carry out internal work, and equip the barn with drains.
Why foam block
Foam concrete as a building material
Foam concrete blocks are almost ideal building materials, this is especially true for those cases when a house is built independently, with your own hands. Foam concrete blocks are lightweight and easy to process; for example, they can be easily sawed with a regular hacksaw. Also, their installation does not require special skills, unlike laying bricks.
Foam concrete material is quite easily delivered to those settlements that are considered inaccessible. Comparing foam concrete and other similar building materials, one can highlight higher strength qualities, as well as a relatively low cost.
When comparing foam concrete and gas silicate blocks, attention is drawn to the fact that their environmental, fire-resistant, heat and sound insulation parameters are almost at the same level. But gas silicate blocks have a very porous structure, and therefore higher water absorption
Also, compared to foam concrete blocks, the frost resistance of gas silicate is low, so it is used most often for internal partitions
But gas silicate blocks have a very porous structure, and therefore higher water absorption. Also, compared to foam concrete blocks, the frost resistance of gas silicate is low, so it is most often used for internal partitions.
The properties of foam concrete and its brand are determined by the density of foam concrete. The best heat and sound insulation qualities are for the material whose density is lower, but with increasing density, its strength increases.
When choosing a brand of foam concrete, it is worth deciding what the purpose of the material is. For load-bearing walls, in the case of building a two-story house, it is worth choosing stronger ones, which are structural or thermal structural. Well, in the case when the question of how much it costs to build a bathhouse from foam blocks is being decided, then you can settle on heat-insulating blocks.
Preparatory work
Before constructing an object, its functional purpose is determined, for example:
- raising and keeping animals;
- storage of tools and equipment;
- use as a handicraft repair shop.
Shed designs with a combination of “compartments” for a garage, bathhouse, bathroom, and summer kitchen are popular.
Based on the purpose of the building, a drawing is made in which the locations of windows and doors are noted.
Based on this, a drawing of the room is drawn up, noting the dimensions of the building, the thickness of the load-bearing walls, the location of partitions, windows and doors. Standard for this type of structure:
- height - 200-240 cm;
- area - 6-9 sq. m.
Using the drawing, calculate the need for expanded clay concrete elements. Next, the project is tied to a specific territory. Outbuildings are located at a distance from the main premises or to the side of it. When planning to place a bathroom or outbuilding for animals in a barn, the structure should be built from the external boundaries of the house at a distance of up to 12 m, from the boundaries of the nearest plot - at least 4 m. If you plan to install a bathhouse or shower, the distance from the home is set at 8 m, to neighbors - more than 1 m.
How to make a block: step-by-step instructions
Material for the construction of walls made of foamed concrete is made in several ways:
- classic;
- dry;
- barotechnological.
On the finished machine
For home production of foam concrete mortar using a factory machine, you can purchase a ready-made mixture in dry form.
By following the instructions for making foam concrete mortar indicated on the original packaging, you can obtain material for casting high-quality blocks.
The special machine consists of:
- foam whipper,
- mixer
- drum for making solution.
The container is equipped with blades for mixing the mixture. The prepared dry mixture or the necessary components (cement, sand, water) are poured into a special compartment.
The solution is thoroughly mixed and foam is added to it, which, when mixed, should acquire a homogeneous cellular structure.
The finished mixture is poured into prepared container molds, the inner walls of which are lubricated with oil. Leave in the molds until the block dries and becomes a durable building material.
On homemade equipment
If you don’t have special equipment, you can make do with improvised means:
- In the absence of factory equipment for mixing the components for foam concrete blocks, you can prepare the mixture with a familiar concrete mixer on hand.
- To form foam, a foam generator is suitable, which is used in car washes. You can also make the device yourself.
- Sand, cement and water are thoroughly mixed in a concrete mixer (hardener can be added).
- The ingredients for making foam are sent to the foam generator. The formed foam is immediately sent into a concrete mixer to a solution of cement and sand.
- All components are mixed well, the finished solution is poured into ready-made molds.
- The dried blocks are removed from the molds onto prepared areas and kept in fresh air for another 10-15 hours for complete hardening.
To further reduce the cost of foam concrete blocks, you can also make molds yourself. To do this, you need to knock down reusable boxes of suitable volume from smooth plywood. You can also pour liquid foam concrete into large molds and then cut it into blocks of the desired size.
Methods for laying walls with expanded clay blocks
Laying walls from expanded clay concrete blocks can be done in several ways. Which one is applicable in a particular situation will depend on many factors.
Laying in the floor of the block
This method is ideal for raising the box of a building that is not used as a permanent residence, for example, a cottage, barn, garage. Concrete rows are reinforced with reinforcement with a diameter of 10 mm every 4 rows. An armored belt is required. Insulation is carried out at will with mineral wool. The blocks are laid on the bed in one row along all the walls with the usual dressing.
Block laying
The method under consideration involves laying walls equal to the length of the bricks with alternate insertion of bonded and spooned rows with ligation. It is possible to build up walls in this way both for residential buildings and for seasonal buildings. It is also necessary to provide reinforcement every 5 rows with reinforcement or mesh.
Well masonry 60 cm wide
This technology for laying expanded clay concrete blocks involves the simultaneous construction of external and partially internal walls, with the formation of voids between them, which are filled with insulation. Well masonry is a very heat-efficient way to build walls.
Another variation is laying two parallel walls in half a block with metal rods connecting them. Instead of expanded clay blocks, you can use brick to build external walls.