What is a hog tile?
Previously, “hog” tiles were used for façade cladding. The tiles were used to depict the Art Nouveau style that was popular two centuries ago. Nowadays, it is used to complement the interior and beautifully combine with other styles and as separate designs in the room.
They gave it an interesting name because during the production of the tiles, both sides were covered with gloss or glaze, and on the sides there were two through holes that looked like a nickel of a pig or wild boar.
This building was needed for ease of transportation. Afterwards, the builders used a pick to split the material, leaving two separate tiles that could be conveniently laid out.
Finishing options
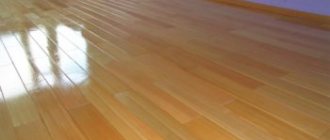
Speaking about ways to decorate a bathroom, it is worth noting that the choice here is limited. Usually they use either cladding made from natural wood species, or tiles with a ceramic base of proper quality.
Moreover, preference is given to materials that contain flowers, ornaments or “boars”. For the latter option, it is typical to create a multi-color combination with one dominant shade.
In addition, the presence of a hog in the bathroom interior usually requires compliance with traditional decorative rules. That is, there must be stucco molding, massive sconces, cornices, etc.
Note!
- Epoxy grout for tiles: pros and cons, scope, varieties, how to work with it (instructions + photos)
Do-it-yourself tile shower tray step by step: instructions, dimensions, design, installation of communications, types of structures, photos
- White tiles in the bathroom: 170 photos of the best ideas and new tile designs. Layout schemes and beautiful combinations
Color palette of tiles "hog"
The tiles have a wide range of colors, from warm shades to bright ones, we list the main ones:
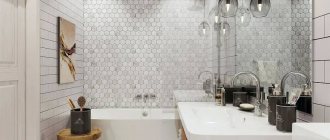
White
Pairs well with other colors such as blue, black, red and other interesting colors. The white shade itself is considered a universal color that can act as an independent color scheme in a room.
But for variety, black is added to highlight interior details or add originality. Black and white looks very impressive.
Red
This color is best used with a combination of other colors, as red can cause irritability and aggressiveness. The shade is rarely used as an independent color. Imagine that it completely covers your bathtub, and your eyes immediately begin to hurt. White is considered the best combination with red.
Green
Can be the main color. The shade evokes calm and tranquility. Green can be combined with white, or with shades of warm.
There is a wide variety of green color in the tiles. Both very bright and very warm colors.
Yellow
Rarely used as one color in a room. It is better to use in small quantities because the shade is very bright in color. But if you still like yellow, it is better to dilute it with white or green shades.
Black
The color is created for lovers of glamor and black. The shade is usually used in large rooms to emphasize the structure of the room. Black is combined with white, gray, and other neutral colors. For big fans, black can be used as the main color.
Examples in the interior of a bathroom
The photo below shows several ways to decorate the interior using a “hog”. Using them as a basis, you can develop your own original design.
Green tile boar.
Red tile boar.
Boar tiles on the walls in the bathroom - white background, black edging. Boar tiles in a neutral color with a pattern. Boar tiles in contrasting colors.
Original layout
In addition to the traditional brick installation, the following are used:
- Diagonal.
- Parquet.
- Chess. The modules are laid alternately vertically and horizontally.
- Vertical. This method visually increases the height of the room.
Boar tiles laid diagonally.
Mixing several shades
A rich color palette allows you to experiment with combinations of shades. You can lay out a pattern or make the wall colorful.
Space zoning
By using tiles of different colors, they visually delimit the space of the combined bathroom. You can also select zones within the bathroom.
Placement of accents
Modules of bright rich colors, well located among pastel ones, will draw attention to an important detail of the interior. The effect will be more complete if you add accent lighting.
Blue
Blue is mainly used to decorate the bathroom. It has a shade that is pleasing to the eyes. Causes a feeling of freshness and lightness. Blue is combined with white, gray, black. But it is often used as the main color.
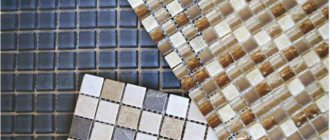
Tile texture
There are two textures of “hog” tiles, a small choice, it seems at first glance, but in fact, the choice is complex and varied:
- Glossy. Glossy tiles always look good in the bathroom. That's why they are often used in interiors.
- Matte. Matte tiles are rarely used, even in simple interiors. All because of the dissimilarity with other materials.
Standard laying algorithm
Installation of the cladding is carried out in the traditional way.
Tools needed:
- Toothed (comb) and rubber spatulas.
- Bubble level.
- Painting cord.
Materials:
- Tile adhesive.
- Grout.
- Plastic crosses.
Preparatory stage
To lay tiles you need a flat and solid base.
For this wall:
- They are freed from old finishing and peeling plaster, which makes a booming sound when tapped.
- Level with cement-sand mortar.
- Treat with a deep penetration primer. The composition increases adhesion and strengthens the surface layer of the base. In the bathroom it is recommended to use a primer with an antiseptic.
Due to its heavy weight, the “hog” is not placed on tiles or paint. But if removing the old finish is impossible, you should resort to surface reinforcement.
Procedure:
- Holes are drilled in the wall using a square nest method in increments of 20-25 cm.
- They hammer dowel nails into them.
- Attach wire to hardware.
In this case, the tiles are laid on quick-drying glue.
The process of laying boar tiles with glue.
Surface marking
Marking is done in this order:
- Using a spirit level, determine the highest angle of the floor.
- From it on the wall measure a distance equal to the thickness of the floor covering + the height of the tiles + the width of the seam.
- A strictly horizontal line is drawn through this point, controlling its position according to the spirit level.
- Using a plumb line, draw verticals in increments equal to the width of the modules.
For diagonal laying, markings are made at an angle.
Laying and grouting
The work is carried out in the following sequence:
- A temporary starting profile is screwed under the bottom horizontal line to keep the tile from sliding.
- Prepare the glue.
- Apply the mixture to a small area of the wall above the profile and level it with a notched trowel.
- Take the tile and apply glue to its back side. This is done due to the heavy weight of the material. Compact modules are covered with a thin layer, removing almost all the glue with a spatula. On large specimens, the composition is leveled with a comb.
- Glue the tile to the wall so that its bottom edge rests on the starting profile, and level it using a bubble level.
- Continue the bottom row, placing crosses between the modules. Using the rule, it is ensured that the front edges of all the “hogs” lie in the same plane.
- Every 2-3 rows make a pause so that the material does not slip under its own weight.
- Having completed the wall cladding, remove the starting profile and lay the bottom row.
https://youtube.com/watch?v=rmlkXc7BfKQ
After a day, the seams are cleaned of glue with a knife and filled with grout using a rubber spatula. In the bathroom, it is recommended to use an epoxy-based composition that is highly moisture resistant. Due to its high setting speed, it is washed off the tiles immediately; other types - after 15-30 minutes.
Hog tile size
The tiles vary in size:
- 10Х20
- 5Х15
- 10X10
- 10Х30
- 7Х15
- 90Х60
- 75Х150
- 60X30
- 10X10
- 200Х100
- 15Х40
Installation and installation
There are several classic types of tub layout: traditional, stacked, vertical, diagonal, herringbone, checkerboard. Most of these options are possible thanks to the rectangular shape of the tiles.
Combination of traditional and vertical layout Source keramoteka.ru Stackable option Source antica.su Diagonal laying Source antica.su
Advantages and disadvantages of hog tiles
Pros:
- Durability
- Great chemical exposure
- Moisture resistance
- Variety of tile sizes.
- The tiles are not harmful to health because there are no dangerous chemical compounds
- Variety of tile designs (texture and color palette)
Minuses:
- Fragility
- Gives off cold (the material is ceramic)
- Weight. (The tiles are heavy for future construction. The base must be carefully prepared)
- Difficult installation (many seams due to size)
Recommendations for selection
There are a huge number of colors and sizes of boar tiles. Therefore, in order not to get confused, you can follow the following recommendations:
- If the bathroom is small, then choose smaller tiles. This way you can create the illusion of expanding space;
Small format in small spaces Source panceramic.ru
- The tiles can be laid not only horizontally, but also vertically and even in a herringbone pattern. There are no restrictions or rules here. The same goes for combining tiles of several colors. Some designers suggest laying out designs or patterns with tiles of different colors. The rule works here: the smaller the room, the smaller the drawing should be;
Herringbone layout option using several colors Source antica.su
See also: Catalog of companies that specialize in finishing materials and related work
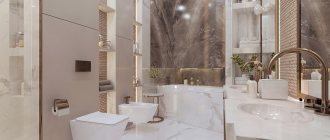
- If you can’t decide on a choice, then work with large white tiles. In this case, a white “hog” in the bathroom will not look faded or out of date. Moreover, white color is an integral part of the Scandinavian and loft style;
Minimalism in design with large white tiles Source sanberg.ru
- In spacious rooms, you can use black or colored accents. They create depth and richness that enclosed bathrooms lack. So, emerald or blue are great. But with the color red it is better to be on your guard - this is the color of aggression and activity. He does not always come to the bathroom, where a person is used to relaxing.
Black “hog” Source rusplitka.ru
Bathroom interior
Loft. Bricks are used in the loft interior. The “hog” tile can replace real bricks and will not differ in any way.
The style emphasizes rough shapes. It includes warm colors like brown. Wood is used to highlight accents in the bathroom.
Art Deco
This design is for those who love luxury. A style appeared from Western Europe and America. Art Deco is still gaining popularity among people and designers. The interior looks luxurious and is always suitable for a bathroom.
Minimalism
This style requires white hog tile. This interior is famous for the fact that it includes a minimum of accessories, objects and furniture. There is an alternative to minimalism, but it’s quite cheap, but if we talk about minimalism as a style, it turns out to be quite expensive.
Modern style
The style is reminiscent of minimalism, but you can add more than a minimum number of things to the room. The interior features light colors and simple bathroom furnishings.
The design of a room can use wood to highlight details and accents in the room.
What is this finishing material?
The hog tile for the bathroom got its unusual name due to the manufacturing features. At the beginning of the 20th century, during production, such tiles received two small recesses on the end side, which were used to remove the material from the conveyor. These indentations looked like a pig's penny. Despite the fact that the production technology of this material has changed significantly and there are no longer any holes on the tiles, the name hog is firmly attached to it.
In the bathroom, the hog tile looks very much like classic brickwork. This material is distinguished by its rectangular shape, small size, and the presence of a beveled end part, which gives it volume. True, in stores you can sometimes find models without a bevel. In this case, the desired texture is created using a special contrasting grout.
Laying tiles “hog”
There are basic types of layout, which will be discussed below. One layout can be combined with another layout. All for your consideration:
- Horizontal stack - is an average level of layout complexity. From the outside it looks quite simple, except for the fact that you need to lay the tiles perfectly, seam to seam. This requires sharpened hands that can do the job quite perfectly.
- Vertical stack - similar to horizontal stack, but the display is vertical, which greatly complicates this work. In order not to make the work dirty and of poor quality, it is better to hire specialists. This stack is one of the most difficult to lay out.
- Herringbone is a popular and classic layout. There is practically nothing to say about this layout, only that it has its own characteristics. That is, you need to lay it out quite evenly in order to get exactly the “Christmas tree”, and not a crooked resemblance to the shape of a Christmas tree.
- Checkerboard - using the “hog” tile, you can lay out a chessboard, but it will take much longer. The chess board can alternate in colors (checkerboard) or alternate first horizontally, then vertically. It looks very impressive.
- Diagonal is one of the most difficult layouts. You definitely need to call a specialist for such a calculation. If you do not have such layout experience, you don’t have to try. The diagonal should go straight, but not in waves. For beginners, it turns out in waves and we advise you to call a specialist. The work is difficult and requires patience
Ideas and design options
For laying tiles that imitate a brick pattern, the ideal place is the floors and the lower part of the walls. An excellent combination is the “hog” surface of a third of the bottom wall and the floor covering in the form of a chessboard, where the colors are selected in an original combination.
A room has a luxurious look when the floor is laid with tiles whose color resembles the softness of milk and coffee, and the grout is always snow-white. Then you should choose tiles of a color pattern for the walls or purchase natural wood for finishing. Place a stucco ornament along the baseboard.
It is not customary to line a bowl with a “hog”. The point is that the basis of the exhibition is always the bathroom – massive and elegant. Then this important attribute in the English style will take its specific place in the space of the room.
If the wall is decorated in the tones of dark gray ornaments of one tile, then the tiled “hog” will add originality and unusualness. Then three walls should have brick-like tiles, and the fourth, with an adjoining bathroom, should have ornamental tiles. Then the effect of surprise arises, which is what makes this combination interesting. A large bath allows masonry to be laid along the horizon line. For a compact bathtub, it is better to use a vertical option.
Photo of hog tiles for the bathroom
How to style
There are 7 technologies for laying hog tiles:
- traditional. The tiles are laid offset by half the tiles in the adjacent row;
- stackable. In this case, the tiles lie seam to seam. This is not the easiest method; beginners should not try it;
- vertical with offset. This is the traditional method, but the tiles are laid vertically;
- stacked vertical. Stackable option with vertical orientation;
- diagonal. Another difficult option for laying tiles at an angle of 45⁰ to the baseboard;
- Christmas tree This method is similar to laying parquet, but the tiles will have to be cut at an angle of 45⁰;
- chess. A combination of vertical and horizontal orientation of tiles.
Preparing tools
To lay hog tiles you will need the same tools as for laying regular tiles.
You need to prepare in advance:
- flexible spatula;
- spatula with teeth;
- drill for mixing mortar;
- marking tools;
- rubber mallet;
- tile adhesive;
- profile made of wood or metal;
- soft sponges and rags.
Surface preparation
Before laying the tiles, the wall surface is cleaned of old paint, plaster and other finishing materials.
Apply primer and putty to the cleaned surface and allow the wall to dry. At this stage, the wall is leveled to simplify the installation process.
Marking
Markings are applied to the prepared wall in accordance with the installation diagram. To do this you will need twine, a marker and a building level.
Before marking begins, the location for installing the socket and other hanging structures is determined. For installation it is better to use a horizontal seam. In this case, the structure should not end at the chamfer of the tile, otherwise the illusion of “sagging in the air” will be created.
When marking, the first thing to do is mark the beginning of laying the tiles.
Next, depending on the selected type, masonry lines are drawn horizontally, vertically or diagonally. Upon completion of the work, profiles are attached to the walls.
A laser level will be a good helper in marking the wall.
Laying
Next comes the most crucial moment - laying the tiles. Here you must adhere to the following rules:
- the solution is mixed strictly according to the instructions class=”aligncenter” width=”800″ height=”785″[/img]
- the volume of diluted solution or glue should be enough for 40 minutes. If you apply more, the solution will lose its properties;
- The “hog” tile is quite heavy, so glue is applied both to the wall and to the tile itself. This is done with a flexible spatula. Then, using a notched trowel, stripes are formed on the tile and wall;
- glue is applied to the wall based on calculations for 2-3 tiles;
- laying begins from the far corner, and the lower edge of the first tile should rest against the profile;
- The seams between the tiles should not be thick. The optimal width is 2-5 mm. To ensure equal distance, crosses are used;
- You can remove excess glue from the surface no earlier than an hour after installation.
Grout
To prevent the seams between the tiles from darkening and absorbing dirt, they are filled with a grout mixture. You can start grouting the next day after installation.
For the bathroom, it is recommended to use epoxy grout. It will protect the seams from darkening and is suitable for damp rooms. Epoxy grout hardens quickly, so excess is removed immediately. In other cases, excess grout is removed after 30-40 minutes with a soft sponge or cloth.
After the grout has dried and the residues have been removed, the tiles are cleaned of dirt. It is washed with warm water, polished with a dry cloth and the profile is removed.
Necessary Requirements
Materials for finishing a bathroom must be selected especially carefully, as they must meet certain requirements. Otherwise, there is a risk that the service life will be very short. Let's consider the necessary requirements.
- Moisture resistant. The tiles should not absorb moisture, and there is a lot of moisture in the bathroom space. If the material absorbs moisture, then with high humidity it will very quickly fail, mold and mildew will appear, and the appearance will also change for the worse. Among other things, the tile may simply fall off due to the fact that it becomes heavy. To determine the level of moisture resistance, you need to look at the back of the tile: there should be almost no pores on it.
- Resistant to cleaning. When cleaning a bathroom, aggressive or chemical cleaning agents are almost always used. They will get on both the tile and the seams at the junction. Tiles that are not resistant to such substances will quickly lose their appearance.
- Evenness on all sides. To check this, you can look at a stack of stacked tiles: if the distance differs by even a millimeter, this is a bad indicator. Laying such tiles will be problematic, the seams will be uneven.
- No damage. There should be no chips or cracks, the pattern should be distributed evenly. If the pattern on one tile is different in color or size, it is most likely a defect. It is better not to purchase such material. It is also important to pay attention to the fact that there are no irregularities, and that the color is of high quality and deep.
Tiles produced in modern times can have different textures - smooth, matte, aged or mirrored.
Competent selection of colors of ceramic tiles allows you to get an original interior
Sizes of tile blocks
The range of boar tiles is very diverse, including the range of sizes. However, despite the large number of different sizes, the most popular parameters are 7.5 * 15 cm, 10 * 20 cm, matte and semi-matte options. Particularly popular are models that imitate wood, glass, marble or natural stone.
The sizes of ceramic tiles are selected taking into account the dimensions of the bathroom - small bricks are better suited for a small room, and in a spacious bathroom you can put a standard or large “hog”
Preparing the base for tiles
Having decided on the installation method that suits your kitchen, you should take care of preparing the walls. Regardless of the type of surface, before each stage of work it is necessary to degrease and prime it, this ensures better adhesion to glue, plaster and tiles. If the wall is concrete and the differences in its height do not exceed a couple of millimeters, you can immediately apply tile adhesive after priming and level the wall with it.
If the wall has been treated or painted with something or has a lot of unevenness, it must first be leveled with plaster, and only then tile adhesive must be applied.