There is an opinion that it is not possible to make sliding doors with your own hands at home, but this is not so. A sliding door is not such a complicated thing, and then we will talk about what sliding doors are like, we will go through the pros and cons of compartment doors, and most importantly, we will give step-by-step instructions on how to make a sliding door with your own hands, in 2 options.
Sliding structures in houses are not only beautiful, but also convenient.
Types of structures
Interior sliding doors have the same essence, but their operating mechanisms are somewhat different:
- Standard. They are classified into single-leaf and double-leaf. Single-leaf doors (have one movable leaf) are best used for small rooms with tiny openings. This saves valuable space. Double doors (two movable leaves) are relevant for spacious rooms with wide openings. Both doors open in different directions, which is not only comfortable, but also makes the interior welcoming.
- Radial. It is a system in which the doors move not in a straight line, but in an arc. This is a non-standard design of a doorway, which is relevant in a room with round or curved walls.
- Accordion doors . The principle of operation of the mechanism is more reminiscent of blinds. The design consists of several narrow doors that fold into an accordion to free passage. Therefore, they are more often called folding door systems. A significant advantage is the mobility of the partition: the width of the opening can be varied at will from a narrow slot to a full passage.
- Coupe. The mechanism is similar to the systems used in wardrobes. This is the most popular solution for decorating a door partition, helping to save space in the passage between the room and the kitchen. The trick of the design is that it not only performs its direct function, but also plays the role of a wall in the room. To comfortably place furniture standing close to the walls and to the side of the doorway, use a mechanism with two leaves.
- Pencil door . Apartments equipped with a wide passage to the kitchen without walls allow the installation of a “pencil” system. A hollow plasterboard partition with a hole on the side is installed for it, which will act as a false wall and occupy part of the doorway. When the door is opened, the panel will be hidden inside the plasterboard structure.
Additional space appears along the wall to accommodate kitchen furniture. The hollow partition can be used for various household needs, such as hanging accessories or kitchen cabinets. The mechanism looks laconic in the interior and is practical to use.
Articles on the topic (click to view)
- Rating of the best steamers of 2022
- Photos of curtains for kitchen design 2022
- Choosing curtains for the kitchen
- Metal kitchen rack for appliances
- Instructions for the electric stove "classic plus"
- How to choose an electric stove with 4 burners and an oven for the kitchen
- Sofa in the bay window for the kitchen
- Pendulum. It is used if the kitchen opening is adjacent to a narrow corridor. The uniqueness of the mechanism lies in the process of turning the door leaves: they not only move in both directions in relation to the frame of the doorway, but also rotate along the vertical axis. More often, only one door is used, opening both inward and outward.
A simple solution accessible to everyone
To get the job done quickly, we choose one of the least labor-intensive options for making hinged cabinet doors:
- from panel;
- from finishing plywood ½ inch;
- according to your size from professionals;
- hanging store-bought sashes.
Homemade paneled doors are hung on semi-concealed overhead hinges. There is no need to cut the grooves with a milling cutter; the sashes can be made to the required size; upon completion of the work, the product is coated with furniture varnish.
Rice. 1. Plywood doors with a semi-secret hinge
Homemade swinging plywood doors have trim around the edges. Each sash should protrude about a centimeter beyond the front frame. No groove cutting is required; fastening to the back of the door and the end of the front frame is easy.
Hanging ready-made doors selected in a store on semi-concealed hinges or manufacturing doors in production according to drawings makes it possible to get the job done without turning the apartment into a carpentry shop.
Rice. 2. Door hardware samples
For accessories, if there are no self-closing hinges, you can use: A – universal lock; B – roller; C – lock, locked with a key; D – door brass bolt; E – magnetic latch. The last element is most often used on glass doors.
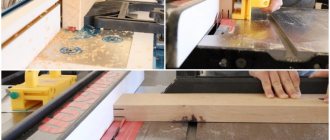
Finishing plywood doors
Work should begin by taking the dimensions of the doorway and selecting the number of doors to be installed. With a width of more than 60 cm, one sash is not enough. If you decide to install one panel, the height and width remain unchanged. When double doors are made, the width of the opening is divided in half and about 1.3 cm is subtracted from it on each side.
Rice. 3. Making a cabinet: taking measurements
To frame the sashes, profiles with bevels of 45° are measured and cut. These pieces are secured to the panel with 11/2-inch finishing nails. Varnish coating is carried out.
On the back side of the doors there are 2 semi-secret overhead hinges. We recommend fixing them at a distance of 5 cm from the edge of the panel (top and bottom). If the door height is more than 75 cm, you should use 1 more hinge in the center. To check the correctness of the taken dimensions, it will be convenient to temporarily stick adhesive marking tape on the front frame, above 1.3 cm from the doorway.
The door is placed on the opening, the top edge is aligned with the marking tape. The location of the hinges must be marked on the front frame with pieces of the same tape.
Basic holes are drilled into which the door is secured with screws. The loops should be in the marked place. The marking tape is removed after installing the door. Lastly, door handles and other door hardware elements are attached.
Rice. 4. Making a cabinet: placing the sash on the opening and installing it
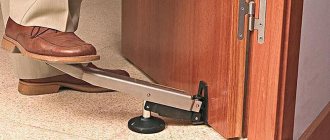
If a folding door is made, then semi-secret hinges are attached to the front frame at the bottom, and holders and latches are installed on the sides to prevent spontaneous tilting of the sash.
Rice. 5. Making a cabinet: attaching door hardware
Materials
The range of materials for the manufacture of door panels is varied:
- Tree. If financial capabilities allow, you can give preference to wooden door consoles. This is a good investment, because varnished wood looks simply perfect, especially between the living room and the kitchen. The door leaf can be either solid or in combination with other materials (paper, plastic, glass, mirror).
- A significant advantage of wood is its environmental friendliness and pliability, thanks to which it can be included in various interior styles. The only drawback is the massiveness of the finished products, so it is better to use door consoles in spacious kitchens. Wood often goes in tandem with glass inserts; such door options are popular and fit into any design idea.
- Glass. Designs made from glass sheets will ideally fit into the decor of a room in the style of hi-tech, minimalism or classic interior. The choice of these doors should be based on the strength and reliability of the material: how the glass reacts to sudden changes in temperature and whether it is afraid of impacts. If there are small children or animals in the house, you should use only impact-resistant fabric. The value of these doors lies in their ability to transmit light; they do not create a completely isolated space.
By choosing models of a certain dullness and color, you can achieve the required transparency of the structure. Then through the closed door it will not be visible what is happening in the adjacent room, but at the same time a certain amount of light will penetrate.
- MDF/Fibreboard is a high-quality budget material for kitchen consoles. Such doors are appropriate if it is not possible to install natural wooden panels or if the kitchen is too small and cannot withstand such door finishing. Visually, they are almost indistinguishable from their natural “colleagues”. Doors made of MDF and veneer are lightweight, do not require maintenance, and are resistant to temperature changes. A wide range of colors allows you to choose door leaves to suit any interior style.
- Plastic. Often used in conjunction with folding structures and sliding doors. The material is an economical option, but has a presentable appearance. This is the optimal solution for the kitchen space: plastic doors do not require special care; all you need to do is walk over them with a soapy cloth. If the kitchen is adjacent to the living room, such decoration of the doorway will look somewhat ridiculous and cheap.
Size calculation
When assembling a sliding wardrobe door yourself, there are two options. The first is to measure the opening, think about how many doors you want to have and contact a door manufacturing company with this information. Just make sure they sell the parts without paying for assembly. The manager himself will count all the necessary materials for you, give you the dimensions and announce the amount. It's simple. But you will have to purchase everything from this office, i.e. choose from what is available.
The second way is to calculate everything yourself and look for the necessary components from different companies. It’s more complicated and more expensive, but there’s a wider choice. For those who do not like simple paths, we will describe the calculation of the components.
Doors
Calculate the width of the doors so that when closed, only one handle is visible, but it should not cover the door leaf itself. For a sliding door with two leaves, you calculate it like this: measure the width of the opening, add the width of the profile and divide in half. This will be the width of the sash.
For example, the opening is 1600 mm, the width of the handle profile is 26 mm. We get 1600 mm + 23 mm / 2 = 811.5 mm
Please note that the width of the handle profile is taken arbitrarily. It can be different in shape and, naturally, in width
When calculating, substitute the width of your chosen structure
When making calculations, substitute the width of your chosen structure.
Profiles may be different, so they must be measured individually
To calculate a tricuspid one, you will need to add twice the profile width and divide by 3.
Example: opening 2100 mm, handle width is the same - 26 mm. We count: 2100 mm + 2*26 mm / 3 = 717 mm.
Everything is easier with height. Subtract 40-45 mm from the height of the cabinet and obtain the required height of the sash, as well as the length of the side profiles. That's all about the dimensions of the sashes.
Filling
Since the filling is in a frame of profiles, we subtract twice the profile width from the total width of the sash. We do the same with the height - subtract the height of the lower and upper profile.
Measuring the width of profiles
So, the width of our sash is 811.5 mm. The measured width of the handle profile is 18 mm. Since the handles are placed on both sides, we double this figure. We get 36 mm. Total filling width 811.5 mm - 36 mm = 775.5 mm.
We also calculate the height: let the initial one be 2350 mm, the width of the upper profile 12 mm, the lower one 48 mm. Total filling height 2350 mm - 12 mm - 48 mm = 2290 mm. This is if the filling is solid and it is laminated chipboard, which does not require a silicone seal. If the sash is a solid mirror or glass, the thickness of the sealing rubber must be subtracted from the found height. It is 1 mm, but since it is put on around the perimeter, it takes up 2 mm in general - above and below. In this case, the filling height is 2290 mm - 2 mm = 2288 mm.
If the sash filling consists of fragments, the thickness of the connecting profile is also subtracted. It is also approximately 1 mm.
Profiles
The height of the vertical profiles of the frames is equal to the total height of the sash. The width of all horizontal ones is calculated depending on the width of the handle: from the width of the sash we subtract twice the width of the handle (there are two of them).
How to measure handle width
Let the handle width be 26 mm. We get the width of the vertical profiles: 811.5 mm - 26 mm*2 = 759.2 mm.
Advantages
Sliding doors to the kitchen have many advantages:
- Space saving. Installing these systems allows you to get additional free space, whereas the open wing of swing doors requires space. Sliding structures maneuver freely along the wall or are hidden in it. This allows even the smallest apartment to look comfortable and roomy.
- Zoning of space. It becomes possible to divide a large room into several smaller ones that perform different functions. For example, separate the dining room area from the kitchen. Sliding partitions are relevant for studio apartments, when there is no desire to reduce the area of the space, but periodically there is a need to isolate any of the zones.
- Safety and reliability of the design. The absence of a threshold and the free sliding of doors ensures comfortable movement for children and the elderly.
- The number of sashes in a sliding structure can vary from one to several. This allows you not only to transform the interior, but also to simplify control over the width of the doorway.
- Depending on the interior design, you can choose different materials and finishes for the partitions, and order the design according to individual sizes.
Door installation
The last stage of work is the assembly and installation of sliding doors. You can start assembling them immediately after the varnish or paint has completely dried. What else will you need:
- pens;
- drill (depending on what material the walls are made of, you may need a hammer drill);
- suitable dowels and screws;
- screwdriver or screwdriver.
Procedure:
- Mark locations for fastenings above the opening. Drill holes and insert dowels. Secure the block or corner with self-tapping screws. Attach the top guide.
- Mark holes for the mounting plates on the top end of the door. Drill them out and attach the plates. Drill holes for the handles and attach them.
- Install the bottom guide using the selected method.
- Drive the rollers and stoppers into the upper guide. Place the blade on the screws screwed into the rollers. Adjust its position so that the gap between the door and the floor is uniform. Secure the plates with screws.
Mounting the upper part of the mechanism
- Move the door in different directions and determine its location in the closed and open state. Secure the stopper.
- Install the lower roller.
- Cover the visible part of the mechanism with a decorative panel.
- Install brush seal and cover beam (if planned).
Brush seal Making compartment doors yourself at home is a completely feasible task even for an inexperienced craftsman.
Voted over 200 times, average rating 4.2
Comments
Unfortunately, there are no comments or reviews yet, but you can leave your...
Add a comment Cancel reply
We recommend reading
Door installation Mechanisms for opening interior doors It is known that a door can make changes in style...
Door installation Equipment for the production of interior doors The process of manufacturing doors is quite labor-intensive. For this...
Door installation Technology for self-installation of a plastic window and balcony door If necessary, you can insert a new balcony block yourself. ...
Door installation Adjusting sectional doors Do-it-yourself adjustment of sectional doors is becoming a common...
All about sliding doors for the kitchen
Sliding doors are an interior element that will bring uniqueness and novelty to any home. They are single or double door designs that slide on tracks to open and close.
For the kitchen, it is important to choose practical and comfortable solutions. A folding kitchen door will be the most profitable investment, as it will not only make the space cozy and stylish, but will also save it.
If there is a niche in the wall, you can use a sliding door to create a dressing room or storage room. For such purposes, designers suggest using barn-style options, which will make the interior fashionable and original.
How to make a sliding door with your own hands. Instructions with photos
To make a sliding door with your own hands, you need drawings, a description of the work plan and step-by-step instructions, because this is a rather non-trivial task, especially for a beginner.
At the same time, installing a sliding door is an opportunity to save space, which is especially important when the room area is limited. In this way, you can still zone the room, without having to build durable floors. You can even make such a design with your own hands, using new materials or old fabric - you just have to purchase a special mechanism and components for it. Today we will dwell on this type of work in detail.
DIY sliding door
Types of sliding doors and their design features
Sliding door structures are divided into types , differing in installation methods, mechanisms, appearance, number and arrangement of panels, etc.
Let's look at the main typical designs and their features :
- Pocket (cassette) doors slide horizontally along tracks, completely fitting into the adjacent wall when open. Because the sashes actually disappear into the wall, they free up valuable space, much needed in small spaces. This design solution was especially popular during the Victorian period, so it gives the house a special charm. This door mechanism can be either single or double. Since the design requires niches in the wall, they can either be made from plasterboard or purchased a ready-made version with all the necessary elements.
- Sliding doors have one or two leaves that move along guides parallel to the wall. The double-leaf design differs from the single-leaf design only in that the panels move in different directions. When you wonder how to make a sliding door in the kitchen, you will be pleasantly surprised, because you will not need to provide niches in the wall. And this greatly simplifies installation work.
- Cascade structures consist of at least two canvases that slide next to each other along separate guides and can be assembled simultaneously from a certain side of the opening. This option will not only become an element of comfort, but will also effectively complement the interior of the kitchen. Cascading door mechanisms are also used for closets or pantries.
- Radius door designs are distinguished by their round shape, which gives them an impressive appearance. In this case, the movement of the canvases is carried out using special guides, also located in a circle. Please note that this option is not suitable for small rooms.
- Internal doors also require a certain amount of extra meters. The doors of the door mechanism move towards each other, folding inside the opening. This design requires careful planning.
- Sliding and folding door structures (“accordion”, “book”) are not so often found in modern homes. Each canvas consists of several vertical sections connected to each other by a hinge. This option is the most optimal for saving space, which is why an accordion door in the kitchen would be the most appropriate option.
- Arcadia doors are usually used as external exits to a patio or deck. The construction panels are usually made of durable glass that can withstand loads. This design solution provides a wide view of the open air, and the room is filled with natural light.
- Sonji doors are a Japanese version made of wood and paper. These sliding doors are typically placed in bedrooms, sunrooms or gardens. Sonji doors are suitable for those who strive for originality and originality when decorating their premises.
Variety of sliding door designs
When installing various types of folding door mechanisms, it is necessary to install a retractable system , which includes a certain method of fastening, the shape of the guides, the number of gutters and roller mechanisms.
In this case, there are retractable systems with two guides below and above, as well as with one guide on top :
- The first type of design assumes that each leaf moves on roller mechanisms along guides located on the floor or in the floor and above the doorway. Such a fastening mechanism reliably fixes the canvas in a vertical position and provides good sound and heat insulation. The disadvantage of this option is that the floor guide gutters become clogged quickly.
- The second design option provides for the door to move only along one rail located above the door . The sliding system includes an aluminum profile, frame mounting kit, roller mechanisms and locking elements. For a door weighing less than 70 kg, one set of rollers is sufficient; for a door weighing more than 70 kg, the number of sets should be increased. This design pleases with its noiselessness and smooth movement of the canvases. But it requires careful attention to installation.
Important! The installation of sliding-folding doors “accordion” and “book” requires special attention. The canvas is attached along the vertical edge to the side profile attached to the wall. At the top of the door sections there are carriages with rollers that move along guides attached at the top of the opening.
Expert opinion
Smirnova Ekaterina Anatolevna
7 years of experience in interior design, professional architect
Sliding doors can be opened manually or automatically . Manual models are quite simple to install and use, but automatic ones have their own characteristics.
Automatic doors are activated by a special sensor with infrared radiation , which reacts to the approach of a person. Automated models are easy to use, practical and easy to adjust, but their cost is significantly higher than their manual counterparts. That is why they are so rarely used at home.
What to choose from
The question of how to make sliding doors is just right to ask when you know what you want, so first let’s figure out what they are like:
The accordion looks original, but is not very convenient to use.
An accordion sliding interior door consists of a certain number of sections connected by hinges, which fold according to the accordion principle. There is no point in assembling this structure manually, firstly, there is a lot of small and precise work, and secondly, the system is inconvenient to use, plus, when the package is completely moved, it takes away part of the doorway.
Cascade sliding structures.
A cascade sliding design refers to several door panels that slide and hide behind each other. The whole trick is that the panels, no matter how many there are, slide apart synchronously, but you can’t make such a sliding door mechanism with your own hands, and installation is far from the easiest.
Retractable radius design.
The sliding radius design is aerobatics in this niche. You shouldn’t even try to make such sliding doors with your own hands, because almost all the parts of radius doors will have to be ordered individually. Agree, it would be a shame to pay money for an order and then break the doors trying to install them yourself.
It’s quite possible to make interior compartment doors with your own hands.
Sliding compartment doors are the best option for the home craftsman. Such a door can be single-leaf or double-leaf. The mechanism for sliding compartment doors is simple but reliable; in short, guides are installed on the wall along which the doors slide.
In some sources, the compartment design is divided into 2 directions:
But this is not true in principle, because the drawings, diagrams and structure of the structure itself are identical in both cases, the door slides in the same way, the roller mechanism is the same. The only difference is that a plasterboard box is mounted next to the door leaf, in which the leaf is hidden.
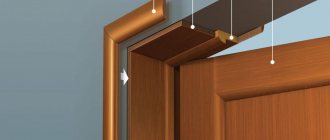
General diagram of hidden sliding doors.
Interior doors differ from similar designs in sliding wardrobes only in their more powerful mechanism, because the fabric here is much heavier. Therefore, it is not so important that you install a sliding door with your own hands on a cabinet or on a doorway, the technology is almost the same.
We’ve sorted out the main differences and design choices, now let’s talk specifically about how to make compartment doors with your own hands.
Sliding door selection criteria
The huge variety of door types, materials and sliding systems, as well as a variety of design solutions, requires careful consideration and thoughtful choice.
Consider several priority criteria that will help you make the right choice
- Products vary in price, and this is worth taking into account. When planning repair costs, determine in advance the amount you can safely spend on the door. The cost is influenced by: the material of the door leaves and the retractable system, the mode of opening and closing the door, the size of the entire structure and the number of necessary components, the complexity of installation, etc.
- The quality of the materials of the canvas and accessories is an important criterion, since the service life of the product directly depends on it. If the material of the canvases is chosen primarily for the purpose of decorating the space, then the fittings are chosen, paying attention to strength and wear resistance. Consider the following characteristics: type of sliding door, leaf weight, number of opening doors. Please note: fittings, fasteners and other components must be compatible. It is also important to pay attention to the quality of the products: the cost of high-quality fasteners will pay off due to long and reliable service.
- The qualifications of the specialists who will install the door also significantly influence the speed of installation, the quality of the structure and the presence of defects.
How to calculate sizes?
There is no need to say that the result of the work depends on this stage, this is clear to everyone. Therefore, the master has two ways to solve the problem. The first ensures quality, the second is more thorny.
- Help from experts. If the doors are for a closet that will take up all the space between the walls, then you can go simple. In this case, owners need to measure the opening, decide how many doors there will be in the closet, and then contact a company that manufactures the doors. It is best to trust an organization that will sell the kit without including the cost of assembling the structure.
- Self-employment. Contacting one company seriously limits the range, since you will only have to choose materials and components from what that company has. Self-sizing, on the other hand, will allow you to source materials from different companies, ensuring that you not only buy what works best for your decor, but also buy it at the best prices.
The second method is more complex, time-consuming and expensive. However, those who are more interested in being able to “choose from many” will probably prefer this solution.
Tool
If you decide to make the doors completely yourself, you will need to prepare the following tools:
- tape measure, metal ruler and angle,
- drill with screwdriver,
- electric hacksaw,
- metal hacksaw,
- Screwdriver for self-tapping screws,
- straight and plumb
- scissors and cutter (construction knife).
Sources
- https://stroychik.ru/mebel/dveri-dlya-shkafa-kupe-svoimi-rukami
- https://mblx.ru/shifoner/razdvizhnye/434-dveri-dlya-shkafa-kupe-svoimi-rukami.html
- https://dom-i-remont.info/posts/mebel/dveri-dlya-shkafa-kupe-svoimi-rukami-sborka-i-montazh-udobnoj-sistemy/
- https://mebel-sovet.ru/shkafy/kupe/616-dveri-svoimi-rukami
- https://made-box.ru/samostoyatelno/dveri-dlya-shkafa-kupe-svoimi-rukami.html
Between the kitchen and living room
The wood-look door material matches the texture of the furniture facades. The design separates the kitchen-dining room from the living room space.
Sliding doors between the kitchen and living room
Partition between the living room and kitchen in a common space.
Sliding frosted glass partition
The wooden model with glass goes well with the interior of a country-style home.
Door leaves with glass in country style
Neoclassical sliding version, consisting of two panels with glass inserts. Installation of the cassette system is the most labor-intensive, since part of the wall must be dismantled, then a metal cassette and special guide parts must be inserted, only then the wall is sewn up using gypsum board.
Cassette option for retracting canvases
The main stages of assembling a sliding door using the example of the Ramir system. detailed instructions
Consider the option of combined doors. The package may include the following items:
- two sets of chipboard inserts (thickness 10 mm);
- 2 glass inserts, 2 mirror inserts;
- set of aluminum profile, end brushes and rollers.
Use a special program - it will help you easily calculate sliding doors. Using the calculator, you are guaranteed a competent selection of all the parts needed to fill the facade. It's free and convenient, just download the app on your PC.
Stages of work when assembling combined sliding doors with your own hands using chipboard inserts:
We attach chipboard to the lower horizontal profile
In this case, it is important that its relation to the chipboard protrusion is the same.
We install the inserts using connecting horizontal guides. Their protrusion relative to the profile should be the same. We repeat the steps from step 1 for the upper guide element. The inserts are connected to each other using horizontal connecting elements.
We attach the profile handle to one side of the structure (so that the two holes are oriented in relation to the lower profile). On the opposite side we install a handle profile.
Considering the order of the instructions, this stage involves checking the tightness of the joints
If necessary, the structure is hammered with a mallet, aligning the joints along the length.
We tighten the screws halfway into the lower guide. After installing the wheels, tighten them.
We tighten the screws halfway into the upper profile. After installing the wheels, fix the fastening parts.
Glass
Most often, the guides are fixed only in the upper part of the opening, so as not to violate the integrity of the floor.
Door with glass between kitchen and hallway
Glass sliding partition
Glass partition with a pattern.
Sliding curtains with decorative patterns
White sliding doors to the kitchen
The classic door opens into the space between the refrigerator and the wall - ideal for a small kitchen.
The modern model moves along the wall, providing access to the kitchen preparation area.
Is such a mechanism convenient?
This question is individual for everyone. Among the possible disadvantages, it is necessary to note the throughput of such models - the smell and noise from the kitchen cannot be hidden. If this point is not important, then the operational characteristics of the system will only please you.
Design features
The most important step is planning the wardrobe.
When independently calculating the placement of parts, you need to be extremely careful, taking into account all structural elements. The length and height of the product are measured taking into account the dimensions of the room and the volume of things that will be stored in it. Structural components are determined by the type of cabinet selected. But for any variety, the characteristics of the height and depth of the shelves and rods are important. We must not forget about proper calculation of the position of sliding systems. Be careful that the doors do not hit each other or walls while closing. Today there are restrictions for this.
The best option would be to create a sketch with the exact location of the components and their dimensions, method of fastening, and a description of decorative nuances.
Main types of sliding doors
On the modern construction market there are several design options for the manufacture of sliding doors:
- A sliding door to the kitchen is a very common option. To move the canvas in this design, the same mechanism is used as in a wardrobe. Sliding parts are mounted on a rail; they consist of two panels; handles are used to move them. The product can be made from various materials. The price of such a door starts from 7,000 rubles. The canvases can move along one upper or lower flight, but to strengthen the structure, guides are installed in the upper and lower parts of the doorway. The main disadvantage of the product is the presence of a low threshold that you have to constantly step over.
Advice! When choosing sliding doors, consider their features, advantages and disadvantages, as well as the material of manufacture.
Two options for installing sliding doors yourself
Do-it-yourself sliding interior doors can be made in different ways, or rather, for different rooms. Plus, the size of the budget plays a significant role; it’s one thing to assemble doors for a small summer house with seasonal living, and quite another to make sliding interior doors for a city apartment.
Option No. 1. A good door for an apartment
In this case, we will learn how to properly install sliding doors on rollers with our own hands.
You should immediately forget about homemade mechanisms; we are only talking about installing ready-made systems. Of course, such designs are sold with a description, but there are nuances that are not in the description.
To install sliding interior doors with your own hands, you need the following tool:
We assume that the door is made from ready-made components, that is, we have a door leaf, guides, rollers, stops and other door fittings. The only thing you will need to buy additionally is a wooden block 50x50 or 50x70 mm.
Even before assembling the sliding door and even before going to the store for components, you need to make sure of the following fundamental things:
How to make a compartment door with your own hands:
There are many models of rollers; we are interested in mechanisms on a supporting platform with the ability to adjust the gap between the blade and the guide profile.
Wide platforms are mounted on the edge of the door leaf, but if the door leaf is more than 80 cm, then you can step back from the corner by 1/6 of the door width.
Using a tape measure, we calculate the center and, attaching a roller platform to the end of the canvas, mark the entry points of the screws.
Marking for the roller platform.
You shouldn’t immediately drive the screws according to the markings; you don’t know what quality the slab is; when screwing the screw in “live”, it may crack. Therefore, first drill holes, the drill diameter is about 2 mm. Next, apply the bar and screw in the screws.
Fastening the bar.
Now insert the carrier plate itself, equipped with a rod for the roller, into the grooves of the roller bar. In this case, the plate is fixed to the bar by screwing the rod a couple of turns (open-end wrenches will come in handy here).
Installing the plate with the rod.
As you can see in the photo, the rod is equipped with a thread; we need to screw the rollers onto this thread. Of course, there is a possibility of adjustment, but the thread must enter the roller by at least 3 - 4 turns. It’s better to count the revolutions so that they are approximately equal on all rollers.
Screw the roller onto the rod.
In order not to work in the dark later, it is better to embed handles and locks right away, especially when it comes to hidden handles, as in the photo. All such grooves in the canvas are cut with a hand router.
Installation of fittings.
We are done with the rollers and fittings, now we move on to installing the guide bar. The guide bar itself is metal; we will attach it to a wooden block. It is important here how to calculate the cross-section and length of the bar.
Don’t be alarmed, for the calculation we only need a tape measure and a pencil. If your doorway is simply plastered, without platbands, then you can take a 50x50 mm block. The platbands will take up at least 10 - 15 mm, so you need to take a 50x70 mm block for them.
As for the length of the bar, it is calculated as 2 times the width of the door leaf, plus another 50 mm for the stoppers.
Calculation of a wooden block.
Now we lay the guide on the block and fasten it with self-tapping screws in increments of about 200 mm. The holes in the guide are drilled subtly, that is, so that the screw head does not protrude from above, otherwise the roller will begin to cling to it when moving.
Fastening the guide.
Next we hang the structure. A professional only needs to take one measurement, after which the craftsmen attach the timber separately, and then attach the doors to it. It is better for an amateur to try on assembled doors; to do this, we insert the rollers into the guide.
We insert the rollers into the guide.
To make the measurement more accurate, you need to insert a wedge, preferably more than one, between the door and the guide bar.
Wedging the gap
You need to put a mark on the wall above the block and move upward from this mark by at least 7 mm, plus the thickness of the carpets, if any are planned.
Holes in the block must be drilled immediately. The step depends on what exactly you will hang the structure on. For anchor bolts with a cross-section of 6–8 mm, a pitch of 50–70 cm is sufficient, and for long self-tapping screws with plastic dowels, holes are drilled at a distance of no more than 25 cm.
We make markings on the wall through a block. The photo below shows how craftsmen drill a wall without removing the door; we do not advise you to do this. We have the markings, now we can remove the door, attach the block to the wall, level it and mark the future holes with a drill. Then you remove the block and drill it out.
Holes for anchors.
To prevent the rollers from jumping out, you need to install stoppers along the edges of the guide, but they are installed after the doors are hung. The stopper is inserted into the groove and the clamping screw is tightened. The installation point is determined experimentally by the position of the rollers.
We install stoppers under the rollers.
Our doors hang on a guide, but to prevent them from dangling, they need to be somehow fixed from below. To do this, a groove is cut from the bottom end along the entire length with a router; if the door is factory, then the groove should already be there.
The blade will control the flag pressure roller, which is attached to the floor directly next to the door jamb.
Flag pressure roller.
In order for the door to rub against the roller less, it must be set strictly plumb. The technology for installing the flag is shown in the photo below.
Control flag installation technology.
In principle, the retractable door was installed with your own hands, it will work, but you still need to make it beautiful. To do this, buy a platband to match the door leaf and nail or screw it to a supporting wooden block. Such a bar will hide both the block itself and the hanging mechanism.
Decorative strip.
Option number 2. Homemade for the garden
Sliding doors are a good thing and they have a lot of advantages, but all these advantages fade into the background when a person finds out the price of such fittings. Don’t be upset; if you use a creative approach, you can solve this problem. The design is not the most beautiful, but it is quite suitable for a summer house.
So, let's take a step-by-step look at how to make sliding doors for your dacha yourself without spending a lot of money.
The door leaf will cost the most. Although there are options here, for example, you can restore an old door and hang it.
Old doors can be put to new uses.
Next, we go to a store with furniture accessories and buy the simplest furniture wheels there. Do not use swivel mechanisms on a hinge; it will only make things worse. Such wheels are attached to the doors with a pair of self-tapping screws. There are 2 reference points for each canvas.
Using furniture wheels.
At the top end of the canvas, above the wheels, we screw steel rings. The thickness of the metal in such rings must be at least 3–4 mm, otherwise they will quickly fray.
Fixing steel rings.
We will use a three-quarter-inch steel pipe as a guide, although this is not important; you can take any pipe, as long as the rings fit into it properly. We calculate the length in the same way as in the case of a wooden block.
We install, as shown in the photo below, the elbow and fastening “penny” can be found on any construction market, as well as the pipe itself.
Fastening the pipe to the wall.
In principle, that's all, you can then paint and admire. If you take an old door leaf, the fittings will cost you a maximum of 500 rubles, and the tools you can get by with are a drill, a screwdriver and a hacksaw.
Single door design.
How to choose a sliding door for the kitchen?
The sliding door to the kitchen is used for arranging a small room or zoning it. Despite the fact that this design looks neat and compact, its installation will require free space on the kitchen walls.
Having learned how much sliding interior doors cost, most people think about the advisability of having doors as such. Swing systems are only suitable for spacious apartments and houses.
In the conditions of cramped spaces with an old layout, many people think about removing the doors to the kitchen, leaving a free arched opening instead. Is it correct? Let's consider all the pros and cons of this decision.
DIY sliding doors - 2 options for different budgets
There is an opinion that it is not possible to make sliding doors with your own hands at home, but this is not so. A sliding door is not such a complicated thing, and then we will talk about what sliding doors are like, we will go through the pros and cons of compartment doors, and most importantly, we will give step-by-step instructions on how to make a sliding door with your own hands, in 2 options.
Sliding structures in houses are not only beautiful, but also convenient.
Advantages of sliding systems
Today, more and more people are inclined to install sliding doors in their homes. The prospect of using them to optimize the interior and make it more presentable is quite attractive. To achieve this, property owners are willing to part with a considerable amount of money.
Such a solution is worth it, since sliding systems have the following advantages:
- Saving living space. The canvas simply slides to the sides, providing the opportunity to move comfortably.
- The use of modern fasteners and seals makes it possible to achieve almost complete tightness when the panels are closed.
- The presence of many models of standard sizes with a variety of colors and textures.
- Possibility of manufacturing sliding systems of any complexity to order and in a short time. Installation is carried out by the manufacturer.
The consumer can order a sliding system that best matches the color and design of the walls or furniture. Modern technologies allow this.
Types of roller systems
To make sliding doors to the kitchen, designers use two types of roller systems. Their difference is not fundamental; they differ only in the installation location of the main mechanisms.
The consumer can choose from the following types of roller systems:
- With top guide. All fasteners for such panels are located in a box located above the opening. The movement mechanism consists of a rail and rollers rigidly fixed to the canvas. The door itself does not touch the floor. Tightness is achieved by installing dense gaskets that cover the resulting gap. This system is good because the integrity of the flooring is not compromised, since there is no need for a bottom rail. The canvas retains its shape as it is suspended.
- With floor guide. The steel rollers on the canvases are located at the bottom. They roll along the slots in the tire, which is bolted to the floor. A box is fixed in the upper part, inside which silicone rollers move to ensure the position of the canvas in the correct position. This design is more vulnerable during operation. The rollers periodically come out of the grooves, and the grooves themselves are constantly clogged with debris. In addition, the canvas may bend over time under its own weight.
For ease of opening and closing, the canvases are equipped with functional handles that do not interfere with their free movement.
What is needed for production
In fact, making interior compartment doors yourself is not difficult. Moreover, not much material is required. We will consider in detail the necessary structural elements, and then we will be able to figure out how to assemble and install it ourselves.
- Laminated chipboard. You can make a door leaf from chipboard. To do this, it is better to choose a canvas with a thickness of at least 16 mm. If it is thinner, then during operation the door will sag, and as a result, after a while the door will lose its presentable appearance. You will also need an aluminum profile for edging the chipboard around the perimeter. This will extend the service life of the compartment doors, as it will add rigidity to the structure.
- System of rollers and guides. This one is simple. You should purchase a ready-made set of rollers and guides. To do this, give preference to a reliable manufacturer. You can also meet many DIYers who will design a roller system on their own. Moreover, it is necessary to decide whether the system will be suspended or on a rail. A suitable system is selected accordingly.
- Accessories. This includes a mortise lock and handles. They must also be reliable and of high quality. The lock for sliding doors does not have the usual tongue that sticks out from the leaf of a regular swing door. It has a special locking mechanism. The lock design has a special movable hook.
Handles for sliding doors
- Fasteners This means self-tapping screws or dowels that can be used to secure the roller system and guides to the floor or ceiling.
- Extensions and platbands. They will be needed in order to disguise all the fasteners, and to make the frame of the doorway itself beautiful.
Coupe door mechanism
In fact, this is the entire set of material that is necessary for the manufacture of sliding doors. As for the tools, the set consists of the following:
- Electric jigsaw.
- Screwdriver.
- Drill.
- Hand-held circular saw.
Tools
- A hand router, which is necessary for cutting grooves.
- Screwdriver Set.
- Pliers.
- Hammer, etc.
If you have all this, you can proceed directly to assembly.
Material for the manufacture of sliding systems
Since these structures experience quite heavy loads, the canisters and rails are made of steel. This material is durable enough to withstand decades of intensive use in wet conditions. The frames of sliding systems are attached to the walls with anchor bolts, which eliminates the possibility of deformation.
For the manufacture of the roller system, stainless steel or titanium alloys are used. For silent sliding, the wheels are covered with a layer of high-quality polyvinyl chloride.
This material is resistant to mechanical abrasion, temperature changes and chemically active substances. When ordering sliding systems, you need to choose fittings only of the highest quality and from trusted manufacturers.
Expert opinion
Smirnova Ekaterina Anatolevna
7 years of experience in interior design, professional architect
The design of kitchen doors depends on the filler of the door. The material for the sliding door must be durable, resistant to aggressive liquids, moisture and corrosion.
Today it is possible to purchase canvases for sliding systems from the following materials:
- Natural wood. Such doors look very beautiful and prestigious. But it should be understood that wood has a limited service life; it is not resistant to moisture and scratches. In addition, solid wood has significant weight. Moving such canvases will be quite difficult. Don’t forget that wood absorbs odors and moisture. Over time, it can swell and become distorted.
- Plastic. This is a budget option for filler. Modern technologies make it possible to stylize plastic to look like natural wood, natural stone, fabric and leather. Drawings with a wide variety of content, in any color scheme, are applied to the canvas. But plastic is not strong enough and transmits sound well. As a rule, this material is used when carrying out economy class repairs.
- Glass. This is the material recommended by builders and designers. Glass products have all the characteristics necessary for sliding systems. With sufficient strength, they look impressive and presentable. The best option is triplex (laminated) and tempered glass. Worthy analogues are monolithic polycarbonate and plexiglass. The canvases are available in transparent and colored versions, sandblasted and with mirror inserts.
Decorative canvases should be installed so that their front part faces the kitchen. You should not opt for solid doors.
It is better to install translucent structures that visually expand the space. Wooden and plastic canvases can be equipped with frosted glass inserts or stained glass windows.
The choice depends on taste and financial capabilities.