- Screed for laminate
- Wet screed
The house in Moscow has been put into operation. The keys to the apartment have been received. But the general condition of the concrete slab is depressing. You cannot lay laminate or tile on it. Floor screed in the apartment will help get rid of unevenness and seal cracks in the ceiling. How to do it correctly will be discussed later in this article.
If we talk about the features of repairs in new buildings, one significant advantage should be noted - there are no old coatings. No hammer drill is required to remove plaster. You don't have to take out tons of trash. The buyer receives absolutely free space, often without even internal partitions. Only utility entry points (water supply, sewerage, gas and electricity) are marked.
General preparations for installation
- Preparation, the entire room must be cleared of debris and dust, treated with the “Betonokontakt” composition, to the expected level of the floor covering.
- Level determination (tapping), for this purpose a laser or water level is used. If they are carried out in several rooms of the same room, the level must be determined in each room and the same marks must be set at a height of 100–150 centimeters. Marks should be placed on each corner of the room, as well as on the walls. The more there are, the easier it is to navigate when leveling the surface.
- Determination of the difference in the floor plane (height difference). Knowing the surface level and the difference in heights on the floor, you can determine the amount of material that will be spent on the work.
- Attach a protective coating to the walls to a height of 1.5 meters; film is suitable for this.
You should know this
- For a high-quality floor covering, according to regulations and standards, it is necessary to make a good foundation.
- It should be noted that violation of screed laying technology entails serious consequences, even repeated installation. Therefore, if you are not sure that everything will be done correctly with your own hands, it is better to involve specialists with experience.
- The first step is to prepare the floor: dismantle the old covering (if any), remove all construction debris, dust, and dirt (it is advisable to use an industrial vacuum cleaner).
- The next mandatory step is to prime the surface - this will increase the adhesion of the layers. Several layers of primer may be needed, which are applied after the previous layer has completely dried.
- All cracks must be sealed with putty before applying primer to the floors.
Construction beacons
- Measures must be taken to establish the level - about the level, the height is noted.
- After this, you can determine the amount of material required.
- Walls are waterproofed using polyethylene.
What is a floor screed
Screed refers to a building mixture laid in one or more layers. The base for installation can be a ceiling between floors, a rough foundation or an insulation layer. Subsequently, the final decoration of the floor is carried out on top of this layer using porcelain stoneware, tiles, linoleum, laminate, etc. In some cases, screed is used as a finishing touch in utility rooms, garages, basements, and industrial facilities.
Floor screed process
How to choose a design
Having understood the types and types of structures, you can determine which option is best suited for the room.
To do this correctly, you need to determine:
- Purpose of the premises.
- Type of finishing coating.
- Estimated load during operation.
- The time that can be spent doing this work.
- Financial opportunities.
The quality of the screed in a new building depends on the professional level of the people who will carry out the installation, as well as the materials used in the work. The design is one of the hidden works.
Therefore, it is important to check the quality of installation and materials used. If materials are used that are of poor quality or not suitable for their intended purpose, and the installation does not comply with technological rules, all this can only become apparent during operation. The result will result in a loss of funds and the need for new expenses will arise. Which can be several times higher than the cost of the structure itself.
Rules, sequence of work
Before starting work, you should prepare inventory, that is, tools. These include:
Tools for work
- building level;
- roulette;
- knife;
- hydraulic level;
- roller;
- Master OK;
- drill;
- container for solution.
Next, we begin to carry out the work of a simple wet screed:
- the room is prepared: dust and dirt are removed, cracks and holes are sealed, mounting loops of the floors are removed;
- make markings for the future screed;
- lay plastic film with the edges turned up on the wall (15 cm);
- install beacons along which the screed will be aligned;
- DSP is prepared in the proportion indicated on the packaging;
Attention! The mixing proportion is observed, because if it is violated, the coating will be of poor quality.
What type of floor screed to choose in a panel house is up to the owner to decide, but you definitely need to weigh and study everything. The work should be carried out strictly adhering to laying technologies, then the base of the floor, and with it the finishing floor covering, will serve for a long time.
Pros and cons of floor screed
When considering the advisability of using a floor screed in your home, you should carefully weigh the pros and cons.
Pros:
- Durability. A properly executed floor screed is a reliable finish that can withstand external influences in the form of mechanical, climatic and other loads for a long time.
- Strength. Compliance with the correct proportions of the constituent components and the use of high-quality reinforcement makes the screed especially durable. Any finishing material can be placed on the finished base, without any special restrictions.
- Various fill areas. You can install a leveling layer both in a small room and on a large area. All you need to do is knead the correct amount of ingredients.
Floor screeding can be done even on very large areas
- Variety of technologies. There are several types of screeds, depending on the composition and method of installation. Depending on the type of binder, they can be cement, gypsum, or concrete. According to the installation method - dry, semi-dry, wet, self-leveling. There are also highly specialized compounds - finishing, soundproofing, insulating, chemically resistant, etc. The properties they need are imparted by introducing certain additives into the base composition of the solution. This variety allows you to choose the most suitable option for a particular room.
Minuses:
- Labor intensity of implementation. To lay even the minimum acceptable layer, you have to spend a lot of effort delivering sand, cement, water, and various additives. During the work process, all this must be thoroughly mixed and poured, strictly following all recommendations.
- A lot of dirt. This is especially true when working with wet and self-leveling cement-based mortars. Gypsum mixtures are not so dirty in this regard, but they cannot be used in rooms with high humidity levels.
- Significant weighting of the base. Before leveling floors in old buildings, careful calculations must be made. It happens that increasing the load on a dilapidated floor or foundation leads to its destruction. In such cases, it is better to choose another leveling method (chipboard, joists).
- It takes a lot of time to dry. Once traditional cement mortar is installed, it takes at least a month to achieve optimal performance. When deadlines are running out, it is recommended to choose a semi-dry or self-leveling mixture (they dry in 3-7 days).
Laying a self-leveling floor screed
Basic elements and their purpose
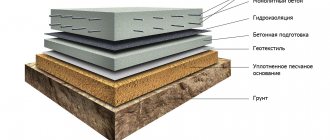
- Leveling layer - serves as a base. It hides major imperfections. For this you can use sand or crushed stone of a small fraction.
- A waterproofing layer is used here to retain moisture. Mastics that have water-repellent properties.
- Moisture and vapor barrier membranes or cellophane.
- Roll roofing material.
- Expanded polystyrene boards.
Why do floor screeds?
Using a floor screed, the following objectives are achieved:
- The rough base receives the necessary evenness.
- The soundproofing and waterproofing properties of the floor are improved.
- The amount of heat loss towards the ceiling is reduced.
- The floor acquires mechanical strength.
- Conditions are created for the installation of certain communications under the screed (meaning pipes, wiring, underfloor heating circuits).
- Informs the floor level of the required height.
- The required slope angle is ensured.
Leveling the floor
Uneven floors in a room negatively affect its interior design. In this case, pieces of furniture cannot be placed straight: they will warp, gradually losing their aesthetic and functional characteristics. When laying some finishing materials, the evenness of the floor is of fundamental importance. First of all, this applies to such piece elements as ceramic tiles, laminate, parquet boards, etc. Not only will the finish look terrible, but it will also begin to gradually break down on a crooked base.
Solid materials (linoleum, carpet) can somewhat smooth out the negative impression, but depressions, bumps and drops are also quite clearly visible on their surface. After installing parquet or laminate flooring on an uneven floor, such an unpleasant problem as squeaking when walking inevitably arises. The so-called apartments are especially often rich in such “flaws”. "secondary" housing.
Soundproofing the floor
It happens that the rough base seems quite smooth and does not require additional leveling. However, if we are talking about an apartment above the first floor, using a screed you can achieve additional sound insulation of the home. If it is missing or insufficiently thick, neighbors below will hear all the nuances of family life without interference. No person would be delighted to constantly “enjoy” the stomping of small children or other people’s conversations. To improve the soundproofing effect, the screed is laid on a layer of noise-absorbing material - foamed polyethylene, mineral wool or polystyrene foam.
Special rules define standards regarding the permissible noise level in a home:
- During the daytime – 40-55 decibels.
- At night - 30-45 decibels.
If you don't adhere to them, problems will arise with your neighbors. It is almost impossible to achieve complete sound insulation, but reducing the level of household noise in your family by an order of magnitude is a feasible task. For such purposes, a floating screed was specially developed, the design of which eliminates contact of resonating surfaces.
Insulation
The lion's share of heat loss in the house occurs through poorly insulated floors. First of all, this applies to the first floors, basements and country houses. For thermal insulation, screed is used in combination with expanded polystyrene and mineral wool.
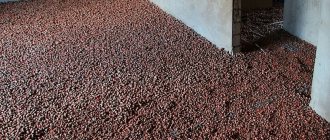
In rare cases, expanded clay chips are used to install an insulated floor screed, but to obtain a good result, its layer must be thick enough.
Insulation of the floor under the screed using expanded clay
In order for the desired effect to be achieved, it is necessary to use materials of the required density:
- Mineral wool – 180 kg/m3.
- Expanded polystyrene - at least 25 kg/m3.
Waterproofing
In some rooms it is very important that their floors do not allow moisture to pass through. This primarily applies to the bathroom, toilet, kitchen and basement. Also, moisture resistance will not be superfluous in any other room. Laying waterproofing material into a common “pie” depends on which side the protection is needed. For example, in a basement, moisture spreads from the soil, which is why the bottom of the screed is equipped with waterproofing. Bathrooms and other rooms where water often gets on the floor are decorated with a screed with moisture protection on top. In areas such as swimming pools and showers, a certain slope is necessary for the outflow of water towards the sewer funnel. This is achieved by laying the solution at the desired angle.
Concrete pool floor screed at an angle
Strengthening the floor
Even if the house is made of panels, it is advisable to do a floor screed, because... ceilings do not always have the proper strength and quality. Proper laying of the cement-sand mixture allows you to end up with a flat, strong base that can withstand significant mechanical loads. This is especially important for industrial areas, where the finishing serves as a finishing coating.
Increasing the overall floor level
As a major renovation progresses, one often has to deal with the problem of different floor levels in individual rooms. The most practical way to make it the same everywhere is to level the foundation throughout the entire house using a screed. There are also cases when, according to the project, one of the rooms should be slightly higher than the others. A screed laid locally in one room will also help achieve the desired result. To avoid the solution from flowing into other rooms, formwork is used.
Conditions for laying communications
For inconspicuous laying of pipes, wires or cables without gouging walls, a leveling concrete layer is used. In this case, communications are laid first, and then the solution is poured. All conductive lines must be placed in special waterproof corrugations.
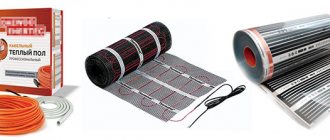
In addition, heated floors (electric or hydronic) are often installed in the screed. This makes it possible to reliably protect them from mechanical influences. Due to the excellent thermal conductivity of concrete, the heat from the circuit is distributed evenly over the entire surface.
Heated floor screed
Features of concrete floor screed
Each type of screed has its own usage characteristics and installation recommendations. Concrete screed is no exception. Due to its massiveness, this option is not suitable for installation in rooms with a light base or a base made of wood, since such a floor may collapse. Concrete screed also has a special parameter - tensile strength. Due to the fact that the wooden base will remain quite mobile in any case, the screed itself may crack. The quality of this floor leaves much to be desired. That is why the concrete option is recommended to be installed either in apartment buildings or in private ones, where there is a solid and immovable foundation.
Example of a concrete screed
Preparing the mixture
If the mixture was purchased ready-made, then there are usually no problems with it. All you need to do is follow the manufacturer’s recommendations, which are on the packaging or in the instructions for use. You just need to thoroughly knead the entire mixture with a construction mixer until it reaches a homogeneous consistency, reminiscent of sour cream.
If you wish, you can not take the ready-made mixture, but make it yourself. For example, to obtain M300 you need to take part of the M400 cement mixture and mix it with two parts of sifted clean sand.
Preparing the mixture is a simple matter
Types of floor screeds
Floor screeds differ in the method of adhesion to the floor, installation options and composition.
Dry screed
Excellent for leveling floors with large differences in height and in rooms where additional weight load is undesirable. A covering made of chipboard, gypsum fiber or plywood is laid along the logs on an expanded clay backfill. Dry screed does not require time to harden and is as simple as possible to implement.
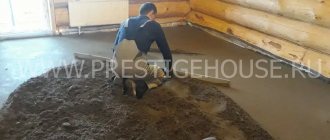
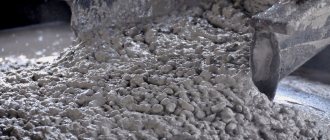
Wet screed
Concrete, gypsum or cement mortar is the most popular method of pouring the surface before the final coating. Suitable for leveling subfloors in new buildings. The screed is based on cement and other fillers; when dry, it weighs a lot (100–120 kg per 1 sq. m of floor), so it puts a serious load on the structure. But at the same time, wet screed is very durable and, when poured correctly, provides a high-quality, indestructible coating for many years.
The process of laying wet screed takes a lot of time. Concrete screed and cement-sand mortars dry at the rate of seven days per 1 cm of coating thickness - that is, a standard 4 cm screed should dry for 28 days. Much depends on the composition: the more water, the more time the material needs to dry completely. High humidity and low indoor air temperature also “slow down” the process.
Self-leveling screed
A good option, but expensive and acceptable only for small floor unevenness (up to 2 cm). It is often used on top of a regular wet screed to make the surface as smooth as possible. An additional bonus: the mixture spreads on its own and fills small depressions.
Screeds can be single-layer or multi-layer. The latter are poured in two stages - rough (about 2 cm) and finishing (0.03–0.2 cm) surface.
Photo: Shutterstock
How much mixture do you need?
In addition to the issue of manufacturing and application, you need to think about the consumption of the mixture. As a rule, this data is indicated on the packaging, but since each has its own conditions, it is necessary to carry out calculations. But before that, you need to measure the area of the floor that needs to be filled with this screed. The calculation will look like this:
- a layer 1 cm thick will require the use of 22 kg of mixture per square meter of room area;
- the optimal layer of screed is 3 cm, which means that 22*3=66 kg of mixture must be spent per square meter of area.
Important! It happens that there are large differences in the floor in a room; they must be leveled.
When choosing a mixture, you can always simply use a calculator to accurately calculate the required amount of mixture - everyone has a calculator.
Important! If a warm floor is installed, then a layer of 40 mm or more is needed.
You need to correctly calculate the amount of mixture before using it.
Calculator for calculating the amount of mixture for floor screed
Go to calculations
What is the difference between wet, semi-dry and dry screed?
Wet screed is a classic cement-sand mortar that is poured directly onto the floor slab or onto a layer of hydro- or thermal insulation. The disadvantages of this method are the labor-intensive installation process and the length of time it takes for the solution to mature (up to one month). But what’s a shame is that the surface is not perfectly smooth and most often requires additional leveling using special mixtures.
Semi-dry screed is an improved version of the wet method. The composition is prepared on the basis of cement-sand mortar with the addition of fiber fiber and plasticizers. These additives made it possible to significantly reduce the amount of moisture in the solution. Thanks to this, it is easier to work with the solution, the screed dries much faster, and the surface is additionally leveled with a special trowel. This method has, perhaps, only one drawback - the need to use special equipment - a pneumatic blower that mixes the components and delivers the mixture to the site through hoses.
Photo: ultrapol.by
Self-leveling solutions
Such materials are sold in the form of packaged dry mixtures from which a working solution is prepared. The purpose of self-leveling mortars is to create a thin leveling layer on the concrete surface. The working mixture is poured onto the prepared surface and distributed over it. Due to its properties, the solution self-levels, that is, it forms an even horizontal plane. Thanks to special additives, this material quickly sets and becomes suitable for laying finishing floor coverings.
Important! It makes sense to choose such a material to create a flat surface only in cases where you need to bring an existing screed to an ideal state. The cost of self-leveling solutions, frankly, is quite high, so it is very expensive to form thick layers with such material.
Comparative characteristics of different types of screeds
| Options | Screed type | ||
| Dry | Wet | Semi-dry | |
| Technique used | — | concrete mixer | pneumatic blower, vibrating screed, trowel |
| Withstands loads from furniture and equipment | minimum | big | significant |
| Moisture resistance | minimum | average | significant |
| Lifetime | average | big | big |
| Recommended temperature | any | +5 and above | +5 and above |
| When can you walk on the screed? | straightaway | in 3-4 days | after 12 hours, after 2-3 hours you can move around in special shoes |
| When can you lay tiles or laminate? | straightaway | no earlier than 30 days | in 5-20 days |
| Load on load-bearing structures | minimum | significant | insignificant |
| Cost per sq. meters | from 750 rub./sq. meter | from 800 rub./sq. meter | from 800 rub./sq. meter |
Note! When calculating the cost, only materials at average prices from Moscow online stores are taken into account. To this amount should be added the costs of paying workers, servicing this screed, for example, during the drying or post-processing process (leveling, polishing, cleaning, etc.).
Our company offers floor screeding services in a new building at a price of 450 rubles per square meter. Absolutely everything is included in the price!
What is the best screed in a new building?
We talked about the main types of ties and their possible applications. Several conclusions can be drawn:
- Dry is recommended for wooden floors on the first floors. The main disadvantage is susceptibility to moisture. Without high-quality waterproofing, the floor covering will quickly lose its original appearance.
- Wet requires mandatory reinforcement. It is easy to install, but makes the structure very heavy. It is recommended to be used when there are significant differences in heights; it is more suitable for a garage than for a new building.
- Semi-dry allows you to quickly complete repairs. You don't have to wait a month for it to dry completely. Within a few days you can lay tiles or laminate.
If you don’t want to wait six months for the opportunity to move into your own apartment in a new building, when arranging the screed you should choose a semi-dry one. The likelihood of the slab getting wet is reduced; neighbors below will not complain that wet spots are “blooming” on their ceilings.