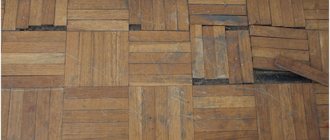
Even if you accurately calculate the parquet board or parquet needed for your rooms, there will still be leftovers. Are there any unused parquet floors left after the renovation? Set them aside in the pantry. Let's say one of the parts is cracked or hopelessly damaged by some caustic substance. The die needs to be urgently replaced.
The floor is laid so that the damaged board can be removed without damaging adjacent tiles. A couple of pieces saved “for a rainy day” definitely come in handy.
Another option is to contact our company and offer to buy out the remaining balance. Sometimes this is an essential necessity for us. The main thing is to keep the receipt and packaging from the batch.
Below are practical examples of what you can make from parquet with your own hands. You will need a minimum of tools and materials. The main thing is a creative approach and attention to the needs of your home.
What kind of home furniture can be made from parquet?
A good way to use loose floorboards is in furniture doors. Give old cabinet furniture new life. For example, cover it with laminate.
Oak is resistant to changes in temperature and humidity. Narrow cabinets for small items can be easily assembled from parquet.
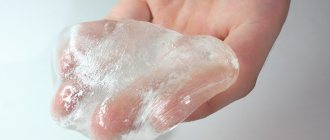
An effective method for attaching them is with a glue that is water-resistant and suitable for wood. A good brand of polyurethane compound is quite suitable. After the parts are glued, the seams need to be additionally coated, sanded after drying and the parts coated with waterproof varnish.
The practice of our clients shows that it is possible to make useful and original things for the home from parquet.
Below is advice on how to assemble a cabinet from parquet on a balcony or loggia
You will need about 8 squares of parquet.
The cabinet will look very impressive - “oak-like”.
It goes without saying that it is better to lay out facades using tiles. The height of our loggia is 1.6 m. We decided to make the bottom of the furniture along the entire width of the balcony. The height of the cabinet was planned to be 1.1 m.
Between its end and the window frame a small space was left for a natural niche - that is, the lower part of the cabinet is one compartment wider than the upper ones. The shelves were assembled from wooden lining. Several meters of polished timber will be needed for the frame - crossbars, racks.
For each shelf you need four crossbars - two transverse and two longitudinal. One of them additionally serves as cladding for the front end of the shelves. 5 mm fiberboard or plywood is suitable as a base for the door.
The dies were glued on, then each door was framed with plastic molding. Before laying the parquet flooring on the base, indentations along the width of the frame were marked.
I was pleased with the constructive solution: now our loggia is decorated with a full-fledged, spacious closet.
Let me clarify that the parquet cabinet on the balcony very successfully covered the ugly balcony slopes, on which the plaster very often flies off due to temperature changes. Now they are not visible. And before they looked the same as on the page with photographs showing similar plastering of slopes. Just pleasing to the eye...
It can also be made from parquet boards. Do you think that parquet and parquet boards are the same thing? Not at all. Read about the differences between parquet and parquet boards.
Cosmetic (surface) repair of plank coverings
This section will look at some of the ways to repair wood floors without completely dismantling them. Perhaps it will be discovered after an audit. that you are lucky, and, most likely, you will be able to get by with minimal financial investments and physical effort.
Surface scraping and damage repair
If the floors are strong and do not creak, but are covered with numerous layers of paint, and the boards are somewhat deformed, that is, they have bent or sagged along their length, then the situation can be corrected with the help of sanding.
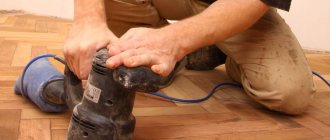
If scraping is carried out using a tool specially designed for this purpose - a scraping machine, then the work of an experienced craftsman will take one day. This procedure will help get rid not only of old layers of paint, but also of uneven boards.
Floors after the first stage of sanding
After the floors are leveled, they should be thoroughly cleaned with a vacuum cleaner. The clean surface should be carefully inspected for cracks in the boards and excessively wide gaps between the floorboards. If any are found, they need to be repaired using ready-made wood putty or a self-made composition of PVA glue and small sawdust. Homemade putty should have the consistency of thick porridge.
Applying putty mixture to surface defects found on the floor.
The putty is applied using a metal or rubber spatula, so that the recesses in the wood are filled to the level of the main floor, and the surface is as level as possible.
Sealing wide gaps between boards
If wide gaps have formed between the boards, you cannot fill them with putty, as it will simply fall down. But to close them, you can use narrow slats or silicone tape.
Installing tape in the gap between the boards
Silicone is elastic, and the tape needs to be bent in half so that it forms a kind of channel in the gap, thanks to which the putty will stay at the desired level. The edges of the tape should be recessed into the gap and rest against its walls.
Filling gaps between floorboards with silicone
If the cracks have an average width, for example, 4÷5 mm, then silicone can be used to close them. To use it, you will need to purchase a special construction gun that will help squeeze the mass out of the tube.
After the material used for repair has dried, you can move on to the next stage of work. If putty was used for sealing, it should be sanded - this can be done with an electric hand sander - belt or eccentric.
Installation of plywood on plank floors
Sturdy plank floors with wide gaps can be used as a subfloor under plywood. There will be no problems with this if the floor surface is smooth, but most often during operation it becomes somewhat deformed and therefore requires leveling. On an uneven surface, plywood will creak and sag.
Wide gaps between the boards in a wooden floor will help heat escape quickly from the room
An important preparatory step before attaching plywood, in addition to leveling the surface, is to check the boards for reliability of their attachment to the joists, otherwise they will creak under the new coating.
If the boards “play”, then they should be securely fixed to the joists with wood screws, but so that the fastener heads “sink” into the wood and do not interfere with surface treatment. . After this, you can proceed to sanding the floors. In this case, it is not necessary to completely remove the paint from the boards, since the main task is to level the surface.
Sanding planks for plywood installation
It is recommended to treat the scraped plank covering with an antiseptic wood primer, which will protect it from rotting and from insects that destroy wood.
For flooring, plywood sheets measuring 500x500 (600) mm are most often used. If you plan to lay two layers of material, then a thickness of 10 mm is sufficient. For one layer of flooring, you should choose sheets with a thickness of 18÷20 mm. However, experienced craftsmen still recommend installing two layers, as the design is more reliable.
Attaching the first layer of plywood
It is best to use double fastening of sheets. That is, they are first fixed with glue for plywood or parquet, and then additionally secured with self-tapping screws. Each sheet is fixed along its perimeter and diagonally. Plywood rows are laid relative to each other with the seams offset by ½ of their width, tied together, that is, according to the principle of brickwork.
Laying the second layer of plywood.
The sheets laid as the second layer must be laid so that not one of the joints between the sheets of the lower layer coincides with the joints of the upper one. It is also recommended to attach the second layer with glue and screws.
When fixing plywood with self-tapping screws, their heads must be recessed into the wood. To do this, it is very convenient to use a special bit for a screwdriver - with a “skirt” limiter. If you plan to make the top layer decorative by covering it with varnish or paint, then the caps should be below the level of the main floor surface so that they can be covered with putty. If a laminate or other hard covering will be laid on top of the plywood, it is enough to recess the caps to the level of the main surface.
Sanding plywood covering
The edges of adjacent sheets of plywood should be at the same level. In case of small differences, the floors are leveled to perfection using a scraper or grinder.
The joints of the sheets of the top layer, which will become decorative, must be covered with putty, which can also be made from PVA and sawdust left over from cutting plywood.
When the putty dries, the joints are sanded so that they are almost invisible.
Before coating plywood with varnish or paint, its surface must be primed by applying two or three layers of primer. This stage is necessary to ensure that the paint layer lies evenly on the surface.
If you plan to lay one of the finishing decorative coatings on top of the plywood, the work is carried out according to the recommended technologies for the selected material. These processes can be found in detail on our website in separate publications.
Eliminating squeaks
Another common problem that occurs with old plank flooring is squeaking, which negatively affects the mood of the residents. To get rid of unpleasant sounds, it is not necessary to dismantle the boards and replace the flooring with a new covering. If the floors are durable, but squeak, there may be several reasons for this:
- loosening the fastenings of the boards to the joists;
- the wood has dried out;
- the boards have increased in volume due to increased humidity;
- in certain areas the boards “play”, touching each other;
- the fastening of the joist to the base has weakened;
To decide on the repair method, it is necessary to inspect the coating, which will help identify the areas of the floors where creaking sounds occur. To do this, you should clear the surface of carpets and furniture and walk along it along and across the flooring. If several zones are found, it is best to mark them by outlining them with chalk, after which each of them will have to be examined more carefully.
Fixing boards to joists when the fastening is loose
- Loosening of fasteners leads to the fact that the board is not firmly fixed to the support. Therefore, when you press it, a squeak may be produced from the friction of the board against the log beam or against a nail or self-tapping screw. In this case, it will be enough to remove the old fasteners and fix the board to the beam in another place. In this case, the head of the nail or screw should be recessed into the wood.
- If the board at the fastening point has dried out, and therefore the head of the fastening element falls into the wood, and therefore does not fix it on the joist, then this part (or even the entire board) should be replaced.
When you lift up a damp board, you can sometimes discover more serious problems underneath it; for weeks it’s just a creaking sound.
- If the floorboards are too moistened, causing them to swell and there are no gaps left between them, then squeaking may also occur due to friction of the parts. In this case, minor repairs are not enough, as the problem will appear again. Therefore, you will have to eliminate the source of the problem. To do this, you need to dismantle the covering, dry the base, provide it with reliable waterproofing, and only then install new floor parts. It should be taken into account that damp wood creates a favorable microclimate for the development of mold colonies and the activity of various insects, which can seriously harm the health of apartment residents.
Pouring talcum powder into the seams between boards
- If the covering boards are thin and the joists underneath them are spaced too far apart, the boards can “play”, creating a squeak. In this case, ideally, the covering should be dismantled and reinforced with additional supports. However, if this is not yet possible, then to temporarily eliminate the squeak, you can use regular talc, which is sold in any pharmacy. Powder poured into the gaps will soften friction and eliminate unpleasant sounds.
Instead of talc, you can use graphite powder, as it also softens the mutual friction of two hard objects in the floor structure.
This option is suitable if the gaps between the boards are small, otherwise the talc simply will not stay in them. This technique will temporarily solve the squeaking problem, but in the future it is recommended to carry out a complete repair of the coating, possibly with replacement of parts.
- If the floors are fastened in only one place, then unwanted sounds can be removed using polyurethane foam with a slight expansion.
Filling cracks with polyurethane foam with slight expansion
Narrow gaps are slightly widened using a spatula, and the length of the repair area is limited by drilling small-diameter holes. The seam is then filled with foam. Its excess can be removed immediately with a damp cloth, or after hardening, the mass can be carefully cut off with a sharp knife.
Strengthening the plank flooring with an anchor bolt
- If the boards are securely held on the joists, but creaking is still created, then it is possible that the fixation of the joists to the base has weakened. In order to remove the load from the log, you can make additional support for the board using an anchor bolt.
A through hole is drilled in the board next to the joist. The hole at the top of the board widens to accommodate the bolt head, as it must be recessed into the wood. Through the same hole, a hammer drill drills a channel in the base (ceiling) to the diameter of the anchor.
Then the anchor is inserted and the fasteners are screwed in, which will attract the board to the base and joist. Another option is a through hole drilled through the board and joist into the base. In this case, the bolt will attract the entire structure, that is, both the board and the joist, to the concrete base.
Home garden, kitchen and... poultry house made of parquet
The simplest use of leftover laminate is in boxes for seedlings. They need to be protected from the inside with oilcloth, since the laminate will not withstand prolonged interaction with moisture.
If you slightly reduce the thickness of the parquet using a hand-held power saw, you can assemble kitchen hot pads. As an option - small square cup holders.
Another family is sure that parquet can be made into an excellent refuge for birds.
Over the course of several evenings, as many as 4 birdhouses were collected.
What can be made from parquet scraps or scraps?
It took a couple of packages of acacia parquet 30 x 5.5 x 2.2 cm.
The dies were glued together with PVA into boards of the required size and secured with self-tapping screws in several places. If the glue suddenly becomes soggy, the bird house will not fall apart. The only problem was the natural hardness of acacia. Before screwing in the screws, I had to drill holes with a drill.
If you have not figured out where you can use leftover parquet, then contact our company for a free consultation on this issue.
A little about the material
Parquet usually consists of three layers of wood, firmly bonded together. The upper part is coated with oil or varnish and is the largest in terms of thickness. Thanks to this, the product can be restored by sanding if, after years, the floor has lost its attractive appearance. Among the main properties of parquet it is worth noting:
- wear resistance;
- low thermal conductivity;
- withstand temperature changes;
- antistatic characteristics;
- moisture rejection.
Usually only high-quality material is endowed with all of the above characteristics. Therefore, before deciding what to make from old parquet, carefully read its properties.
Geometric figures.
Painting in the shape of squares or hexagons in a checkerboard style are very popular. The most traditional option is to alternate black and white squares, but there are many other examples. Choose bolder colors that will radically change the atmosphere of your interior.
Kitchen accessories
When deciding what’s missing at home, head straight to the kitchen. Since parquet has good performance properties, it can be used to construct:
- cutting boards;
- stand for hot utensils;
- containers for dishes;
- container for sweets.
Parquet products such as coasters are especially practical. With their help, you can protect the surface of the countertop from damage and at the same time decorate the interior with a unique and original element. It is unlikely that any of your friends will make exactly such crafts from parquet.
Designer items
Old parquet has high performance characteristics. Decorative items made from flooring are very durable and will last for decades. Due to their uniqueness, designer items will become a beautiful extension of the interior.
Kitchen equipment
It is easy to assemble a cutting board from old parquet, following the laying method you like. Compact models can be hung on the walls, completing the composition of a rustic or Provencal style. Large structures whose dimensions match the tabletop look very nice.
From old parquet you can make coasters for hot dishes or a decorative tray. To assemble a compact model for a frying pan or saucepan, 4 dies are enough. The design is perfect for beautifully serving cups or plates in the kitchen.
Designers use the beauty of old parquet wood to create containers for candy. The decorative arrangement of lamellas will become a bright detail on the window sill, while turning the area into an additional storage area. The dies are used to make a stand with hooks for towels and a screen for the radiator.
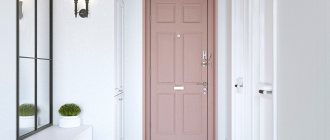
Items for the hallway
Practical, durable material is perfect for use in the hallway. Old parquet flooring is often used to make a rug for a hallway. The design can be either traditional (with a pattern) or in the form of a lattice. The dies decorate the facades of the shoe rack and the surface of the front door.
You can make a convenient designer hanger from old parquet. When connecting the lamellas, free space is left between the parts. A shelf for gloves and hats is mounted on top. Hooks for clothes are screwed to the dies, and large holders for umbrellas are installed on the sides.
apartment flood report sample filling
The old parquet in the hallway will become an original lampshade. The basis is a metal profile bent in the form of a circle, square or triangle. The parts are glued to the frame with furniture glue; after drying, the remains are removed with sandpaper. The lampshade can be tinted with varnish or hard wax.
A bench is being assembled from old parquet into the hallway. A low chair with a decorative seat can additionally be used as a stand for bags or plants in outdoor pots. The typesetting surface and back of a narrow shoe bench are coated with varnish or epoxy resin.
The slats are perfect for creating picture frames or mirrors. The design consists of a thin base and a decorative part. Wooden parts are assembled using flooring laying technology, adjusting the size and pattern. Glass or design is inserted into the grooves.
Old parquet will become an original wall clock that will decorate the interior of any room. The base of the device is made from dies, selecting the desired shape and thickness. A clock mechanism is inserted inside the structure. Toothpicks and cloves can be used instead of numbers. In modern designs, models without marks are appropriate.
Making boxes
Another original solution for using leftover flooring is to make a box for storing things and various items. Even if there is a chest of drawers in the house, the need for additional capacity still arises. Therefore, you shouldn’t even think about what you can make from parquet with your own hands. Just make small boxes that are ideal for storage:
- toys;
- offices;
- documents;
- clothes and other things.
Do you love gardening? Make seedling boxes for growing various plants. Using a similar principle, it is possible to construct a container for storing cereals, berries and vegetables. So you can do a lot of things with old parquet.
Eliminating squeaks
Over time, the installation of a wooden floor leads to drying out and changing the shape of the boards. As a result, the floorboards begin to creak. Causes of floor squeaks:
- Gaps form between the boards and joists;
- the ends of the floorboards rest against the walls;
- fastening elements have become loose;
- friction between the side surfaces of the boards.
A squeaky floor usually requires major repairs. This is not always possible. Often, owners make cosmetic repairs to the wooden floor in the apartment so as not to open it. This can be considered a temporary measure, since a lasting effect is not expected here.
If you have a subfloor in your home, a creaking floor can be repaired by inserting wedges from below between the floorboards and joists. There is no access to the floor from below in the apartment, so the following methods are used.
- The floorboards are secured with self-tapping screws installed oppositely at an angle of 45–600 to the surface of the board, which should be pulled to the joists.
- Talc or graphite powder is poured between the floorboards.
- The space under the boards is filled with foam.
- The floor is covered with 12 mm thick plywood sheets.
- On creaking floorboards, nails are replaced with self-tapping screws. Such an event often eliminates problems with squeaking.
What else?
As you can see, it is not difficult to find a use for leftover or dismantled flooring. In addition to the above options, there are other ideas on what to do with parquet flooring. So, to make your home practical, functional and decorative, build several protective structures for:
- doors;
- furniture facades;
- heating batteries, etc.
If you have imagination and desire, you can actually make even:
- stool;
- table top;
- window sill and much more.
There are hundreds of options for how to use old parquet. Therefore, feel free to implement your design ideas and find a worthy use for such useful building material.
You can make homemade furniture from it, such as a coffee table or bedside table.
Laying it out with a Christmas tree will look even more impressive. Sometimes parquet is used to make wall paels. Or you can lay parquet in the backyard. By adding some gravel.
In my opinion, first of all it is worth thinking about the restoration of the flooring.
Parquet, and especially oak, is an extremely durable coating, the service life of which (with proper care) is 100 years or more.
But if there is no desire to engage in the restoration of the coating, then the following products can be made from parquet blocks:
Use separate lamellas to cover the facades of furniture, for example cabinets or kitchen furniture.
Fireplace trim with parquet.
Can be used as fuel for a stove, solid fuel boiler, fireplace, etc.
As for how, for example, a table can be made from steel corners, only the tabletop will be made of parquet, or a wooden table can be made.
If from corners, we weld the table frame, attach chipboard, MDF, plywood, etc. under the parquet (this is about table tops).
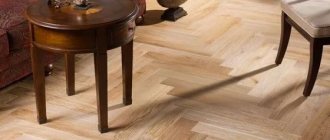
Next, we lay the parquet according to the “classic” version, for example, “herringbone”, installation of adhesive with KS glue as an option, connection of tongue-and-groove dies, trimming along the edges.
There is no need to throw away the old parquet, or use it as firewood. You can make many useful things from it, for example, a small decorative fence, using a transverse strip and nailing parquet boards to it at the required distance:
Major renovation of floors in Khrushchev
The overhaul of floors in a Khrushchev-era building includes all its types associated with the complete dismantling of the wooden covering and the creation of another one from new materials. It could be:
- pouring a cement-sand screed followed by laying a decorative coating on top of it;
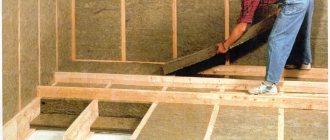
- installation of new wooden floors on joists with or without insulation;
- laying dry screed.
Cement-sand screed in Khrushchev
On our website, many publications are devoted to the arrangement of cement-sand screed , where the process is described in detail.
Installation of floors on joists
The technology for creating wooden floors on joists is also described in detail in the corresponding article.
And in our article we will further discuss in detail the option of repairing floors in a Khrushchev-era building using a “dry screed”.
But first, we recommend watching a video that showed the very difficult process of dismantling the old floor in a Khrushchev building. A wide variety of “surprises” may await you there.
Video: Dismantling an old wooden floor in a Khrushchev building
Major floor repairs in a Khrushchev-era building using a dry screed
In the example demonstrated, the craftsmen perform work in a small apartment, from the rooms of which it is difficult to remove large furniture, for example, a wardrobe. Therefore, we have to adapt to these circumstances. It took one working day to repair the floor in each room of the apartment.
The advantage of this technology is the following:
- The relative simplicity of arranging floors, the ability to do it yourself.
- Lack of dampness in the apartment, which inevitably occurs when installing a “classic” cement screed.
- Less weight of building materials, that is, less load on the floor.
- There is no need to use a concrete mixer - saving energy and keeping the premises as clean as possible during major repairs.
- There is no need to use additional material for insulation and soundproofing of floors, since this function is performed by expanded clay backfill.
- Expanded clay does not rot or decompose, rodents and insects do not live in it.
- All board materials are environmentally friendly.
To work you will need to purchase the following materials:
Instead of expanded clay, granulated foam glass backfill can also be used. True, it is much more expensive.
- Special expanded clay backfill of fine fraction (4÷10 mm).
- Gypsum fiber sheet floor elements, e.g. They are made in two layers, with 50 mm mounting locking lamellas along the edges.
GVL - floor elements for laying a covering over dry backfill
- If the floors are to be installed on a concrete base, then a waterproofing material (200 micron thick polyethylene film) should be laid under the expanded clay backfill, extending it onto the walls, creating a kind of “container” with a sealed bottom;
- Self-tapping screws for fastening slabs to mounting lamellas.
- PVA glue or similar.
- Elastic tape to create a deformation layer around the perimeter
- Polyurethane foam for sealing holes in the base.
- A backing for a decorative coating; in this case, foamed polyethylene under a laminate is used.
The online calculator below will help you calculate the amount of materials for a dry screed.
Calculator for calculating materials for dry floor screed
Go to calculations
A few nuances regarding the calculation of materials.
The maximum thickness of dry backfill is 80 mm. That is, taking into account the thickness of the GVL slabs, the floor rise is allowed up to 100 mm.
If more is needed, then an intermediate layer of gypsum fiber board is made, approximately in the center of the thickness of the backfill. For this layer there is no particular need to use the same floor elements with a thickness of 20 mm - just a sheet of gypsum fiber board with a thickness of 10 mm is enough.
gvl floor element knauf
When specifying the required dry screed thickness, the program will evaluate whether an additional layer is required and, if necessary, include it in the calculation. In this case, an additional data entry field will appear - for choosing the material for this layer. This will affect not only the amount of GVL, but also the total volume of backfill.
dry backfill compevit
All materials are calculated taking into account a reserve of 10%.
Renewing the floor with dry screed - step by step
So, let’s look at an example of converting an old wooden floor in a “Khrushchev” into a “dry screed”
| Illustration | Brief description of the operations performed |
| Craftsmen will have to dismantle the old plank covering, on top of which parquet is laid, replacing it with “dry screed” and laminate. | |
| Materials and tools for performing work are brought into the apartment and placed in a free place. The storage area must be accessible for transporting materials to the repair site. | |
| The first step is dismantling the old coating. To do this, four holes are drilled in the floor, forming a quadrangle. The holes should have a diameter that the electric jigsaw file will easily fit into. Then cuts are made between the holes. After removing the cut piece of covering, it will be possible to determine where the joists are located to which the boards are attached. Now it will be easier to navigate in which direction to make the next cuts. | |
| If you do not plan to use the logs to install a new coating, they should also be cut so that large fragments of the coating can be completely removed. If you want to preserve the timber in its entirety, the covering will have to be removed from it using a pry bar and a nail puller. | |
| By dividing the wooden covering into separate panels, it can be easily removed from the room, freeing the base. All wood chips and debris found in the former crawl space should also be removed from the surface. | |
| If there is bulky furniture in the room that there is simply nowhere to take it out, and there is no way to disassemble it, then you can temporarily leave an “island” of the old covering for it. This area should be located as close to the exit from the room as possible. At this point, new floors will be installed last, when a piece of furniture, in this case a cabinet, can be moved to the new flooring. This is one of the obvious advantages of this technology. | |
| After opening the wooden floors in this case, a concrete floor slab with a small layer of sand was discovered underneath. Before moving on to the next stage of work, the surface of the base must be thoroughly inspected, as holes of various sizes may be found there. They must be filled with foam. After the foam has dried, its excess must be removed, otherwise it will interfere with the leveling of the backfill. Next, the thickness of the sand layer can be increased to approximately 30÷35 mm and evenly distributed over the surface. Only for the reasons that simple sand is still cheaper than backfill. But this is optional. You can also backfill expanded clay directly over the ceiling, having previously covered it with polyethylene. Using a laser or hydraulic level, a zero line is drawn, from which you can dance further. | |
| A line is drawn on which the dry backfill will be placed, taking into account the planned rise in the floor level and the thickness of the coatings - gypsum fiber board and finishing. An elastic damper tape is rolled out along the walls, which can be simply pressed with heaps of dry backfill. | |
| Beacons are installed, for which galvanized profiles can be used, for example CD 60×27. It is very important - according to the “dry screed” technology, the beacons are exclusively temporary, and must be removed after leveling - before laying the hard surface. The beacons are initially installed on backfill scattered in long slides, and are leveled by adding or removing excess material. | |
| Next, between the beacons, starting from the far wall, expanded clay is backfilled. It is filled with a slight excess, just above the profiles of the beacons. Having poured the composition at a distance of approximately 500÷600 mm from the wall so that you can reach it with your hands, you can begin leveling. | |
| A rule is taken, installed on the wall on two adjacent beacons and leveling of the expanded clay begins. This process is carried out by movements first in one direction and then in the other direction. Leveling is carried out until the surface of the backfill is level with the plane of the beacons. Excess expanded clay is poured onto a free area. Next, expanded clay is backfilled, and the process is repeated. | |
| The surface of the expanded clay between the beacons should be as smooth as possible. In the same way, the entire surface is filled and leveled. If necessary, the beacons are removed from the leveled area and moved further. The small groove remaining behind them is carefully leveled with backfill. | |
| Laying of gypsum fiber floor elements begins. They should be placed from the farthest corner from the entrance to the premises. To get through the backfill to the place where the first slabs are installed, a “path” is laid there using peculiar islands made of the same slabs. The slabs are laid along the wall against the damper tape or leaving a gap of about 5÷10 mm. The panels are mounted with the lower slats facing the room. In this case, the lamellas on the starting panels are cut off from the wall side. | |
| Having laid a row of slabs along the wall, the second row is installed. If the first row was started with a whole slab, then the second should be started with half a panel, that is, using the “brickwork” principle, in which the seams of the first row should not coincide with the joints of the second. | |
| Glue is used to hold two joined panels together. It is applied to the locking lamella, onto which the next slab is then immediately laid. | |
| This photo shows how the laid slab is interlocked with two already laid panels. There should be no gaps along the lines of their connection. Leveling the backfill and laying the floor elements in this example is carried out in sections, so the beacons have not yet been removed - they will be needed for the next section. | |
| Having covered part of the surface with a gypsum fiber coating, the joined and glued panel locks are additionally secured to each other with self-tapping screws, screwed in in increments of 100÷150 mm. Thanks to this double fastening, the slabs form an almost monolithic coating. | |
| In this case, the craftsmen immediately bring the covered area to full readiness, right up to the installation of the finishing coating. The surface of the gypsum plasterboard must be cleaned with a vacuum cleaner from dust and small fragments of expanded clay that accidentally fall on them. | |
| Since in this case, a laminate is chosen as a decorative covering, a substrate is laid under it - foamed polyethylene. | |
| The laminate is installed on top of the substrate in the designated area. We will not focus on this operation - many publications on our portal are devoted to it. | |
| When a part of the floor surface sufficient for installing a cabinet is lined with laminate, it is covered with cardboard to avoid damage. Then they carefully move the cabinet onto it. | |
| Next, the remains of the old coating are dismantled, and then the beacons are installed (one, as can be seen in the illustration, still remains from leveling the previous section. Then the work continues in the order already described above. | |
| The floor is completely covered with dry screed - cleaning is being done to install the finishing coating. | |
| Laminate flooring is being laid. The plinth is installed along those walls where the cabinet will be installed, which cannot be removed. After which it is carefully moved to its permanent place. | |
| Skirting boards are being installed in the remaining areas of the room perimeter. Fastening is carried out only to the wall - it is prohibited to fix the plinth to the floor. | |
| The joining line of two floor coverings in the doorway is closed using a special threshold, which will add neatness. |
* * * * * * *
So, we got acquainted with the most common defects of old floors in Khrushchev-era buildings, and with various ways to correct them. As you can see, sometimes you can get by with “little blood”, but sometimes radical measures are required. By the way, if possible, it is better to immediately plan a major overhaul. What seems acceptable today may turn into a serious problem in a year or two, which will still require large-scale reconstruction. Don’t forget that the “original” floors in Khrushchev buildings are no less than fifty years old.
Roman Neglyadov
After renovation, a large amount of old building materials remain in the apartment. There is no need to rush to throw them into a landfill, because on the basis of these details you can create completely new things that will enliven the interior and make you look at it in a new way.
There is an ambiguous attitude towards old flooring, especially creaky, worn parquet. On the one hand, this is an outdated material that needs urgent replacement, and on the other hand, it is natural wood, the image of which is very vintage and evokes interesting images.
Sealing gaps between slats
The opposite problem to flooding can arise when undried slats are laid and, over time, unsightly cracks appear between the slats. If the thickness of the cracks does not require a complete re-flooring, the gaps can be eliminated using various putties based on mixtures:
- oil (long-drying, durable);
- acrylic (elastic, waterproof);
- polymer (for rooms with special sanitary requirements);
- solvent-based (quick-drying).
Bringing back its former greatness
Depending on the original condition, old parquet boards can be easily restored without even removing them from the floor. What is needed for this? Of course, patience and some tools.
The new parquet floor looks simply gorgeous - the glossy shine reflects the lights of the lighting fixtures, reflections play on the surface, and the wood itself adds warm and cozy tones to the atmosphere of the room. Such coating, especially from noble wood species, serves its owners for a very long time.
Expensive parquet should never be thrown away. It would be more advisable to replace the most worn dies with newer ones, or add instead elements of a different texture and color.
First, the old parquet is cleaned of old varnish and the top layer darkened over time. Without this procedure, under no circumstances should you engage in surface restoration, otherwise all your efforts will be in vain.
Next, the parquet board is sanded, with the help of which unevenness and abrasions are removed. As a result, the coating should again become smooth and lighter. If you do not have experience working with such materials, then it is best to contact specialists who have the necessary knowledge and equipment.
The final touch will be coating the parquet with varnish or special impregnation. It all depends on whether a glossy surface is needed, or whether a matte look is more suitable for the interior.
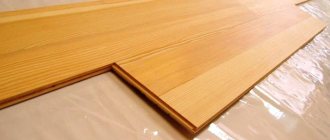
Parquet board
Another option for parquet flooring is parquet board. The material is somewhat reminiscent of laminate both in appearance and in the method of installation/disassembly. This coating can usually be removed quickly and easily, without even damaging the planks.
The structure of the parquet board
On a note! Parquet boards, as well as other types of parquet, if they are removed carefully, can be reused by covering the floor in another room. Therefore, some people take parquet with them when they move to another apartment, especially if the material is of high quality and was very expensive for its owner. However, this is only possible if no glue was used during installation of the coating.
Parquet board in the interior
Fortunately, the parquet board is usually not fixed to the base, and its dismantling is quick and easy - just carefully remove the locks.
Parquet board