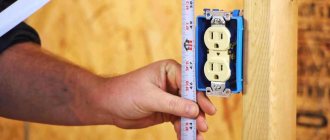
Relocating an electric stove socket
How to move a socket for an electric stove to a new location? This question often arises during a kitchen renovation. After all, an electric oven is a fairly powerful energy consumer, and improper handling of it can lead not only to its breakdown, but also to a fire. Therefore, this issue should be approached in good faith, and we will help you do everything correctly.
What kind of outlet should there be for an electric stove?
For an electric stove, you should buy a grounded outlet. The power supply in the house can be single-phase, three-phase and rarely two-phase. Based on this feature, you need to select a socket that has the necessary contacts and lay the appropriate power cable.
Interesting materials:
How to clear the built-in memory on Android? How to clear the built-in memory of an Android phone? How to clear the built-in memory? How to clean grease from a kitchen hood? How to clear a clogged file? How to clean a dirty sofa? How to clean Suede from a ballpoint pen? How to clean suede sneakers? How to clean suede sneakers? How to clean suede on sneakers?
Preparatory work
After moving the stove socket to a new location, you should perform a number of preparatory work. It is necessary to select a new cable for connection, and also choose the correct method for connecting the old and new wires.
Electric oven power supply diagram
So:
- First of all, you need to decide on the new location for installing the outlet. According to clause 12.29 of VSN 59 - 88, the installation height and the distance between the socket and the stove are not standardized. According to this point, the main argument is the ease of use of the outlet and the prohibition of its installation under and above sinks, as well as in kitchen cabinets.
- We will not describe in detail how to make walls, make recesses for embedded boxes and install them. This dusty and hard work without special equipment needs no explanation.
- After the socket box is installed and the groove for the wire is prepared, you need to think about the wire itself. The easiest way is to use a wire with a cross-section no smaller than the cross-section of the old wire.
- This is quite logical, but not entirely correct. The fact is that in Soviet times they often did it without giving a damn about the norms and rules. If you want to know how to move the stove socket correctly, we advise you to select the wire cross-section according to the table. 1.3.4 and 1.3.5 PUE. You can learn more about the section selection process on other pages of our website.
- Now regarding the connection of wires. Ideally, there should be no connections and you should replace the wire from the circuit breaker to the outlet. But alas, this is quite difficult to implement and often simply adds a wire to an existing one.
- According to clause 2.1.21 of the PUE, any connection of wires must be made by crimping, welding, soldering or squeezing. And if the first three options for doing the work yourself are not very suitable, then using clamp terminals is quite possible.
- To connect flexible copper conductors, we use quick-release terminals, or special brass lugs for connecting with screw terminals. Any terminals can be used to connect rigid copper conductors. For aluminum wire we use self-clamping terminals.
Which cable channel to choose for home and office: 7 tips
What is a cable channel? Which cable channel to choose for home and office: 7 practical tips from professionals...
4 comments
From the experience of our family, I can say that you only need to renovate the outlet during repairs. We had such a story that it was necessary to do this, the husband himself did not dare and an electrician was invited. He probably would have done everything much more carefully at home. The wallpaper was seriously torn and had to be replaced. It would be better to use an extension cord until the next repair; less nerves would be wasted.
How to connect an oven and hob | Combination socket
It is rare that a modern kitchen is complete without a built-in hob and oven. This separation of equipment provides a lot of advantages, allows you to optimize the ergonomics of the kitchen, choose equipment from different manufacturers, improve the appearance of the entire kitchen set, and much more.
The main difficulty when installing an oven and hob is the difference in the methods of connecting these devices. The oven is most often equipped with a regular Schuko Euro-plug and is connected to a standard, familiar socket, but the hob is a particularly energy-intensive device, often consuming 6-8 kW of power, so it is connected with a special plug to the corresponding power socket, which is designed for a higher current .
Not long ago we talked about choosing a cable and its cross-section for a hob (be sure to read this material HERE). With proper electrical wiring, the hob and oven are usually connected to the same connection for the electric stove. But how to do this if these devices have different plugs, moreover, most often the hob is not equipped with an electrical cord for connection at all, or the cord does not have a plug and is designed for connection through terminals.
As installers usually do in such a situation, they cut off the plug from the oven and connect these wires along with the oven through the terminal blocks to the electrical outlet coming out of the wall. The huge disadvantage of this method is that you lose the warranty on the oven due to a damaged plug.
The second option is to install a separate outlet under the oven, and the hob is connected to the terminals. The disadvantage of this method is that it is necessary to think through everything in advance, at the stage of installing the electrical wiring, and connect the power wire to the socket for the oven and the output for the hob.
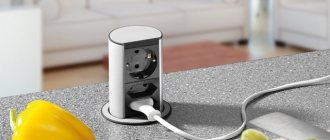
Now there is a third option that solves all these problems and allows you to correctly connect a separate built-in hob and oven, without any additional preparation, even in a kitchen in which the power output has not been specially altered - this is the use of a combined socket. A detailed example of connecting the cooker to the network via such a connector is described HERE.
In this case, this is a combined Schneider Electric socket of the Prima series (Article RA32-211R-B), which combines a power connector for a stove or hob and a standard “Euro” socket for an oven.
This socket is overhead; by installing it and connecting it to the power cable for an electric stove, you can connect both the oven and the hob to it at once. Next I will show how it is installed
INSTALLING A COMBINED OVEN AND HOB OUTLET
The delivery set of the Prima combined socket includes the socket mechanism itself, a support - a mounting platform and a bolt.
First of all, you need to fix the support on the wall, next to the power cable for the stove, as shown in the image below.
Quite often, the wall where the electrical outlet for the stove in the kitchen is located is concrete or brick, so first we apply the support to the installation site and mark the mounting holes.
Then, using a hammer drill, in the marked places we make holes for fasteners; usually a drill with a diameter of 6 mm is used for this.
We fasten the support to the wall with dowel nails. You can also use any other suitable fasteners, for example, dowels (plugs) and self-tapping screws. If the wall material is soft, such as wood or foam block, it is not necessary to make holes; you can fix the support directly with self-tapping screws.
Let's disassemble the socket mechanism. To do this, you need to unscrew the bolt on the front side (see image below)
As you can see, inside there are two separate, unconnected mechanisms, one is a 16A “Euro” socket, and the other is a 32A power socket for a hob or stove. We will connect them a little later, but now we need to secure the socket mechanism in the support, on the wall.
For this purpose, the caliper has a special “eye,” and the platform where the sockets are installed has a protrusion that fits into this “ear.”
Then you need to tighten the bolts that are located in the places where the sockets are attached to the platform. These bolts pass through the mechanism and are screwed into the caliper, where threaded mounting holes are specially made for them, thereby reliably connecting the caliper with the mechanisms.
Before proceeding directly to the connection, be sure to make sure that there is no voltage on the input power cable. You can turn off the current supply in the electrical panel; most often, it is enough to simply find the appropriate machine; it is usually of the largest nominal value, most often 32A-40A.
For your convenience, below we have prepared a diagram that clearly shows the order of connecting the wires.
Diagram of connecting wires to a combined socket
Now we move on to preparing the power cable; it is necessary to remove the insulation from it and strip the conductors. Then we connect it to a power outlet, while the phase and zero are connected directly to the mechanism, and for grounding there is a separate terminal located between the “Euro” outlet and the power one.
Next, you need to connect the socket mechanisms to each other according to the diagram; for this we use small pieces of wire with a cross-section of 2.5 mm2. It should look something like this:
We visually check all connections and perform a test stretch of all terminal bolts, after which you can put on the socket body, securing it with a bolt.
This completes the connection of the combined socket. You can check its operation by first turning on the power supply in the electrical panel. I’ll also add that a white plastic power plug is ideal for this outlet; we talked about it in detail HERE.
If you still have any questions about the combined socket, or have comments or suggestions, be sure to write in the comments to the article, I will be glad to answer everyone.
Dismantling
Any move begins with the installation of a new mounting box, dismantling the old outlet and its power line from the distribution box. When performing this action, it is important not to damage the system of the entire apartment.
You should start moving the electric stove socket by removing the voltage from the network you are going to work with. Pay attention even to the possibility of accidental touches, they can be very dangerous.
Usually there is a separate switch for the electric stove in the panel. But it is still strongly recommended to check the power point with a two-pole voltage indicator.
The dismantling progress looks something like this:
- After removing the old outlet, it is important to check whether all its wires are intact and undamaged, especially if you have a power point with a voltage of 380 V.
- In order for the stove to work correctly, pay special attention to the order of connecting the phase, neutral and protective wires, since their incorrect connection can lead to a short circuit.
- If initially, when installing the network, they relied on the PUE (Electrical Installation Rules), then blue should be used for the neutral wire, and yellow-green for the protective wire. If these tips are missing, you need to mark all the cable cores yourself.
- When the socket is in your hands, carefully inspect all its parts. The presence of any visual defects is a strong argument for purchasing a new product. The only serious cause for concern is the presence of a slight burnt spot in the contact part, which can be removed independently with ordinary sandpaper.
Output of a new branch
This method requires more time and effort, but allows for the safest transfer of an electrical outlet.
The method, which involves installing a new line, is often used in panel houses, where the wires are literally walled up in a concrete wall, and therefore it is not possible to remove them. In this situation, they are simply de-energized and left in place, and a separate groove is laid to power the new outlet.
Grilling the wall and installing the “glass”
To install a new line, the first step is to turn off the electricity in the room where the work will be carried out. On the wall, using a ruler and pencil, mark the route along which the new groove will be laid.
Using a hammer drill or grinder, a groove is cut out in the wall along the intended route. The depth of the groove is made such that the wire laid in its cavity does not protrude above the surface after installation is completed.
To install a new connection point in the intended location, using a hammer drill equipped with a crown, hollow out a “nest” 50 mm deep. The walls of the niche are thoroughly cleaned of construction chips and dust.
The installed “glass” should not protrude above the surface. If the depth of the niche is not enough, you can carefully cut off the back wall of the socket box.
Cable laying and terminal connections
The cable is laid in the created recess, fixing it every 5-7 cm with plastic clamps or alabaster.
Having opened the junction box from which the “old point” was powered, they find the junction of the output cable with the wire going to the former outlet and disconnect the wires. After this, the old line is dismantled along with the socket. If the old groove was opened, then after removing the wire it is sealed with gypsum or alabaster mortar.
The connected unit is buried in the mounting box and secured with bolts. When installing the socket, it is important not to allow even the slightest play. Otherwise, over time, it will fall out of the “socket” along with the plug.
Since it is difficult to ensure a tight fit of the wires inside the box, it is advisable to connect the wires not by twisting, but by installing terminal blocks, spring terminals or plastic caps.
When laying a new conductor, you need to ensure that there is a small margin left at both ends. It will be required in order to create a high-quality electrical connection.
The free stripped ends of the conductors are connected to the socket block of the new “point” through screw or spring terminals. When connecting via terminals, they are guided by the rule that the phase wire is installed on the left terminal, and the neutral wire on the right. The grounding conductor is connected to a terminal equipped with antennae, which is located on the device body.
The connected working unit is installed in the socket box and fixed using spacer tabs and clamping screws. A decorative panel is mounted on top.
Useful video
Sources
- https://220.guru/electroprovodka/rozetki-vyklyuchateli/perenos-rozetok.html
- https://srtmx.ru/novoe/perenos-rozetok-i-vyklyuchatelej.html
- https://oboiman.ru/ingeneer/kak-perenesti-rozetku-v-drugoe-mesto-instruktaz-po-perenosu.html
- https://prostroiku.info/kak-perenesti-rozetku-v-drugoe-mesto-instruktazh-po-perenosu/
- https://lemzspb.ru/chto-nuzhno-dlya-perenosa-rozetki/
- https://www.asutpp.ru/kak-perenesti-rozetku.html
- https://StrojDvor.ru/elektrosnabzhenie/perenos-rozetok/
- https://ElektroKlub-nn.ru/provodka/kak-perenesti-rozetki-v-kvartire.html
- https://HouseDiz.ru/kak-perenesti-rozetku-ili-vyklyuchatel-v-kvartire/
- https://MasterpoToku.ru/full/kak-perenesti-rozetku-v-drugoe-mesto-svoimi-rukami.html
- https://kachestvolife.club/elektrika/kak-pravil-no-perenesti-rozetku
- https://SamElectric.ru/elektrika/perenos-rozetki-bez-shtrobleniya.html
- https://stroypomochnik.ru/perenos-rozetok-v-kvartire-panelnogo-doma-svoimi-rukami-poshagovaya-instruktsiya/
- https://elektrika.expert/vykljuchateli/kak-perenesti-vykljuchatel.html
Working surface
How to properly remove power, and where is the best place to do it for small household appliances? Finding the answer to this question is a serious challenge for many.
Here it is necessary to take into account the possibility of simultaneously connecting the necessary kitchen appliances. For example, it is quite possible that you will need to turn on a kettle, toaster, coffee machine and mixer in one zone, so it is advisable to remove the block of 4 sockets in the appropriate place.
Naturally, it is impossible to provide for everything, so it is recommended to additionally provide for a reserve.
As practice shows, there are never too many sockets. It is considered normal to place blocks at 3–4 points at intervals of 1000–1200 mm along the entire length of the work area table top.
Please note that, for safety reasons, it is prohibited to install sockets closer than 500 mm from the gas pipe riser and wet areas, including the sink mixer.
In relation to the tabletop, electrical fittings should be placed at a height of at least 100–150 mm, which is 900–950 mm from the floor level. The final dimensions are determined taking into account the selected tile - so that the blocks fall on its center. If the electrical installation has begun, but there are no tiles, it is enough to simply separate the wires with a reserve, and install the socket boxes closer to the start of the tiling work.
Daisy chain connection
There are situations when the connection does not involve the use of high-power electrical devices, and the owner wants to save money on this procedure. In this case, you can implement the transfer option with a single loop
Rice. 8: Daisy chain connection diagram
Look at the diagram, here leads are taken from the existing outlet to connect a new one. That is, the phase is powered from the phase, and the zero from the zero, and the sockets are connected in series. A distinctive feature of such a connection is the protective conductor, which must have a separate terminal for each node, in accordance with the requirements of clause 1.7.144 of the PUE. Unlike phase and neutral wires, it is prohibited to connect protected objects in series to grounding.
The advantages of this method of forming an electrical line include lower wire costs. The disadvantages include its low reliability, since if an old outlet breaks down, the ones following it will be without voltage, and the low power of electrical appliances that can be connected to them.
A loop connection can be made to a larger number of outlets, depending on local needs, but the total power of the load connected to them should not exceed the normally permissible current for the wiring available in the electrical network.
The procedure for transferring a socket with a cable is no different from the previous version of extending the wire, with the exception that the old connection point is not dismantled, but continues to perform its functions.
Selection of required materials
When using this method, material costs are minimized.
In addition to purchasing the newest outlet for work, you need to prepare:
- wire of the appropriate cross-section;
- plastic socket box;
- hammer drill with crown D70 mm;
- indicator screwdriver;
- pliers;
- hammer;
- flat screwdriver;
- braid removal tool.
The wire itself does not have to be laid in a groove, but can be laid openly using a cable channel.
The choice of socket box model depends on the base material into which it is supposed to be buried. For concrete and brick walls, ordinary plastic “glasses” are chosen, and for plasterboard bases, models equipped with spacer legs are chosen.
Replacing the power supply cable for an electric stove from the panel
The most reliable, but at the same time, the most expensive option for moving an electric stove socket is laying a new electrical cable from the electrical panel to the required installation location .
At the same time, you get a solid cable that does not have unnecessary connections, damage, wear, etc. is the best way to move a stove socket. In addition, you can install a larger cable and use a more powerful electric stove or hob.
The advantages of this method are obvious:
- Reliability. Having decided to lay a new cable from the electrical panel to the new installation location of the power outlet, subject to all the rules for choosing a cable and laying the wiring, you will receive the most reliable solution that will satisfy all possible requirements and will serve you for many years.
The disadvantages include:
- Price. Laying a new line to the stove outlet will be the most expensive and labor-intensive method. This price is for maximum reliability.
— Installation time. Complete replacement of the electrical wiring to the electric stove socket from the input panel is a long process. If you follow all installation rules, and also take into account the future visual appeal of such an installation, you need to put in a lot of effort, which will accordingly take a sufficient amount of time.
Most often, the power cable for an electric stove is replaced entirely when a complete renovation is carried out in an apartment or house. In cases where complete confidence in the wiring is required, when it is possible to combine the transfer with general reconstruction and quickly repair all possible damage.
The most optimal, in my opinion, option for moving an outlet for a hob or electric stove is to extend the existing cable and lay it to a new location for installing the outlet , in accordance with all the rules and regulations of electrical installation.
FAQ
Question No. 1: How can you create a reliable connection of wires when moving an outlet at home?
The simplest and most accessible methods include crimping and soldering. To perform crimping, special pliers and a sleeve crimped on both sides, made of the same metal as the wire, are used.
Question No. 2: What can result from poor quality work?
When moving an outlet, each step should be taken responsibly. Otherwise, there is a high probability of sparking, melting and ignition of parts of the housing, and a short circuit.
Replacing electricity with gas
It is impossible to live in a house without gas. Gas stoves are not allowed in electrified houses. This reconstruction cannot be approved, since the apartment building must have a gas distribution system, and the premises must meet certain requirements. In this case, clause 7 is taken into account.
36 SNiP 01/31/2003 “Residential multi-apartment buildings”. Although earlier in clause 6.29 of SNiP 2.04.08-87* “Gas supply” it was stipulated that “the installation of gas stoves in residential buildings should be provided in kitchens with a height of at least 2.2 m, having a window with a window (transom), an exhaust ventilation channel and natural light. In this case, the internal volume of kitchen premises must be, m2, not less than:
- for gas stove with 2 burners. . . . 8,
- for gas stove with 3 burners. . . . 12,
- for gas stove with 4 burners. . . . 15".
Despite the fact that this SNiP has ceased to be valid, the requirements have remained virtually unchanged.
Extension cord for electric stove
The easiest way to move an electric stove or hob some distance from a power outlet in the kitchen is to use an extension cord.
Everything is simple here, we plug the extension cord into the existing socket, connect the connector itself to the new installation location of the stove, and this, in fact, completes the transfer.
The main advantages of this transfer method are:
- Simplicity. Using an extension cord, any person who does not have any special knowledge and skills in electricity and electrical installation can easily move the outlet for the stove to the place they need.
- Low cost. This solution will most likely be the most cost-effective, because you will only need to buy an extension cord for the electric stove.
Unfortunately, this method also has serious disadvantages that make this method of transfer undesirable:
— Lack of extension cords for electric stoves . It is quite difficult to find an extension cord for an electric stove on sale, especially if a three-phase connection is used. Since the electric stove is the most energy-intensive device in the apartment, the extension cord uses a large cross-section cable, as well as a special power outlet designed for high current. In addition, a large variety of power connectors of various types complicates the selection task.
Most likely, you will have to assemble such an extension cord yourself by purchasing the appropriate cable, plug and socket.
— Unreliable connection . When using an extension cord, several unnecessary connections appear in the power supply circuit of the electric stove, some of them detachable, which sharply reduces the reliability of the entire system. There is a high probability of contacts loosening and heating, which often leads to fire.
— Possibility of mechanical damage to the power cable . When moving an electric stove, the electrical cable is most often laid openly, simply placed on the floor or passed through furniture, for example, across a kitchen unit. In such conditions, there is a high probability of mechanical damage to the cable under various circumstances - this could be rodents, chafing of the cable, pets or children, or simply a break as a result of careless work nearby.
- The appearance of the room is spoiled. In everyday life, we are surrounded by many electrical appliances, all of which are plugged into an outlet. The kitchen is probably one of the most loaded rooms with various equipment; if you do not organize the connection points correctly, you can simply “drown” in the wires; they will interfere not only with cleaning the room and moving around it, but also simply irritate you with their appearance. Therefore, an extension cord for an electric stove lying on the floor will not add attractiveness and practicality to your kitchen.
— Possibility of electric shock to a person . Elements of electrical wiring accessible to people, which include an extension cord, are dangerous in themselves because they can, under certain conditions, for example, if the insulation is damaged, cause harm to human health through electric shock. In addition, due to the presence of water in the kitchen, these risks increase significantly, because pipes or plumbing fixtures may burst, and, what happens even more often, your neighbors above may flood you. In such conditions, using an extension cord becomes especially dangerous.
As you can see, this method has more disadvantages than possible benefits; the extension cord should be used only as a temporary solution, until the implementation of a more reliable, complete, comprehensively safe one, such as those presented in the following paragraphs of our article.
Should you contact a professional?
Today, many organizations offer their services for electrical work. Professionals are ready to perform installations of varying complexity. The quality of such actions is most often quite high. Each such company provides a guarantee for the installation of electrical equipment.
However, every homeowner knows that the services of a professional can be quite expensive. In this case, it is extremely important to comply with all safety requirements and PUE. Otherwise, an unprofessional technician risks serious injury. In this case, the operation of the electrical system will be unsafe. Faulty sockets and switches can cause fire, property damage and pose a threat to human life and health.
Extension cord for electric stove
The easiest way to move an electric stove or hob some distance from a power outlet in the kitchen is to use an extension cord.
Everything is simple here, we plug the extension cord into the existing socket, connect the connector itself to the new installation location of the stove, and this, in fact, completes the transfer.
The main advantages of this transfer method are:
- Simplicity. Using an extension cord, any person who does not have any special knowledge and skills in electricity and electrical installation can easily move the outlet for the stove to the place they need.
- Low cost. This solution will most likely be the most cost-effective, because you will only need to buy an extension cord for the electric stove.
Unfortunately, this method also has serious disadvantages that make this method of transfer undesirable:
— Lack of extension cords for electric stoves . It is quite difficult to find an extension cord for an electric stove on sale, especially if a three-phase connection is used. Since the electric stove is the most energy-intensive device in the apartment, the extension cord uses a large cross-section cable, as well as a special power outlet designed for high current. In addition, a large variety of power connectors of various types complicates the selection task.
Most likely, you will have to assemble such an extension cord yourself by purchasing the appropriate cable, plug and socket.
— Unreliable connection . When using an extension cord, several unnecessary connections appear in the power supply circuit of the electric stove, some of them detachable, which sharply reduces the reliability of the entire system. There is a high probability of contacts loosening and heating, which often leads to fire.
— Possibility of mechanical damage to the power cable . When moving an electric stove, the electrical cable is most often laid openly, simply placed on the floor or passed through furniture, for example, across a kitchen unit. In such conditions, there is a high probability of mechanical damage to the cable under various circumstances - this could be rodents, chafing of the cable, pets or children, or simply a break as a result of careless work nearby.
- The appearance of the room is spoiled. In everyday life, we are surrounded by many electrical appliances, all of which are plugged into an outlet. The kitchen is probably one of the most loaded rooms with various equipment; if you do not organize the connection points correctly, you can simply “drown” in the wires; they will interfere not only with cleaning the room and moving around it, but also simply irritate you with their appearance. Therefore, an extension cord for an electric stove lying on the floor will not add attractiveness and practicality to your kitchen.
— Possibility of electric shock to a person . Elements of electrical wiring accessible to people, which include an extension cord, are dangerous in themselves because they can, under certain conditions, for example, if the insulation is damaged, cause harm to human health through electric shock. In addition, due to the presence of water in the kitchen, these risks increase significantly, because pipes or plumbing fixtures may burst, and, what happens even more often, your neighbors above may flood you. In such conditions, using an extension cord becomes especially dangerous.
As you can see, this method has more disadvantages than possible benefits; the extension cord should be used only as a temporary solution, until the implementation of a more reliable, complete, comprehensively safe one, such as those presented in the following paragraphs of our article.
Transfer methods
There are two ways to move electrical outlets without disturbing the finishing material of the walls:
- By creating a loop. The method involves the implementation of a jumper from the old electrical point to the new connection section.
- By extending the wire. It is planned to extend the line in the groove.
If the new section is further than the previous one, it is better to completely replace the entire line. To do this, you need to lay a separate cable near a nearby junction box. However, laying a new wire involves a full-scale repair intervention.
The daisy chain option is not the most reliable when it comes to installing three or more power points. If even one section or socket is damaged, the entire circuit will fail, since it is organized in series. In addition, according to the terms of the Electrical Installation Rules, you cannot use a daisy chain circuit to organize power supply to large household appliances (microwave ovens, electric stoves, refrigerators, washing machines, air conditioners, etc.).
It should also be taken into account that combining a pair of sockets with one loop means a sequential load transfer from one device to another. As a result, when connecting multiple devices to jumpered outlets, there may not be enough voltage to operate them.
Below we will talk about ways to move a socket in more detail.
Wire extension options
When extending a new wire, the ends can be connected using one of several acceptable methods. The choice of installation method depends on the material from which the cores are made, their cross-section and the number of conductors.
Option #1 - using terminals
The two simplest connection methods involve the use of spring terminals and terminal blocks. Spring terminals are equipped with a lever type mechanism.
To fasten the ends of the wagami cores, you need to strip the insulation from each of them, and then insert the bare “tails” into the corresponding hole
Spring terminals can be used for both copper and aluminum conductors. On sale there are disposable pads that cannot be restored, and reusable spring plugs, with the help of which you can repeatedly disconnect the contact without hindrance.
Terminal blocks should be selected with an inlet hole whose diameter corresponds to the specified cross-section of the cores.
To switch wires using a terminal block, insert the free end of the conductive core on each side of the structure and tighten them with screws
Terminal blocks should not be used to connect aluminum cables. Aluminum is a brittle metal that can become damaged when tightening screws.
Option #2 - fixation with plastic caps
This method involves installing connecting insulating clamps (PPE) at the ends of the wires. Plastic caps are made of non-flammable material, which eliminates the possibility of spontaneous combustion of the wiring at the point where the wires are twisted.
The use of caps of different shades is convenient for creating color markings when connecting the “phase”, “zero” and “ground” conductors.
The connecting insulating clamps are made in the form of plastic caps, equipped inside with a special spring, which holds the ends of the wires
Option #3 - by twisting and soldering
The highest quality of all methods of connecting cores is welding. But to implement it you need to know how to work with a soldering iron.
To do this, strip the ends of the cable to be connected, twist them together and immerse them in molten solder. The intertwined ends are lowered into the soldering bath, and after they cool, they are wrapped with insulating tape.
Some “craftsmen”, in order to speed up the cooling process of the solder, immerse it in cold water. This should not be done for the reason that when a temperature difference occurs, microcracks appear on the metal surface, which deteriorate the quality of the bond.
Switching of electrical wires in the distribution box is most often performed by soldering and installing mounting terminal blocks