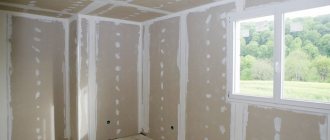
It is difficult for a home craftsman to install a frame under plasterboard with his own hands, plus such a design “eats up” at least 40 - 50 mm of area, so in residential premises leveling walls with plasterboard without a frame is more important. In the article I will talk about three methods of covering gypsum board walls and will dwell in detail on small but important details.
Installation of drywall on walls without a frame
We insulate from the outside
External insulation
Any surface requires external cladding. Wind and precipitation gradually destroy any material, negatively affecting its heat and sound insulation qualities .
Additionally, after prolonged exposure, it can cause the wall to collapse and require costly restoration.
- An adhesive layer is applied to the surface, allowing the thermal insulation materials to be secured.
- Foam-based slabs are attached to this layer using dowels.
- A painting mesh is installed on top of the foam, and two layers of putty are applied.
- When insulating and repairing external walls, the last step is to apply a decorative protective layer of mineral plasters or silicate facade paints.
How to choose drywall
There is no bad or good material; all existing modifications of sheets are designed for specific purposes.
Advice! When choosing a material, pay attention to the manufacturer (for example, Knauf), plus the documents must contain a link to a specific GOST (Russian GOST 6266-97 or GOST 32614-2012, the European analogue of DIN 18 180). A reference to specifications (technical conditions) does not guarantee quality, since they are developed by the manufacturer himself.
Now there are many modifications of sheets, you just need to know the basic ones:
- GKL is the most common option, the sheet has a gray shirt and is marked in blue, it is quite affordable;
- GKLV is a moisture-resistant cladding option, designed for kitchens, bathrooms and toilets, also marked in blue, but the outer surface is green.
- GKLO - the sheet is declared as fire-resistant, its lining is gray, and the markings are red. Suitable for finishing fireplaces, the material is also recommended for lining the kitchen stove area, but there is no point in this, the temperatures there are low, so it’s cheaper to take gypsum plasterboard.
Advice! Now you can find GKLVO - this is a universal moisture-fire-resistant sheet, the material is expensive, if you take the household sector, then the only place where the costs will be justified is the accompanying bathhouse sector (GKLVO has a green shirt, red markings).
Which sheet of drywall is better?
Leveling wooden walls
I would like to separately consider the question of how to level walls with plasterboard in a wooden house. Usually in this case the walls are almost flat, so you can work using the first method. However, wood has its own nuance. You can use less adhesive, and additionally fasten the sheets to the wood with self-tapping screws. Some people recommend using nails, but you can overdo it and drive them in too hard, bending the drywall.
Self-tapping screws should be used carefully. They are driven flush with the gypsum board, but the screw will first attract the plasterboard to the maximum, and then only “drown” into the sheet. Therefore, it is worth considering whether it is necessary to use self-tapping screws in this case.
Also, do not forget about special primers for wood with antifungal additives. Before leveling work, the wooden base itself must be covered with a special waterproof mixture to prevent rot and mold.
Making the finishing touches
When the work is completed and the wall is leveled, you need to wait for the mixtures used to dry completely. This will take 2-3 days. Then you should putty all the joints. All places where gypsum from plasterboard protrudes must be covered with putty or acrylic sealant. This is done so that moisture does not penetrate into the sheet and it does not swell in the future.
Since no self-tapping screws were used, there is no need to putty them, which is a definite plus. Everyone will decide for themselves what to do next with a flat and smooth surface. The choice should depend on what finish will be used.
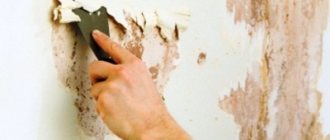
Preparing the wall
Before leveling the walls with plasterboard without a frame, they must be carefully prepared. The first step is to remove all old coverings from the wall until a solid base is obtained. All old putty and loose plaster must be removed. Work only with a strong base. The surface is also cleaned of dirt, dust and grease stains. This is done to improve adhesion.
Using a rule and a plumb line, they determine how large the difference in heights is. It is necessary to identify how crooked the wall is and where its protrusions are located. After this, it will be clear what will be aligned and where. It is along the maximum protrusion that the entire surface will be leveled. Perhaps there are small protrusions that would need to be cut off with a chisel or an ax. The smaller the height difference, the cheaper all the work will be.
If the old plaster does not adhere well, it also needs to be removed.
To know how to level a wall with plasterboard without a profile, you need to know how the working surface absorbs moisture. Depending on how strongly the wall absorbs moisture, a special primer is selected. Various primers may or may not reduce liquid absorption by the wall. For example, concrete and monolithic surfaces are coated with a “Betonokontakt” type primer. For highly hygroscopic surfaces I use Tiefengrund type primers.
For better adhesion, you can coat the back side of the plasterboard sheets with the same primer that is applied to the wall.
The dry wall is treated with a primer. The easiest way to do this is with a roller. Depending on the material chosen, two coats of primer may be required. The packaging always indicates such information, as well as how long the wall should dry out after such a procedure. Leveling walls with plasterboard without a profile is carried out on a dry surface, so you will have to wait for the primer to dry.
Wooden houses
Wooden structures are no less common. The unique atmosphere inside such a building has a calming effect on guests and owners, and the fresh and fragrant air gives a good mood .
The tree requires constant maintenance; the only repair option is to replace sections.
Using a support system, the load on the damaged part is removed, damaged logs are removed and replaced with new ones. This work is quite complex, requiring the participation of several people.
It is better to take care in advance of waterproofing, lining external walls with suitable materials, creating a drainage system and draining the soil under the house.
Types of gypsum boards
First of all, you need to choose the type of gypsum board that will be most suitable for the type of room.
There are four types of gypsum board sheets:
- standard (they have gray cardboard with blue markings, density - 800 kg/m3, thermal conductivity - 0.35 W/Mk, the most popular option, suitable for all types of dry and heated rooms);
- insulated (have two components - polystyrene foam + gypsum board sheet);
- moisture resistant (the cardboard is green and blue marked; the cardboard itself is impregnated, including antifungal, hydrophobic additives in the core material, suitable for finishing rooms with high levels of moisture)
- fire-resistant (pink or gray cardboard with red markings, density - 850 kg/m3, thermal conductivity - 0.22 W/Mk, covered with multi-layer fire-resistant impregnation, not exposed to fire for up to 30 minutes, sheet thickness 12.5 mm, They can also be used to equip home boiler rooms and industrial premises).
When choosing gypsum board sheets based on thickness, keep in mind that for a flat wall surface, thicker sheets are applied, and thinner sheets are applied to a curved surface. On the presented table you can familiarize yourself with the optimal parameters and ratios of gypsum board sheets.
Important points
Next, I will talk about those little things on which you can “stumble” and ruin your work.
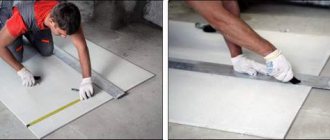
- How to cut drywall
- Mark the sheet.
- Place a ruler on the marked line, as in the photo below (you can take a rule or a level) and cut several times with a sharp knife. Your task is to cut the paper shirt and go a little deeper into the plaster.
- Place the sheet on the edge of the table and press lightly; it should break along the cut line.
- Lift the sheet, bend it slightly along the break line and cut the paper shirt from the back with a knife.
Step-by-step instructions on how to cut drywall
- To install the cladding, it is advisable to use specialized adhesive for gypsum boards, for example Perlfix from Knauf. Theoretically, it can be glued to ordinary plaster, but when it hardens, it shrinks, and accordingly the plane will move in a wave.
- The average glue consumption is about 5 kg per 1 m2, about 15 kg per sheet.
- Below, along the baseboard, you need to form a continuous bead of construction adhesive, this will make it easier to attach the baseboard later and less likely to break the sheet.
- When installing gypsum boards on self-tapping screws or beacons, glue beads can be thrown both onto the wall and onto the sheet itself, but the work is easier if you throw the composition on the wall.
- Do not mix a lot of glue, remember that the active life of the composition is about 30 minutes, then it hardens and it will not be possible to soak it by adding water.
- When sealing seams, use a professional finishing putty. There are many options, the most famous are Fugenfüller, ABS, Eurogips. Regular plaster shrinks, after which the groove will have to be puttied again.
- Any drywall at the finish MUST be puttied over the entire area . If you paste wallpaper or paint the bare gypsum board shirt, then during the next repair this coating will be removed along with the shirt, resulting in a one-time repair.
- I have seen advice to use polyurethane foam instead of construction glue; an amateur should not do this; when it hardens, the foam will expand and tear the cladding.
Scheme for plastering plasterboard walls
Clay houses
Walls in high-rise buildings do not require a special approach during repairs; all that may be required of you is preliminary leveling. A completely different approach is required when renovating private houses that are made from non-standard materials. .
House with adobe walls. These were built in areas rich in clay deposits. Clay was mixed with any fibrous materials (hay, moss, wood shavings) and bricks were formed from it.
Good quality adobe can be easily chopped with an ax without cracks and can fall from a height of human height without breaking. The masonry is the same as brick.
When repairing adobe walls, you should know that their destruction occurs due to insufficient moisture insulation.
Main factors that need to be addressed:
To strengthen an old clay structure, you can perform a simple set of works to bring the surface to perfect condition.
Installation technology
Before starting installation work, it is recommended to keep the plasterboards for a couple of days in the room where they will be used. You also need to calculate in advance how many sheets you will need. You can draw a simple installation diagram on a sheet of paper to calculate how many whole sheets will be needed and how many sheets will be needed for the remaining sections. But if the height difference is too great, then additional sheets of drywall may be required.
Leveling walls with plasterboard without a frame can be done using several methods. They depend on what height difference needs to be compensated. Let's consider three main cases.
Leveling walls with differences of up to 4 mm
The adhesive should not be on the very edge, so as not to get into the joints of the sheets.
Such a small difference indicates that the wall is almost flat, which means it is very easy to level. Most often, a metal profile frame is abandoned precisely in such cases. The most common gypsum putty is suitable for attaching gypsum boards. It is sold dry, so you will need to stir it with water until you get a thick paste-like substance. So there is no need to buy more expensive adhesive.
In principle, you can opt for acrylic putty, which is sold ready-made. There is no need to mix with it and calculate the proportions of the required water.
Apply the composition with a spatula to the back side of the drywall. Moreover, the putty is applied in small beds around the perimeter and in the center. They are leveled across the sheet so that their thickness is the same. It is important to know how to properly level walls with plasterboard under tiles. Due to the heavy load from ceramic tiles, the entire plasterboard is treated with putty, and not just around the perimeter.
Now you can press the gypsum board against the wall. Someone taps with a rubber hammer, and someone presses the sheet with their hands. By this point, you should know where the biggest bulge on the wall is and where the biggest depression is. The amount of putty and the force of pressing the gypsum board against the wall will compensate for the difference of up to 4 mm.
The solution can be applied directly to the wall
You can also apply the putty directly to the wall, but you need to know exactly how the sheet will lay. Regardless of where the adhesive is applied, you need to work with a spatula. It helps to distribute the putty evenly over the surface.
Leveling walls with a difference of 4-20 mm
Leveling walls with plasterboard using glue is carried out when the height difference is 4-20 mm. Perflix or a similar product is usually used. This method differs slightly from the previous version:
- piles are applied in 4 stripes in increments of 20-30 cm;
- the diameter of the pile is up to 15 cm, and the height is not more than 3 cm;
- the adhesive mass is applied to the wall, and very rarely to drywall;
- It is convenient to pour the solution with a ladle.
All further work is no different from those described earlier. Sheets of drywall should be attached as tightly as possible to each other. The lowest sheets can be installed on original supports (gypsum plasterboard scraps) so that they do not touch the floor. After a couple of days, the supports will need to be removed and the gap sealed with sealant.
Leveling walls with a difference of 20-40 mm
If the height difference is no more than 4 cm, then it is still possible to level the walls with plasterboard without a frame with your own hands. If the surface falls more than 4 cm, then you should think about a frame.
Strips of drywall are used to fill depressions in the surface. GCR is taken and cut into 10-centimeter strips along the length of the problem area. The strips are attached vertically to the same glue in increments of 40-50 centimeters. This way we can cover a significant difference in height, which is compensated by strips of drywall.
Such strips must be pre-treated with a primer on both sides
These strips will serve as a kind of frame, to which sheets of drywall will then be attached using the technology described earlier. Remember that such pieces of gypsum board must be firmly fixed, so you will have to wait up to three days. Now you know how to level walls using drywall without using metal profile sheathing.
A few words about safety precautions
Working with gypsum boards generates quite a lot of dust. Inhaling it will not add health to anyone, so it is better to protect yourself with a respirator. You should also ensure that dust does not penetrate into living spaces by curtaining the openings with a damp cloth.
As you can see, gluing drywall to a wall with your own hands is not such a difficult task. To do this, it is not necessary to invite a specialist of the appropriate profile. Just be patient and have a little experience, and you will succeed.
Average cost of work
By deciding to level the walls with plasterboard exclusively with your own hands, you can save significant money, because you will only have to spend money on materials and, possibly, tools.
Let's assume that we want to finish walls 3 m high in a room measuring 4 by 5 meters. To do this, we will need 15 sheets of plasterboard, 34 rack profiles, 6 guides, 136 hangers, a pack of dowel screws and a couple of packs of self-tapping screws.
MaterialPriceQtyAmount, r
| Drywall | 250 RUR/piece | 15 | 3750 |
| PS Profile | 90 RUR/piece | 34 | 3060 |
| PN profile | 70 RUR/piece | 6 | 420 |
| Suspension | 4 r/pcs | 136 | 544 |
| Dowel-screw | 300 r/pack | 1 | 300 |
| Self-tapping screw | 70 r/pack | 2 | 140 |
| Total | 8214 |
Not so much, considering the area to be finished is 54 m2. Naturally, we should not forget that for further finishing you will still need putty, serpyanka and other materials. Those who do not want to do this work with their own hands should be prepared to increase the price per square meter by another 300-500 rubles.