In what cases is grounding necessary?
So why do you need grounding? For clarity, it is worth considering a few examples:
1. For example, there is a dishwasher in the apartment. But for some reason, at a certain moment, a phase appeared on the case, and the case was not grounded. But the neutral of the power line, which leads to the house and provides electricity, is grounded, and taps and batteries are also grounded.
If you are wearing rubber slippers, then upon contact there will be no unpleasant sensations or even the slightest blow. But if there are no shoes, and at the same time the person also grabbed the tap, and the second hand is located on the body, then it becomes a conductor of electric current, which is supplied through the body to the person, and then into the ground to the neutral, and to the substation.
2. If the dishwasher is grounded? What will happen in such a situation? If for some reason a zero appears on the housing, the current will immediately go into the ground. Even if the person is barefoot, even if he is wearing slippers, nothing will happen, the grounding has worked, there is no electric shock, everyone is safe and sound. One downside, the dishwasher will need to be repaired, but it will still be cheaper and better.
3. The washing machine in the room has broken down, and the equipment body is under voltage. In this case, if the person comes into contact with the body, he will receive an electric shock. This is why grounding is needed, then the current goes into the ground and everything is fine with the person.
The fact is that the resistance of human skin is much higher than the resistance of the wire, and then the current follows the path of least resistance, enters the ground, and the person remains intact. This is one of the simplest examples, which shows why grounding is needed in a house or other building. Without such a system, the risk of receiving an electric shock increases.
Expert opinion Evgeniy Popov Electrician, repairman
It is worth taking one more point into account, especially for the owner of a private house this is extremely important information. Even if the structure is built from natural material, the amount of electrical wiring remains the same as in a multi-story residential building, but the natural material is highly flammable. It is on this basis that a grounding system in a private home can prevent the occurrence of unpleasant situations and harmful consequences.
The most terrible event that can happen is a fire; it occurs due to a short circuit or failure of electrical equipment. That is, if doubts and questions arise about why grounding is needed in a private home, you need to realize that such a system protects not only from fires, but also prevents each family member from electric shock.
Expert opinion Evgeniy Popov Electrician, repairman
The situations can be quite scary, but they are a clear example of what negligence and disregard for safety precautions can lead to. As you can see, sometimes the consequences can really be the most serious and harmful.
Installation work
Step 1 – Choose a location
First you need to decide where to make the ground loop
The importance of this stage is very high, because The safety of using the system depends on the choice of grounding location in a summer cottage
If a breakdown of the electrical wiring occurs, as a result of which the protection is triggered, then there should be no one in the place where the pins are located. The presence of a person or animal at the site where electricity is discharged into the soil can cause death. That is why the location of the electrodes is chosen taking into account the fact that no one will be there. It is best to place the outlet along the fence behind the house, at a distance of no more than 1 meter from the foundation of the building. Additionally, it is recommended to make a low fence or border to fence off the unsafe area.
If you do not want to spoil the landscape design of the area, we recommend organizing a grounding system for your residential building under boulders or some kind of voluminous garden sculpture. In this case, no one will be able to be in the danger zone and nothing will harm the beauty of the garden area!
Step 2 – Excavation
For example, let's look at how to properly ground a private house with a triangle according to the scheme we discussed above. At this stage, you need to dig a triangle with sides of 2-3 meters with a shovel (the most optimal distance between the corners). The depth of the trench should be from 50 to 70 cm. The same trench should be dug to the porch of the house.
Step 3 – Assembling the structure
Now the main part of the process begins. According to the diagram, it is necessary to drive the electrodes 2 meters into the ground (so that only the tops remain, which will need to be welded to).
It is recommended to sharpen the driven end with a grinder so that it penetrates the soil more easily.
When all the pins are driven in, it is necessary to weld the plates to the tops to form a metal triangular frame (as shown in the photo).
Another plate is placed in a long trench leading to the house, and one end is secured to the nearest vertex of the triangle.
After this, you can proceed to connecting the cable to the plate using a bolt and, ultimately, filling all the holes back with soil.
One important nuance - if the area is represented by a sand cushion, the conductivity of the soil will need to be increased with a salt solution. The liquid must be poured under the base of all electrodes. The disadvantage of such an event is that the metal will quickly begin to corrode, which will make the grounding in a private house not as powerful as it should be.
Step 4 – Control Check
The last thing you need to do is measure the resistance of the finished grounding in a private house. In a good way, to measure it is necessary to use a special electrical device, the cost of which is quite high.
At home, you can take another way to solve the problem, a simpler one - check the functionality using a lamp with a power of at least 100 W. All you need is to connect the light source with one contact to the ground loop and the other to the phase. If the light is bright, the grounding installation in your own home was done correctly, if it is dim, the contact between the structural elements is weak and the joints need to be redone. If the light does not appear at all, you have made a mistake somewhere and you will need to completely revise the entire system, perhaps starting with the circuit itself! We talked in more detail about measuring ground loop resistance in a separate article.
This concludes the instructions
We hope that now you know how to make grounding in a private house with your own hands! We draw your attention to the fact that this technology and all sizes are suitable for dachas too.
You can see the whole process in more detail using visual video examples:
Video instructions for creating a protective line (part 1)
Video instructions for creating a protective line (part 2)
Errors when installing the ground loop
Related materials:
- How to make lighting in the house
- How to make an electrician's pilot lamp
- Why does an RCD trip in a house?
Diagnostics of network grounding
The presence of a PE bus in the shield and a characteristic yellow-green wire does not always indicate that it really works.
It all depends on the condition of the metal circuit buried in the ground. If the wiring was done a long time ago, the metal has probably already been “eaten” by rust or the contact with the circuit has weakened.
Another common cause of malfunction is human negligence and shortsightedness. In order for a private house to be accepted into the Distribution Zone, the main thing is that there is a grounding input into the house, but in fact no one ever checks it, so a dummy was often made, an ordinary piece of cable was inserted into the panel, leading to nothing.
Based on the potential danger, check the quality of the PE contacts. For this purpose, RES uses expensive equipment that is not practical to buy for itself. Instead, use cheaper but more effective methods.
Checking with a pocket multimeter
You have examined the socket; all three contacts are connected correctly. Now turn on the voltage on the panel.
Use a test screwdriver to check which hole has the phase. Touch the tip of the contact and place your finger on top. In one of the two holes the light bulb should light up - this will be the phase contact.
The check is needed to make sure that the phase and zero are connected correctly. An inattentive electrician could simply confuse them when connecting.
Take the most common multimeter and touch the red probe to the phase and the black probe to the neutral. Note the displayed data.
Move the black probe to the side contacts. If nothing is displayed on the screen or the difference between the data is too large, then you have a poor-quality grounding that needs to be redone.
If the multimeter measures resistance, then simply switch it to the appropriate mode. The resistance will be displayed on the screen; the acceptable value should be within 20-30 Ohms.
This is a fairly cheap way to check. A new multimeter can be purchased from $15, and a test screwdriver for $1 is sold at any transition. Over time, they will come in handy more than once.
If you are too lazy to buy, you can do diagnostics using the “old-fashioned method”.
Verification using the traditional method
You will need a socket with a light bulb and two wires. Strip both ends 10-15mm. Now attach one of them to the phase, and the second to the side contacts. The light should burn brightly.
If the light does not light up at all, it means the “ground” is not working; dim lighting indicates a weak contact, which means the circuit is rotten, or a contact has fallen out somewhere. In this case, find and fix the cause of the poor throughput. Monitor where the yellow-green wire leads and whether it is actually connected to the PE bus in the panel. Never leave a problem just like that
What happens if you ignore the malfunction?
After checking, it turned out that the grounding is real, but not good enough to carry current. What happens if you leave it as is?
Imagine that there is a leak on the body of an electrical appliance. Electricity begins to slowly flow into the ground, but the metal surface continues to be energized. After touching the hand, a path with less resistance appears for the current - the human body. It will change direction and flow into the body, causing you to get a blow. Thus, poor grounding is even worse than no grounding.
To prevent such problems from arising in the future, do the wiring “conscientiously” at the stage of construction or major repairs. You will probably have to redo everything, including the ground loop.
How to determine phase and zero with a multimeter
In addition to using an indicator screwdriver, you can also use a multimeter to find the phase and neutral wires.
Today, there are many models of multimeters on sale, but the method that we will now consider can be used on absolutely all models (regardless of functionality and cost). For example, I have a DT9208A digital multimeter.
The first step is to set up the device to measure alternating voltage. We insert the probes into the appropriate connectors (in my case these are “VΩCX+” and “com”). Next, we set the mode switch to the AC voltage measurement sector at a value of 750 Volts.
There are two ways to determine phase and zero with a multimeter.
The first method is contact
We insert one probe into the socket connector (it doesn’t matter which one is red or black), and clamp the second probe with two fingers. If the readings on the device are close to “0”, this means that you have touched the neutral conductor in the socket
Now we move the probe to another socket of the socket. If the readings on the device differ significantly by 20-60 Volts (can reach up to 100 Volts), this means that you have touched a phase wire.
The numbers on the device may be different, it all depends on the person’s shoes, floor covering, room humidity, etc. Accordingly, the better the insulation of the floor and shoes, the lower the voltage value will be shown by the device.
The second method is contactless
The second method is non-contact, that is, without touching the multimeter probe with your fingers. We take one of the probes and insert it into the socket of the socket, we simply keep the second one near the device and do not touch anything with it. If a “zero” is connected to the socket pole, the device will show zero values.
We move the probe to another socket of the socket; we also do not touch anything with the second one. If a “phase” is connected to this pole of the socket, the device will show 3-10 Volts (up to 15 Volts).
As you can see in the photo, in my case, when determining phase and zero with a multimeter, the device shows 10 (11) Volts and 0, respectively.
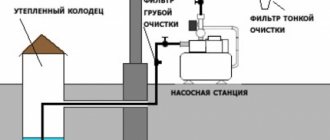
Grounding circuit without welding in country conditions
Not all owners of summer cottages have the opportunity to perform welding work. At the same time, there are requirements to connect the elements of the ground loop only by welding. You can do it differently: prepare grounding pins where it is possible to weld a galvanized bolt to each of them.
Grounding diagram at the dacha
On a summer cottage, to install a grounding loop, you first need to dig a 0.5 m deep ditch next to the house. Now all that remains is to hammer the pins into the bottom of the trench and connect one whole grounding wire with a cross-section of at least 10 mm2 to all of them. The joints should be treated with anticorrosive and wrapped with several layers of electrical tape.
The resistance of the finished circuit, of course, needs to be checked.
Do not dig at the grounding location so as not to damage the protective conductor. It is better to mark it and cover it with a board or other material in the form of a sheet.
Another way to ensure grounding without welding is to purchase a special ready-made set of copper-plated rods. Such a kit costs a lot, which will not suit everyone.
Examples of grounding connections without welding
In this case, it is quite possible to purchase galvanized pipes of small diameter, flatten and make one end sharp. Such rods are driven into the ground according to the above plan. You can connect to them using galvanized clamps with a clamping bolt, which are also commercially available. The joints should be treated with anticorrosive and wrapped with several layers of electrical tape.
Thus, we examined the features of arranging grounding in a country house with our own hands. With some effort, it is not at all difficult to provide protection against electric shock to a person. We have put together an informative video for you about how others did it.
Test method
Checking the ground loop is carried out according to a single algorithm:
- Cleaning the tire area for good contact.
- Driving 2 additional pins into the ground 50 cm.
- Connecting the busbars to the pins using the device clamps according to the diagram.
- Perform measurements according to the instructions for the device.
Place electrode “C” at a distance 5 times the length of the vertical ground electrode. Remove pins from underground utilities for data accuracy.
Technology for working with the M-416 device
Checking wires with the M416 device for resistance compliance
If a visual inspection does not reveal any faults on the ground line, you can find out the condition of the circuit using the M-416 device. The work is carried out as follows:
- Power supplies are checked. The device must have 3 batteries of 1.5 V each.
- The device is placed horizontally on a flat surface.
- Calibration in progress. The range switch is set to the “5Ω Control” mode.
- The arrow is set to the zero position. You need to press the red button and turn the rotor handle. The scale displays 5±0.3 Ohm.
- The meter is located at a minimum distance from the ground electrode. This will help prevent the resistance of the connecting wires from affecting the overall result.
- The test is carried out according to the diagram under the cover of the device. The main and auxiliary electrodes will need to be driven into the soil to a depth of 50 cm.
- Calculations are being carried out. If the resistance is less than 10 Ohms, the total must be multiplied by 1, and the switch must be moved to x1. If the measurement result is more than 10 ohms, the switch is switched to x5, x20, x100.
Dangerous grounding options
There are several methods of grounding that should not be used if you are not sure that you will do everything correctly.
Grounding the old-fashioned way
The easiest way to create a ground connection is to connect one end of the wire to the body of the washing machine using a bolt on the back wall.
Screw the other end of the wire to a water supply or heating pipe, cleaning the contact area. This method is effective and quite workable, but has its drawbacks:
- it is unsafe - even neighbors who touch the riser can “feel” the effect of electric current;
- the use of pipes as grounding conductors stimulates destructive processes; cracks intensively form on the walls, which can lead to flooding of the facility.
This solution to the problem is prohibited by electrical safety rules.
Connection with zero in the socket
In order to save money, some electricians do not pass the PE wire from the grounding bus, but short-circuit the conductors with the N wire with a jumper directly in the socket; this is prohibited!
The grounding system connects the body of the washing machine to the “ground” and helps protect the “electronic filling” of the product from damage.
Thanks to the normalization of the operation of the network RF filter along the “case” → “ground” circuit provided by product manufacturers. And to protect users, which is important when operating the unit in a damp room.
If the insulation of the wiring of the washing machine is broken, there may be 220 V on the body, so one touch is enough to give a person a good shock, and this is generally a direct threat to health and life.
In addition, grounding will help with voltage surges and when a lightning charge hits a transformer or antenna on the roof of a building. That is why proper connection of the washing machine with grounding is necessary - this is safety for you and your equipment.
Using Outlet Testers
Only when using specialized testing instruments can one judge the safety of the outlet. However, only persons who have permission have the right to use such equipment, because usually the devices test the outlet without turning off the voltage.
Using the equipment, they check the supply of electricity to the general circuit and sockets. This shield is usually located in the entrance or apartment of the residents.
Appearance of the electrical panel
All sockets are under voltage of 220 V (sometimes less), so this creates a real danger for the person who is going to test them using devices. Especially when he has little knowledge of the electrical network.
Differences between grounding and grounding
Grounding and grounding methods have different protective effects. Grounding ensures instantaneous operation of circuit breakers when a phase is shorted to the body. In this case, the connected consumers of electricity, for example, machines, transformers, are de-energized.
But this does not save a person from the effects of leakage current, and if the neutral conductor breaks, voltage will appear on the housings of electrical equipment. In connection with this, zeroing in its pure form is not used.
At the same time, in electrical equipment with a four-wire network with a solidly grounded neutral and a neutral wire with a voltage of up to 1000V, grounding is the main means of protection.
The implementation of grounding and grounding circuits has a number of differences. One of the main ones is that for grounding it is necessary to use cables with a separate core. The cross-section of PE conductors may be smaller than the cross-section of phase conductors, and their insulation is always yellow-green.
One of the main advantages when implementing grounding is the use of cheaper cable. The advantages of grounding are that it always works and does not require frequent monitoring of the quality of the connection; once a year is enough.
Connecting zero to ground (zeroing) in a private house or apartment is not only not necessary, but can also be unsafe. If the neutral wire burns out or breaks in the floor panel, then household devices operating on 220 V will receive a much higher voltage, which will lead to their failure, and dangerous voltage will appear on their cases.
By “ground” we mean a conductor connected to the housings of electrical appliances and the grounding contacts of sockets.
To ensure the greatest safety, we can recommend a grounding and grounding device at the same time. For this purpose, the TN-CS system is implemented - grounding and zero separation at the entrance to the house, in the input common house electrical panel of the ASU.
Tools and accessories for testing voltage and grounding
To find out about the presence of grounding, use an indicator screwdriver, or a light bulb in a socket from which two wires with plugs are removed. To reduce heating, it is better to take a lamp with a power of 25 W. To make the “control” safe during frequent use, it is better to place the light bulb in a special housing. The magnitude of the mains voltage can be checked by the brightness of the “control” glow.
To accurately check the voltage value, it is best to use a digital or pointer voltmeter. Pointer voltmeters can operate without a power source, unless we are talking about checking current resistance. Digital devices are characterized by maximum shock resistance and work in any position.
Ready-made grounding kits for a private home
Self-installation can significantly reduce the cost of the grounding system. However, ready-made kits allow you to speed up work and increase the reliability of the circuit. The following models can be distinguished:
- ZandZ is a circuit with one or more stainless steel electrodes. Allowed depth is up to 10 m. The price depends on the length of the pins. The average price of a set with five-meter electrodes is 23,500 rubles.
- Galmar - has electrodes up to 30 m long. The average price is 41,000 rubles.
- Elmast. This system is manufactured in Russia and adapted to Russian operating conditions. Price – from 8000 rubles.
Difference between zero and ground
The consequences of incorrect switching of the neutral and grounding conductors can be different:
- Incorrect operation of electricity meters down or up. Accordingly, in the first case, when the supplier company finds an error, a huge fine may be assessed.
- Incorrect operation of residual current devices and differential circuit breakers: with significant voltage drops, household appliances will constantly burn out.
- Lack of human protection from electric shock. Moreover, the wrong design can be the main cause of the impact.
The article discussed ways to distinguish between neutral and grounding conductors in three-wire systems. They are arranged in order of increasing complexity of actions. Only correct installation of electrical wiring guarantees the correct operation of RCDs, differential circuit breakers and sockets with a grounding circuit. If there is the slightest doubt, it is better to seek help from a qualified specialist who can provide a certificate of repair work.
Why is grounding needed?
The instructions for any electrical appliance clearly state that it is prohibited to use it without grounding. The main purpose of grounding is to ensure stable operation of complex household devices and protect against electric shock.
According to the PUE clause 1.7.6, grounding is a deliberate connection of one of the elements of an electrical installation with a grounding loop. It is constructed with the purpose of draining currents of values that are damaging or not damaging to humans through the grounding protective conductor into the ground.
If earlier two-core electrical cables were laid in apartment buildings, today it is mandatory to use wiring consisting of three cores
In the outdated system, the “neutral” partially served as grounding. The zero was connected to the metal body of the device, and in case of overload it took over it.
The calculation was that if the load was exceeded, current would flow through one of the phases, resulting in a short circuit and, as a consequence, disconnection of a section of the network by an automatic circuit breaker or fuse.
This solution simplified electrical installation work, but carried the risk of electric shock.
The legacy TN-C system does not have a protective earth conductor. For grounding in such cases, a PE bus is required in the apartment panel. If there is no grounding bus, then it is necessary to connect all the panels to each other and connect the entire group to the grounding system of the house - i.e. re-grounding (+)
It is unacceptable to connect devices whose housing is made of metal without grounding. For example: a slow cooker, microwave or electric stove. Indeed, if there is a short circuit, thinning or partial destruction of the insulation of the wires on the housing, a current breakdown may occur.
If voltage hits a conductive element, the protective conductor will conduct it further to the ground.
No less dangerous is the use without grounding of devices that come into contact with water during operation, for example: a dishwasher or boiler.
The type and design of the grounding contact depends on the model. In sockets of American brands it is presented in the form of holes with side slots. For French analogues, this is an additional third pin.
According to the current rules, new buildings are provided with TN-S or TN-CS systems with a mandatory grounding protective conductor in single- and three-phase power supply systems (+)
But most often you can find the German type of grounding sockets on sale. They are equipped with protruding metal parts on the sides.
The design of an electrical outlet with grounding assumes the presence of three contacts: “phase”, “zero” and “ground”. At the moment of switching on, in the first fractions of a second the grounding terminals come into contact, and after them the “phase” and “0” contacts are connected. This sequence guarantees complete protection.
Externally grounding sockets can be easily visually identified by the presence of an additional metal contact - the “grounding” terminal, necessary for connecting the wire directed from the electrical panel
Sockets without grounding: brief description, characteristics, application, expert advice
Nowadays, PUE (electrical installation rules) provide for mandatory grounding of outlets in private and apartment buildings. But it was not always so. In older houses and most private sectors, a two-wire system is still used - phase and neutral. To be precise, a considerable number of electrical appliances do not require a grounding contact. Usually these are various lamps in a plastic case, televisions, and musical equipment. If the distribution board does not have a corresponding busbar or one of the listed household appliances needs to be connected to the network, you can use sockets without grounding, the cost of which is much lower. We will talk about them.
Electric networks yesterday and today
During the Soviet era, houses were built at an accelerated pace; there was not enough time to think through and arrange grounding. Moreover, such protection was useless - none of the household electrical appliances had a corresponding contact on the plug. The maximum that one could count on when moving to a new home was double sockets without grounding, which pleased with the possibility of connecting additional electrical appliances to the network.
Now everything has changed, and it has become quite difficult to find large household appliances in stores without a grounding contact. The sockets also acquired a new look, in which an additional bracket appeared, and the contact holes began to be covered with internal curtains to protect them from children. But although the usual connection points have not disappeared anywhere, they can be seen much less often. Outdoor sockets with a high IP protection class are usually installed without grounding.
Types of products for connecting household appliances
On the counters you can find sockets of various modifications, shapes and colors. This allows the buyer to choose those that will suit his interior or meet his requirements. You can purchase products with curtains and sockets without curtains, with or without grounding. It is worth considering these varieties in more detail.
Sockets with curtains: what are they for?
Such products are perfectly protected from children's curiosity. Curtains are special partitions inside the housing that block access to live contacts. In order to insert the plug into it, you need to make some effort. A little curious discoverer will not be able to stick any foreign body into it - a nail or a knitting needle. This allows parents to be calmer. Previously, special plastic plugs were used for such purposes, which were quite easily removed by the child.
Another type of such protection, although simpler, is a cover that is pressed against the body by a spring. Such products are more often used for outdoor installation, and therefore they do not have a wide range of colors. Mainly produced are gray and white external sockets without curtains with or without grounding, equipped with covers.
What does the presence of a grounding contact affect?
To connect such an outlet, certain wiring is required. There should be 3 wires approaching the connection point - phase, neutral and a yellow-green ground wire. Such sockets, when installed correctly, provide additional safety for both household appliances and people. If the grounding is done properly, and all the necessary automation is installed in the distribution cabinet, you don’t have to worry about overloads, voltage surges, and even phase breakdown on the metal body of the household appliance.
Connecting sockets without a grounding contact: what do you need to know to do the job correctly?
Installation of such products is extremely simple. Preparation may be a little labor-intensive if a new seat is being made. If a simple replacement is required, for example, single to double sockets without grounding, all manipulations may take about 5 minutes. The algorithm of actions will be as follows.
- The general power supply to the home electrical network is turned off. This is done from the input circuit breaker located in the distribution cabinet. If the shield is located on the staircase of the entrance, it makes sense to hang a prohibitory sign: “Do not turn on! People are working."
- Unscrew the fixing screw of the decorative panel, 2 spacer bolts of the socket contact platform and loosen the clamps of the supply wires. After this, the old product can be thrown away or put in the pantry “until better times.”
Important advice! You should not hope that everything is done perfectly and immediately turn on the household appliance. It is necessary to check the voltage at the contacts using an indicator screwdriver.
What are the benefits of sockets without grounding?
The advantage of such products is their simplicity - the fewer components, the more reliable the mechanism. It is also worth noting the low cost of such sockets. Ease of connection will most likely play a decisive role for novice home craftsmen who are faced with this issue for the first time. However, it is necessary to understand that if the home power network provides a grounding wire, then it should not be ignored, much less cut off, as some do. Such contact at some point can save a life. Of course, it would be better if such a danger did not arise, but the Japanese (and these people are very smart) say this: “It makes sense to sharpen your sword all your life so that it can save your life just once.” A similar statement is true in the case of grounding.
Let's summarize what has been said
Sockets without grounding have a right to exist, but only if there is no circuit. This applies to old houses and private sectors. If there is a third, yellow-green wire in the home power network, you should not ignore it. It is better to purchase and connect an outlet equipped with a grounding bracket. You should not assume that you plan to connect equipment whose plug is not equipped with the appropriate contact - everything can change. After all, it makes no sense to redo it several times when you can mount something that is suitable for powering any household appliance.
How to make reliable and high-quality grounding in your own home?
Carrying out grounding in a private home requires a responsible and correct approach. All actions for grounding work can be of two types:
- Without constructing a grounding loop;
- With ground loop.
The type of grounding without constructing a grounding loop is that an ordinary steel pipe that lies in the ground or metal elements on a wooden pole can serve as a grounding structure. Old rails and supporting metal piles are also used. Thanks to the lead winding of power cables, they do not rust.
With this method of grounding, it is necessary to observe the depth of the grounding. It must be at least a meter.
It is also considered mandatory to measure the level of current spreading. Four ohms is the maximum value for alternating current of 220 volts.
The wire that will be laid from the house to the grounding switch must also be reliable and of high quality.
The loop grounding method is that the beginning of the grounding circuit is in the distribution bus, and all connections begin from there.
The contour must be made of several elements located at a certain distance from each other. All metal elements must be connected to each other. The welding method is used to securely fasten the paper.
For a reliable and tight fit of metal grounding elements to the ground, they must be driven into the ground. It is not recommended to pre-prepare a hole for them.
The connection diagram can be of several types: triangular, circular or in the form of a line. The highest quality and most reliable scheme is the triangular scheme. This is due to the fact that if one of the elements fails, the other two will continue to reliably produce grounding.
Grounding sockets
It will be possible to ground the outlet after the grounding structure is ready and connected to the busbar in the electrical panel. It is necessary to purchase Euro sockets; they have a grounding terminal between the terminals for phase and neutral. If it is necessary to replace the wiring with a three-wire one, then it must be done, since the third wire is needed for grounding.
The main mistakes in the manufacture of a grounding loop
The quality and reliability of the grounding loop depends on many factors. There are errors in the production of structures and fastenings:
- Incorrect fastening;
- Use of inappropriate materials for construction;
- Incorrect preparation of the steel contour.
One of the main conditions for a high-quality grounding loop is the strength and reliability of the fastening of all elements of the loop. Bolts, nuts and other fasteners are not suitable for these purposes. They can oxidize, rust, or corrode. As a result, the reliability of the fastening may be impaired, which will lead to the elements coming apart. It is best to fix it using a welding machine.
The choice of material for the grounding structure is also important. Metal fittings are not suitable for this. The essence of its unsuitability is that its surface is calcined. Because of this, the uniform current distribution is disrupted. This surface is susceptible to rapid corrosion.
A common mistake is that some uninformed installers of the ground loop paint it. This is absolutely impossible to do. Paint will not provide protection against corrosion, but will provide resistance and the grounding effect will disappear.
Determining phase and zero with a multimeter or screwdriver
Multimeter
The device is a combined electrical measuring device capable of performing several functions. The minimum configuration includes a voltmeter, ohmmeter and ammeter. Some modifications are made in the form of current clamps. Both analog and electronic meters are available.
To begin the measurement process, you must switch to AC voltage measurement mode. Measurement is carried out using one of several methods:
- We clamp one of the existing probes with two fingers. We direct the second probe to the contact, which is located in the switch or socket. If the data on the monitor is insignificant (does not exceed 10 volts), we are talking about zero. If you touch another contact, the indicator will be higher - this is a phase.
- If there are concerns about touching the dipstick, there is another way. We direct one of the rods into the socket. With the second rod we touch directly to the wall next to the outlet. The result will be approximately the same as in the case described above.
- There is a third way to measure using a multimeter. We touch the probe to a grounded surface (for example, the equipment body). We touch the surface to be measured with the second probe. If the wire is a phase, the multitester will detect a voltage of 220 volts.
Indicator screwdriver
The indicator is a simple way to determine the phase, accessible even to a person who is doing this for the first time. The test screwdriver looks like a standard one. The difference lies in the internal structure of the indicator screwdriver. The screwdriver handle is made of special transparent plastic. There is a diode inside. The upper part is made of metal.
Note! The indicator screwdriver must not be used for purposes other than its intended purpose. It is not intended for loosening or tightening screws.
Improper use of the test screwdriver will cause its failure.
To find phase and zero using a screwdriver, you need to perform the following sequence of operations:
- Use the end of a screwdriver to touch the contact.
- Press the metal button at the top of the screwdriver with your finger.
- If the LED lights up, we are talking about a phase. If it doesn't react, it's zero.
Note! An indicator lamp rated for 220-380 volts will glow at voltages greater than 50 volts. When working with an indicator screwdriver, it is recommended to adhere to the following safety precautions:
When working with an indicator screwdriver, it is recommended to adhere to the following safety precautions:
- Do not touch the bottom end of the screwdriver while taking measurements.
- Keep the screwdriver clean, otherwise there is a high risk of insulation damage.
- If you need to determine the absence of voltage, first check the functionality of the device, which is definitely under voltage.
Advice! In a DC network, the polarity of the contacts is determined in a very simple way. To do this, simply immerse the wires in a container of water. Bubbles will begin to form near one of the wires - this is a minus. The second wire is positive.
An indicator screwdriver should not be confused with a dialing device. The dialing screwdriver is equipped with batteries. When working with such a device, you do not need to press the button to determine zero and phase, since the screwdriver will light up in any possible situation.
Why is it necessary to install an RCD?
Let's look at this issue using a simple example. Let's say there is a washing machine in the bathroom. Electrical wiring in the apartment is made only with neutral and phase wires, there is no protective grounding, and the RCD is not installed.
Let us present the situation further. The insulating layer inside the machine was damaged, causing the phase to come into contact with the metal body. Some potential has appeared, that is, the body of the washing machine is now energized. If a person approaches it and touches it, it will play the role of a conductor through which electric current will flow. The effect of the current will continue until the person withdraws his hand from the washing machine, because the damaged area will not be turned off by any device. Unfortunately, under the influence of current, a person’s muscles are paralyzed, and it is not always possible to pull the hand away.
There are two options here - either the person loses consciousness and gives in, or someone else helps him by turning off the input machine for the room.
If, in the example considered, there was an RCD in the distribution panel, it would react to the appearance of a leakage current, turn off and protect human life. It is for this reason that in an apartment equipped with a large number of powerful household appliances, the installation of an RCD is simply necessary.
Useful video on the topic
A lot of interesting information is in the video.
Leave a comment Cancel reply
Similar posts
How to choose a hidden wiring socket, practical tips. An outdoor waterproof socket is an important attribute of your site. Do-it-yourself installation of an outdoor socket, detailed instructions
What features does the Legrand switch have and how can you connect it?
Features of installing a grounded outlet
The connection diagram for a grounded outlet does not involve any complex manipulations. Anyone can cope with this. It is enough to familiarize yourself with the theoretical part and be careful during installation.
Before installing a grounded outlet, the type of wiring is determined. To do this, the old socket is dismantled. If two wires are connected, there is no grounding, only phase and neutral (zero phase) are available.
When purchasing a socket, the quality of the product is taken into account and preference is given to a manufacturer that has proven itself in the market. Its body must be without damage. So-called “internal” sockets are suitable for the home - they are built in when installed in a wall recess. The recommended rated breaking current for a home outlet is from 30 to 100 milliamps. Information about the rating can be read on the back of the socket. Russian samples are usually rated at 10 or 6.3A; foreign - at 10 or 16A.
Particular attention is paid to the size of the holes and the distance between them. European samples have both a larger diameter and a larger distance
If you use exclusively domestic appliances at home, it is better to buy sockets that are also domestic.
The plug can be removed from a correctly selected socket with little effort!
There is a wide variety of grounded sockets on the market:
- There are samples with overload protection - there is a built-in fuse inside, which blows out in the event of a short circuit.
- With protection against current leakage - a special device turns off the socket if a leak is detected. The socket is ideal for a child's room! As soon as the baby puts something into the socket, the protection will immediately work.
- With overvoltage protection - automatically turns off when there is a power surge, suitable for connecting expensive devices.
- With mechanical protection – special curtains protect against touching the contacts.
- With lightning protection – for regions with strong thunderstorm activity.
- For powerful devices - designed for a current of 20 amperes or more. Always sold with a special plug.
- Universal – complete with connectors for different types of plugs.
The socket box is selected based on the type of wall. The socket box is fixed inside the wall, in a special recess.
Drywall boxes are used for drywall, wood, and plastic. And for brick, concrete, foam concrete - concrete boxes. They are fixed with gypsum or alabaster mortar.
Attention! The working body of the product must be of high quality - made of ceramics. The socket contacts are made of good metal (not foil!)
It is desirable to have a screw clamp - the wires are inserted between two plates and pressed with a screw, which ensures reliable fastening of the contacts and prevents them from loosening during operation.
Poor contact at the connection point of the conductors causes an increase in current, heating the cables, which can cause an emergency situation
Therefore, it is very important to ensure the correct connection of the wires in the junction box when carrying out electrical work on a home network.
The choice of distribution boxes must be made based on their design and purpose, which is discussed in a separate article.
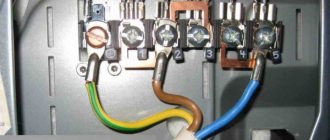
Before installation, turn off the power to the electrical panel. The wires are routed to the sides. The phase is determined by an electrical tester (probe). Usually the wires differ in color. Yellow-green insulation indicates grounding. If the wires are the same color, a tester will help you find the phase.
Wiring connection rules. phase - on the right, neutral - on the left, grounding - to the top or central terminal of the socket.
Multimeter reading options
Any device, indicator screwdriver or tester, must be checked for functionality and only then used. The insulation must be intact, without cracks or tears. The tip of the probe should be separated from the holder by a dielectric washer to protect it from accidental touches.
The body of the measuring device must be intact. Before measurement, the plugs are inserted into the sockets of the device, which correspond to the measurement of alternating voltage. After making sure that the device is working properly, you need to switch it to the AC voltage measurement mode with a scale of 750 V. This is necessary in case of measuring line voltage when two phases were connected to the socket by mistake.
This method of testing an outlet is suitable if the tester is confident that the ground contact is indeed ground. Then the task is to find zero. One probe touches the ground contact, and the second is inserted into any socket of the socket. The following options may be available:
- the device shows 220 V, which means the contact is phase;
- if 0 or a few volts, then this is the neutral wire.
A reading of a few volts says it's zero. But how to determine zero when the house is supplied with electricity through a TN - C power supply system and re-grounded next to the building? After all, in this case, the device readings will be zero.
To make sure that this conductor is neutral, you need to disconnect the grounding in the entrance electrical panel. Then measure the voltage between the socket contacts of the socket. The device shows 220 V - the zero of the socket has been found. The multimeter does not show anything - grounding has been detected.
If the device reads 220 V on each contact relative to the grounding one, you need to make an additional measurement between the two sockets of the socket. The device shows 0, which means one phase is connected to both sockets. Otherwise, the device will show 380 V, which means there are two phases on the outlet.
How to check for ground in an outlet
We figured out how to connect an outlet with grounding, but it is also advisable to understand whether the grounding works or not. To make everything official, you need to invite electricians. They will use an ohmmeter to measure grounding parameters. In general, this procedure is mandatory before putting electrical wiring into operation - today no one will connect your electricity without grounding. Moreover, grounding must meet the requirements, but no one checks it on sockets. You just need to invite electricians.
In different countries, sockets and grounding contacts have different shapes. In our country there is type F
Self check
You can check the quality of grounding in the outlet yourself. But keep in mind: all such methods are prohibited by regulatory documents. There are simply no “normal” and safe ones. There are risky ones in which you can get electrocuted. They usually check it using a tester - this is a socket with a 220 V incandescent lamp of low power (25-30 W). Two wires with a cross section of 2.5 mm² are screwed/soldered to the cartridge terminals. For convenience, you can solder crocodiles to the ends of the wires. And it’s better if they have an insulated housing - it will be easier to comply with safety precautions.
Checks using a light bulb are prohibited.
First, we determine the phase on the outlet. Even if you just connected it, double-check. This can be done using an indicator screwdriver: if the LED lights up when you touch the screwdriver probe, this is a phase. Next, we connect one of the control wires to the found phase. We touch zero with the second wire - the light should light up. When you touch the ground wire, the RCD should trip, since by your test you created a leakage current. If this happens, your grounding and RCD are working normally.
If the wiring is old and there is no RCD, the lamp will simply burn. By the brightness of its glow, you can determine whether the grounding parameters are normal or not. In theory, the brightness of the combustion when connected through zero and ground should not differ. This is if the “ground” works normally. If the brightness drops noticeably with ground, the grounding parameters are bad and it is necessary to redo it, check contacts, pins, etc.
On the issue of safety
Please note once again: it is better to invite an electrician to check the functionality of grounding in sockets. He will take measurements and give a conclusion based on the results
But if you still decide to try one of the methods of self-checking, you need to be well prepared and take all possible precautions:
Avoid touching exposed wires and metal parts with your hands.
- Place a rubber mat under your feet.
- Handle only isolated parts.
- Don't check alone. So that “if something happens” there is someone to react.
But as we have already said several times above, it is better to call an electrician. You may be able to connect a grounded outlet yourself, but it’s better to entrust the quality of the work to a professional.
Wire marking by color
Indeed, the easiest way to determine the phase, neutral and ground of an electrical wire is to look at the color marking and compare it with the accepted standard. Each core in modern wires used in electrical wiring and electrical equipment has an individual color. Knowing which color of cores corresponds to which function (phase, neutral or grounding), you can easily carry out further installation.
Quite often, this is quite sufficient, especially in cases where the installation is carried out in new buildings or places with fairly new electrical wiring, made by professional, competent electricians in accordance with all modern rules and standards.
IEC 60446 2004 standard
According to this standard for residential electrical networks:
Working zero (neutral or zero) - Blue wire or blue-white
Protective zero (earth or grounding) - yellow-green wire
Phase – All other colors including black, white, brown, red, etc.
Now, knowing the standard for color marking of wires, you can easily determine which wire performs which function. This applies to most cases, the exception may be wires suitable for switches, switches, etc., due to the fundamentally different operating scheme of this electrical equipment.
Double socket: connection details
As a rule, all double sockets have 3 contacts for connection: phase, neutral and ground. That is, connecting a double socket is done in exactly the same way as a single one. For convenience, all wiring connections between the 3 input contacts and socket outputs are carried out by the manufacturer inside the product.
- To connect a double socket, you need to carry out several preparatory steps - determine the identity of all the wires, examine the markings (do not forget to check with an indicator screwdriver).
- We protect the ends of all wires that supply electricity to the outlet.
- Remove the cover from the socket.
- We loosen all the bolts that are located on the marks.
- We connect each end of the wire that comes out of the socket to the corresponding contacts and secure it in the holes of the terminals. Wires such as phase and neutral can be easily connected without taking into account their functionality. This suggests that they can even be swapped. But, the grounding wire must be connected to the terminal block, which is designated as “PE” or marked with a special symbol indicating grounding (see the figure above).
- We fasten the case with self-tapping screws to the box in the wall, and hide the wires in the case.
- Using the claws, we fix the body and tighten the screws.
- Check the tightness of each bolt and install the socket cover.
After all steps have been completed and the grounded outlet has been connected, it is recommended to check that the grounding is ready.
Socket device
The main components of the socket are an assembled block, protected on the back by a socket box, and on the outside by a decorative box with a fixed screw. The box in most cases consists of a front panel and a frame. The socket box is used only for those sockets that will be installed on the wall, and not in a recess. The block includes:
- frame;
- phase and neutral contacts, into which the plug is connected;
- terminals for connecting electrical wires;
- ground contact;
- movable or rigidly fixed legs for mounting in a box or on a flat surface.
Grounding is not provided for all sockets; the simplest devices do not have it. When screwing in the screws, the movable legs move apart, securing them to the walls of the plastic boxes. Double-tongue claws hold the joint more securely, as they are sharper and penetrate deeper into the plastic.
If the terminals to which the power cable is connected are screw terminals, they should be lubricated before use, for which cold solder is used.
Algorithm for laying Internet cables in walls
The most correct, but at the same time difficult to implement solution for laying an Internet cable in a home (office) environment is to install it inside the walls. The advantages of such wiring are obvious: the cable does not get tangled underfoot and does not affect the decorative design of the room. A significant disadvantage of in-wall installation is that in the future there may be problems with access to the cable for repair or maintenance. But with proper cable routing along grooves in a corrugated PVC pipe, you can not only minimize the risk of a malfunction, but also provide relatively easy access to the twisted pair without complex dismantling work.
Before you start laying the Internet cable, it is worth marking the places where it will be located. Remember that unshielded twisted pair cable is made of copper, which is very sensitive to electromagnetic interference. Try to keep the distance between computer and electrical wiring at least 50 cm.
- We outline the route. When planning a place for a groove for future wiring, keep in mind that the Internet cable has a certain limitation on the bending radius. Specific values can be found in the specifications of the selected cable.
- Choosing a cable. The most significant quality characteristic of a twisted pair cable is reliability. Access to the cable after its installation will be significantly difficult, so it is advisable not to skimp on quality. To connect to the Internet, UTP of the fifth category and higher is most often used. You need to select a specific cable model based on its main technical characteristics:
- minimum permissible bending radius (the smaller it is, the easier it will be to install in the walls);
- maximum permissible tensile force (the higher this value, the easier it is to insert the cable into the corrugation, and in case of technical problems, subsequently remove it from the groove);
- warranty (for quality products the warranty period can be up to 25 years).
- We do installation. The cable is placed in a corrugated pipe of the required diameter (it must move freely inside it). Then the corrugation is secured in the groove with a plaster screed. Next, you can begin finishing work. As a result, an Internet socket will appear at the cable output. However, before that it is worth pinouting it.
How to properly install it yourself?
- Observe safety precautions.
- Do not use damaged parts or wiring, carefully monitor the condition of the insulation during operation.
- Do not cut live wires with wire cutters.
- Do not crush, groove, or drill walls in places where wiring has already been laid.
- Do not touch the neutral and phase wires with a screwdriver. This will cause a short circuit in the network.
- Install sockets in suitable locations. The placement location should be at a height of 30 cm from the laid finishing coating on the floor for universal use, 1 m for large household appliances and at least 10 cm from the surface of the table and other surfaces. The distance between the centers of the socket boxes is 71 mm. From corners, ceiling, floor, door frames to a point there must be at least 15 cm, from heating radiators - at least 50 cm. It is prohibited to install them above heating appliances, kitchen stoves (how to correctly position one or more sockets in the kitchen?).
- For every 6–10 sq. m of living space, one socket is made.
Connection via socket
Step-by-step connection option:
Turn off the electricity. Remove the decorative cover from the main outlet. Loosen the spreading tabs that hold the inner part in the socket. Remove the block for free access to the terminals
Connect the wires that will go to the “daughter” outlet. Attention: Before inserting the internal part into place, it is recommended to check whether its limiter will not pinch the wire
If it's too tight, you'll need to expand the space.
To do this, you will have to carefully break off a piece of the electrical box or even the wall to free the wire. Make a small hole in the cover to match the size of the wire so that the cover can fit snugly against the wall
The housing is then screwed into place
Make a small hole in the cover to match the size of the wire so that the cover can fit snugly against the wall. The housing is then screwed into place
The wire through which the connection is made is lowered to the baseboard and laid along or along it to the desired location. It must be secured with electrical wiring staples every 30–40 cm.
Ground connection
Connection steps (standard diagram):
- Turn off the electricity.
- Disassemble the device.
- Separate the wires from each other and determine phase, neutral and grounding with a multimeter or tester, insulate them.
- Screw the decorative cover back on.
Did you know there are smart plugs and USB plugs? Read about what they are and how to connect them on our website. Also read about relocating and repairing sockets.
Dual device
There are two types of dual devices:
- Stationary.
- Prefabricated.
Installation Attention: If the device has several wires for grounding and power supply, then there must be the same number of additional ones. here is the socket
here is the socket
Installation features
block
It will not be difficult to install a combined unit without the involvement of a professional electrician, since connecting modern models requires a minimum of wires.
The installation process will have only a few features that need to be taken into account:
- You need to prepare the necessary tools in advance; you won’t need many of them: an electric drill with a drill core; several screwdrivers of different sizes; pliers and wire cutters.
- To ensure safety during work, make sure that the handles of all tools are insulated.
- Some modern varieties are designed for external installation, that is, when installing them, you can completely avoid drilling holes in the wall surface.
- You can choose a variety with an increased level of protection from environmental conditions; such models can be installed not only indoors, but also outdoors. Such devices also have an additional element in the design in the form of a special lid that helps prevent liquid from getting inside the device.
- All modern types of blocks are suitable for installation in walls made of any material and regardless of the type of finish.
Determining the wiring type
Installation of a grounded socket is carried out in those houses where three-wire wiring is laid. In homes with wiring that includes only two cores, there is no point in installing such a grounding outlet, since it will not perform its intended task.
Therefore, the first thing to do is determine what type of wiring is in the apartment. If the electrical wiring in the house is outdated two-wire, it will have to be replaced with a three-wire analogue. Modern three-wire wiring meets all safety standards in all respects.
Replacing wiring is an additional expense item, but the costs will certainly be recouped by the long “life” of electrical appliances and the safety of household members
You can find out whether the electrical panel has a grounding bus from the electrician servicing your entrance or house. The type of wiring is also determined by the number of wires. If a two-core cable is connected to the connection point, then only “phase” and “neutral” are available.
If the socket line is laid from the switchboard with a two-wire cable, you only need to connect a third grounding wire from the electrical panel to each point. But this procedure can only be performed if the lighting panel is equipped with a grounding bus.
Clause 1.7.127 of the current PUE clearly states that the grounding conductor must be made of insulated copper wire with a cross-section of at least 2.5 sq. mm.
To introduce a new line of sockets, it is worth using a ready-made three-core cable, already equipped with a ground wire
It is not advisable to lay a cable with a cross-section of 1.5 mm2 from the junction box to the socket. Indeed, in this case it is impossible to “power” a powerful device from it. For a single-phase network, it is better to take a cross-section with a margin of 2.5 mm2.
For wiring under the socket group in apartments and private houses, choose cable marked VVG, for wooden buildings and fire-hazardous premises - VVGng.
The main requirement for a protective conductor is that there should be no disconnecting devices in its circuit. Therefore, it is installed in addition to any fuses, circuit breakers and circuit breakers.
According to clause SNiP 3.247, it is prohibited to connect protective conductors in series; each new point should be connected with its own cable
Serial grounding is fraught with the risk that in the event of an emergency, electromagnetic incompatibility may occur. Connected electrical installations will create interference, which can lead to undesirable consequences in which the protective circuit will not cope with its task.