The kitchen is the most important room in the house. And, of course, it should not only be comfortable and functional, but also beautiful, setting the mood. This is important, because every day of any person begins in the kitchen.
But what sets the tone in the kitchen? What gives it style, creates the appearance of the room, defines the interior? Of course, an apron. No matter how beautiful and expensive the household appliances used are, no matter how original the countertop is, if the apron looks bad, the whole room as a whole makes a depressing impression.
As a rule, it is this detail of the interior that is not given due attention during self-repair. It would seem, why be puzzled by what the walls look like? Still, most of them are occupied by lockers? Therefore, washable wallpaper, inexpensive tiles and other similar materials are used. And, as a rule, this leads to the fact that the kitchen does not look as it was imagined. Its appearance is not only far from the rooms depicted in glossy magazines, but it is also completely devoid of style, harmony and integrity.
Meanwhile, creating an apron that sets the tone for the entire kitchen area is not so difficult. And you won’t need any expensive materials for this, nor the services of a designer. We made an apron from ordinary plywood with our own hands, and as a result of such simple work the room was transformed beyond recognition.
What's the idea?
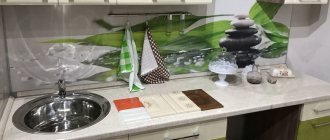
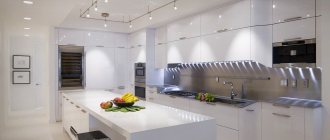
The idea behind this kitchen makeover project is to create a backsplash that is completely versatile, sleek and neutral in style. One that would be in perfect harmony with everything that is on the tabletop, and with itself too.
An unexpected discovery by scientists has revealed the cause of drought in Europe
Counting calories in your diet and more: reasons for feeling unwell in the morning
Like in 2018: Russians were warned about a possible fuel crisis
Sometimes it's the little details that ruin everything. For example, if you cover the backsplash with white tiles, the edges between the tiles will become noticeable, regardless of how they are designed, end-to-end or through a seam. Paradoxical but true. Anyone who has a tiled backsplash has encountered this.
In this particular kitchen, the backsplash surface was designed in two tiers, with relief and border. I wanted it to look like the street wall of a southern Mediterranean house. And this was the main mistake. This apron looked great on its own. But in combination with the cabinets and tabletop it looked ridiculous, somehow “Soviet-style”, not at all stylish and not at all presentable.
So when it came time to renovate the kitchen and replace the countertops, the fate of the backsplash was sealed. The appearance of the wall had to change and become as neutral as possible.
Singles are increasingly choosing to use TikTok for dating
Beautiful soap from soap remnants: simple and fast
10,000-year-old basket and fragments with text discovered in the Judean Desert
Technical nuances of choosing an apron
Apron area dimensions
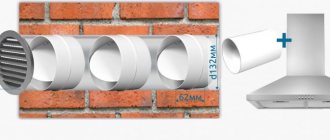
The standard height of the apron is 50-60 cm, depending on the height of the household and the type of stove. If tiles are used, then the standard is 30+30+0.1 cm because a height of 30 cm is the standard size of the tiles plus the seam between them. Although now this rule is not strict and there are many sizes of tiles. If the hood is not built-in, then it is placed at a distance of 70-80 cm, which means the apron will be higher. This is important to consider if you are going to make a skinal from glass because... in this case, production will cost a little more, or you will have to finish the wall between the edge of the glass and the hood with something. When calculating the height, take into account 2-3 centimeters of overlap at the top so that the apron goes behind the cabinets.
The work surface should run along the entire perimeter of the kitchen, and not be limited to islands behind the sink and stove. Although water and dirt get behind the sink and stove more often, other places are still not safe. This is not where you need to save money.
If the sink is in the corner of the kitchen, use the apron to touch the perpendicular wall - the areas around the sink are always the dirtiest.
Apron design and color
The color of the apron itself is important for kitchen design, but not for practicality. There are many types of dirt in the kitchen, so no matter what color of backsplash you choose, there will be contrasting stains that will be visible on it.
Therefore, the most important thing in an apron is texture. The texture should not be uniform because... Any stain will be immediately visible on it. Conversely, on a contrasting and heterogeneous texture, small spots are not visible at all. The best option is to imitate various natural materials: concrete, marble, wood, stone. Or any patterns, in 2022 patterns are in fashion and are often used in Scandinavian style kitchens.
Light tiles are much more practical than dark ones, because... Most of the stains are wet, and when the water dries, salt stains remain. Although light tiles are a workable option, the color of the grout for the backsplash should not be white. Dark shades of gray are best in terms of appearance and practicality (article about gray kitchens). White tiles with dark gray grout look quite good:
If you want something bright, look in advance at the photo of the curtains in the kitchen and separately with the balcony door. Skins and textiles are the 2 best accents and they should be combined.
If you are going to do a kitchen in monochrome colors, keep in mind that you will always have a lot of cooking items that are not always easy to find in black and white. It's a good idea to combine a monochrome kitchen and shades of green, such as light green. This natural combination is always relevant, and most importantly, light green contains a lot of kitchen utensils, such as cutting boards, oven mitts, coasters, etc. There is an interesting combination: a white kitchen with a wooden countertop and a glass apron, under which there is an image of grass. It turns out that colors are completely borrowed from nature.
If you have a small kitchen (lots of photos), then only plain options without complications.
What was used in the work?
It was decided not to remove the old coating, which was in excellent condition, but simply change its appearance by covering it on top. And, of course, the question arose of how and from what to make it.
It was decided to use thickened plywood as the main material. It would be more convenient to work with boards, but their thickness is greater than that of plywood. And the cost of ordinary lining, as they say, “bites”. Plywood holds paint perfectly, and, most importantly, the sheets can be cut as required. Moreover, this can be done directly in the construction goods hypermarket.
In addition to plywood, the following was used in the work:
- primer;
- enamel with semi-gloss effect;
- universal construction adhesive for installation;
- putty.
Of course, in the process of creating the apron, tools and sandpaper also came in handy. In this case, it is more convenient to apply the putty not with a spatula, but with a soft squeegee.
Options for making an apron for the kitchen
Let's figure out what they are and what to choose:
- Ceramic tile
- Glass
- Made from the same material as the tabletop: laminated MDF or chipboard (postforming)
- Mosaic
- Plastic
- Phototile
Let's consider everything, but.
Only the first 3 are sensible modern options. They meet all the requirements for sustainability and practicality, and the number of variations in appearance tends to infinity. The 3rd point is closely related to the choice of cuisine.
Phototiles are bad and inferior to glass. Plastic looks cheap and bad; you can always find inexpensive tiles that will still look much better than plastic.
Kitchen apron made of tiles
We will compare tiles with glass. Tile features:
- Huge selection of formats, colors and textures.
- Unlike glass, it can have a deep texture, which means it will look much cooler under the lighting, which is almost always built into the upper cabinets.
- The downside is the seams between the tiles, which is not so critical if you know how to choose grout for the tiles, but still.
In the photo below, the emphasis is on the backlight as the main difference from other options.
The area of the apron, even in large kitchens, is rarely more than 2 square meters. This means you can buy expensive, cool tiles and make your backsplash really stylish. It would be stupid to miss this opportunity - choosing more expensive facades or countertops will cost a large sum, but you can easily spend money on 2 meters of apron.
Tiles that imitate wood, concrete and marble look cool, but only when they imitate the texture, and not just the pattern.
The white boar is also still in fashion and most likely will not go out of fashion. It looks too stylish in both classic and modern styles. In this case, there is absolutely no risk that it will look bad - the white boar is the most common and proven option.
In classic design styles, there are no alternatives for a backsplash other than tiles:
Stage one: preparing the premises
Of course, in order to change the backsplash, you need to at least remove the cabinets. In this case, preparing the premises took almost more time than the entire work. The fact is that they changed not only the apron, but also the tabletop. Therefore, cabinets and shelves were removed, and the countertop, hob, and sink were dismantled.
However, if you want to decorate only the apron area, you can do it easier. You can cover all surfaces to protect them and get to work right away. But in this case, you will also need a wooden baseboard to create the transition between the new backsplash and the cabinets and countertops in contact with it.
Important fossils found deep beneath ice sheet in Greenland
“Aliens are smart, with wings, legs, fins,” says astrobiologist
Anticipation is important. Why do people ignore their inner voice?
Tiling the apron
We will consider finishing with tiles in comparison with glass. Because most are torn in choosing between these materials. So, the tiles are characterized by:
- Wide range of sizes, textures and shades
- It has a relief structure, which means it will look cool when illuminated due to the play of light and shadow.
- It is necessary to take into account the color of the grout. We do not recommend making the joints light.
Since the apron takes up very little space, it is possible to decorate it coolly, with expensive textured tiles. At the same time, the cost will not be high, as in the case of choosing an expensive countertop and facades. So take advantage of this life hack. And make the apron the brightest and most interesting accent of the kitchen.
Tiles that imitate wood texture, concrete or marble look interesting. It’s especially cool when not only the external part is imitated, but also the texture of these materials.
Tiles laid like brickwork in light shades have already become a classic. And it is unlikely to ever go out of fashion. This tile is also called “white boar”. It will suit any chosen style and always looks stylish and fresh.
Stage two: preparation of materials
The actions at this step of the work directly depend on what material is used and how large an area they need to cover.
In this project, the plywood was cut using a miter saw into large boards of varying lengths. This is done in order to lay out the pieces of plywood in a checkerboard pattern.
Of course, it was possible to do things differently and cut out large panels from a sheet of plywood to cover the wall without gaps, with a minimum of joints. But this idea was abandoned due to the fact that the plywood could swell due to changes in temperature and humidity.
Color laminated plywood
Color laminated plywood is made by pressing special paper impregnated with resin onto hardwood plywood under high pressure and at high temperature. The result is a material with new performance properties and appearance.
| Rice. 4. Colored plywood |
Depending on the texture of the film used for laminating plywood, the following types of colored plywood are distinguished: W - embossed, mesh; F - smooth, glossy; SP - paper.
Stage three: installation of plywood sections
Since the goal of transforming the apron was to create a neutral, smooth surface, devoid of any decorative or other accents, it was decided to abandon the use of hardware.
The boards are simply glued to the wall in a checkerboard pattern. Since the plywood had already been treated with antiseptic impregnations, it was not pre-coated with anything. Of course, if a material that has not been processed in production is used, then before installation the boards must be coated with an impregnation that prevents the appearance of mold.
Learn not to respond: bloggers and influencers suffer mainly from women
Facts about lard that are better to know (especially for those who still doubt the benefits)
You can’t inhale: Beijing is covered by a dense sandstorm (photos from users)
What is plywood?
To put it simply, plywood is many layers of thin wood that are glued together, as a result we get a material of greater thickness.
You will say why this is necessary, take boards or a furniture board and that’s it. But the use of such materials has disadvantages. Wood reacts to environmental changes and especially to humidity. In humid conditions, wood accepts moisture and expands. When it becomes dry, moisture leaves the wood and the board dries out, its width and thickness change.
Plywood does not have these problems; thin layers of wood are glued at 90 degree angles to each other, which gives the plywood dimensional stability and equal strength in all directions.
| Rice. 2. Layers of plywood |
In addition to plywood consisting only of layers of thin wood, there is plywood with a core of other materials, such as MDF or composite materials.
| Rice. 3. Various types of internal plywood “filling” |
Stage four: applying primer
After the glue has dried, the plywood pieces must be primed for painting. A primer is needed because plywood absorbs paint, and in fair quantities. If the surface of a plywood apron is not primed, an incredible amount of paint will be required.
As a primer, you can use either special compounds or regular PVA glue. The use of PVA in this case is the optimal solution, since the glue covers the plywood with an insulating layer, and this is additional protection.
In this project, the surface of the apron is primed with two layers.
Photo printing on tiles
Tiles with photo printing always look worse than glass. If we are talking about the kitchen. The area for the apron is very small and photo tiles cut with joint seams will never be a cool solution. It just doesn't make sense. It’s easier to order any ornament you like in glass, where it will look like a solid composition with beautiful reflections.
The only option when photo tiles will be better than glass is your own ornament, which will be designed by you and it will be visible. Uniqueness is always highly valued.
Stage five: applying the first coat of paint
One coat of paint is not enough to decorate a kitchen backsplash. The specific location of this interior element is such that the paint is exposed not only to changes in humidity and temperature, but also to mechanical stress.
Agree that when putting a saucepan aside or hanging ladles and spatulas on hooks, it is very difficult not to touch the surface of the apron. Therefore, you need to paint at least twice. Otherwise, you will then have to decorate scratches and areas with removed enamel.
For painting you can use either a brush or a roller. The first layer of paint will be covered by the second, so there is nothing wrong with noticeable brush strokes.
Decorating an apron with glass panels
Glass is characterized by smoothness and strength. These two options are ideal for a kitchen apron. Glass can be matte or glossy. It also has the function of applying any image that you find on the Internet or choose from a wide range of ready-made pictures.
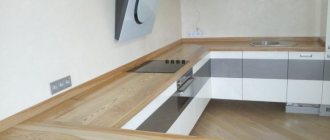
Our recommendation is to choose a plain or textured wood or marble pattern. Since during operation there will be many objects that separate the overall design and the integrity of the composition will be lost.
A glass splashback has its advantages and disadvantages. Let's look at them.
- A glass apron is ordered complete with a kitchen set. This means you don’t have to spend additional time purchasing materials and installing them.
- Due to its homogeneous texture, glass is easy to clean from dirt. And even if the appearance is neglected, after spending a little time, you can return it to its former luster. In addition, unlike tiles, glass does not have joints containing porous material. This means that the option of ingrained dirt, which can no longer be removed, is excluded.
- Wide range of designs and ornaments
- No texture. Sometimes the texture looks richer and more interesting. In the case of glass, it will not be possible to create a beautiful relief. Only imitation.
A significant disadvantage is the cost of glass. But high-end tiles will also come out at the same financial level. Therefore, it is in your power to weigh the pros and cons of such a decision.
Stage six: filling cracks
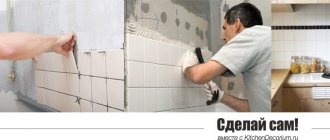
Once the first coat of paint has dried, it's time to work on the gaps between the pieces of plywood. Of course, you can sheathe the wall without leaving any gaps. But in this case, the wall was not level, so it was impossible to place the boards end to end.
As a rule, when filling cracks, a spatula is used. But in this case it is much more convenient to work with a soft squeegee. This tool does not harm the freshly painted surface and perfectly removes excess putty that appears above the crack.
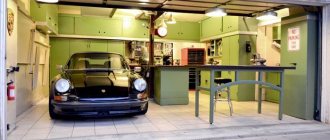
Photos of kitchens using plywood
Plywood for making kitchens is used both in its “pure” form, that is, with minimal finishing and preserving the natural texture, and it is also painted and tinted, and sometimes in unexpected colors.
| Rice. 10-14. Photos of kitchens using plywood |
Color palette
To add brightness to the kitchen, it is better to use small elements in the decor of the room. These could be pens, vases, flower pots, watches, etc. A bright panel will require exceptional care, since any contamination involuntarily attracts the eye.
Choosing a neutral color is most suitable. It should match the furniture and be almost invisible. The highlight may be the texture of the material, which does not require constant rubbing, but will pleasantly surprise guests.
The choice of contrasting solutions is relevant when using several colors in the design of a room. So, an apron for a white kitchen can be made black if the curtains are white and black, the chairs are black and the table is white. There can be many options.
Important! Before choosing a material for an apron, you need to think about what materials, colors, and design solutions will be present in your kitchen for the appropriate combination of all elements.
Kitchen backsplash panels must perform their main function: protect the walls. They should wash well, without fear of aggressive agents. Even if you rarely use the frying pan, you cannot guarantee the cleanliness of the wall.
Tips on what style to decorate: photo gallery of kitchens in real interiors
Choosing a kitchen style is difficult. Before making a decision, look at photos of different designs and choose the one you like best. There's no need to rush.
Scandinavian
The name itself implies the use of light colors. The apron is made to match the brick wall, you can choose contrasting furniture - a black kitchen set looks great. The combination of a wooden tabletop in a warm, brown shade with a plain wood-look floor will make the room cozy.
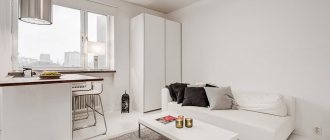
Modern minimalism
Lots of light - little decor, lots of space - little furniture. The set is selected with closed niches for household appliances. Spot lighting, long fluorescent lamps are suitable. The apron is smooth, usually it is not decorated in any way, separating part of the wall with a strip of a different shade or using lighting. This style may seem somewhat “official” to many.
Provence
Designers say that white color for the Provence style is a canvas for the artist. There will definitely be color accents: dark blue, gray, brown. White is chosen in warm shades: for example, milky, ivory. The furniture is wooden; ceramic vases with flowers are used as decoration. Wallpaper with a floral or discreet floral pattern is suitable.
Classic
It never goes out of style. The room becomes elegant, beautiful, unusual. An original solution would be to put large tiles with black corners on the floor. Contrasting colors are golden, blue, green.
Loft
White color for the Loft style is unusual and non-standard. The materials are glass, wood and metal. There is practically no luxury or interior decoration. The emphasis is on saving space. The industrial elements of the room are played out.
Perforated panels
Such panels allow you to conveniently place the necessary kitchen utensils, hanging them in any place on the wall you choose.
- you need to attach the panels to the walls,
- and then insert hooks from the hardware store into the holes, and their location can be constantly changed depending on your needs.
Errors during registration
Despite the fact that design professionals consider this stylistic combination of materials and textures safe, there are points in which one should not be mistaken:
- an excessive amount of wood will not benefit the overall appearance of the kitchen; white color should predominate;
- You cannot replace the wood in the apron above the work surface with tiles of the same color, it looks unpresentable;
- kitchen facades and other surfaces must be the same color and texture.
Brick
Brickwork looks very majestic and stylish. It is perfect for all rustic, classic, loft styles. However, it is used very rarely due to its disadvantages:
- reducing the kitchen by a significant brick thickness;
- heaviness of finishing;
- difficulty of care.
The last drawback can be easily corrected by using glass covering the natural material.
Combination with curtains
It is better to choose curtains of short length or with a lifting mechanism, Roman or roller blinds. Curtains with grommets and cafe curtains are also suitable.
In color they can be white translucent, coffee, red, green, matching the shade of the walls. From fabrics, it is better to choose linen and cotton with admixtures of synthetic fibers viscose or polyester so that the fabric retains its shape and color after washing.
The photo shows an example of decorating a wide window with translucent tulle with clamps that do not interfere with the passage of air and light into the room.
Requirements for a kitchen apron
Whatever apron is chosen, it should be distinguished by:
- resistance to temperature changes;
- immunity to moisture, dust, grease;
- resistance to mechanical damage;
- ease of cleaning.
In addition, the coating should harmoniously match the chosen decoration and furniture, creating an attractive appearance for the entire room.
The material for creating a nice and functional decoration can be anything, especially since modern manufacturers offer a huge selection of a wide variety of wall protection options.
Cork
This amazing material is only gaining popularity. The cork apron is characterized by:
- unique appearance and soft charm of natural material;
- durability;
- resilience to climate change;
- antistatic, allowing you to keep the coating clean;
- ease of cleaning;
- absence of mold and other harmful microorganisms.
The disadvantage will be the cost of registration.
Finishing a white kitchen with wood
Experts recommend finishing the room in which you plan to place a white kitchen set, taking into account some rules:
- Adhere to the strict matte finish of the white ceiling.
- Give preference to gray color. All shades of this color are suitable for walls, capable of emphasizing the freshness of the whiteness of the facades.
- It is necessary to remember the principle of monochrome when choosing a different color scheme.
- Do not change the rule of moderation and restraint, although according to designers, white color can be combined with any shades of different colors.
- Choose flooring made of wood or materials that imitate wood. It will well support the interior in a light tone.
- Remember what goes best with white:
Combination with wallpaper
Wallpaper in delicate shades of pink, blue, green, cream and beige, wallpaper with a golden pattern, white wallpaper, bright orange, dark green, light brown, gray, lilac will suit a white kitchen.
The photo shows a combination of gray wallpaper with a pattern of brickwork near the work surface, where the wooden tabletop looks organic.
Wallpaper can be plain or with a design. It is better to choose vinyl wallpaper with a non-woven backing, which can be wiped with a damp cloth without harming the color and texture of the wallpaper.
Important Tips
There are a number of things to consider when planning the size of your splashback. For example, the apron must extend a few centimeters under the installed headset.
Using a plinth, it is also recommended to protect the joint formed between the tabletop and the apron itself.
Otherwise, water will constantly flow onto the lower cabinets, which will soon lead to the formation of fungus.
- Table setting for February 14th - the best ideas and ways to decorate to create a romantic atmosphere
- DIY Easter flower arrangements: master class (photo), original ideas
- How to decorate the Easter table - ideas, tips for decorating the Easter table, photos
When decorating a backsplash, you should never use various porous materials, such as unglazed ceramic tiles.
Otherwise, large quantities of moisture will constantly accumulate in the pores. In addition, washing such a surface will be extremely inconvenient, and after a while mold will appear.
It is best to choose an even, smooth apron without prominent joints and seams, because they usually also contain various dirt and moisture, and cleaning them means wasting a lot of free time, which, on top of everything else, is quite difficult to do.
Shape and size of kitchen plinth
The form of the side is developed by the designers of the manufacturer. When choosing the right option, you should pay attention to compliance with the style of the kitchen. Based on their shape, kitchen plinths can be divided into several types:
Triangular is the most common type of kitchen molding, which has become a classic. A product of this shape has an internal right angle, on the sides of which there are holes for fastening to a tabletop or wall. Hypotenuse - the front strip has a decorative surface and snaps into place after fixing the internal fastening part. Skirting boards of this shape can be made from any material.
Rounded - a type of triangular, which also has an internal right angle. The front, decorative part is convex and rounded.
Square and rectangular - a stylish option for a kitchen in a modern design. As a rule, aluminum products have such a variety of shapes.
Flat ones are a kind of compromise between a full-size plinth and its absence. It is used when it is necessary to close a small gap of a couple of millimeters between the tabletop and the skin. At high heights they can be used instead of an apron.
Curly e (fillet) is another type of triangular skirting boards. They are characterized by figured elements on the decorative part: bends, grooves and protrusions. Most often found among wooden sides.
Kitchen edges are sold in lengths up to 5 meters. The exact size can be obtained from the supplier. For successful installation, they must be purchased with a reserve so that there are as few joints as possible on the baseboard itself.
The width and height of kitchen moldings may vary significantly between different models. For example, there are plastic skirting boards 5mm high and 30mm wide.
Aprons are handmade and made from original materials
Do you think that all the best things are made with your own hands? This is true, especially if you have certain professional skills. Just remember that the kitchen apron should be moisture and heat resistant, strong and easy to clean. You already have enthusiasm (since you are reading this section), all that remains is to decide on the materials.
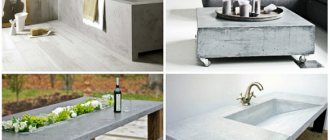
The extraordinary design of the kitchen apron will become the highlight of the interior. Among the materials stand out:
- pebbles or river stones;
- slate paint;
- wine corks;
- laminate;
- mosaic made of broken glass;
- parquet;
- CDs;
- concrete;
- vintage, aged wood.
This concludes our selection of photographs of various kitchen aprons. We look forward to your comments and wish you original ideas, inspiration and successful renovations!