Frame installation
Installation work begins with the fact that you need to take profiles of the required sizes (cut them according to the measurements obtained) and number them. Make holes for fasteners in each profile with a certain step. Profiles are attached to the lines one by one, maintaining accuracy. For this, a building level is used. To create a frame, the guide profiles are made double - 2 profiles are nested inside each other. Horizontal jumpers are also made double for structural strength. Each attached part must be checked for “evenness”.
The base of the frame should be strengthened with spacers - double profiles. Two spacers are placed horizontally with the same distance. To do this, the total height is divided into equal three parts. Vertical spacers are placed on the sides where the posts are. It will be easier to install the upper lintels if you use a cardboard model of the washbasin.
The process of assembling a frame for a plasterboard tabletop
After the frame is completely ready, it needs to be checked again with a level for accuracy. Apply a little effort by pressing on the structure, it should not “walk”, but stand clearly - this is the practicality of the tabletop.
Professional techniques
- The most popular and accessible method even for beginners is to attach kitchen cabinets to plasterboard using butterfly dowels and special plasterboard dowels.
When attaching cabinets to the so-called “butterflies”, you need to make holes in the wall and then install the fasteners.When screwing a self-tapping screw into a “butterfly”, the tendrils of this type of dowel spread in different directions and tightly press the installed fastener to the surface of the gypsum board.
Operating principle of the butterfly dowel
If the cabinet is mounted on special dowels, use a screwdriver to screw the dowel into the cavity of the material and only then screw in the fastening bolt (screw). This method allows you to fasten only lightweight structures whose weight with all contents does not exceed 5 kg.
dowel nail; 2. snail dowel; 3. butterfly dowel;
- The second method is to attach kitchen cabinets to drywall using mounting strips.
The main feature of this fastening technology is that the mounting strips are attached to a sheet of drywall, and not to the suspended structure.The strips are fixed in several places (both to the gypsum board and to the metal profile located under the drywall). Fixation is done with self-tapping screws.
Mounting rails for wall cabinets
After completing the installation work, you can hang a cabinet on such slats, the weight of which when fully equipped will not exceed 15 kg. But this method has one significant drawback - the use of unaesthetic fasteners that are unlikely to decorate your kitchen.
If you need to hang bulkier and heavier cabinets on the wall, there are other secure mounting options that will help you do the job yourself:
Extended anchor bolts can be used as fasteners - such fasteners will allow you to attach bulky kitchen cabinets and even household appliances to the wall.
anchor bolt
In order to secure them, you should drill deep holes with a hammer drill through the drywall at the very base. We insert anchor bolts into the resulting holes and clamp them there using ordinary wrenches.
This method of fastening is relevant only if there are base walls (this fastening option is not applicable for a plasterboard partition);
Anchor Bolt Installation
The price of mortgages is zero - they can easily be made from leftover building materials.
Sheathing with plasterboard
For a countertop under a bathroom sink you will need 2 identical gypsum board blanks. They are cut to the dimensions of the frame. One workpiece needs to be attached on top of a horizontal surface, and the second below the first horizontally. After this, the prepared templates for the sink are taken, attached to the gypsum plasterboard at the top and bottom, and holes for the sink are carefully cut out.
The sides require sheets cut to size. First, the drywall “sits” on the glue, after which it is fixed with self-tapping screws. They are attached every 20 cm. At the bottom, the gypsum board should not touch the floor so as not to get wet. To do this, it must be shorter by 5 mm. The side parts are sheathed on 2 sides, on the outer and inner sides. The ends are sheathed with cut gypsum board strips. First, the planks are glued and then secured with self-tapping screws.
An example of plasterboard covering the side parts of a table top
After completing the plasterboard sheathing, all corners of the structure should be “sanded” using sandpaper. After this, they should be treated with a primer. The basics of installing a countertop in a bathroom combined with a toilet can be viewed in the video.
Technological embedded supports
A reliable solution for partitions is to insert reinforced metal profiles or brackets into the frame at the locations of the planned hanging points for cabinets. Accurate marking of such places will ensure high-quality installation of mortgages.
To enhance the rigidity of the frame, metal sheets are installed on top of the mortgages.
Wood spacer
Distance spacers (brackets, wooden beams) make it possible to perform fastenings at the stage of installation of gypsum plasterboard structures. The essence of the technique is that the cavity of the spacers corresponds to the attachment point. Successful implementation is possible with pre-designed locations of interior objects.
Wooden beams are used with a thickness equal to the width of the frame profiles so that they absorb the load without gaps. Installation is carried out with anchor hardware with a countersunk head to the wall or to the main partition. The edges of the bars are inserted into the profiles. Sometimes, for greater strength, the beams are also connected to each other. It is recommended to use coniferous wood with a thickness of 40 mm or more.
What elements does the cabinet consist of?
The process of assembling a sink cabinet is considered not the most labor-intensive of the many options. Especially if you have a ready-made sketch with all the markings
When assembling a product, it is important to understand its structure as a whole and the design features of individual parts. The cabinet's components are:
- the frame is constructed from wooden blocks;
- the end walls can be either plasterboard or lighter plywood, which is not particularly important from the point of view of load perception (they are not load-bearing elements);
- additional parts of the structure - shelves, drawers, hanging components - are made from a material that is most capable of absorbing the functional load (glass, plywood, drywall).
the tabletop (upper surface of the product) is constructed both from GC panels and from wood, stone, glass and other materials;
The following assembly tools are required:
- electric jigsaw;
- hammer;
- drill;
- hacksaw;
- screwdriver;
- pliers;
- sandpaper;
- screwdriver;
- pencil and tape measure;
- chisel.
how to install a washbasin correctly.
This work can be done in different ways. But we are interested in how to do everything with the highest quality and at the lowest cost.
Today, there are many different designs of washbasins, large and small, with different types of fastening to the floor and to the wall, on all kinds of brackets. The easiest to install and most common is a washbasin with a footrest. It is called a “tulip”, there is a ceramic leg at the bottom, and a cup at the top.
For installation we need a tool: a hammer drill. With this tool we will drill holes for the brackets to attach the sink. Level, to check the clear horizon of the bowl. A set of wrenches, 10-12 or adjustable, pliers and a screwdriver.
Everything else is connected by hand, meaning the lower part: an elbow, a corrugated hose that is inserted into the sewer.
To seal joints and seams you will need silicone, and to twist the threads - fum tape.
We start by attaching the sink.
Place the leg where it will stand and the sink will be located. Place the cup on top and you will see where the mounting holes are. Using a marker, make two marks where you need to make holes. Move the cup and stem aside and drill holes. We remove the bowl and attach a faucet and siphon to it; the assembly diagram depends on the type of faucet with siphon itself. The kit you purchased will definitely have a diagram of its assembly drawn on it.
We install dowels into the holes and screw in the brackets. We substitute the leg, place the bowl on it, inserting the holes into the brackets, and tighten it with nuts. For reliability and sealing, we glue the edges of the bowl and the legs with silicone.
We connect flexible hoses to the water supply.
This can be done through spacers or using investment material. Wrap a small amount of tow on the thread, on the external thread. We wind from the root of the fitting to its edge clockwise. And then we make another 3-4 turns of fum tape, and screw the hoses to the riser. Clamp with keys.
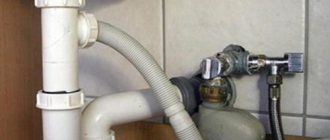
After installing the “tubepan” and connecting hot and cold water to the tap, you need to install a siphon into the sewer.
To connect the siphon to the sewer pipe, it is best to use a corrugated hose. This will allow you to easily bend at the desired angle. It also comes in various sizes and diameters, which makes it easy to select the desired diameter for the siphon and drain pipe.
Upon completion of complete installation and installation, fill the sink with water, then open the plug,
Process
Below are installation instructions, which, with a few exceptions, are universal for each type of wall-hung sink.
Tools for work
Having the necessary tools at hand, you can do the installation necessary in such cases with your own hands.
- screwdriver;
- gas key;
- electric drill;
- drill bit with pobedite tip for concrete work;
- wrenches of the required sizes;
- marker;
- building level;
- hammer.
Tip: also buy silicone tape “Fum” for sealing threaded connections or tow.
So as not to search separately for the necessary fasteners to install the wall-hung sink you like. We recommend purchasing a special set from the retail chain right away.
Choose brands that have already proven themselves well in the market, so as not to suffer during work and not to worry about the reliability of installation. Usually the price differs not much.
To connect the sink to the wall you will need a specific set of fasteners
Preparation
- Turn off cold and hot water.
- Determine the place for the bowl in the interior of the room, taking into account the water supply under the mixer.
- Try on the sink prepared for installation in the selected area and finally select its position.
- Decide correctly on the size of the bowl and its installation height.
Advice: choose a model that does not take up extra space in the room, but has sufficient dimensions to cover the spray sector of the water flow.
Which is better: heated floors or radiators?
Warm floorBatteries
Before attaching the sink to the countertop, we recommend applying silicone sealant to its edge.
- Standard equipment dimensions:
- width – 500-650 mm, depending on the model;
- height – 800 mm from the floor is considered the most ergonomic;
- Leave a distance of 800-900 mm in front of the washbasin.
- Take a ruler, pencil and level. At the required height, mark the central horizontal line - all installation work will be carried out along it. It is the upper limit of installation of a plumbing fixture.
Drawing the upper horizontal line for installing a plumbing fixture
- When choosing, do not forget to check the thickness of the side walls of the bowl, which will have to withstand the support of the brackets. Place the measured thickness down from the horizontal on both sides of the sink and record with a mark. Connect the resulting marks with a horizontal line, indicating the mounting height of the brackets.
Sink with mixer tap on the cabinet
Working with a bowl
- Turn it over and secure the brackets to its sides.
We recommend inviting an assistant for this work, then you will be able to simultaneously:
- carry out manipulations with the sink, installing it horizontally;
- make the necessary marks.
- Place the bowl horizontally, mark with a marker through the recesses on the back of the place for fastenings. Make sure everything matches up.
- Take an electric drill with a pobedit-tipped drill and drill according to the markings. Please note that the diameter of the drill should be slightly smaller than the dowel screws or mounting screws.
Sinks should be mounted on drywall using a “Molly” anchor.
- Install nylon or plastic bushings in the drilled places and screw screws into them, securing the support brackets to them. The sink bowl will be installed on the latter.
- Mark the areas where it will be attached to the wall with a marker, drill holes and place the bowl in place.
Self-installation of a wall-hung washbasin in place
Advice: the fasteners should not be tightened all the way straight away; it is better to leave room for adjustments. After adjusting the level, secure it completely.
Corner wall-hung sink in the bathroom interior
Recommendations from experts
Not everything is clear or explained in the installation instructions. There are points that the home master should know about before starting work:
Check the completeness of the product when purchasing it in a retail chain. Ideally, the necessary fasteners should comply with the stated installation instructions. In the event that the manufacturer does not provide this or the quality of the fasteners does not suit you, purchase all the necessary parts in advance. This way you will feel much more confident after finishing work.
- To prevent moisture from entering the gap between the sink and the wall, the bowl should be sealed with silicone.
- After completing all installation work, check the drain section of the system for leaks by filling the siphon with water. If a leak is detected, tighten the threaded connections more tightly and insulate them with additional sealant.
We recommend installing the sink after finishing the finishing work. Please pay attention to the mounting holes.
Fastening plumbing equipment to the wall is justified only when the surface is strong and reliable. Otherwise, it is necessary to make a supporting frame in advance.
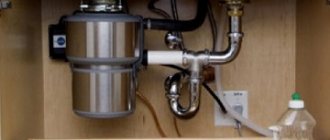
Water supply and siphon
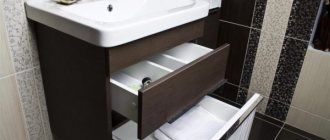
You can make a hidden water supply to the sink and hide the siphon in a cabinet or cabinet, which will also serve as a place to store various toiletries. You can increase the free space under the sink by using a flat-shaped siphon. When installed correctly, the bowl stands stable, without moving or wobbling.
How to attach a faucet to a sink? There is a special kit for this - two studs, two metal washers of a special configuration and a gasket
What kind of furniture can be made from HA
A plasterboard board is a kind of “sandwich”, the layers of which are gypsum with additives (core) and thick cardboard (core frame). In this case, the cardboard takes on the role of a kind of frame for the internal contents with a looser structure. The layers have reliable adhesion to each other, which is very difficult to damage when simply moving the sheet and even when installing it without special application of physical force.
Furniture made from plasterboard is distinguished by such qualities as practicality, reliability, and durability. Arches, niches, shelves, tables, bar counters, cabinets and cupboards, and even an entire kitchen set - this is not a complete list of what can be constructed from plasterboard sheets. At the same time, no special skills are required to assemble any of the interior elements. But knowledge of working with drywall will come in handy.
The main thing is to have before your eyes a drawing with indicated dimensions, to be able to “hold in your hands” a hammer drill, metal scissors, and a screwdriver. Well, many people have been able to take measurements with a ruler and tape measure since school. Experienced craftsmen recommend starting to gain experience working with drywall, choosing not the most complex furniture elements. These include shelves, countertops, mini-cabinets. Below is a short guide to making a vanity cabinet.
Unique engineering board Bentline SUPERBASE
Solid board is a popular floor covering that is often chosen, but this coating has its drawbacks: in the Russian climate, the board often begins to dry out, which leads to warping, the appearance of gaps and cracks. Moreover, the thicker the boards, the greater the effort that occurs when they dry out.
But there is a solution - this is a perfect version of an engineered board with a unique design and SUPERBASE fastening system!
Bentline engineered board has a 2-layer construction, with a SUPERBASE fastening, which no other manufacturer has. It is specially designed for the conditions of the domestic climate with sudden changes in humidity and temperature conditions.
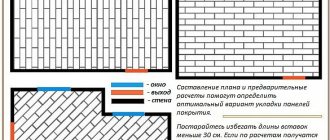
Step-by-step instructions for making a countertop
Drawing with dimensions of a plasterboard countertop
To install a plasterboard countertop in the bathroom, you need to decide where it will be located. The most convenient way is to install it around the sink, building a niche next to it for the washing machine. It looks modern and practical.
Required materials and tools
To design and install a countertop in a bathroom, you need the following tools:
- A simple pencil, a sheet of paper, a ruler.
- Meter or tape measure.
- Set of screwdrivers of different lengths and types.
- Scissors for cutting metal.
- Set of spatulas.
- Water level.
- Moisture-resistant “green” drywall.
- Metal profiles of various types.
- Self-tapping screws for various surfaces.
- Putty for drywall is moisture resistant.
- Glue.
- Reinforced tape.
- Tile or mosaic.
- Crosses for tiles.
- Special grout.
- Silicone or other waterproof insulator.
The amount of material is calculated after measurements taken.
Design and marking
In order to begin installing the tabletop frame, you need to draw a diagram, with precise measurements and marking all the important points. To do this you should:
- Measure the length at the location of the future countertop.
- Calculate the height and width of the structure.
- Record all received data on paper. All lines should be drawn and fastening locations should be indicated.
The measurements of the sink and its diameter are important, since they are different. For a more accurate drawing, you need to make an outline of the sink on cardboard. After the drawing is completely designed, all data is transferred to the wall and floor. Lines are drawn using a level and a corner. At this stage of work, it is required to maintain the accuracy of the drawing. And also mark fastening points and places to strengthen the structure.
Some nuances of fixing mixers
The pipes through which water is supplied can be located outside the cladding or hidden behind it. In both cases, the device must be connected to the water supply using special angles or tees.
If the mixer and supply pipe elements are made of different materials, then fittings called water sockets come into play. These elements can connect copper, metal-plastic and polypropylene pipes. Parts of this type serve as a kind of adapters when the diameter of the water pipe does not match the parameters of the mixer. The water socket must be firmly fixed to the wall, as it acts as a holder for the entire structure.
Installing a sink with a pedestal - how to do it yourself
Installing a pedestal sink is a fairly simple task that you can do yourself.
Of course, plumbing work requires a certain skill and is associated with the risk of flooding neighbors if installed incorrectly. Therefore, if possible, it is better to invite a specialist from a repair company. But if you're curious to try it yourself, why not? It's nice when something in the house is made with your own hands. You will spend more time than a professional, but the special atmosphere of comfort is worth the effort. Let's not forget about the social role of the craftsman. Fixing the tank, getting a plate of borscht, and if the borscht is successful, then winning the heart of the hostess is a proven tactic that is no less effective than a bouquet of orchids and a trip to a good cafe.
On-site inspection and marking
A pedestal sink is commonly called a "tulip" sink. Usually both the sink and the “leg” are made of sanitaryware. Porcelain, artificial stone, and glass options are available. First of all, we are interested in the mounting location. Walls and floors, plumbing connections, sewerage connections.
Although most of the weight of the sink rests on the pedestal, wall mounting is also necessary. Therefore, the walls must be strong. Not drywall or plywood. If the drywall is properly secured to the frame base and tiles are laid on it, this option for additional fastening is possible, although less reliable. Take care of "helicopters" - drywall bolts with distributed loads. They will have to be used instead of self-tapping screws.
The floor must be level and the pedestal must be free and level. Try to assemble the structure without fasteners and pay attention to what might interfere with you. The pedestal should not wobble, the sink should not warp. To level the pedestal, it is convenient to use silicone gaskets; they are quite dense and do not slip out. It is better if the leveling materials do not stick out from under the pedestal. If the distortion is severe, you will have to level the floor with a cement mixture.
When you test install the sink, make marks on the wall and floor, noting the location of each part. Now the structure can be disassembled and put aside.
Note! The marking lines must be straight. To level the structure when trying it on, use a level. Be sure to mark the mounting locations.
If you got a “deep” pedestal, which should fit perfectly against an imperfect wall, but the sewer connections absolutely do not match, you can, of course, try to file the “leg” with a grinder with a diamond blade. but the probability of destruction of the pedestal is quite high. To avoid problems, it is better to immediately select plumbing fixtures that fit the existing dimensions. If the plumbing is not suitable, it must be returned to the store.
Socket Protrusion Dimensions
The sockets need to be deepened to such a distance that their holes are flush with the finishing material of the wall. Reliable fastening of the strip will ensure easy installation and dismantling if necessary for repairs or replacement. When installed correctly, only the mixer eccentrics should protrude from the wall.
If you know any other ways to attach plumbing fixtures to a plasterboard wall, please share your experience.