Home » Building a house » Categories » Doors
Alexander Korovaev 04/30/2020
3806 Views 1 comment
If you have a welding machine and at least some skills in working with it, it would simply be unreasonable to purchase a Chinese product that is not very durable. A DIY metal entrance door will provide more reliable protection against burglary and bad weather. Let us describe in detail the process of its manufacture.
Required materials and tools
Free instrument 50% success
Before you begin manufacturing a metal structure , you should prepare the necessary materials and tools for the work.
We will need:
- yardstick
- carpenter's square for taking measurements;
- metal corner for the door frame and door frame; it can be replaced with a square pipe 40x40 mm; for the manufacture of the internal frame of the box and stiffeners, slightly smaller pipes of 40x20 mm are used
- metal sheets: you should not take material that is too thin; its thickness should be at least 1.5-2 mm
- welding machine
- grinder or wire brush for cleaning welds
- drill with drill bits
- metal anchors or pieces of reinforcement for attaching the structure to the wall
- screws, bolts
- a wrench of the appropriate size for tightening the bolts
- screwdriver
- door hinges capable of supporting the weight of a door weighing over 100 kg
- rim lock
- plywood, MDF, lining or laminate for finishing
Taking measurements
Welding a metal structure
Even when using standard drawings to assemble an iron door, you will need to take measurements. Ideally even, symmetrical doorways simply do not exist. Therefore, it is necessary to be extremely careful when taking measurements.
One measurement will not be enough - you need to take measurements three times and then select the smallest number obtained. The door leaf should be measured at the top, bottom, and middle.
The height of the opening is determined in exactly the same way. If the old doors have not yet been removed, it is easier to measure them.
In most cases, the width of the canvas is a multiple of 10 cm - its width can be 70, 80 or 90 cm. Please note that the size of the future opening should be 1.5-2 cm smaller than the size of the opening itself. The remaining cracks are subsequently filled with polyurethane foam. After all, it will be difficult to insert and perfectly align a door cut exactly to the size of the doorway.
Immediately determine which direction they will open. According to SNiP, entrance doors must necessarily open outward, so that in the event of an evacuation or transfer of a sick person, it can be opened without hindrance. In this case, it will also be possible to save useful space in the hallway.
How to correctly measure the width of an opening
The opening side is selected taking into account comfort and convenience. Traditionally, doors are made right-handed so that upon entry they can be opened with the right hand. But this option can be changed taking into account specific circumstances.
After all, the door should open so as to occupy a minimum of free space without creating interference. In apartment buildings, the location of neighboring doors is also taken into account.
Number of metal sheets
Single-leaf (single-leaf)
Standard openings from 800 to 1000 millimeters require the use of one sash, but if the opening width exceeds 1000 mm. It is customary to install double-leaf models to eliminate windage in the structure.
Double-leaf (double-leaf)
A double-leaf door has two leaves, one of which is a working leaf, which is used constantly, and a leaf that can either be opened using bolts (for example, to bring in furniture or large items) or be tightly welded. Installation of this type of structure is carried out in apartments with large openings (mostly old buildings), vestibules, entrances, garages, etc.
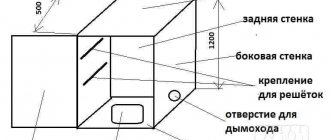
Door frame
So, we will describe in detail how to make an iron door yourself:
1After cutting a metal corner or pipe to the specified dimensions, you need to fold the resulting parts into a rectangle on a flat surface or welding table, once again double-checking its dimensions.
2There is no need to cut 45° corners. The metal strips are simply joined end to end.
Metal strips are joined end to end
3We weld the inner frame from the corner with the smaller shelves. The distance between it and the frame is 3-5 mm.
4 Stiffening ribs are welded from the same corner - sections that are inserted inside the frame.
5 Don’t forget to thoroughly clean all seams with a sander, special abrasive fiber, brush, or pickle them with a seam treatment agent. Otherwise, the smallest remnants of metal, and behind it the metal corner itself, will immediately begin to rust. It is more convenient to grind off large deposits with a grinder or a file.
6A fairly common mistake made by novice welders is to join the frame parts together immediately, “tightly”. There is no need to do this under any circumstances - most likely, the frame will have to be trimmed. Therefore, first you just need to “grab” the metal corners, and then align the assembled door frame with a building level not only horizontally and vertically, but along the corners and both diagonals.
7Check that all parts fit exactly at 90°. Final welding can only begin after alignment.
Frame with internal frame
8The next step is drilling holes for the anchors and attaching the hinges. At the same stage, holes are prepared for the lock bolts.
9 To attach the sealing rubber and protect the frame from deflections, small metal plates are welded to it.
10To insert the frame into the doorway, you can weld steel eyes to it or provide through mounting holes.
Finished door frame
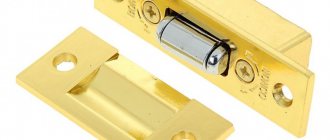
Lock installation
To install the lock in the flange of the corner of the door frame, make a cutout of such a size that the lock fits into it without a gap. Having installed the lock, you need to mark all the holes: mounting, key, handle, etc. Based on the markings, you need to drill holes of the required diameter.
In addition, you need to make holes around the entire perimeter of the door for screws with a diameter of 4 mm, with which boards will be screwed to the door from the inside (one of them should have a cutout for a lock). For fastening, you can use screws 35-40 mm long.
All cutouts for the latch and various latches in the box are made only when the box is installed and the door is hung. At the stage of installing the lock, a door peephole is also made.
Do-it-yourself cold forging of metal is a real art that takes a long time to learn. When welding titanium, certain difficulties can arise, especially if the welder is inexperienced. Read more in this article.
Do you need to cut metal quickly and efficiently? Useful tips and recommendations at https://elsvarkin.ru/texnologiya/plazmennaya-rezka-metalla-svoimi-rukami/ link.
Door leaf
- The height and width of its frame must match the size of the door frame minus 5 mm on each side for the door to move freely.
- After cutting the sheets (this can be done with a grinder), we clean the edges from burrs with a file or grinder with emery.
- Metal sheets are attached to the frame so that they protrude 10 mm at the top, bottom and side of the lock. The allowance on the hinge side is made slightly smaller - 3-5 mm.
- After “grabbing” the sheets, we check the correctness of fastening, and then weld the seams completely. If the sheets do not move, we proceed to final welding. First, we “sew” them to the main frame, and then attach them to the intermediate stiffeners. There is no point in making continuous seams - it is enough to weld the sheets in small sections.
- The cutout for inserting the lock must be provided before the sheathing.
- At the same stage, you can attach a wood frame to the door leaf to secure the trim. To do this, holes are drilled in the metal in the right places.
Single sheet metal door design
Portraits
The narthex and double narthex serve to ensure tightness. In the case of a double rebate, the tightness is doubled due to the second sealing circuit.
Narthex
The narthex is present both on the frame and on the door leaf. In the case of a leaf, this is a protruding part that partially extends onto the frame of a metal door. In the case of a box, the narthex is an additional step formed by the platband and the box. A sealing gum can be glued to the canvas rebate.
The figure (click to enlarge) shows:
- Narthex
- Sealant
Thick (reinforced) porch
In the figure, number (1) indicates a thick vestibule; in contrast to the usual vestibule, this part is made thicker, i.e. is further strengthened; in addition, the response step on the door frame is made deeper by the amount of the thick rebate (2) (the door turns out to be recessed into the frame), this helps prevent:
- Squeezing the door leaf with a crowbar and other power devices
- Sawing the crossbars of the lock group with a grinder
Double porch
A double ledge is made by making an additional step on the door frame. This design of the door leaf is highly recommended when installing the door on the street, outside the city, to create additional heat and noise insulation. In the case of a bent-welded structure, this step is formed by bending the door frame in a special way. If the door has a double ledge, then a second sealing contour can be glued to it.
The figure (click to enlarge) shows:
- Narthex
- Double porch
Connecting the door leaf to the frame
- Just as with the previous assembly, the seams should first be “tightened” by welding. The final connection is made only after checking the correct installation.
- We drill holes for inserting a key and, if necessary, a peephole.
- To attach the hinges, you need to step back 20 cm from the bottom and top of the door.
- Raise the door (it’s easier to do this together). We fasten the canopies in such a way that the lower elements (the pins are attached to them) are attached to the frame, and the upper ones, called counters, are attached to the door leaf.
- All loops must be located strictly along the same axis. This is not easy to do - you will have to take measurements many times. Otherwise, if an error occurs, the door will warp.
- It is better to hang a massive door not on 2, but 3 hinges.
- Lubricate them immediately so that the door opens easily and does not creak.
Entrance metal structure
Even if the door will be upholstered or decorated with decorative panels in the future, it should be treated with an anti-corrosion compound or painted. For painting metal, it is better to use the so-called “hammer” enamel, made on an alkyd-styrene base.
Anti-lifts
Anti-removal pins
Anti-removal pins are welded to the box, and reciprocal recesses are made at the end of the leaf, which allows them to form a non-removable structure when closing. The main purpose of the pins is to protect against cutting of loops.
Continuous anti-removal
A continuous counter-removal is made by bending the box and the blade in a special way, but unlike pins, the overlap goes over the entire area of the end, which significantly increases the reliability of the structure. When closed, the metal sheet and the box form a completely non-removable structure.
Insulation
insulate an iron door welded from metal with expanded polystyrene, polystyrene foam or mineral wool. When using polystyrene foam, sheets 4 cm thick are sufficient. Too much density of the material is not needed - after all, the load on it will be small. You will need to purchase 4 square sheets of 1 m wide.
When purchasing polyurethane foam, choose a composition with minimal expansion, otherwise the foam will simply squeeze out. We apply it around the perimeter of the frame, stepping back slightly from the edges. Next, polystyrene foam is laid. All seams between sheets, cracks between foam plastic and a metal corner should also be sealed with foam. It can be replaced with Moment glue or any other suitable adhesive composition.
Installation of insulation
Mineral wool or stone wool has a significant disadvantage - these materials can absorb moisture. A metal door with this type of insulation will quickly rust. For apartment buildings this is not critical - there is not much moisture in the entrances. But it is highly not recommended to insulate a street door with mineral wool.
If in the future the door will be finished with self-adhesive film, there is no need to cover the insulation with chipboard. Any irregularities will be immediately visible. Replace chipboard with furniture-grade moisture-resistant plywood. It is attached to the metal using self-tapping screws through pre-drilled holes.
Metal door covered with film, trimmed with molding
You can decorate a door covered with film with moldings - decorative strips made of metal or polymer materials, painted to resemble wood, stone, silver or gold.
Visible parts
Visible parts include hinges, door ends, and trim.
- If the door leaf is painted on at least one side - with primer-enamel, powder primer or powder coating such as "Antique" or "Shagreen" - the visible parts and the frame are covered with the same coating.
- If there is a solid finish on both sides - lining, laminate, vinyl leather, MDF and others - the coating of visible parts and the box can be chosen as desired.
Painting visible parts with primer
- If at least one side of the door leaf is painted with primer, the visible parts are also coated with it (in the color of the leaf), however, if at least one side of the door leaf is powder coated, the visible parts are also painted with powder coating.
- If there is a hard coating on both sides of the canvas (lining, MDF, laminate, vinyl artificial leather), the visible parts can also be painted with primer.
The primer has low mechanical characteristics and is not recommended for painting when installed outdoors, without further coating with a more resistant paint.
Painting visible parts with powder primer
- If the door is coated with powder primer on at least one side, then the visible parts are also coated with it (to match the color of the door leaf).
- If there is a hard coating on both sides of the canvas (lining, MDF, laminate, vinyl artificial leather), the visible parts can also be painted with powder primer.
This coating has all the mechanical characteristics and weather resistance of conventional powder coatings, at a price similar to primer-enamel, but there is a drawback - the color can usually range from gray to brown tones, depending on the color of the powder coating residues.
Powder coating of visible parts
- If the door leaf is coated on at least one side with powder coating (“Antique” or “Shagreen”), then the visible parts are painted with it (in the same color)
- This can also be done if the door leaf has a hard finish on both sides.
Powder coating has high mechanical characteristics; it is highly advisable to do it when installing a door on the street, outside the city, and in cases where you want to get durable paint that can withstand both weather conditions and mechanical stress.
Inserting a metal door into an opening
It is unrealistic to install a massive metal structure alone. You will need an assistant.
Removing the old door
- Before installing iron doors, the old door leaf should be removed from its hinges. To do this, place a crowbar under its bottom, lift the structure and remove it from its hinges. Some types of hinges have to be unscrewed. This must be done starting from the bottom.
- After dismantling the slopes of an old metal door, you need to find its attachment points. To do this, plaster is knocked down in the area of the proposed anchors or reinforcement. All metal parts are cut off with a grinder, and then the old box is pulled out.
- A regular wooden box is easier to remove. It is enough to cut the side posts in the center, and then, using a crowbar, pry them out of the opening.
- All loose pieces of brick and putty should be knocked down. The resulting voids are filled with new bricks and then covered with cement mortar. Small potholes will be filled with foam in the future, so you can leave them alone for now.
- Significant protrusions are knocked down with a hammer or cut off with a grinder.
- Pay attention to the condition of the threshold. In old houses, wooden beams are installed in these places. If it is damaged, the beam needs to be replaced. You can check its safety with an awl. Insert it into the wood and try to loosen it. If this can be done easily, the timber has become unusable.
Removing the door frame
Door insert
1It is more convenient to install it with the door leaf removed from its hinges.
2The frame is installed on pads 2 cm high. With their help, the structure will be leveled. If no mistakes were made when welding the front door and all measurements were taken correctly, it should fit into the opening freely.
3Check the horizontal and vertical position of the structure with a bubble or laser level. When checking vertically, you can use a plumb line - a weight suspended from the side.
4After leveling, we wedge the door frame using wooden or special plastic wedges. They are located closer to the fastening points. There should be three of them on the sides, two on the top.
5Check the level again to see if we accidentally moved the frame to the side.
6There are two ways to fasten metal doors. In the first case, the lugs should be pre-welded to the frame. If the walls are not thick enough, through holes are made in the box into which anchors or small pieces of reinforcement will be inserted.
Door fastening methods
7To install anchors or fittings in the wall, you will need to prepare holes with a depth of 30 cm. The size of the drill must match the diameter of the fastener. You can mark the drilling depth on it using masking tape.
Installation of anchors
8After inserting anchors or reinforcement, they are additionally driven in with a hammer. If you need to move the fastener slightly, insert a screwdriver between it and the wall, tapping it with a hammer.
9Attachment begins from the hinge side. Then two fasteners are inserted from above, below and one from the side of the lock. The anchors should not be over-tightened - the door frame may need to be adjusted.
10We check with a level to see if we have displaced it when driving in the fasteners.
The frame must be clearly leveled
11We hang the door leaf. Let's check its progress. If there are distortions, cracks, or jammed locks, you will have to remove it and re-align the position of the box horizontally and vertically.
12If the door leaf is installed correctly, it needs to be removed again and the anchors finally tightened. First, tighten the bolts from the hinge side, then from the lock side. The last ones are the bottom and the top.
13After the final hanging of the web, its progress is checked again.
14To create a reliable sound and heat insulating barrier, all gaps between the door frame and the wall are filled with foam. Its expansion coefficient should be minimal - it is easier to work with such a solution.
15Excess foam should be removed immediately with a damp cloth. If you delay a little, after 5 minutes it will be problematic to erase it - the surface of the door will have to be scraped.
Due to strong shrinkage in wooden houses, doors are not attached to the wall itself, but through a frame (beam) or casing (assembled frame). But even in this case, it is possible to install the front door to the house only a year after the construction of the log house.
To insert a structure into a wall made of foam or aerated concrete, additional installation of a metal frame to the size of the doorway is required. She will stay in it due to the emphasis. In this case, the mounting holes will be located in the metal frame crosspieces.
Slope fastening
The appearance of our door is still far from ideal - polyurethane foam and pieces of broken plaster stick out from all the cracks. It is necessary to bring the entrance structure to perfection by making slopes.
Of course, the doorway can simply be plastered over. But it is quite difficult to perfectly align its corners. It is much easier to install slopes - to decorate the part of the wall framing the door frame with panels, for example, made of MDF, laminated or veneered chipboard.
To do this, it is enough to correctly mark, cut out the parts and attach them to the wall.
There are three ways to install slopes:
- using polyurethane foam
- on plaster mortar or special glue called liquid nails
- on a pre-assembled frame
Slope fastening
After fastening the slopes with self-tapping screws or gluing with liquid nails, the platbands are attached. The screws are recessed a couple of millimeters deep and then sealed with putty matched to the color of the platbands.
Entrance door threshold
According to the standard, its height should be 30 mm. But in most cases this parameter is not followed. The threshold can be made a little lower - about 20 mm. Too high will make it difficult to enter or drag heavy bulky objects into the house. Yes, and stepping over a high threshold is not very convenient.
Such a structure can be made not only from metal, but also from wood, stone or plastic.
- All debris and dust must be removed from the installation site.
- After taking measurements and cutting, grooves are prepared in the thresholds according to the size of the door frame.
- Holes are drilled in each part for inserting screws.
- There is no need to screw the threshold on right away - you just need to secure it with self-tapping screws and check whether it interferes with the opening/closing of the door.
- If it moves freely, without effort, we finally attach the threshold, and cover the locations of the screws with the help of special covers, which can be purchased at a furniture store.
Threshold for entrance door
Assembly of the structure
Essentially, it all comes down to hanging the sash, checking its position, the operation of the locks and adjustments (if necessary). All that remains is to install the handle, lock and peephole. If the door design includes crossbars and lower (upper) stops, then you need to make markings.
The sash is covered, and the places for drilling holes are marked on the jamb. After readiness, their coincidence with the fixing elements is checked. This applies to both the main canvas and the additional, small one.
The final “touch” is installing the manufactured door into the opening and lubricating all rubbing parts (which many people forget about). After this, we can state that everything is complete, the work has been completed.
For those who have skills in working with metals and want to get a high-quality iron door at low cost, making it yourself is the best option. Moreover, the drawing, diagram, and external finishing are chosen not by the manufacturer, but by the craftsman. This means that the entrance to the house will not only be reliably protected, but also designed in an original way, and the block structure will fit perfectly into the interior of a particular building.
Finishing
A metal iron door looks too rough, so it is better to finish it using veneer, MDF, laminate, self-adhesive film or painting with special paints. Chipboard is not suitable for these purposes - even with internal lining, after a year the sheets will begin to delaminate.
Special powder paints, which are applied by spraying, look very decorative. However, their cost is quite high. Finishing with laminate is allowed only in apartment buildings - this material is too afraid of moisture.
Laminate installation
The finishing of an iron door can be done with MDF panels - they are produced according to the size of the door in the form of solid overlays, called cards, including from natural wood veneer. You can also order panels according to your own dimensions.
For quite reasonable money you will receive elite doors that are indistinguishable in appearance from products, for example, made of natural oak. MDF panels from Belarusian and domestic manufacturers have very good quality.
Types of MDF overlays
- When finishing a metal door with clapboard, you will need to make a special frame. In principle, wooden planks can be attached to it with liquid nails or using special fasteners - clamps. But still, the frame method is considered more convenient. You can additionally lay thermal insulation material under a wooden frame made of narrow timber.
- After cutting the wooden parts, the cut areas are carefully sanded. To protect the wood from moisture penetration and premature destruction, it is treated with a special impregnation and dried well.
- The door leaf must be removed and all interfering elements must be unscrewed from it - handle, locks, peephole. The sealing tape must also be removed.
- After attaching the wooden frame to the metal door (for this purpose holes are prepared in it), the installation of the lining begins. The planks must be joined to each other as tightly as possible. The step between the fastenings is 15 cm.
- Working on the floor will not be very convenient - it is better to lay the canvas on a table or workbench.
Options for finishing the door with clapboard
We have described in detail the entire process of manufacturing such structures from start to finish - from welding to installation and finishing. A detailed video of making iron doors with your own hands can be seen at the following link:
Conclusion
In a forum thread dedicated to making metal doors yourself, the opinion was expressed that the costs of homemade products would be significant, and the savings would not be so significant that the game would be worth the trouble. However, for skilled hands, the manufacturing process is quite feasible, and the ability to choose decent materials, and not guess what’s inside the purchased structure, is an important factor. Therefore, while some are talking about the feasibility, others are doing and sharing real experience to make the task easier for beginners.
You can learn how to save on wooden entrance doors from the article about transforming budget blanks. How to insulate an already finished metal door is also on our portal. The video contains an overview of popular new doors from the famous exhibition.
Subscribe to our Telegram channel Exclusive posts every week