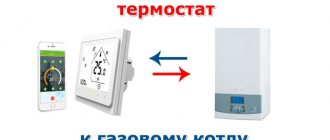
The thermostat (TR), or thermostat, plays an important role in heating equipment. This is a universal device that controls heating systems. Its design can be different, but the function is the same: TR stabilizes the temperature of a given environment for a certain period of time. You need to know how to connect the thermostat so that it correctly fulfills its purpose.
Mechanical thermostat
Warm floor
The main function of such underfloor heating is to heat the floor and/or room itself.
There are two types of such heaters: water and electric. The first involves laying pipes into the base of the floor, through which warm water is released. This is a cheaper and not entirely safe option, since if the pipes are damaged, not only will you have to remove the entire coating in order to repair the leak, but there is also a very real risk of ruining the repair completely. Read also: about the features of operating an electric heated floor.
As for the electric variation, everything is much more favorable here, although the cost of such a heating project will be more expensive. However, the costs will quickly pay off, because such a system:
- safe;
- very convenient;
- economical;
- In the event of a breakdown, repairs are much easier.
Some people fear that electric heating options use a lot of electricity, but this is not the case. After all, it is worth considering that the main expense is only for warming up. Further, electricity is required only to maintain the set temperature. And a high-quality and competently installed and configured heater will not be a very greedy consumer.
A mixed type of heating will allow you to further reduce electricity consumption, that is, when there is both a heated floor and main heating in the room. Although without the latter, energy consumption will not become a big problem.
In this video you will learn how to connect a cable heated floor to a thermostat:
Features of the device and installation
Despite the apparent complexity of installing heated floors, in reality it is extremely simple, as is the installation itself. The basis of its operation is the conversion of electricity into heat through a conductor having high resistance. This can be a cable or mat that connects to a 220 volt network. The thermostat monitors the degree of heating and temperature.
The thermostat will help maintain the required temperature without overheating the floor
The selected conductor is laid on foil, which is covered with a rough screed 1 cm thick. Under it, in turn, there is a heat insulator, which can be placed directly on the ceiling. The wire itself is secured using a special mounting tape and connected to the thermostat. A temperature sensor is also attached to it, which will record the degree of heating.
After laying and securing, you can apply a basic screed with a thickness of 2 to 5 cm, on which the finishing coating will subsequently be laid
When choosing it, you should pay attention to the admissibility of use with the “warm floor” system.
Thus, the floor heating device includes:
- heater;
- thermostat;
- temperature sensor.
All installation and adjustment work can be carried out even by a person who does not have special knowledge in this area.
Some useful information about electrical wires
Inside the box you need to insert several wires with different insulation colors. According to the standards, zero is blue, and phase is black. The ground wire is painted in two colors - yellow and green.
To determine the phase, you should use an indicator screwdriver. In addition, at the time of preparation, before installing the floor heating regulator, you should check the voltage in the network. Ideally, it is as close to 220 volts as possible.
Next you will need to cut the main heating cable and the power cable. To do this, it is best to use a sharp knife or special nippers. You need to cut it so that the cables protrude from the mounting box by about 50 mm. Next, the wires are stripped.
If the model provides screwless cable fastening, then the stripping length is determined based on the recommendations indicated on the device body. Be careful not to let the stripped cables touch each other. It is best to connect the ground wire to the heating cable braid by soldering or a terminal.
After this, the power cable is connected to the mounted thermostat. Instructions on how to install a thermostat for a heated floor are indicated by the manufacturer either on the body or in the manual. The instructions may vary slightly between similar models, so the diagram must be studied in each individual case individually.
Connect the wire with the phase and secure it to the desired contact in the device; it is usually marked with the letter L. The terminal for the neutral wire is marked N. However, you should be careful, as there are types of systems in which the N terminal is intended for connecting the main heating cable. This nuance needs to be studied separately with special care.
Next, you need to connect the temperature sensor to the terminals marked sensor. As mentioned earlier, it is located inside a corrugated tube. If the sensor is not initially located in the tube, then you will need to place it there yourself.
Types of heating cables:
- A two-core heating cable hides two current-carrying conductors under its protective insulation. This type of cable is considered more convenient than its single-core version, because it is connected to the thermostat only at one end. In such a cable there are 3 wires nearby, two of which are conductive and one is grounding.
- A single-core cable has only one conductive wire, usually white.
Types of thermostats
Based on the type of functions, they can be divided into several groups:
– with one function (temperature maintenance);
Thermostat with one function
– with a large number of functions (programmable).
Programmable temperature controller
Based on their design, thermostats are divided into types: wireless and with wires for communication with the boiler. Install the thermostats in a convenient place, connect the temperature sensor, connect it to the boiler control system and use it.
Room thermostats need a constant flow of air to function properly and properly, so they should not be covered with curtains or blocked by furniture. Devices adjacent to the electric thermostat may interfere with the correct operation of the device: lamps, televisions, heating devices located nearby.
Varieties
There are 2 main types of temperature controller. Mechanical devices have manual adjustment of the response temperature. They are among the simplest devices.
There are electronic regulators. They can be adjusted remotely via a computer or Wi-Fi network.
Non-adjustable sensors are increasingly appearing on the market. Such options cannot be configured at the moment of operation; they have a very narrow scope of application.
Connecting a thermostat to a heated floor system
Depending on the type of heating cable in the underfloor heating system, the connection diagram will be different. There are two types of flooring: with a single-core and two-core bundle, the principle of operation between them is similar, but a multi-core cable has a service life, as well as technical indicators for speed and heating height, much higher.
It is easier to connect a thermostat to a single-core system - just connect two neutral cables to one terminal, and the phase to the corresponding socket. In this case, the current will pass through the entire length sequentially along the ring of the bundle.
In a two-core cable, all wires come out from one side, so the connection is made in series - one wire to one terminal. The current in this scheme passes along the entire length of the heating element and returns along the same path in one direction.
Thus, if you follow all the rules and the algorithm for connecting the thermostat to any circuit, all that remains is to adjust the device to the desired parameters by rotating the wheel on the temperature scale.
Criteria for error-free installation of equipment
Among the main installation points that you should pay attention to in order not to make mistakes are the correspondence of the diameters of the pipelines in relation to the inlet fittings, as well as the cross-section of the cable supplying the electric heater of the boiler. The diameter of the supply pipes must ensure free flow of water along the inlet/outlet lines
Therefore, a larger diameter of hoses with a transition to the size of the fittings is still acceptable, but a pipeline cross-section smaller than the boiler inlet pipes seems to be a gross mistake
The diameter of the supply pipes must ensure free flow of water along the inlet/outlet lines. Therefore, a larger diameter of hoses with a transition to the size of the fittings is still acceptable, but a cross-section of pipelines that is smaller than the inlet pipes of the boiler seems to be a gross mistake.
The cross-section of the power cable shows a similar picture. It is not prohibited to use a cable with a larger cross-section, but it is strictly prohibited to use a cable with a smaller cross-section.
True, a cable with a larger cross-section than the norm creates difficulties when laying in channels and takes up more free space. Here it seems logical to precisely select the wire cross-section depending on the load current.
The power socket is usually mounted directly next to the device. The installation height of the socket from the floor level is not less than 1.5 m. Household boilers are designed for power supply with single-phase alternating current 220-250 W. The current load is usually at least 10 A.
The exact value is determined by the performance of the heater and is indicated in the technical documentation. It is for the specified current value that the circuit breaker must be selected.
For example, for flow-through heaters, the following current cut-off standards for automatic machines are relevant (table):
| Boiler power (flow circuit), kW | Circuit breaker current, A |
| 3,5 | 20 |
| 5,5 | 25 |
| 6,5 | 30 |
As a rule, all required connection parameters are specified in the instructions for the boiler. The user manual explains exactly all aspects of installation. Therefore, it is recommended that you carefully study the documents included with the device before installation.
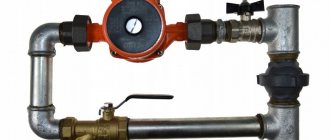
Thermostatic control valves
The thermostatic valve is a simple solution to the problem of obtaining a coolant at a given temperature by mixing colder water with warmer water. The three-way valve is shown below:
Three-way valve
Scheme for connecting a three-way valve to the heating system:
Scheme for connecting a three-way valve to a heating system
Piping diagram for a solid fuel boiler using a thermostatic three-way valve:
Piping diagram for a solid fuel boiler using a thermostatic three-way valve
Piping diagram for a gas boiler using a thermostatic three-way valve:
Piping diagram for a gas boiler using a thermostatic three-way valve
The thermostatic radiator valve allows you to control the temperature in the room by varying the flow of hot water through the radiator. They regulate the flow of hot water through the radiator, but do not control the boiler. Such devices must be installed to adjust the temperature needed in each individual room.
This idea should be considered as an addition to the thermal control installation. Also, such devices require periodic readjustment and regular performance checks (every six months when changing operating modes).
Preparatory work
Before you begin connecting the regulator, it is necessary to carry out a number of preparatory steps. First, determine where it will be located, taking into account a number of nuances:
- The device should not be installed where it may be exposed to direct sunlight; installation in drafts is not recommended. This is especially true for models with a built-in sensor, which will regulate the temperature according to the air flow of the room.
- It is also undesirable to install the regulator on external walls in contact with the street, as this may lead to incorrect readings.
- The installation height of the device is an equally important point. Installation at a height of at least 400 mm is prescribed.
- It is prohibited to install temperature control devices in rooms with high humidity, since almost no model is equipped with a moisture-proof housing. Therefore, if the heated floor is located in a bathroom, shower or bathhouse, then the regulator itself must be moved to the next room, where it will not be exposed to excess moisture.
- The temperature sensor must be located no closer than 500 mm from the wall, in the case of a cable floor model - between the turns in the center. If the film version is used, then the thermometer head is located in the center of the carbon heating strip.
For more convenient and comfortable installation, it is recommended to use an extended 60 mm socket box. This will allow you to freely position all the wires connected to the device.
For heated floors, it is recommended to install a separate dedicated power line with a copper cable with a wire cross-section of 2.5 mm, which can easily withstand a load of up to 3.5 kilowatts. Moreover, the line must be equipped with a separate 16 ampere circuit breaker.
Before you start connecting, you need to make a groove from the installation site of the device to the floor. It should fit two corrugated pipes with a diameter of 10 mm. In one of them there will be wires to the “cold ends”, in the other - the temperature sensor line. It is especially useful to place the sensor in a corrugated tube, since they can often fail, and in order not to open the coating every time, it will be enough to simply pull out the old one and just as easily insert a new one.
If the screed is designed to be quite thick (35–50 mm), then the corrugated tubes do not need to be immersed in the groove on the floor. Otherwise, you will have to prepare a corresponding groove here too. The ends of the corrugation should be plugged so that the solution does not get there during the process.
When connecting a thermostat to a film-type heated floor, corrugated tubes are not used, since here the principle of measuring temperature will be different.
Examination
Despite their simplicity and reliability, capillary thermostats fail. This is due to the following factors:
- Carbon deposits on electrical contacts. Fixing this malfunction is very simple if the mechanism is suitable for disassembly. Carbon deposits are removed by cleaning the contact group with fine sandpaper. As a result of sticking, dents may form on the surface of the contacts. Cleaning is carried out until the surface is completely leveled.
- Loss of membrane elasticity. For collapsible devices, this problem is solved by leveling the surface. For those that cannot be repaired, the defect cannot be eliminated.
- Breakdown of the tube or flask of the capillary system. The only solution is to completely replace the device. In some workshops, the flask is filled with liquid and sealed. But the cost of repair is often higher than the new original.
To determine the operability of an element, you can only check the contact group. Often, regulators for household use are equipped with 3–4 contacts, 2 of which are in the closed (working position), and the next 2 contacts close when the mechanism is activated. To check you need:
- Set the tester to dialing mode with sound notification.
- Connect one probe to the first contact of the element.
- The second one is to find the contact with which the first one is closed. The tester's audio alert will indicate it.
- Next, the flask must be brought to a heating device or open flame without disconnecting the tester probes.
- When the response temperature is reached, the membrane will open the contacts, thereby interrupting the tester's notification.
- Now you need to ring contact 3 of the mechanism. To do this, attach one probe to a contact that has not been tested, and with the second probe find a circuit from the tested terminals. An audible alert will indicate that the circuit is closed and the correct terminal has been found.
Successful testing of all terminals is a sign of complete serviceability of the regulator.
A full check can be carried out in the same way, only with an increase in the trigger moment.
Central thermostat
This thermostat is located far away from your boiler and usually allows you to turn the heating on or off throughout the house. Older versions are connected by wires to the boiler; newer systems tend to send signals to the device's command post. It is the new type of devices that are equipped with quite expensive but effective appliances: double-circuit boilers Ferroli, Beretta and domestic AOGV.
The most famous are room thermostats for double-circuit boilers of the Gsm and Protherm brands. They have a built-in dilatometric thermostat for the boiler, which, depending on the model, can operate remotely; this technology is often used for an electric boiler or solid fuel units.
The room thermostat turns off the heating of the system as needed. It works by measuring the air temperature, turning on the heating when the air temperature drops below the thermostat setting, and turning it off when the set temperature is reached.
Adviсe:
- It is recommended to set the thermostat to 20°C;
- At night, the set temperature should be between 19-21° C.
- It is advisable that the temperature in the children's room is about 22 ° C.
- The temperature should not fall below 22°C in rooms for elderly and disabled people.
As a rule, the temperature of the entire house or individual rooms is based on only one climate microcontroller in the heating system. The best option is to place it in the living room or bedroom, which should probably be the most visited place in the house.
Room thermostats need free air flow to measure temperature, so they should not be covered with curtains or blocked by furniture. Devices adjacent to the electric thermostat may interfere with the correct operation of the device. These include lamps, TVs, neighbors' boilers through the wall, touch switches.
The best choice
The selection of a thermostat for a heating boiler is based on the personal preferences of the room owners. When choosing, you should consider what characteristics are required when using a particular boiler.
Wired or Wireless
The communication between the control unit and the sensors and the boiler for different models is carried out wired or wirelessly. In the first case, you will need to lay a wire. The cable length reaches 20 m. This allows the control unit to be mounted at a great distance from the room in which the boiler room is installed.
Wireless thermostats for heating boilers are designed as a receiver and transmitter. A distinctive feature of products of this type is that there is no need for wiring. The transmitter signal can be received at a distance of 20-30 m. This allows you to install the control panel in any room.
Temperature setting accuracy
Depending on the design of the room thermostat, the room temperature setting differs. Inexpensive models have mechanical control. The disadvantage of cheap thermostats is the error reaches 4 degrees. In this case, the temperature adjustment step is one degree. Products with electronic control have an error of 0.5 - 0.8 degrees and an adjustment step of 0.5o. This design allows you to accurately set the required power of the boiler equipment and maintain the temperature in the room in a certain range.
Ability to set the hysteresis value
The room thermostat for a gas boiler has a difference between the switch-on and switch-off temperatures. It is necessary to maintain optimal heat levels in the room.
Hystersis principle
For mechanical products, the hysteresis value does not change and is one degree. This means that after switching off, the boiler will start working after the air temperature in the room drops by one degree. Electromechanical and electronic models have the ability to set hysteresis. The adjustment allows you to change the value up to 0.1 degrees. Thanks to this design, it is possible to constantly maintain the room temperature in the desired range.
Programmable
The function is only available for electronic or electromechanical thermostats. It is possible to program the control unit to set the temperature according to the clock. Depending on the model, thermostats are programmed for up to 7 days. This makes it possible to make the heating system with the gas boiler turned on autonomous. At a certain time, the thermostat turns on or off the boiler unit or changes the intensity of its operation. With weekly programming, gas consumption can be reduced by up to 30 percent.
Wi-fi or GSM
Thermostats with built-in wi-fi and gsm module connect to the internet. Gadgets with installed applications are used to control heating. This is how remote shutdown, connection of the boiler and adjustment of temperature indicators in the heated room are carried out. Using the GSM standard, the room thermostat transmits information about the occurrence of malfunctions in the heating system to the owner’s phone. It is possible to remotely turn on or off the gas boiler.
Safety
When choosing a thermostat for gas boiler equipment, you should pay attention to the presence of safety systems. Functions are available to prevent the circulation pump from stopping, protect against freezing or exceeding the maximum temperature in the heating system, etc.
The presence of such options allows you to safely use boiler equipment in autonomous mode.
Areas of application of thermostats
Thermostats are widely used in various fields, both in industry and in everyday life. Most often, these devices can be found in underfloor heating systems with a heating element in the form of a heating cable, which is located in the screed. When power is supplied to the electrodes, the wires heat up and give off heat to all surrounding layers; for proper operation, the system is equipped with a temperature sensor built into the screed. The controller can be used for electric or water heated floors, the principle of its operation does not change.
Thermostat with sensor for heated floors
The thermostat is also used in heating or heating boilers to automatically adjust the heating level of the internal environment. Many manufacturers equip heating devices with these devices already at the manufacturing stage, but even if the boiler design does not provide for this, you can install the controller on the line yourself.
District No. 9
Genre: fantasy, thriller, action, dramaCountry: South Africa, USA, New Zealand, Canada Cast: Sharlto Copley, Jason Cope, Natalie Boltt, Sylvain Strike, Elizabeth Mkandawi Director: Neill Blomkamp
More than 20 years ago, aliens made first contact with Earth. People were ready for everything - from a hostile invasion to an incredible technological breakthrough.
Neither one nor the other happened. The aliens turned out to be refugees from their own planet, and while the world community was deciding what to do with them next, a temporary camp was organized for them in South African Region No. 9.
Watch a movie on Kinopoisk
Programmable room thermostat
A programmable electronic room thermostat allows you to select the desired and comfortable temperature at any time; it is easy to reconfigure and change the operating mode. The timer allows you to set a different heating pattern on weekdays and weekends. Some timers allow you to set different settings for each day of the week, which can be useful for people who work part-time or shift work. Many Terneo and KChM models are equipped with such thermostats.
Programmable room thermostat
A programmable room thermostat allows you to set individual heating standards for each day in accordance with your lifestyle and maintain the temperature of the house all the time, regardless of the presence or departure of the owners. Video: Connecting a room thermostat to a gas boiler
If the heating system is controlled by a boiler with a radiator, as a rule, only one programmable room thermostat is needed to control the entire house. Some patterns need to be adjusted in the spring and fall as the clocks move forward and backward or certain changes in climatic conditions occur. We also recommend changing the temperature settings when changing from day to night.
This climate controller has several options that expand its capabilities:
- “Party”, which stops heating for several hours, then resumes;
- “Override” allows you to temporarily change the programmed temperatures during one of the configured periods;
- “Holiday” increases the heating intensity or reduces it for a certain number of days.
Settings
Popular models of thermostats have software modules. Using the device makes it possible to set the floor temperature for any period of time. And the presence of a touch panel allows you to do this in a few clicks.
The electric floor controller is configured as follows:
- Press the power button “0”;
- Temperature heating is adjusted using the “up” and “down” buttons;
- When the temperature rises, “set” is displayed;
- The desired temperature level is reflected in the “run” indicator;
- The power is turned off with the on/off button.
Setting the date and time
The thermostat panel is equipped with a “book” icon; this button is intended for setting the date, time of heating on and off. To do this, hold it pressed together with the “up” key for 5 seconds.
A menu opens where you can set the hour and day of the week (days are represented by numbers from 1 to 7). The selected option is saved with the power button.
Setting heating by day and hour
The menu is also activated by pressing the “book” icon and holding it for 5 seconds.
On the menu, days come first. To select the required option, use the “book” keys, as well as the “up” and “down” keys. The sequence of settings is as follows: day, time, temperature indicator.
In these settings, the day is divided into six time periods - time:
- rise;
- leaving home;
- returning for lunch;
- leaving lunch;
- returning in the evening;
- night.
Setting up the service menu
This menu is activated when the device is turned off, using the “book” and “power” buttons. This option does:
- calibration, switching and simultaneous activation of sensors;
- setting temperature limit;
- setting the step for turning on and off the temperature;
- adjusting the heating level.
In addition, this menu allows you to reset all settings.
Kids mode
To protect the thermostat screen from accidental pressing, there is a function - setting a lock. To do this, press two “up” and “down” keys simultaneously for 5 seconds - this will reliably protect the device from accidental switching.
As you can see, connecting an electric or film heated floor to a thermostat is not difficult - the easiest step when installing underfloor heating. Therefore, anyone can do this type of work with their own hands.
Connecting the thermostat
Since thermostats can be used both to control heating elements and control the cooler, the device has two types of contacts and terminals. When connecting the device to the system yourself, you must strictly observe the polarity of the contacts and avoid contradictions in the circuit.
Thermostat connection diagram
No electrical connection is required to connect a mechanical thermostat, since all control and opening of the switch is accomplished by physically changing the characteristics of the heating plate. To connect this device you need to follow the algorithm below:
- In the documentation for the devices there is a designation of the terminals by numbers; in accordance with these indicators, it is necessary to assemble the system. First of all, you need to connect the neutral cable to the electrodes of the box and take it directly to the consumed heating elements, for example, a heated floor;
- The phase is supplied to the controller directly, without connecting to household appliances. The box itself will distribute electricity when the contacts are turned on. In some devices, it is necessary to lay a jumper inside the thermostat from the positive wire to the operation indicator, which shows a signal at the moment the heater is turned on and throughout the entire period of operation;
- The control device contains terminals for connecting a cooling heating element, as well as for an external temperature sensor. All devices must be connected in series, and the current must be turned off completely. This is a typical connection diagram for a thermostat, which is most common in underfloor heating or infrared heating systems;
- The temperature sensor is connected last, after which a test run of the system is performed and the voltage on all elements is checked.
Scheme using a machine
There is also a diagram for connecting a thermostat using a magnetic circuit breaker; most often, this scheme is used when there are several controlled devices that require high voltage current for operation. In this case, the machine is connected to an open network of the positive cable in parallel with the thermostat; in addition, there is a connecting cable with the control device. Current is supplied to consuming devices through a circuit breaker, but it is controlled by a thermostat. The heating elements are connected to the controller only on a parallel line and through an automatic machine, this allows the system to operate with high voltage without interruption and in a safe mode. In the event of an emergency, the switch will operate and completely de-energize all devices.
Thus, it is clear from the diagram that the thermostat is connected to heating or cooling devices immediately before voltage is applied to them, that is, the controller will be the first element in the system. Many thermostats are equipped with an electronic chip and processor, which, in addition to temperature indicators, provide additional data on various indicators, such as the state of humidity in the room, pressure and the time required to achieve the set parameters. Such devices have a much higher cost than mechanical thermostats for household use.
Infrared heater with thermostat: prices and characteristics of three popular models
Wall and ceiling models of infrared heaters are quite popular, their main advantage is their compact size. In addition, buyers are attracted by the design and the ability to choose a model to match the interior of the room. Below you can see the characteristics and prices of several popular infrared heaters with a thermostat.
Nikaten 200 is one of the most modern infrared heating stoves. Control of the dynamics of temperature changes is regulated by a built-in thermostat. In addition, there is a safety system that automatically turns off the device in the event of a dangerous situation or fire threat.
Changing the temperature regime of the Nikaten 200 heater is regulated by a thermostat built into the design
Main characteristics of the Nikaten 200 heater:
- ceramic panel;
- size – 30x60 cm;
- cools down within 90 minutes, continuing to release heat;
- silent operation;
- installation is as simple as possible.
The distinctive qualities of this panel include a huge selection of color options, as well as a very affordable price - about 3,500 rubles.
The Zilon IR-0.8 S heater was designed as a wall-ceiling heater. This model can be mounted on any suitable surface. The kit includes a thermostat that regulates the correspondence between the specified and actual temperature parameters. To protect the device, it automatically turns off in case of overheating.
Included with the Zilon IR-0.8 S panels, the manufacturer provides a thermostat that helps maintain a comfortable room temperature
Main characteristics of Zilon IR-0.8 S:
- power - 0.8 kW;
- size – 119x13x4 cm;
- weight – 3.2 kg;
- does not affect the carbon dioxide content in the air;
- consumes a minimal amount of electricity.
Types of thermostats
The floor temperature controller can be of three types:
Electro-mechanical thermostats. In appearance and principle of operation, they resemble a similar device on an iron: there is a switch, by turning which you set the required temperature. These are the cheapest and easiest to operate devices.
Electromechanical thermostat for electrically heated floors
Digital. More expensive models. They are controlled not using a graduated wheel, but using buttons (tactile or touch - depending on the model). They usually also have a digital panel that displays the current temperature and/or the set value.
Digital regulators - have a slightly more “advanced” look
Types of thermostats
There are two main types of thermostats, which differ depending on the principle of operation:
- Mechanical devices are thermostats that regulate the temperature of the actuator by opening the contact between two plates of different densities. When the sensor heats up, the signal enters the contactor body and transmits a pulse to open or close the plates;
Electronic thermostat
- Electronic thermostat. In this case, the information coming from the temperature sensor is analyzed in a digital processor, only after which the command to supply power to the heating element is executed.
In both cases, control is carried out manually, by setting the required temperature on the controller body. You can also classify thermostats based on visualization and control keys. Thermostats come with rotating dials, adjustment buttons or a touch screen. The operating principle of all of the listed products does not differ significantly from each other.
There is also a classification of thermostats by type of placement: external or internal. Depending on the task being solved, the device can be installed in a wall in a pre-made niche. The construction size of such a device coincides with an ordinary socket, so it is often mounted in a hole cut with a crown.
An externally located thermostat has a thicker body, which is covered on all sides with plastic plates. The downside of such a device is its size; due to the impossibility of placing the device inside the wall, it will protrude on the plane; in addition, when connecting a cable to it, you will have to create an additional channel from a corrugated pipe or pencil case.
Concept of temperature controllers
Products in this category are used to solve various problems. Based on the appropriate temperature threshold setting, power is supplied (turned off):
- heating in the cellar;
- heating the soldering station;
- boiler circulation pump.
From the examples given, the basic requirements for accuracy that a suitable thermostat circuit must provide are clear. In some situations it is necessary to maintain a given level no lower than ±1C°. To monitor operating parameters, an operational indication is needed. Load capacity is essential.
The listed features explain the purpose of typical functional units:
- the temperature value is recorded with a specialized sensor (resistor, thermocouple);
- the readings are analyzed by a microcontroller or other device;
- the actuator signal is sent to an electronic (mechanical) switch.
For your information. In addition to the parts discussed, the thermal relay circuit may contain additional components to supply power to an electric heater or other powerful load.
Connection recommendations
To increase the service life of the electronic temperature sensor, it is not recommended to install it in drafty areas or in places where there is active exposure to direct sunlight. Thanks to a simple thermostat connection diagram, almost any home DIYer can handle this job. However, first you need to decide on the connection method:
- Classical.
- Using a magnetic starter.
Both options are worth considering in detail.
Standard scheme
One of the important parameters of any thermostat is the power indicator. One device can be used to control several room heating devices. The number of heating devices that can be connected to it depends on the power of the thermostat. At home, it is quite enough to use devices with a power of no more than 3 kW.
Most often, thermostats have four contacts - two each for input and output. To connect the device, you need to stretch two conductors from the junction box and connect them to the input terminals. After this, the output contacts are connected to the heating system using two other wires.
If there is a need to connect two heating devices to the thermostat at once, then you need to decide on the type of connection:
- Consistent.
- Parallel.
Using a magnetic starter
This connection diagram for a mechanical thermostat is most often used to control several heaters. A magnetic starter is an electromagnetic type switching device. It is designed for use in networks with high loads. There are quite a few options for connecting a thermostat via a magnetic starter, but a home master only needs to know one.
If everything was done correctly, then all that remains is to configure the regulator to the desired operating mode. Connecting the thermostat should not be difficult if you follow the instructions. However, you should not overestimate your strength, because the safety of family members depends on the quality of the connection.
Schemes for connecting heating elements to a single-phase network.
Tubular electric heaters are designed for a specific power
and
voltage
, therefore, to ensure the nominal operating mode, they are connected to a supply network with the appropriate voltage.
According to GOST 13268-88, heaters are manufactured for rated voltages: 12
,
24
,
36
,
42
,
48
,
60
,
127
,
220
,
380 V
, however, heating elements designed for voltages of 127, 220 and 380 V are most widely used.
Let's consider possible options for including heating elements in a single-phase network.
2.1. Plugging in.
Heating elements with a power of no more than 1 kW (1000 W) can be safely plugged into an outlet through a regular plug, since the majority of electric kettles and boilers that we use to heat water have this power.
in parallel via a regular plug
two heating elements, but both heaters should have a power of no more than 1 kW (1000 W), since when connected in parallel their total power increases to 2 kW (2000 W). Thus, you can turn on several heaters, but their total power should be no more than 2 kW, and to plug into an outlet you must use a more powerful plug.
There may be a situation when you have several heaters lying around at home, designed for an operating voltage of 127 V, you can’t throw them away, and you can’t plug them into the home network. In this case, the heaters are turned on sequentially
, which makes it possible to apply increased voltage to them. When two heaters with a voltage of 127 V are connected in series, their power remains the same, but the total resistance doubles. For example, when two 500 W heaters are turned on, their total power will be 1000 W.
However, this scheme has one drawback: if any of the heating elements fails, then both will not work, since the electrical circuit will break and the power supply will stop.
You must also remember that when two heaters with an operating voltage of 220 V are connected in series, their total power decreases
twice as much, since due to the increase in total resistance, each heater will receive about 110 V instead of the required 220 V.
Principle of operation
Most often, temperature sensors operate cyclically, and at the same time, an electrical circuit opens and closes. As the temperature increases, the resistance of the internal thermostat sensor drops. As soon as the specified parameter is reached, the device is triggered and turns off the circuit. When the temperature decreases, the reverse process occurs - the resistance increases, and as a result, the thermostat turns on the electrical circuit.
Using a temperature sensor, you can easily control the indoor climate. You just need to set the desired temperature in the apartment, after which the device will do everything on its own. Now infrared heated floors have appeared on the market, which can heat not only the air, but also surrounding objects. For the system to operate in automatic mode, a thermostat must be connected to it.
Electric boilers
A fairly common alternative to gas and solid fuel boilers. Lots of advantages, high efficiency, but long payback period. The connection is simple, like with gas boilers, but without a cold water supply. Temperature regulation and overheat protection are provided.
Mechanical boiler timer
Using a simple mechanical timer for an electric boiler, there are three options for starting the central heating system:
- The boiler is turned off;
- The boiler supplies warm water;
- The boiler turns on and off at the set time.
Mechanical timers usually have a large round dial with a 24-hour scale in the center. By turning the dial, you can set the desired time, and then leave it in that position. The boiler will turn on at the right time. The outer part consists of a set of tabs for a 15-minute period, which are inserted for easy adjustment of operation and mode settings. Emergency reconfiguration is possible, which is performed with the boiler connected to the network.
Mechanical timers are easy to set up, but the boiler always turns on and off at the same time every day, and this may not satisfy the owners if the family is large and bathing procedures are carried out several times a day at different times.
Purpose of thermostats
Depending on the purpose of the room, it can be different, but not higher than +27°C. Although in some cases, when heating large rooms, heating up to +33°C is allowed.
Even a novice specialist can connect the thermostat
There may be several main reasons for maintaining the temperature within such limits:
- Providing comfortable conditions for a person, because when the floor is heated above +27°C, the sensations for the feet can be far from pleasant.
- Floor covering also requires maintaining certain temperatures, non-compliance with which can lead to various unpleasant moments - deformation, drying out, divergence of seams.
- And the constant unregulated operation of the heating element will result in a significant waste of electricity.
It is in order for the temperature to be maintained within certain parameters that electric underfloor heating systems are equipped with thermostats. Moreover, the scheme for connecting a heated floor to a thermostat is quite simple and will not cause problems even for a person who is faced with such a need for the first time. This is clearly visible in the figure.
Connection diagram of the floor to the thermostat
Heating element device.
The heating element is an electric heating element made of a thin-walled metal tube (sheath), the material for which is copper, brass, stainless and carbon steel. Inside the tube there is a spiral of nichrome wire, which has a high electrical resistivity. The ends of the spiral are connected to metal leads with which the heater is connected to the supply voltage.
The spiral is insulated from the walls of the tube by a compressed electrically insulating filler, which serves to remove thermal energy from the spiral and securely fixes it in the center of the tube along its entire length. Fused magnesium oxide, corundum or quartz sand is used as filler. To protect the filler from the penetration of moisture from the environment, the ends of the heating element are sealed with thermal and moisture-resistant varnish.
The heater leads are insulated from the walls of the tube and rigidly fixed with ceramic insulators. The supply wires are connected to the threaded ends of the terminals using nuts and washers.
The heating element works as follows: when an electric current passes through a spiral, it heats up and heats the filler and the walls of the tube, through which heat is radiated into the environment.
fins are used to increase heat transfer from heating elements.
, made of material with good thermal conductivity. As a rule, corrugated steel tape is used for fins, wound in a spiral on the outer shell of the heating element.
The use of such a design solution helps to reduce the overall dimensions and current load of the heater.
Main types of boilers and temperature control
There are several types of boilers: solid fuel, gas, electric and liquid fuel.
Boilers have become widespread throughout the world. There are domestic samples, and there are also imported boilers. Material of manufacture: steel or cast iron. Easy to use, economical, with the function of adjusting the coolant temperature. In cheaper models, this function is implemented using a special device - a thermoelement.
Structurally, a thermoelement is a metal product, the geometric dimensions of which decrease or increase under the influence of temperatures (depending on the degree of heating). And this, in turn, changes the position of a special lever that closes and opens the draft damper. The photo shows an example of such a regulator:
Photo: thermostat sample
The more the damper is open, the stronger the combustion process, and vice versa. Thus, the volume of air that enters the closed combustion chamber is completely controlled by the thermostat, and if necessary, its supply is stopped and the combustion process is extinguished. More modern models are equipped with controllers that, depending on the specified thermal conditions, control the air flow, turning on (or off) a special fan (see photo below):
Boiler with temperature controller
Gas boilers are the most common and cheapest units to operate. Boilers are single-circuit and double-circuit. Single-circuit boilers have one heat exchanger and are intended for heating only. The connection diagram is shown in the figure below:
Switching diagram for a single-circuit boiler
Double-circuit boilers have two heat exchangers and are designed for heating and producing hot water. The boiler switching diagram is presented below:
Switching diagram for a double-circuit boiler
Some boilers have separate controls for heating and hot water temperatures.