The area of a domestic apartment often leaves much to be desired, but even such housing provides empty niches to which a closet can be attached. The main thing is that the furniture product itself is built-in. Then, instead of a sofa or chest of drawers, it will certainly be possible to arrange an excellent storage system for things.
Moreover, making and installing built-in wardrobes with your own hands is already a trend in apartment furnishings. A trend that saves your budget when you have tools and consumables.
Brief overview of the article
Purpose of the built-in wardrobe
Before you jump into tools, supplies, and design, it's important to figure out the versatility of a themed furniture piece. In addition to storing clothes, a built-in wardrobe also:
- Saves usable space by stretching along one or two walls;
- Suitable for on-site assembly and disassembly;
- Optically enlarges the space and illuminates it if there are mirrors on the doors.
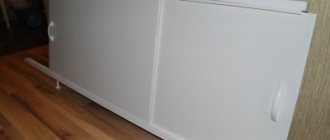
And if the latter are sliding, i.e. working in the same plane, then the built-in wardrobe, being open, saves an additional 2-3 sq.m. At the same time, it is impossible to hit such doors.
Layout
As already mentioned, door cabinets are designed individually. You can either assemble the structure yourself or order it from a company, but in both cases there are a number of nuances that need to be understood.
Place in the interior
To properly adapt furniture to the interior, it is necessary that the elements or color of the façade of the structure resonate with any objects or surroundings of the room.
Elements of the built-in wardrobe should echo the interior items.
In addition to the generally accepted norms and rules for developing furniture interiors, there are still nuances that specifically relate to arched cabinets around doors:
- It is not necessary that the color scheme of the cabinet facade completely matches the color of the doors, but the texture and material should have something in common. So, wooden or veneered doors against the background of painted MDF or plastic will look like an alien inclusion.
- In some spacious houses, the doors are decorated as a cabinet section, thereby making them completely invisible. Such secret rooms are practiced for arranging a study or storage room.
Doors decorated like a cabinet section make the entrance completely invisible.
- If clearly defined mezzanines are provided, then they should be mounted along the entire length of the structure, plus the lower section of the sector is oriented along the upper edge of the door opening.
- If the cabinet width is more than 4 m, you cannot make a monochromatic façade; it will look like a huge thing hanging over the doorway. In this case, the finish is “diluted” with different types of material or colors, thereby obtaining a combined design.
- According to the rules, the average depth of a built-in wardrobe is 600 mm. This is normal for a structure around a door. You can do less, the appearance will only benefit from this, but the functionality will suffer. Deep structures are installed on doors wider than 90 cm, and only in large rooms.
Cabinets with a depth of more than 600 mm are in harmony only with wide or double doors.
Internal content - features of the organization
There is no universal layout of shelves, niches and drawers; it all depends on the purpose of the furniture and the room in which it is located. With bookcases everything is clear without advice. In kitchen cabinets, each housewife distributes sections at her own discretion. There are general recommendations only for wardrobes.
- The lower sector (from the floor to the waist) is reserved for shoes and bulky items, such as a vacuum cleaner. You can install retractable drawers from below, but if you place shelves for clothes there, then it is not recommended to store light-colored clothes and bed linen below half a meter from the floor.
- The middle sector (from the waist to eye level) is universal; it contains essential items, such as shirts, suits, etc., as well as frequently used underwear, for example, bed or underwear.
- The mezzanine is reserved for rarely used bulky items and seasonal items.
One of the schemes for distributing sectors in built-in furniture.
Facades - design, materials and decor options
To prevent the façade from looking too bulky, it is necessary to follow a number of recommendations:
- In open facades, the height of the shelves ranges from 30 cm to half a meter, with the only exception being niches for TV and similar household appliances.
- The height of the drawers is limited to 20 cm.
- The maximum width of swing door leaves is 650 mm. As this indicator increases, there is a possibility of skew and breakage of the hanging fittings.
- The range of sizes for sliding doors in sliding wardrobes is wider, the maximum here is 120 cm, and the minimum is 50 cm. But most often this width fluctuates around 60 - 80 cm.
It is not advisable to make open shelves too small; the view will be lost.
Not only the operational, but also the decorative characteristics of the structure depend on the choice of material:
| Illustrations | Recommendations |
| Tree. Natural board facades are found only in the elite sector and among home craftsmen. In the first case, the facades are decorated with carvings, covered with varnish or wax and look luxurious. And homemade options are immediately visible and are suitable only for the rustic design style called “Country”. | |
| Furniture board. When making a furniture panel, identical wooden planks are glued together, after which the panel is finished on both sides with veneer or plywood. The result is a cabinet made of natural wood, only several times cheaper. | |
| MDF. Now considered the best-selling material. There is veneered, laminated, laminated and painted MDF.
| |
| laminated chipboard. Laminated particle board is considered the most affordable material - it is a reliable budget option. But it is not advisable to install such cabinets in the kitchen, since delamination is possible due to temperature changes.
| |
| Glass. Beautiful, reliable and durable facade material. There are 4 types of glass facades:
|
Door opening systems - types and design
The simplest and most common are swing doors. They open silently, are easy to install and cost reasonable money. Plus, the average lifespan of such systems is 50 years. The only disadvantage of the swing system is that to open the door you need space in front of the cabinet.
In the classic design, the doors and mezzanines are decorated in the same way.
Sliding doors of sliding wardrobes look impressive. They don’t need a place next to the closet to work, but there are more disadvantages:
- The sliding system is much more expensive than the swing system.
- When the doors move, they make a sound.
- It is impossible to open the cabinet completely; in any case, some sector remains closed.
- The maximum warranty for such a system is 25 years.
Sliding systems that are popular today are considered the most expensive, but not the most reliable.
What supplies will you need?
The built-in wardrobe is assembled from ready-made blanks, for the manufacture of which various consumables are used:
- Solid solid wood (timber, boards) is natural, but shrinks and weighs heavily (therefore, it is suitable mainly for a load-bearing frame);
- Profiled pipe is durable and moisture-resistant, mainly serves as a material for assembling the supporting frame;
- Lining is a processed solid mass that is suitable for finishing the facade;
- A plasterboard sheet is an artificial analogue of a solid mass, which weighs heavily, which means it is only suitable for filling a load-bearing frame;
- MDF, fiberboard - pressed chipboard material that does not shrink, is perfectly processed and is light in weight.
The last option is cheaper than the others. But you need to understand that the walls, shelves, flooring and roof of the cabinet must be stable. Therefore, materials for a built-in wardrobe with your own hands must be durable or have a large thickness.
The simplest option
This method is the least labor-intensive, but will require certain financial investments and at least initial theoretical training.
The point is to draw your own drawing of the future cabinet and order all its elements from the carpentry shop of a construction hypermarket. There:
In this case, all you have to do is bring everything home and assemble it.
In fact, this option is very profitable, since you do not need to pay for the services of a furniture maker. Few people know, but the cost of the cabinet in all cases does not exceed the amount of the advance payment given to the specialist, and this is often only a third of the total price. It is quite easy to calculate how much money you can save by doing this.
In order to create a diagram, you don’t need to be able to draw or delve into the intricacies of craftsmanship - just download and install a special program on your PC that will do everything for you. Currently the most popular is PRO100. Here you:
The software then processes the sketches and produces a finished drawing with the optimal layout of parts on a standard plate. Then, as they say, it’s a matter of technique.
It’s not difficult to master the program – just watch a few lessons on YouTube and practice for a couple of hours.
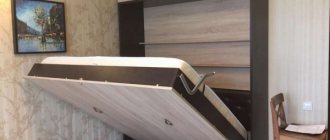
Fittings set
In appearance, this built-in wardrobe resembles a large box running along the wall. When you need to use this cabinet, it becomes clear that the following parts are present inside it:
- Self-tapping screws and dowels for attaching sheets to each other or to the frame;
- Corners for attaching canvases under shelves;
- Friezes, guides and rollers for door operation (if the doors are hinged, then only hinges are needed);
- Handles, locks, latches for opening and closing and locking door leaves;
- Crossbar, crossbar holders, baskets - for storing outerwear and other things.
Recommendations for use and care
The built-in wardrobe around the door will last a long time if you adhere to the general principles of operation. They relate to the correct placement of things and compliance with the permissible load.
So heavy objects are placed in the lower part, closer to the edge of the shelves. You can store light items at the top. The permissible vertical load for shelves made of chipboard and MDF is about 10 kg, glass shelves have an indicator of up to 2 kg. The force applied to drawers should not exceed 5 kg, and to hinged doors - 3 kg.
If it’s about appearance, then you should adhere to the following recommendations.
To care for the surface, special products are used depending on the material of the façade.
In the case of a sliding system, the guides are regularly cleaned of small debris and dust using a vacuum cleaner, and the wheels are wiped. This rule also applies to retractable mechanisms.
From time to time you should inspect the fastening points, tighten them if necessary, lubricate the hinges and hinges.
What tools will you need?
The speed and quality of assembly of parts depends on the set of tools. Finally, the default inventory solves the question of how to make a built-in wardrobe with your own hands. If this furniture is a sliding wardrobe, then you will have to arm yourself with:
- Electric jigsaw;
- Screwdriver;
- Electric drill;
- Belt sander;
- Level;
- Tape measure or electronic rangefinder;
- With a simple pencil.
The entire set of tools listed can cost a lot of money. Therefore, some products can be rented, purchased second-hand, or replaced with traditional analogues. In particular, we are talking about a hand drill, a hacksaw, a plane, screwdrivers, and sandpaper.
Let's sum it up
So, we learned how to assemble a wardrobe with our own hands. It can easily be built into any free niche you have in your home. Of course, we have considered the simplest possible option, since it is represented by a small design, however, having acquired the initial skills by reviewing the step-by-step instructions associated with it, you will get a general idea of the process and will be able to install the model that you need, having previously purchased the necessary details for her.
Small-sized apartments exist not only in old Khrushchev-era buildings; completely new housing projects, designed for the poorer category of our fellow citizens, also save on passerby space. The industry takes into account the situation in the housing market and produces small-sized but very functional furniture specifically for such situations. In a special article you will find tips on choosing a cabinet for a small hallway, as well as instructions for assembling a door cabinet.
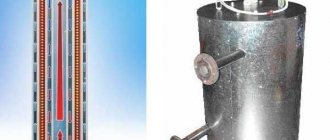
Built-in wardrobe area measurements
Wardrobes are different from each other and the corresponding difference is explained by the shape, dimensions, storage system, and the presence of various auxiliary attributes. You also need to be guided by the style of the interior so that the future closet matches the space.
Note!
- Do-it-yourself wardrobe: a review of ways and methods on how to build a stylish and original wardrobe (video and 145 photos)
- Do-it-yourself furniture restoration - removing chips and scratches, restoring surfaces. Instructions with photos and video tips
- DIY ottoman: how to make it at home. The best ideas, master classes. Photo + video review of beautiful ottomans
After purchasing the necessary consumables, you can begin sequential measurements:
- First, according to the free space for the cabinet, measurements are taken of the conventional (!) back wall of the furniture (the built-in cabinet has no back wall);
- Next, you need to step forward from the conditional wall a certain distance in order to find out the width of the “end part”, i.e. walls, subfloor and roof;
- The next stage is measuring the facade (doors) according to the end parts.
Moreover, individual photos of do-it-yourself built-in cabinets show that the cabinet roof may have a protruding canopy, which definitely emphasizes the design of the entire structure.
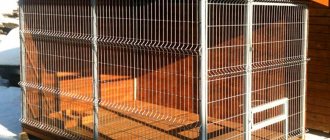
Partition in a public corridor: advice and the issue of legality of construction
Very often the common corridor is large and the apartment has a recess that ends with the front door. Many people fence off this part with various (usually metal) partitions. But is it legal? The corridor is part of the property of all owners of apartments in a given building. Such an inter-apartment staircase is not the property of the residents of one apartment. Permission to erect a partition can only be obtained during a general meeting of residents.
Additional things you need to know:
- It is strictly forbidden to block the corridor without permission. But if there is no lock on the door, such a partition is quite legal, since any resident of the house can gain access inside.
- It is necessary to notify regulatory authorities (for example, housing inspection authorities). One meeting and consent of residents will not be enough.
- You can install a partition only if you own the apartment itself. The inspection may require the presentation of documents. In rented living space, such actions are illegal.
Cabinet interior
Having found out the total area of the thematic structure, it is necessary to work out its internal space. Furniture makers recommend:
- Divide the closet into two or three parts so that each user can use the storage system separately;
- Arrange crossbars for outerwear in one or two sections;
- Organize shelves below and above the crossbars for other things.
If the closet is used by one person, then one half is completely suitable for outerwear, and the second for shelves. Moreover, inside the latter (mainly on top) it is recommended to arrange baskets for bed linen.
Door leaf design
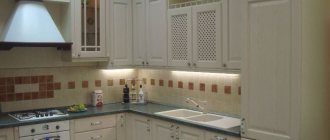
There are a lot of door design options. Solid wood products are coated with varnish or paint, and a composition is selected that will highlight the texture of the wood. So, in a Provence-style kitchen, olive or lilac-colored doors will look good, and brown wooden doors are suitable for the bedroom.
Accent on a dark corner of the kitchen
Doors made of MDF can be with inserted frosted glass, decorated with patterns. They are placed in the corridor or hallway. Iron doors are rarely decorated with decorative elements, because they are installed in minimalist interiors.
Plastic is also in demand. It comes in different colors and works well. Products that imitate wood are popular; designs made of bright plastic also look original, but they are not suitable for all styles. Glass sheets can be made of transparent or darkened material.
Manufacturing of blanks
To assemble a built-in wardrobe on site, you need to make blanks by sawing consumables. The corresponding event occurs as follows:
- First you need to cut a profile pipe or timber for the supporting base;
- Next, the sawn parts are assembled against each other close to the wall to determine the dimensions of the sheets for cladding;
- The next stage is sawing sheets for walls, roofs, bottom flooring, doors;
- Next, you need to cut the sheets for the shelves;
- Holes for door fittings are drilled in the walls and roof;
- Holes are drilled on the inside of the walls for the corners that will support the shelves and crossbar;
- If necessary, certain elements of the facade are treated with natural silicate paint.
If it is recommended to fasten the elements of the supporting base and the sheathing to each other using dowels, then the corners can be mounted with self-tapping screws.
Door opening systems - types and design
The cabinet around the door is equipped with one of the door system options.
Hinged doors are considered the simplest and most common. They provide a complete overview of the contents and have a simple design, which explains their high reliability and long service life (up to 50 years). I'm pleased with the quiet operation. An important factor is reasonable cost. The installation of the sashes on the frame is carried out using hinges. The door leaf is equipped with handles. There are models that open by lightly pressing the door. The products are also equipped with automatic closers. However, for normal functioning it is necessary to have free space in front of the facade.
The sliding system operates on the principle of a compartment. The shutters move along the upper and lower guides using rollers. When opened, one of the panels slides behind the other. It is worth considering that such a system reduces access to the internal space by half. The advantages of sliding doors are:
The weaknesses are as follows:
The intermediate space is occupied by folding doors. In this case, the facade consists of panels connected to each other, which, when opened, fold in the form of a book or accordion. Their movement occurs along the upper guide, which can cause instability of the door leaf. To reduce the negative effect, the design is supplemented with a bottom rail.
The advantages of the folding system include:
It is reasonable to equip some sections with lifting doors. The canvas is lifted using a gas shock absorber. Smooth movement is ensured by sliding bearings, and tightness is ensured by the bushing, oil seal and seal. The device is mounted on the inner wall and door on both sides.
The advantages of this method are:
High cost and limited application are considered disadvantages.
Preparing the installation site
Before assembling the themed item on site, it must be cleaned. This is especially true for the wall surface, because it will serve as the rear plane of the directly built-in cabinet.
It may be necessary to install utility lines in some places to simplify the operation of the furniture if it has lighting. Instructions describing built-in cabinets rarely emphasize the importance of site preparation.
Advantages
Many people have probably thought more than once about how they can functionally use all the walls around the front door. By placing a structure with mezzanines near the doorway, you can not only save space, but also create a convenient area for storing many household items. Installation of such furniture will be an ideal solution for small apartments where you simply need to free up living space.
If the apartment layout has unaesthetic and non-standard protrusions and niches, then by installing a U-shaped cabinet near the entrance or interior door, you will be able to give the room classic and regular shapes.
Of course, you won’t be able to purchase a ready-made wardrobe to suit your layout in a simple furniture store, since the sizes of doorways vary significantly even in standard buildings of a typical design. Therefore, you will have to make such furniture yourself or contact workshops that make custom-made furniture.
But despite all the difficulties, installing a cabinet around the door will provide you with the following benefits:
- You can independently develop the design of the cabinet, determining the number of compartments, shelves, hangers and drawers you need;
- You can choose a design that matches the overall style of the room, choose the color and texture of the doors, thereby most optimally fitting your furniture into the color space of the interior.
Assembling a built-in wardrobe
The finished cabinet, although it rises to the very ceiling, should be convenient for all users. Therefore, before assembling it, you need to make sure that the frame will support the sections at the optimal height.
The capacity of the cabinet is increased not only by the height, but also by the L-shape or the addition of other compartments that can be manufactured and assembled over time.
Note!
- How to make a backlit mirror with your own hands: necessary materials, tools. Tips for choosing lamps and LED strips
- A simple and beautiful DIY bathroom shelf made of MDF, glass, plasterboard: straight and corner options. Photo instructions, tips, video master class
- How to make a computer desk with your own hands from wood or chipboard. Photo/video master class + description of models
The main structure is assembled sequentially:
- First, the supporting frame is assembled;
- Next, the building is sheathed with walls, flooring and roof;
- The internal space is equipped with corners, crossbar and guides;
- The doors are equipped with rollers, after which they are threaded into guides;
- Shelves are attached to the corners;
- Handles are mounted in the door leaves (if the design of the structure provides for them);
- Mirrors are placed on top of the doors.
When the structure is fully assembled, all that remains is to check its moving elements to ensure smooth movement.
Design ideas
The original decoration of the facade can be different:
half-timbered construction is a unique structure in which vertical columns or columns are load-bearing. Spacers are installed between them.
- designer painting is done on a glass, mirror surface or even an MDF panel;
- stained glass film, which gives the facade a luxurious look at its low cost, is resistant to fading;
- fusing is a technology that allows you to create incredible designs using pieces of glass baked under high temperatures. Three-dimensional images made using the fusing technique look impressive;
- sputtering using ion-plasma or magnetron technology is quite expensive, but incredibly effective, somewhat reminiscent of glass tinting;
- laser engraving can be performed on both the outside and inside of glass; the technology allows you to create decorative images of any complexity;
- facades with glass plates of various shades using the beveli technique (fixed on glass or a mirror using an ultraviolet lamp or special glue) can have fancy patterns;
- a mosaic assembled from pieces of colored glass always looks very impressive. Mosaic technology is labor-intensive, which is why such doors are expensive;
- airbrushing has become popular as a decoration for cars, but modern designers also use it to decorate doors;
- milling is used to apply images of any complexity on panels made of natural veneer or MDF;
- A democratic way to decorate sliding doors is a decorative film, which you can even apply yourself. Corner patterns on a mirror surface look especially beautiful; they serve as decoration and at the same time leave the main part of the mirror free;
- You can independently apply a design to a glass or mirror surface with matting paste using a stencil and a rubber spatula.
Combined facades, which are easy to match to any interior, have gained great popularity.
As a standard budget option, the number of sashes can be 2, 3 or 4, combining a mirror and chipboard facade.
The design of such facades is:
- classic, where mirrored and solid doors alternate;
- sectoral - the canvas is divided into sectors;
- geometric - rectangles made of different materials make up a single facade;
- diagonal, when the fabric is divided diagonally and the material of each part is different;
- wave with smooth lines.
The most successful combinations of materials are:
- mirror cloth with MDF/chipboard or plastic;
- lakomat with bamboo or MDF/chipboard or plastic;
- leather with wood or plastic.
Photos of built-in wardrobes with your own hands
Ready-made models or to order
Buying a partition cabinet is a responsible decision. These are not the cheapest designs, but you will use them for a long time. With our advice you will not go wrong with your choice. First, decide whether to buy in a store or order from craftsmen according to your sketch. Large furniture hypermarkets offer a decent catalog of ready-made models.
As a rule, these are large racks that will become an alternative to the wall in the living room. The advantages are a relatively low price, and you don’t have to wait long for the craftsmen to make and install them.
Some companies produce collapsible types. You receive a set of components and fasteners, and assemble a homemade rack at home. This is how the popular furniture chain Ikea works.
Usually, hypermarkets have several shelves in their assortment that will match the design of your room and, for little money, will do a great job of zoning.
We suggest considering the Ivar and Kallax models. Their low price and sleek design make them a universal choice for modern apartments.
“Ivar” is taller - 226 cm, material - unpainted pine. Nothing superfluous - simple forms with spacious shelves through which light freely penetrates into the separated part of the room. It will fit into both a classic interior and a fashionable loft.
"Kallax" is a white shelving unit with square sections. You can choose storage boxes of the right size for it in the store. You can put books and decor on open shelves, and in closed compartments you can hide everything that should not be displayed.
If you want to purchase a practical model with minimal investment, take one of these. If you need a built-in multifunctional cabinet, only professionals can make it. It is also better to make a compartment to order, since it is quite difficult to find a ready-made partition that will fit into the overall style of the room and have all the necessary characteristics.
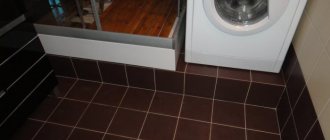
Tip 2: Accent tiles on the floor
If earlier they tried to decorate the hallway in neutral shades and focused exclusively on decorative elements, for example, paintings, now other techniques are being used. Designers unanimously say that one should not be afraid of experiments, giving preference to light and plain finishing materials. It’s better to take a risk and choose bright or graphic tiles to decorate the corridor. This will attract attention and make the floor an accent.
Designer Elena Erashevich believes that the original floor covering in the corridor allows you to create the necessary dynamics. You wouldn’t expect this from boring white or beige tiles, but a bright example with an unusual print will add relevance and character to the interior.
Tip 4: Bright walls
Most people are afraid of bright colors because they think that they are difficult to combine, they can quickly get boring or will be overwhelming. Yes, there are certain risks, but it is worth considering the fact that the hallway is a passage room. The owners and guests of the apartment spend a minimum of time here, and therefore you need to boldly use accents. Any rich color will work to your advantage, as it will create the right atmosphere, add volume and help transform the existing space. If the hallway is small, use the one-color technique: let the walls, ceiling, floor, and closet be the same shade. This will visually blur the boundaries of the room and make it larger.
Tip 6: Install a console or chest of drawers
These items in the hallway interior are often ignored, believing that they only take up space. If the room is small and there is not enough room to maneuver, then a chest of drawers or a console may really be superfluous. However, in large hallways it is worth setting aside space for them. Elena Erashevich says that the console is very practical and easy to use - you can always put an umbrella, gloves, keys, or handbag on it. A flower arrangement or seasonal bouquet also looks great on the console, adding a touch of freshness and coziness to the interior.
Tatyana Ovdiy and Maria Islamova share the same opinion: “Choose either a console or a chest of drawers and make it to order. In this case, you can provide the required number of drawers and compartments for convenient storage of small items that constantly get lost,” say the designers.