Choosing the type of plasterboard ceiling
The choice of the type of plasterboard ceiling depends on its purpose. The technological diversity of plasterboard structures allows you to create the following types of ceilings.
- A flat single-level plasterboard ceiling, with the ceiling level lowered by 100-1500 mm.
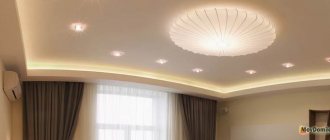
- Two-level ceiling with possible lighting.
- Two-level ceiling with figured elements;
- Curved ceiling on several levels;
- Other types of ceiling.
The appearance options for a plasterboard ceiling are very diverse and are limited only by the imagination of designers and the technology of plasterboard construction.
The influence of lighting fixtures on the height of the structure
The choice of lighting fixtures, as well as their location, also influences how much a suspended ceiling consumes. Proper lighting allows you to zonally divide a room into functional zones and visually increase the space.
The following lighting devices are used:
- spots (spotlights). Their use allows you to lower the ceiling by 1-1.5 cm, it all depends on the specific type and shape of the spot. The use of these devices allows you to save on electricity and create an original interior. It is better to choose lamps with a metal casing.
Which is better: heated floors or radiators?
Warm floorBatteries
- Chandeliers are a classic option for interior design; this solution, at first glance, is simple, but there are nuances in choosing a device. You can purchase a chandelier that will be mounted on a special strip, or a version with a hook and loop. The choice depends on the distance - how many centimeters from the ceiling to the base base. On average, for a hooked product this figure is about 3 cm.
- Halogen lamps are practical and economical, while allowing for brighter lighting. The shapes of the devices are varied, which makes it possible to design the design in an original and stylish way. When choosing lighting devices, you should take into account that lamps with high heat emission are not suitable.
- LED lighting allows you to visually enlarge the space. Their use will help create a zonal division of space thanks to a large selection of options for placing them on the surface. In this case, the ceiling drops by at least 2 cm;
- LED strips look impressive; they allow you to smooth out surface unevenness that was allowed when installing the sheathing under the tension structure. It is worth noting that the ceiling drops by at least 2 cm, and depending on the specifics of the room and the lighting method, the descent can reach 10 cm.
Video description of lamps
Plasterboard ceiling - two designs
There are two fundamentally different designs of plasterboard ceilings.
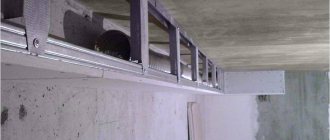
- The first design is mounted on a frame made of a special profile, which is called a profile for plasterboard, also known as the ceiling profile PP 67/27 and the ceiling guide profile PNP 28/27. Ceilings are made on a metal frame more often in city apartments and stone houses.
- The second design, plasterboard ceilings, is made on wooden beams. For this design, any dry construction timber with a width of 60 mm and a height of 30 or 40 mm is used. Ceilings on a wooden frame are most often installed in wooden houses, houses with wooden floors and attics with a rafter system.
Materials and tools
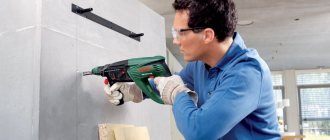
Before starting installation work, prepare the tools that will be needed during work and calculate the amount of material for installing the structure. Among the tools you need to have:
- screwdriver;
- reforator;
- roulette;
- special knife for cutting plasterboard;
- scissors for working with metal;
- level.
Force majeure may occur in the process, which will require additional tools, but in most cases, this set is enough to install the structure. The same list of tools is used to create a standard or stretch ceiling.
Before purchasing material, you should carefully calculate the required quantity. Firstly, this will help you save money, and secondly, it will help you avoid the inconvenience associated with additional trips to the hardware store. Materials needed for installation:
- Metal profiles (60x27 and 27x28):
- Suspensions;
- Dowels and screws;
- Putty.
You can include LED strip and baseboards in this list, but this relates more to finishing and are not materials of primary importance.
Floating ceiling with light trim
Purchase of materials for plasterboard ceilings
Plasterboard ceiling material can be divided into three groups:
- Material for the ceiling frame and its fastening (suspension) to the rough ceiling;
- Plasterboard sheets;
- Fastening and additional material for the structure.
Material for the ceiling frame and its fastening
Consider the option of a ceiling in an apartment using a metal profile for plasterboard.
A special profile for the ceiling is called a ceiling profile. Correctly, such a profile is called and labeled as follows:
- PP ceiling profile PP 60/27,
- PNP ceiling guide profile PNP 28/27.
The dimensions of the profiles are such that when assembling the structure they can be inserted into one another. The profiles are secured to the structure using special screws called “bug” (“bug” is a screw type: LB) or a special tool called a cutter.
Install the main frame profiles
YouTube channel “KNAUF Russia”
Cut out the necessary pieces from the PP 60×27 profile and insert into the guides. Position them so that the centers of the beams coincide with the previously marked marks.
YouTube channel “KNAUF Russia”
If the length of one profile is not enough, add an additional section and join them together using a special connector.
Floating and hard plasterboard ceilings
Pay attention to this section. There are two technologies for installing a gypsum plaster ceiling on a metal frame.
The first technology is tough. She assumes that the plasterboard ceiling is simultaneously attached to the sub-ceiling and to the walls. The frame of the suspended ceiling is attached to the rough ceiling using special PP hangers (straight hangers) or clamps with rods. Direct suspension will allow you to lower the ceiling to a height of no more than 200 mm. Suspension with traction allows you to lower the ceiling by 300-1500 mm.
Note: It is worth paying attention that when choosing the type of ceiling, you must understand how much the ceiling will lower and from this make a choice of types of suspensions.
The second technology is floating. She assumes that the ceiling frame will be attached to the sub-ceiling, but will not be attached to the walls. This ceiling is made only with PP profiles, without using PNP profiles. This ceiling design is used in new buildings in the first years of completion, houses near highways and railways.
I described in detail an example of a ceiling with direct hangers in the article: Suspended ceiling with direct hangers. Here, for a variety of examples, we will consider the installation of a single-level floating ceiling on rods with clamps.
Install wiring and sound insulation
Electroas.ru
Before covering the frame with plasterboard, you need to lay electrical cables. As a rule, they are attached to the ceiling or suspensions. Under no circumstances should wires be laid inside the frame, as there is a risk of damaging them with screws when installing the sheets.
YouTube channel “KNAUF Russia”
To increase the sound insulation of the ceiling, mineral wool slabs are laid between the frame profiles or on top of it. If the free ends of the suspensions are sufficiently long, they are bent, thereby holding the sound insulation layer.
Material for single-level ceiling
To determine how much and what material you need to purchase, you must first draw a diagram of the future ceiling design. We draw the room where the ceiling is planned, with dimensions.
Ceiling hangers should be installed with a pitch of 600 mm and a distance from the walls of 250 mm (see photo). Draw the planned hangers on the drawing of the room based on the required gaps between them, and get their number. An example of the arrangement of profiles can be seen in the figure from the article Marking a single-level suspended ceiling.
When making a hard ceiling with your own hands, you would need a guide profile (PNP 20/27) around the perimeter of the room. Its length can be calculated by the length of the perimeter of the room plus 10% margin. This profile is not needed in this floating ceiling design.
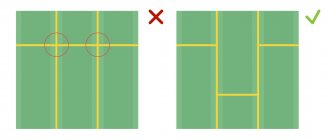
The main structure of the floating ceiling frame is a kind of grid of ceiling profiles (PP 60/27). Some of these profiles will be attached to hangers (they are called main). The second part of the profiles will be attached to these profiles (they are called load-bearing). The name is load-bearing due to the fact that sheets of drywall will be attached to these profiles.
In technologies for working with plasterboard, intersecting ceiling profiles can be connected in one level (end-to-end) or in two levels, overlapping one on top of the other.
- The first connection is called a single-level connection of ceiling profiles and it is made with special “crab” type fasteners.
- The second connection is called two-level and it is made with a special two-level profile connector.
In the design of a floating ceiling, only a two-level connection of profiles is used!
I repeat and this is important . In the design of the plasterboard ceiling frame, two types of profiles are clearly separated. Some profiles are called main, the second are called load-bearing (load). The main profiles are attached to the sub-ceiling, and the load profiles bear the load from the weight of the drywall attached to them.
Important! In a two-level frame, the main profiles are located at the top of the structure, and load-bearing profiles are attached to them.
The height of the suspended ceiling - what should it be?
The prevalence of suspended ceilings is due to a lot of technical, operational and aesthetic advantages. However, installing a ceiling structure forces its owner to make some sacrifices. This applies to the height of the room being equipped. In most cases, installation of the canvas cannot be done without using at least a low-power frame, but that’s not all. There are other reasons why a room may shrink significantly. What should be the normal and minimum height of a suspended ceiling? There is no way to answer this question in one word, since the location of the structure can be influenced not by one, but by several factors at the same time, which are worth discussing separately.
The feasibility of installing a suspended structure
With the most successful option for installing the structure, the distance from the base ceiling to the suspended ceiling is about 3 cm. Therefore, even if the height of the walls in your apartment is small, you can safely sacrifice a few centimeters and this will not affect the room as a whole. It is worth paying attention to other nuances:
- in case of a high probability of flooding from above, it is preferable to install suspended ceilings made of polyvinyl chloride film, which absolutely does not allow moisture to pass through. It will protect the furniture and save you from unplanned repairs, not only the coating, but the entire room as a whole. Plasterboard structures usually fail during intense flooding, as a result of which the sheathing has to be completely replaced,
- If you are tired of constantly whitewashing and painting an old, constantly cracking surface, a suspended structure is exactly what you need. The frequency of repairs in this case is reduced to simple maintenance several times a year, and then only if contamination appears,
- when the main ceiling is already low, but you still want to install an equal suspended ceiling, then a pure white glossy or matte version of the product is an acceptable solution. In this case, a stretch glossy coating is even better suited, due to its reflection creating the impression of the presence of another floor,
- In order to minimize the loss of height due to the installation of a suspended sheet, in the case of tensile structures, it is best to choose a wedge or glazing bead method of fastening the sheets.
Factors affecting the installation height of a suspended structure
We will try to take into account the reasons affecting the ceiling installation height:
- lighting system. Installing a chandelier or lampshade does not require a special change in the height of the ceiling structure, which cannot be said about built-in lighting fixtures. A spotlight will fit in a new structure only if the required level is maintained. In this case, it must be lowered to at least the height of the lamp body minus the thickness of the ceiling covering itself. For example, the lamp body is 9 cm, and the thickness of the coating, let it be plasterboard, is 9.5 mm, which means the ceiling needs to be lowered by at least 9 - 0.95
8 cm,
- wiring. Sometimes it is necessary to install the hanging surface below the desired level, so as not to damage the electrical wiring running along the wall and disable the entire residential power supply system. If you are not an electrical specialist, it is better not to take risks, but determine the level of the wires and step back a little lower and only then fix the wires. After all, if you damage the electrical wire running under the ceramic tiles, you will have to spend more than one hour to find a way out,
- furniture. The minimum height of the hanging covering is also affected by the size of existing or already ordered furniture. After the completion of repair work, the floor level often changes by several centimeters, which may lead to an increase in the level of furniture arrangement in comparison with the previous one. This is important to consider when your furniture is the same size as the entire area of the room. After all, by raising the floor and lowering the top of the room slightly through the use of a hanging fastening mechanism, the furniture may turn out to be too high, which will cause difficulties not only in installing it, but also in moving it around the room,
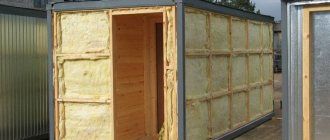
- insulation. The use of insulation necessitates the use of a frame structure that allows you to safely hide the insulating layer underneath. The thickness of the insulation varies, from a few millimeters to several tens of centimeters. Try to avoid the insulation putting pressure on the sheathing,
- general health. Oddly enough, when installing a suspended covering, you have to think about it because lowering the surface level affects the change in the microclimate in the room. Both temperature and humidity change somewhat. This is especially noticeable in rooms with low ceilings, where residents may occasionally suffer from a lack of clean air.
As practice shows, there is simply no universal way to determine the minimum installation height of a suspended ceiling, since each owner, when installing an artificial ceiling, solves his own individual problems.
Note: It is worth remembering that lowering the ceiling level too much leads to a shift of the zone of the highest room temperatures downward, which is not desirable for everyone, especially for those who cannot stand the heat in the room.
DIY plasterboard ceiling - marking
- When making a plasterboard ceiling with your own hands, it is important to make the markings correctly. You need to start work by cleaning the old ceiling and top of the walls from old building material. If necessary, the walls are strengthened with building mixtures.
- We begin work by marking the ceiling. Marking is best done using a laser level.
- We apply the lower level of the ceiling along the perimeter of the room.
On the ceiling we mark the places for attaching the suspensions, taking into account the distances from the outer profiles to the walls (at least 100 mm) and the distances between the main profiles (at least 600 mm).
For accurate marking, we mark the location (fastening) of the suspensions on the marking lines. To mark, we use a construction marking cord and, with the help of an assistant, we put the markings on the ceiling.
Cut out the sheets
YouTube channel “KNAUF Russia”
To cut the panels, mark the desired size with a tape measure and, applying the profile or rule, cut the cardboard with a knife. Hang and break the cut part, and then score the paper from the bottom side. Then use a plane to trim the edge along the cutting line.
Also, before installation, do not forget to use a plane or knife to chamfer at an angle of 22.5° on the edges that will be adjacent to other sheets. This is necessary in order to properly seal the joints with putty in the future.
Be sure to measure and mark on the sheets the places where the lighting wires are located. After finishing the work, the drywall can be easily cut through and the cables can be removed.
Installation of hangers
- According to the markings made, we install the suspension rods using dowels with screws or other fasteners.
- On the installed rods, at the same level, we attach clamps with hangers for the profiles.
Decorating a plasterboard ceiling
Finishing a plasterboard suspended ceiling can be done in a variety of ways. The market offers a wide range of different materials and solutions that can be used to decorate a ceiling structure - and not all materials are intended for decoration.
The variety of options suggests that decorating a suspended ceiling is a purely individual matter, which is worked out personally by the owner or a hired designer. In addition, the selection of the most suitable decorations largely depends on financial capabilities - budget decoration is made from completely different materials than expensive decor.
For some situations, plaster molding may work well, while in others, simple foam moldings will be appropriate. The finishing of the ceiling surface is also important - in one style, wallpapering will be quite appropriate, but for other cases, more complex and expensive solutions will be required, such as an elegant handmade pattern applied to the ceiling by an artist.
When designing a ceiling design, you also need to take into account the characteristics of the room itself, as well as the entire home. Will all the rooms fit into the general style, or will they be completely different from each other? This question needs to be thought through as early as possible, so as not to end up with incompatible design solutions.
Ceiling frame installation
We begin installing the ceiling frame with our own hands by installing the main profiles. They are secured with a suspension as follows.
- We attach load profiles to the main profiles. We connect them to the main profiles with a two-level suspension.
- We maintain technological distances between profiles.
Important! When making a plasterboard ceiling with our own hands, we constantly measure the horizontality of the profile levels. If necessary, adjust the level using clamps on the rods. In the photo, this adjustment is shown with arrows.
Upon completion of installation of the frame, we once again check the horizontality of the entire structure in different directions.
Fix the main profiles in one plane
YouTube channel “Stone Guys”
To obtain a perfectly flat surface for plasterboard cladding, you need to align all the beams in one line. The easiest way to do this is with regular thread.
Lift all profiles 10–15 mm up and secure by inserting screws into the holes of the hangers. Stretch a thread across the profiles between the walls and secure them with self-tapping screws on the guides flush with the latter.
Also, the correct installation of profiles can be controlled using a bubble level / YouTube channel “KNAUF Russia”
Starting from the outermost one from the wall, release the profiles one by one and, aligning them so that they barely touch the thread, secure them with four 3.5 × 9 mm screws - two on each side.
First, fix the hangers in the middle of the beams to remove any slack. After this, the main profiles will almost clearly fall into place. All that remains is to check the thread and tighten the screws into the hangers.
Covering the frame with plasterboard
Gypsum craton sheets are attached to the load profiles with TN self-tapping screws with a pitch of 150 mm. You will need an assistant or device to support the sheets. You can make a device for supporting sheets with your own hands, for example, a T-shaped support made of wooden slats.
The joints of the sheets on the ceiling should be made in the middle of the profile so that they do not hang in the air. The screw caps need to be recessed by 2-3 mm.
We have a single-level floating ceiling, so we retreat from the edge of the walls by 5-7 mm.
The joints of adjacent rows of plasterboard sheets should be offset, as in brickwork.
How many layers of gypsum plaster should be in the ceiling?
For apartments, that is, rooms that are quite small, the ceiling is made of plasterboard in one layer with sheets of 12 mm thickness. When using thinner sheets, the sheathing is done in two layers.
Mark the frame
YouTube channel “Guys from Stone”
For proper installation, you need to accurately mark the position of all frame elements. It consists of guides mounted on the walls, where the main profiles are installed, and they, in turn, are attached to the ceiling with hangers. Supporting profiles are mounted across the main ones, onto which drywall is directly screwed.
- Guide profiles. We have already noted their position in the previous step.
- The main profiles are installed at intervals of 1200 mm along the axes. In this case, the outermost beams from the walls are located at a distance of ≤ 1170 mm.
- Suspensions are mounted in increments of 650–1000 mm.
- Supporting profiles are installed every 500 mm.
The main profiles are marked with a red line, the load-bearing ones with a blue line, the mounting points for suspensions with gray circles.
For example, let's mark a room 3.5 by 3.6 m. Three whole sheets clearly cover the entire width of the room. The length is 1 m short, so we will add pieces of 1 × 1.2 m to each row. According to the installation technology, the joints of adjacent sheets should be staggered, in the manner of brickwork. This means that we start the first row from a whole sheet, the second from a piece, and the third from a whole sheet again.
Use a tape measure to measure all the necessary gaps. Place marks in the right places, and then connect them in lines using a tapping cord. Distribute the hanger fastenings so that there is no more than 1 m between them, or preferably less.
For a two-level frame you will need
A two-level plasterboard ceiling will require more material and its amount depends on the ceiling pattern. All curved edges of the structure are made from guide profiles (PNP 28/27), and how to make a two-level ceiling in detail is in the next article here.
©Gipsokart.ru
Articles on the topic
- Selecting and installing a chandelier on a suspended ceiling
- Suspended flow frame with single level connectors
- Plasterboard finishing of attics
- Suspended ceiling with direct hangers
- Suspended ceiling with a two-level frame
- Plasterboard ceiling for narrow rooms
- Plasterboard ceiling on a wooden frame
- DIY plasterboard ceiling: single-level floating ceiling on rods
- Ceiling profile for plasterboard
- Marking a single-level suspended ceiling made of plasterboard
Seal the joints
YouTube channel “KNAUF Russia”
Upon completion of installation, all sheet joints are covered with putty using reinforcing tape. To do this, first make sure that the screws are securely fastened and, if necessary, tighten the protruding heads with a screwdriver.
Then use a brush to brush off any dust at the joints of the sheets and prime all cut edges. Fill the seams with putty using a putty knife. Glue reinforcing tape in the center of the joint and press it in with a spatula. Next, apply a second layer of putty. Use the same compound to seal the fastening points of all self-tapping screws.
Drywall: scope
Drywall has long gained popularity as a flexible and versatile material for construction and repair. Installing drywall is not as complicated as it may seem at first glance. It is enough to understand some rules and nuances.
Drywall is a sheet made from gypsum. It can be in size 1.2*3 m or 2.5*1.2. The material is covered on both sides with thick cardboard. Because of this composition, it is considered environmentally friendly. But during manufacturing, additives can be used to impart certain qualities to the building material: moisture resistance, heat resistance.
When performing repair work, plasterboard can be used for the following purposes:
- Insulation of premises.
- Construction of partitions, walls, niches, various complex structures.
- Leveling surfaces. It is worth noting that this is a fairly economical and fast method.
How to glue drywall
The sheets are attached to flat surfaces using specialized glue. This is the easiest and fastest installation method. But it is only suitable for leveled surfaces. A difference of no more than 20 mm is allowed. This takes up less room space. There are two ways to fasten sheets:
- On clean and primed walls.
- On strips of Perlfix glue 10 cm wide.
Drywall should be fixed only after the wires have been laid and sound insulation has been thought out. Glue is applied around the perimeter and in the middle of the sheet. To ensure uniform application, use a notched trowel. After the glue has hardened, you can strengthen the structure with dowel nails.
You can also attach drywall to polyurethane foam. In this case, the sheets are attached to long screws, and the gaps are filled with foam.
Installation of drywall - finishing
After the putty has dried well, the entire surface is primed with a regular paint roller. Next, the base layer is applied using a pair of spatulas: small and large. The first mixture is taken from the container and smoothly distributed along the edge of the second. The surface is already treated with a large spatula.
Next, you must sand the drywall. It will become completely smooth. On such surfaces you can easily glue wallpaper or apply paint, but only after another layer of primer.
Disadvantages of gypsum board
- The problem is that gypsum board structures visually make the room smaller. This is especially important for standard apartments where the ceilings do not differ in height;
- The specifics of the installation require at least two people to participate in the repair;
- After installing a gypsum plaster ceiling there will be a lot of waste. The reason for this is the use of a jigsaw and other tools when cutting sheets;
- When moisture gets on an improperly treated ceiling, unpleasant stains remain. The point is the mineral gypsum base of the material. Therefore, you should not use gypsum board as a material for the ceilings of bathhouses, showers and other spaces with high humidity;
- Cardboard for the outer layers of gypsum board is susceptible to fungal diseases and mold because it is made from cellulose materials;
- In addition, to avoid corrosion and deterioration in the appearance of the seams, you need to update them regularly;
- Gypsum ceilings are not very durable. But if you can regularly update or give them a facelift, you won't regret the choice.
Calculation of the number of profiles for wall mounting of plasterboard
Wall plasterboard has a thickness of 12.5 mm. During operation, the wall is subjected to various loads, which can provoke deformation of the metal. The thickness of the profile metal, as well as its quantity, directly depends on the Estimated loads. It is important to take this into account when making calculations and choosing material for the construction of plasterboard walls.
If the loads on the frame are small, then it is possible to use a profile with a wall thickness of 0.4 mm. In another case, it is better to protect yourself by purchasing a more reliable reinforced profile with a thickness of 0.6 mm.
When installing a frame subject to heavy loads, it is recommended to reduce the pitch of the rack profile to 0.4 - 0.5 meters. For light frames, it is allowed to install elements at a distance of 0.6 meters. When calculating the number of profiles, the corresponding values must be taken.
Calculation of the guide profile for walls
The calculation of profiles for a frame for drywall begins with determining the number of guide elements (PN or UW profiles). Installation of this type of building material is carried out to the surfaces of the floor and ceiling. They should be located
as accurately as possible vertically, relative to each other. Subsequently, a rack profile will be installed in the groove of the profiles. Deviations will lead to the wall “pilling” towards or away from itself.
Calculation of the guide profile is simple. It is necessary to measure the length of the wall and multiply the result by two. If the frame is mounted on several walls, measurements are taken for each of them.
An additional guide profile may be required if there is a window opening on the wall. In this case, you need to add the length of the window to the calculated value, also multiplied by two (installation from below and above the opening).
Calculation of rack profile for walls
This calculation is more complicated. To avoid buying excess material and avoid shortages during construction, it is most correct to create a scaled drawing of the wall on a blank sheet of paper. Next, on the same scale, draw the location of the guide (CW) profile in the future frame
The location of the guide profile for wall mounting can be as follows:
- in the corners;
- every 40-60 cm (depending on the thickness and load-bearing capacity of the frame);
- above the doorway (above the lintel);
- on and under window openings to enhance rigidity.
To enhance the rigidity of the structure in the areas of door or window openings, it is allowed to install the rack profile in increments of 30 to 40 cm.
Don't forget about the jumpers. It is necessary to do it if the section of the wall is large and more than one sheet of plasterboard is required to cover it, as well as to strengthen the structure at the end connection of the profiles. The jumpers are made from the same CW profile. Typically, one jumper requires a length reserve. The calculation is carried out by adding two profile thicknesses to the distance between the posts.
Based on the finished template drawing, we calculate the number of whole metal profiles. We add 1-2 “for marriage”. An approximate diagram of a frame drawing for installing gypsum boards looks like this:
Drywall installation - what you need to know
Installation of drywall is carried out in several ways:
- Apply strong special glue to leveled surfaces. Next, you will need a finishing finish, for example, dry plaster. It is not recommended to use it to make wood surfaces even.
- On a pre-prepared frame. With a similar installation, it can also be used for wooden floors. The frame can be made of either metal or wood.
Wooden bases are cheaper, since only blocks of wood are required for execution. Metal ones are made from galvanized profiles, special hangers, and connecting elements. This is a more reliable and durable option.
Before starting installation, you should familiarize yourself with several rules:
- The joints of the sheets are placed strictly on the frame and fixed with self-tapping screws.
- The seams must be taped with joining tape.
- External corners are closed with special corners.
- Interior partitions are mounted in two parallel layers.