Those who have the opportunity to purchase square meters in new buildings can wholeheartedly rejoice at the purchase, because the apartments in the new building are equipped in such a way that future residents will feel comfortable, cozy and warm living in them. However, not everyone can afford to spend their savings on luxury living space, especially since it is extremely difficult to collect the full amount with the current level of wages.
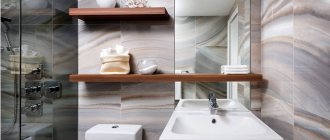
Figured plasterboard partition
Therefore, most have to huddle in old buildings, where real estate cannot boast of comfort and high-quality layout, especially for small-sized Khrushchev-era apartment buildings.
When more than one generation lives in such an apartment, you have to take into account each member of the household and sooner or later think about how to isolate the rooms from each other so that the residents can coexist in the same area more or less separately, and everyone has their own corner. How can I do that? There are several options that we suggest you familiarize yourself with right now.
Redevelopment of living space
What does it look like?
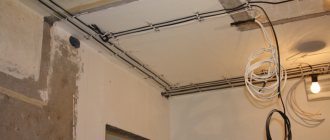
The doorway is covered with sheets of plasterboard or plywood panels, wood or thick reliable cardboard. After which an additional partition is installed, forming a hallway. A new opening for entering the room is created in this partition.
Redevelopment of an apartment using plasterboard
This option of insulating premises in an apartment is considered the most labor-intensive method, requiring considerable financial investments from the owner.
Flaws
Firstly, if the wall structure in which you are going to build a new doorway is load-bearing, for construction work you need to obtain the appropriate permit issued by housing authorities. If you are given such a document, upon completion of the work, the redevelopment must still be properly registered.
Plasterboard partition
Secondly, when taking away part of the space from the room to install a partition, keep in mind that as a result the room will greatly decrease in size.
You can't expect great results in terms of sound insulation, especially if cardboard is used as the new wall.
Required Tools
To make redevelopment a reality, you must have the following list of tools and tools:
- tools powered by electricity that can be used to make holes, for example, a drill or hammer drill;
- self-tapping screws;
- plasterboard sheets;
- metal carcass;
- foam tiles;
- door frames;
- door design;
- glue for wallpapering;
- wallpaper.
Installation technology
If you decide to build a partition from a metal component, it should be treated in advance with sheets of drywall. Pre-measure the height and width of the new wall structure, select a metal profile in the store, taking into account that the slats placed horizontally are located at a distance of 50 to 60 cm from each other, for vertical slats a different step is set - 100–110 cm.
Plasterboard partition
Now use dowels to secure the structure to the wall. Tighten the metal profile using screws. Make a frame part and cover it with plasterboard.
Next, cut the wallpaper into strips, apply a sufficient amount of glue and glue the wallpaper. If you want to achieve a sufficient level of sound insulation, fix several layers of plasterboard, between which lay foam boards with a thickness of 40 to 50 mm.
Kitchen-living room equipment
You can combine the kitchen and living room if two conditions match:
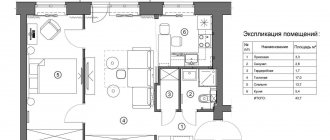
Example: in this project we combined the kitchen and living room by removing part of the wall between them. There was an electric stove in the kitchen, so there was no need to install a tightly closing door. Since the apartment had a so-called imaginary corridor, they did not expand the bathroom, but in place of this corridor they installed a dressing room. The partition between the corridor and the living room was removed, and the location of the built-in wardrobes was revised: instead of a separate wardrobe in each room, there was one accessible from the corridor. The home series is I-510. View the entire project (pdf, 17 MB).
What is an imaginary corridor
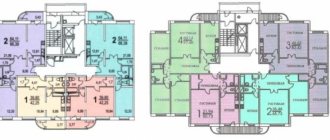
This is the space opposite the bathroom in front of the kitchen entrance, which looks like a corridor, but according to documents it is a living area. In the illustration it is marked in red and is located between the corridor (3) and the kitchen (5). It is impossible to expand the bathroom here, since this is a residential area. But you can equip a dressing room here.
If the kitchen is gasified, then according to current rules there should be a door between it and the living room that closes tightly. You cannot move the wall between the kitchen with gas and the living room; it must stand exactly where it was. The law does not prohibit the installation of sliding doors: they can be made of glass so that the kitchen and living room space is at least visually united.
In the illustration we show which solutions when remodeling an apartment with a gasified kitchen are permissible and which are prohibited.
Moreover, the gas stove in the kitchen can be replaced with an electric one. If you make the apartment not gasified, this will remove some of the restrictions on redevelopment. Such work must be carried out with the participation of Mosgaz employees.
Making a temporary partition
In this case, you need to make a frame from planks or a metal profile, cover them on the sides with a thin plywood sheet. Fix the resulting frame against the wall in the area where you are going to install the partition, using good quality hinges.
DIY plasterboard partitions
It's time to get creative and properly disguise the partition as walls. When the desire arises, you can roll the partition to the wall or, conversely, lower it and secure it to the floor and ceiling surfaces using latches.
What to consider when registering?
A walk-through living room differs from a regular living room primarily by two (or even three) doorways instead of one. The number of doors primarily affects ergonomics and furniture arrangement: there are fewer opportunities in the room for arranging large objects - for example, a sofa.
For example, doors are deliberately emphasized by choosing a wenge color for light walls, or a contrasting color for colored ones. Or they hide it: ready-made designs of invisible doors are available for sale, literally merging with the wall.
The first option in this case is better suited for large living rooms, the second - for tiny ones. Secret doors will not distract attention or visually divide the space.
In the photo there is a sofa between parallel entrances
The photo shows a hall with high ceilings
Walk-in closet
Dressing room tasks
If you can allocate 1.5-2 square meters for the dressing room, we recommend dividing the walk-through rooms using this method.
In addition, a wardrobe room will solve this problem; installing a large rack inside will allow you to move most of the clothes and free up stationary wardrobes and chests of drawers in other rooms.
Step-by-step instructions
Buy self-tapping screws, sheets of drywall and wallpaper for decoration.
Wall structures are made of plasterboard on a special metal frame fixed to the floor plane. Drywall is attached using self-tapping screws, and wallpaper is glued on top. Now you can start installing the door.
If you have additional living space, it is better to move temporarily and only then isolate the passage rooms in the apartment, otherwise it is impossible to avoid inconvenience during the work process.
- Julia
The layout of three-room apartments with adjacent rooms often causes inconvenience. But there are several options for isolating a walk-through room.
Lighting
The lack of natural light forces the use of a large number of different lamps. A chandelier is traditionally used for general lighting, but this is not always appropriate for walk-through spaces. A large structure under a low ceiling will make the ceiling even lower, and the room will seem smaller. For walk-through living rooms, the best solution is spot lighting around the perimeter or a central group. Local light in the form of wall sconces is actively used. For each allocated zone it is necessary to provide independent lighting.
Plasterboard wall
The labor-intensive option involves a considerable investment, but allows you to get a comfortable and practical free space with a separate entrance to all rooms. It should be remembered that the implementation of this method requires obtaining appropriate permission to carry out all redevelopment work.
Construction stages:
- Take measurements for the future structure and determine the location of the doorway transfer.
- Purchase the required amount of metal profiles, horizontal slats, and fasteners.
- Assemble the frame base. To do this, you need to install horizontal slats at a distance of 50–60 cm from each other and vertical elements at intervals of 100–110 cm.
- Sheathe the finished frame with sheets of plasterboard with a layer of soundproofing material.
- Place the frame in the opening and hang the door leaf.
At the final stage, the finishing of the plasterboard surface is performed. Most often, wallpaper or self-adhesive decorative film, as well as regular paint and varnish, are used for this purpose.
Zoning
The allocation of functional areas in the walk-through living room is tied primarily to the location of the doorways. Partitions are rarely used in such rooms, but if it is necessary to isolate a working or sleeping area for one of the family members, they will be appropriate. To prevent partitions from cluttering up an already small space, they should be as light as possible. Pass-through shelving to the ceiling will create a border without blocking natural light. A sliding screen made of frosted glass in Japanese or French style will hide the bedroom from prying eyes. The use of LEDs in the design will help create a natural lighting effect for the area left without a window.
Zoning with wall decoration, a low podium, and multi-level ceiling structures would be appropriate. Regarding the latter, it should be remembered that multi-level ceilings look good in spacious rooms; they are not suitable for small rooms.
Lightweight partition
This method involves the construction of a simple frame based on a metal profile or wooden blocks. The advantage of a lightweight partition is its mobility.
Manufacturing stages:
- Fix a U-shaped structure made of wooden blocks or metal profiles to the walls and ceiling. A sliding product will be attached to it.
- Assemble rigid frame bases for the sashes from a metal profile.
- Sheathe the workpiece with thin sheet plywood or plasterboard.
- Connect the doors with an accordion using piano/furniture hinges. Install the door handle on the outer panel.
- Mount the finished structure in the prepared opening.
To decorate the doors, you can use wood carving or painting, figured forging, as well as any other methods, including gluing wallpaper.
Choosing a ceiling
The well-known problem of “khrushchev” is low ceilings. Such a significant flaw can be corrected only with the help of skillful design. This circumstance dictates its own design rules:
- give up bulky chandeliers, replacing them with several bright spotlights;
- Light shades create a feeling of spaciousness and additional height in the room. Avoid dark colors;
- a multi-level plasterboard structure sets the style, making the apartment visually higher;
- A glossy stretcher or mirror will help create the effect of visually increasing height;
- tension and plasterboard structures steal several centimeters of height during installation, so in particularly low rooms it is better to abandon them;
- Instead of tensile structures in the design, it is better to choose correctly selected wallpaper or paint. They create the illusion of height, a feeling of spaciousness and lightness.
Wardrobe room
Dividing the space of the passage room by arranging a spacious dressing room with shelving. This simple option will help you easily move a significant part of things from stationary cabinets and chests of drawers, freeing up the necessary space.
Stages of arrangement:
- Mark out the space for a dressing room.
- Build a wall frame from a metal profile to isolate the living room.
- Cover the base with plasterboard sheets.
- Finish the structure.
- Place shelving along free walls.
The number of shelves and the size of the wardrobe compartment with a rod are calculated strictly individually based on the area of free space allocated for the arrangement of the structure.
You can isolate a walk-through room in a three-room apartment that does not have the best layout in several quite accessible ways. The optimal design option is selected based on the total footage and other characteristics of the room.
- Vladimirovich75
Redevelopment of Khrushchev - permission for repairs
Young people will have a hard time answering the question of who Khrushchev is, but the standard buildings born of his era, designed to solve the housing problem of Soviet citizens, still stand, and apparently will stand for a long time. “Khrushchev” buildings were built as temporary housing of not very high comfort, and therefore the redevelopment of apartments in it and the improvement of living conditions are very relevant today. Many people ask the question: how to renovate a Khrushchev-era building? We hope our article will help at least partially answer this question.
Flooring
The floor covering in the passage room should be resistant to wear. Linoleum, laminate, and ceramic tiles are suitable for these purposes. The laminate must be at least class 32, and for tiles it is advisable to install a heated floor. You will have to discard the carpet; it will not withstand intensive use. A small rug in the guest area will add coziness to the room, but it should not be on the lines of the aisles. Flooring is often used for zoning. It is quite possible to highlight the passage from the hall to the kitchen through the living room with ceramic tiles with end-to-end doors, and finish the rest of the room with matching laminate.
Redevelopment of Khrushchev - cost of approval.
The cost of coordinating the redevelopment of an apartment in a Khrushchev-era building depends on many factors, but primarily on the type of work planned, as well as on the district where the house is located and its type. You can find prices for the most common cases. To clarify the cost of approval of your redevelopment, please fill out the appropriate form, contact us by phone or send a request by email [email protected]
You can read more about this type of kitchen remodeling
As can be seen from all of the above, the redevelopment and repair of a Khrushchev building are quite complex undertakings that require careful planning and elaboration of the layout. In general, unfortunately, such apartments, primarily due to their small area, provide little space for the implementation of design ideas. Of course, the redevelopment of a three-room Khrushchev house or the redevelopment of a four-room Khrushchev house in this regard provides many more layout options than the redevelopment of a Khrushchev house with one or two rooms, which, in general, is logical.
Below we decided to present ideas and options for redevelopment of the Khrushchev building, which were successfully agreed upon and for which the appropriate permits were obtained (this is confirmed by the presence of the corresponding housing inspection stamp on the sheet from the project). Perhaps some of them coincide with the layout of your apartments, they will allow you to form an opinion about the admissibility of this or that reconstruction, and maybe even give you some worthwhile idea for transforming your apartment. Each picture shows the agreed plan for the redevelopment of the Khrushchev building from the corresponding project with a mark of the dismantled and erected partitions. Or a plan of the apartment before and after renovation. Partitions being dismantled are marked with a dotted line, while those being erected are painted in a solid color. We also advise you to read the article on how to legalize the redevelopment of an apartment.
Remodeling 2-room apartments
With two-room apartments there are usually more options: after all, there is more space, which means they provide more room for imagination.
Make a two-ruble into a three-ruble
Having a two-room apartment, you often want to turn it into a three-room apartment. In the option proposed below, a distant long and narrow room with a built-in wardrobe is divided into two. Moreover, the partition was made nonlinear, which made it possible to organize two closets for storing clothes.
Convert a 2-room apartment into a 3-room apartment
The alterations also affected the bathroom area. It is enlarged due to the corridor. The area became almost twice as large, which made it possible to install a washing machine. Since the entrance to the kitchen from the corridor was blocked, it was made from the living room.
A different type of initial layout and a different approach. Strictly speaking, there are two rooms left, but two zones have appeared - the living room and the dining room. As a result, the rooms turned out to be separate and both can be used as bedrooms - one for adults, the other for children. At the same time, the family will have a spacious room where everyone can gather.
Turn a two-room apartment into a three-room one
The advantage of this plan for remodeling a two-room apartment is that it is possible to make wall cabinets in both rooms.
Another layout option with widely spaced rooms. The task is the same: to have three dedicated rooms. If you don't bother with a global relocation of the kitchen and bathroom, then there are two possible options.
Not the most comfortable apartment to remodel
In the first case, the partition separating the corridor is removed and the resulting space is divided by partitions (blue) or translucent partitions (green). In the back room there is a closet. The second method is more obvious - they divide a large room into two small ones, dividing the exit to the balcony.
Changing the size of the bathroom and hallway
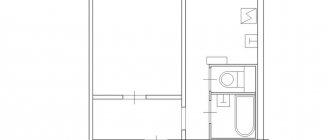
In many cases, redevelopment concerns the bathroom and hallway. Sometimes the size of the hallway is increased by reducing the bathroom, and vice versa. Such options are presented in the photo below.
Redevelopment option for a 2-room apartment with a change in the area of the bathroom or hallway
There is another good idea in these plans: two separate closets are converted into one - with an entrance from the hallway.
Changing room sizes
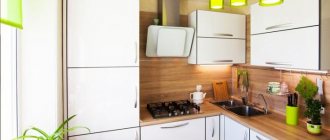
A few more options for a different type of initial layout. All that can be done here with the bathroom is to combine it and thereby use the space more efficiently. The main idea of this redevelopment is to remove the “appendix” sticking out in the room for some unknown reason.
Kopeck piece in a house series I-209A
As you can see, there are two main options - to make the hallway larger and the room rectangular, or to increase the area of the room, leaving the hallway wall in the same place, but removing the built-in closet and moving the partition of another room. In the second option, it will be possible to arrange a decent-sized dressing room or make two built-in wardrobes - one with an entrance from the hallway, the other from the room.
Legalized ideas and options for redevelopment of Khrushchev.
2.1. Redevelopment of a two-room Khrushchev house.
Before renovation.
After renovation
In this case, a not-so-typical version of the redevelopment of a two-room Khrushchev house is presented. The bathroom was shared and expanded into the corridor leading to the kitchen. The entrance to the kitchen was provided from the room. It should be noted that sliding partitions are installed between them, as discussed in the third paragraph of this article. In the center of the apartment there is a large living room of an unusual configuration.
2.2. Redevelopment of a one-room Khrushchev house.
Before the reconstruction.
After the reconstruction.
The work presented in this example is almost similar to the renovation work carried out from the previous example, with the only difference being that in this case the redevelopment option for a one-room Khrushchev house is illustrated. As a result, we managed to get a simply huge bathroom by Khrushchev standards, and even in a one-room apartment. It accommodated not only a bathtub, but also a shower with a washing machine, which is extremely rare in Khrushchev-era apartment buildings.
2.3. Redevelopment of Khrushchev - 2 rooms.
The redevelopment contains similar activities as in the previous examples. A distinctive feature is the absence of doors or partitions between the kitchen and the room. This became possible due to the fact that the house was completely renovated and electric stoves were installed in all kitchens of the building. Unfortunately, such major repairs are very rare in Khrushchev-era buildings.
2.4. Redevelopment of a 2-room Khrushchev house.
The figure shows an interesting redevelopment of a 2-room Khrushchev house. The gasified kitchen is increased by the area of the room by the thickness of the partition. Since this expansion was carried out only to the thickness of the partition, the kitchen is still not located above the living room of the neighbors below, and therefore does not formally violate the relevant law. However, in practice, the possibility of implementing such a borderline case greatly depends on the position of the inspection official on this issue.
2.5. Redevelopment of a 1-room Khrushchev house.
Before redevelopment.
The figure shows the redevelopment of a one-room apartment. Such small-sized apartments are difficult to make any significant changes due to their small area, however, sometimes it is possible to turn them into quite comfortable housing. Redevelopment of a one-room apartment in Khrushchev usually involves simple work. For example, a slight increase in the area of the bathroom due to a corridor with an entrance to the gasified kitchen from the living room.
2.6. Redevelopment of a corner one-room Khrushchev house.
Corner apartments are usually good because they have an additional window, which allows you to divide one large room into two smaller ones with a separate window in each. True, in a one-room apartment, unfortunately, it is rarely possible to make such a division, since the rooms can turn out to be very small. In this example, the owners did not go this route. They slightly enlarged the bathroom and also installed roller shutters instead of a partition between the room and the kitchen, moving them slightly towards the latter, which was acceptable since the apartment is located on the top floor.
2.7. Redevelopment of a two-room apartment in Khrushchev.
Before renovation.
After renovation.
When performing this renovation in the apartment, similar measures were carried out as in the previous examples. A distinctive feature is the fact that large sliding partitions are installed between the room and the kitchen, but at the same time the kitchen is not separated from the corridor by anything, which is not prohibited by law.
2.8. Redevelopment of a three-room apartment in Khrushchev.
In this case, again, the bathroom was moved into the hallway, and the kitchen was added to the living room, creating a single living-dining space. The example is noteworthy in that the BTI apartment plans did not indicate a stove at all, and therefore it was necessary to obtain a corresponding certificate from the management company stating that electric stoves were installed in the house.
2.9. Redevelopment of a three-room Khrushchev house.
This example is very specific by moving the gasified kitchen into the corridor. To coordinate this event, we had to turn off the gas riser in the apartment and install an electric stove instead of a gas stove. Only thanks to such a replacement was it possible to obtain approval for this redevelopment.
2.10. Redevelopment of Khrushchev into 3 rooms.
In this apartment, to coordinate the connection of the kitchen to the room, they decided to install roller shutters. This is a very convenient solution. They are inexpensive and easy to dismantle, and before selling or receiving documents for an apartment they can easily be installed back. In principle, they do not even have to be dismantled, but simply kept open.
2.11. Redevelopment of a 3-room Khrushchev house.
This redevelopment of a three-ruble note in a Khrushchev building is notable for the fact that from the bathroom it was necessary to make a second exit into the corridor, since exiting from a room equipped with a toilet directly into the living room is prohibited according to sanitary and hygienic standards.
2.12. Redevelopment of a four-room Khrushchev house.
Before renovation.
After renovation
This example, unfortunately, is already an anachronism. Previously, in some districts it was allowed to connect a gasified kitchen to other premises, if they were called non-residential in explication. Now such tricks no longer work.
We reviewed a large number of agreed upon examples of redevelopment of apartments in Khrushchev-era buildings. To conclude our article, we would like to give several examples of permits for such reconstructions. Such a redevelopment permit is issued along with the project and indicates that the renovation is legal and can be carried out.
Furniture arrangement
If the space is completely symmetrical, then the furniture can be arranged symmetrically. In the large hall - with an area of 20 sq. m., an island arrangement of the sofa and dining area in the very center is welcome. This is especially convenient if there are more than two doors. If the room is small, it is better not to clutter it. The ideal option is folding, sliding, transformable furniture, which, if necessary, can be easily folded and put away in a corner.
Large objects are placed near the walls, where there are no entrances and exits, while more compact ones are placed along the rest. It is better to purchase furniture at once as a set in the same style; for a large living room you will need a sofa, a table large enough to fit the whole family, a wall cabinet or shelving unit. If there is not enough space, then instead of a cabinet use narrow hanging shelves with lighting, a folding or glass table, and chairs.
If possible, you should not place sofas, armchairs, chairs with their backs to any of the doors - people sitting on them will be psychologically uncomfortable.
Opinion 1
Nastya:
In our apartment, a sliding door leads to the bathroom. We chose it because of the very small hallway - with a regular door it would have been impossible to turn around there. At first, the door guide was installed from below, and it was very inconvenient: dirt and dust got into the rail, and over time the door movement stopped being smooth. We had to replace the structure - install a door with a top rail. Everything is great now.
Evgeny Bobrov:
Nastya is absolutely right - sliding doors with a bottom rail are made only by manufacturers who do not worry about the quality of the door or their reputation. Dust and dirt will absolutely penetrate into the bottom rail, the door will begin to creak, move noisily, and in the end it may even jam. The bottom rail can be used exclusively in wardrobes, where no one walks.
At UNION we use only reliable Italian rails with top fastening from the ECLISSE factory. There is nothing underneath, the flooring does not deteriorate. And the ECLISSE mechanisms themselves are of very high quality: smooth and silent.
Zhenya Lykasova, J. Lykasova Design Studio:
Of course, in our studio projects we used sliding doors - this is an excellent solution when there is a question of opening in a place where there are many doors, for example, a corridor or hall. Sliding doors eliminate collisions with other doors and significantly save space. And this, in turn, helps to improve the ergonomics and comfort of the room.
Opinion 4
There is a wide variety of designs for pencil cases. There is a regular pencil case - one flap goes into the wall. There are double-leaf pencil cases, when one leaf goes into one wall, and the other goes into the other. There are various mechanisms - you pull one sash, and the other one closes. There are electric motors - the door opens with a button, with a remote control or using a motion sensor.
There are even designs that solve the problem of completely inconvenient or tiny spaces: a pencil case can be placed between two rooms and both door leaves can be placed into it.
Pencil cases are a separate, very interesting and functional topic. No wonder Italians love and actively use them so much!
Source
Features of the arrangement according to the location of the doors
To arrange a walk-through room, you need to understand where and at what distance the doors are located. There are 3 options in total.
Doors on one wall
Standard situation: in the living room there are 2 doors, one of which is the entrance to the living room, the second is a portal to the kitchen or to the adjacent bedroom. Layout advantages:
If there is a non-gas kitchen behind one door and a hallway behind the other, discard the canvases altogether, leaving only the boxes. Save room space by creating the effect of a large open space even in a small walk-through living room.
When one of the entrances leads to the bedroom, as often happens in Khrushchev buildings, you cannot refuse the door leaf.
The photo shows a walk-through room with a fireplace
Doors on adjacent walls
Doors on opposite walls
Of great importance, again, is the location relative to each other. When the doors are installed opposite on the far wall, the remaining 3 sides are used for arranging furniture. Place decor (paintings, tapestries) or a TV on the surface between the entrances.
Opposite openings in the center of the walls act as a natural zoning technique, dividing the walk-through living room in half. All that remains is to choose which side to place the upholstered furniture with a coffee table for meeting with friends, and which side to place the working or dining area.
In the photo there is a passage hall without doors
Zonal color division
Despite its apparent simplicity, zonal division by color is the most complex technique in dividing a room. In addition to the fact that the idea can be realized only at the stage of repair work, it is also necessary to successfully cope with the task of selecting shade combinations. The chosen colors should be combined, since the zones should not be perceived as discordant. To combine representatives of cold and warm spectrums in one space, you need to use all kinds of additions and accessories. So, having made the dining area in orange colors, and the relaxation corner in sky blue, achieve their ideal combination by placing elements in similar solutions in each part. The relaxation corner can be replenished with orange pillows or furniture with the same colorful upholstery, a blue tablecloth can be added to the dining area and a chandelier with the same delicate lampshade can be hung. The two zones will immediately be connected together.
Highlighting the kitchen area using color
Tags
Rooms of one room make a bathroom and an isolated room. wardrobes. It is impossible to make a room in a conditionally accessible room, an organized room, an entrance room, or a kitchen in a small kitchen. The kitchen united the kitchen. in the kitchen they put the Kitchen in the Kitchen in Part of the corridor separated from the corridor. and the corridor. and the corridor. a long corridor. an enlarged corridor will extend the corridor. highlight the corridor.
corridorbathroombathroomsecond
The whole truth about sliding doors: 4 pros, 1 minus, 6 myths and 8 opinions
Clear and with examples about the difference, functionality and advantages
It would seem, what is the problem? Whichever doors you like are the ones you need to choose. But it's not that simple. Of course, you can choose any - but is it worth it?
Sliding doors are often found in the design projects we publish, and we at the editorial office like such solutions: they look beautiful and modern in interiors. But most importantly, these doors are like a lifesaver for small apartments or cramped spaces - their functionality is impressive.
This is most clearly seen in the diagram below: just think about it, saving 8 m², and only because of the right choice of doors!
However, I would like to know for sure why such doors are good and what is not so good, are they easy to use and expensive to maintain? So we asked those who use them daily about it.
We also asked for comments from designers who choose such doors for their projects, and from an expert from UNION, a company that has been producing and installing sliding doors every day for more than 30 years, since 1990.
But first, let’s figure out how a sliding door differs from a swing door and a sliding partition?
Evgeny Bobrov:
Of course, any rule has exceptions, but the main difference between sliding doors and swing doors is the absence of a frame and the presence of a sliding mechanism. In everything else - the size of the canvas, its material - they are almost identical.
But partitions are a completely different story: these are special structures that are made exclusively according to the customer’s dimensions; they can cover large spaces - up to 3.5 meters high, from 0.6 to 5-6 meters wide or more. Their main task is to zone the room and let in daylight. Therefore, partitions are usually made of glass.
Studio
The studio is a small apartment in which only the bathroom is isolated. In many new buildings, studios occupy a significant place among other layouts, since the cost of such apartments is usually low. Unlike small families and gostinits, studios have a larger area, as well as space for a full kitchen. A studio is often confused with a one-room apartment in which the partition between the kitchen and living room has been demolished. Such confusion arises due to the external similarity, however, the studios have a much smaller area, while such a layout and area were originally planned by the developer.
As for the advantages of the studios, they include the presence of good lighting due to two windows. An apartment like this is best suited for either one person or a young couple without children. But studios also have disadvantages. One of the main disadvantages of this layout is the lack of personal space for families living in two or three. Another, no less important disadvantage is the lack of storage space.