In this article we will tell you how to make a plasterboard partition with a door with your own hands. Such a partition made of plasterboard sheets is erected very quickly and with almost no debris. It has sufficient strength and good sound insulation. And when finishing gypsum plasterboard, the wall is very simple, because it turns out perfectly flat. This is ideal if the work is performed by a person with no experience.
Another undeniable advantage of a plasterboard partition is that dragging sheets and metal profiles to the upper floors does not cause problems, because they have a variety of sizes and are light in weight. Here is an incomplete list of gypsum board sizes: 3000*1200, 2500*1200, 2000*1200, 1500*1200, 1500*600. Metal profiles come in lengths of 3 and 4 m, they are very light.
What do you need for a plasterboard ceiling?
To make it, you need: UD and CD profiles, fastenings for CD profiles (butterfly pendants), quick-installation dowel-nails (for attaching “butterflies” to the ceiling
and for attaching UD profiles), flea screws (for attaching CD profiles to “butterflies”, as well as for connecting and fixing profiles to each other, to brackets and crabs), ...
Interesting materials:
How to fertilize fruit trees in summer? How to fertilize fruit trees in August? How to fertilize fruit trees for the winter? How to cover coniferous trees for the winter? How do you whiten trees in spring? Why is money tree harmful? How to paint a cut tree? How to cover damaged wood? How to cover cuts on wood? What will be the cut down tree?
Creating a wireframe
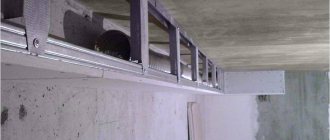
The next stage is installation of the frame. It involves attaching a guide profile to the floor. choose the one that has the greatest load-bearing capacity to eliminate possible difficulties in subsequent operation. Dowels are used to secure the profile. They are placed at a distance of 50-80 cm from each other. The specific distance depends on the dimensions of the structure.
Frame base for partition
Next, fix the rack profile, starting from the edges of the guide and in the place where the doorway will be located, if it is planned. The fixation should be of the highest quality, so do not skimp on fittings. This will prevent movement or deformation of the finished structure. The rack profile is mounted along the length of the entire frame. The distance is fixed - 60 cm. Metal screws are used for fastening.
At this point, the installation of the frame is considered complete. It is recommended to ensure its strength and, if there are minor flaws, provide additional reinforcement. Rigidity is enhanced by installing cross bars made of profiles. The frame itself must be double-sided. This will ensure the rigidity of the partition itself. If you wish, pay attention to the video, which will allow you to understand the principle of operation. In the video you will get acquainted with the features of installing profiles and their fastening.
Finishing and useful recommendations
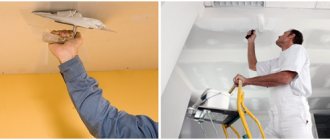
Finishing is also easy to do yourself. Initially, irregularities and seams are sealed. The joints are glued with a mounting mesh, and then leveled using starting putty. Rub and level the putty with an abrasive mesh or sandpaper.
After this, finishing begins. Choose any material at your discretion. Drywall is universal, so it can be easily combined with any options. Among the traditional ones are wallpaper or paint. If desired, you can leave the drywall itself. If the work is done well, it looks attractive. This option is suitable for high-tech or minimalist design.
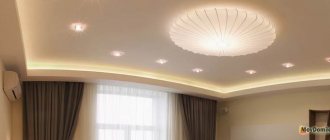
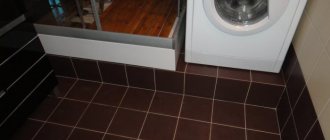
Living room with plasterboard partition
The partition is a useful element of the interior. With its help, they zone the space, achieving individuality and originality of the interior. Creation is a feasible task for everyone, so you can save on calling specialists.
Lack of damper tape on the guides
When installing the frame, a special sealing tape is glued to the mounting plane of the guide profile. It acts as a layer between the base and the frame. This allows you to compensate for the expansion of plasterboard sheets, and the tape is also an important element of the sound insulation system.
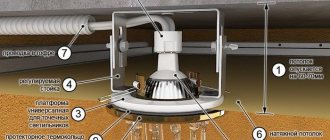
Sound propagation through ceilings and drywall frames.
The damper tape reduces the indirect transmission of noise across floors. Read more about sound insulation in the articles “How to make sound insulation in an apartment”, “Sound insulation of walls in an apartment: materials and solutions”, “Sound insulation of the floor: stages and practical tips”.
Read about the mistakes that are often made when installing drywall in the article “10 Mistakes When Installing Drywall.”
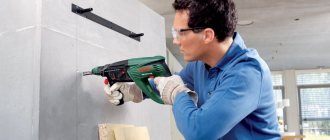
Grinding
- How to sand a partition after the putty has dried?
I use an oscillating sander with 80 and 120 grit (for the first and second pass, respectively) for sanding. Sanding is performed in bright light directed at an oblique angle to the wall surface: this way the slightest irregularities will be highlighted with shadows. After sanding, the partition is carefully swept and primed with penetrating primer.
A disc sander will make sanding even faster.
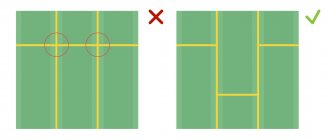
Why is it inconvenient to mount horizontally?
As with any building material, there are a number of rules for drywall that should not be violated, especially without special knowledge or skills. First of all, you need to choose the right lathing pitch. If you do it more often than required, the cost of the structure will increase significantly, as will the labor intensity of the work, but the strength will not change. If the calculation is incorrect or the recommended interval is exceeded, the entire structure will be fragile and unreliable. The pitch of screwing in the screws is also maintained. It is recommended 0.2-0.25 m for the first sheets and 0.17 m for the rest, and for ceiling tiles - 0.15 m. Here, overspending is similarly taken into account, as well as unnecessary work when reducing the distance between the fastening points.
If the sheet is fastened with self-tapping screws with a frequency exceeding 0.05 m, it will break.
When attaching drywall horizontally:
- It is much more difficult to bring slab joints into a flat surface.
- Most likely, a complete coating with putty will be required due to the “playing” open ends of the sheet or, as they also call it, “spreading” of neighboring slabs.
- Calculating the location of the guides is complicated due to the different lengths of the sheets used, which also complicates the measurements and fastening of the sheathing.
- The likelihood of cracks even when using reinforcing and self-adhesive sickles increases.
Therefore, it is better to adhere to the technology of vertical fastening of drywall, since otherwise you will have to face many difficulties. Without special skills it will be impossible to cope with them.
Finishing a room with plasterboard involves its correct installation, starting with the arrangement of the sheathing. It is very important to maintain parallelism in the arrangement of all elements: horizontal and vertical profiles, guides and horizontal jumpers. Drywall sheets can be attached in different directions, but their horizontal position requires special skills and abilities. If there are none, then there is no need to take risks and make unnecessary mistakes. In the future, during operation, distortions and cracks will appear in the structure, which will lead to additional measures to eliminate defects in plasterboard walls and partitions.
Finishing work
The final stage is finishing work. The following materials are needed: perforated corners for leveling the corners, serpyanka mesh (to seal drywall seams), two types of putty, starting and finishing. You will need: spatulas (large and small rubber), containers for diluting and applying putty. Finishing stages:
- Starting putty is applied to the corners of the structure, and a perforated corner (metal, plastic) is attached to it. The remaining putty is removed with a spatula.
- The seams of the joints of the gypsum board sheets are sealed with sickle tape, then they are puttied.
- Clean the putty with a grouting mesh.
- The walls are primed, allowing the composition to absorb and dry.
- Putty is putty in 2 layers, and before applying each subsequent layer the partition is primed and sanded.
- The last stage of preparation for finishing will be a layer of finishing putty.
The partition is ready for finishing, according to the design concept. This could be painting drywall, wallpapering and other types of finishing. The shelves will look more impressive if they are highlighted according to the principle of contrast. If you have certain repair skills, then try making a partition with shelves with your own hands.
Arranging a partition from slabs, blocks or bricks
The partition can be constructed from various materials, but in each case a different solution is used. For example, when working with a brick wall that does not reach the ceiling, concrete mortar is usually used. To prepare it, take 4 or 5 parts sand to 1 part cement. If gypsum boards are used, then only special gypsum-based adhesive is suitable for them. If the partition needs to be made from foam concrete blocks, then glue is also used, either cement or gypsum based. The ceiling remains intact.
All building materials are supposed to be laid in the same way as brickwork, so the principle will be the same.
Before starting work, it is imperative to wash the floor in the place where the partition will be located and remove all debris and dust. The further algorithm of actions will be as follows:
- Lay strips of roofing felt or plastic film on the cleaned floor. First lay a beam around the perimeter, which is fixed directly to the floor. Thanks to this trick, the wall will be even. Now glue is applied to the roofing felt sheets and to the wall.
- Now you can lay the first block. Be sure to check everything using a building level. Beat it down a little with a rubber mallet. Now it is necessary to smear not only the roofing material and the floor, but also the side of the adjacent block itself. This is how the entire first row is installed.
- The first row is considered load-bearing, so it needs to be fixed to the main wall with special hangers, which are usually used to strengthen the metal profile. The suspension is supposed to be bent at an angle of 90 degrees. Then one side of it is attached to the blocks, and the other to the wall. To do this, use nails or dowels. So it is necessary to strengthen the partition every 2-3 rows.
- Then the solution is applied to the first row. To distribute it evenly, it is recommended to use a notched trowel to create grooves. They increase the adhesive properties of the material and prevent the appearance of voids at joints.
- The second row should be laid out starting from half the block. It is attached to the solution and tapped a little with a rubber hammer. Be sure to check the level horizontally and vertically.
- The third row also begins to be laid out from a single block. Fasten the parts according to the same principle as the previous 2 rows. Do this up to the very top level. You need to leave a gap to the ceiling of about 30-50 cm. When the masonry is completely finished, you need to wait 2-3 days for everything to dry and fix.
- Now you need to thoroughly prime the surface. For this, a deep penetration solution is used. It is recommended to choose one that has an additional antiseptic effect. After applying this composition, you must again wait until it dries completely.
- When plaster is applied to the wall, the remaining gaps where the rods are laid will be filled with the substance. It is necessary to wait until everything hardens so that the reinforcement is secured.
The plaster is applied to make the wall uniform and even. The layer should not be thick. The composition should be leveled using a spatula. After this, a special tool is used to ensure that the surface becomes perfectly smooth when rubbing. When the plaster is completely dry, all that remains is to prime everything and apply the finishing compound.
Now you need to wait until everything dries. This wall is very durable and will last a long time.
Factors
What influences the choice of frame and sheathing sizes?
- Requirements for the stability of the partition with respect to horizontal loads. This parameter is especially important in rooms with high traffic (corridors, hallways, kitchens) and in cases where a plasterboard wall encloses a room with a suspended ceiling made of PVC film;
Reference: when tensioned, the vinyl sheet creates a horizontal load of 70 kgf per linear meter on the baguette.
- Requirements for wall strength in relation to impact loads. A typical example of a room with high demands is a children's room. Thin single-layer drywall can break when an aborigine hits it with a wooden machine or a pirate's cutlass;
Quiet games? No, we haven't heard.
- Requests for the soundproofing capabilities of the wall. The thicker it is, the larger the layer of noise-absorbing material placed between the frame posts can be;
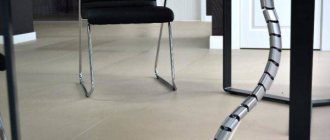
- The need for hidden installation of engineering systems . Electrical wiring and a local network, water supply and sewerage, ventilation ducts and air conditioning lines can be mounted in the wall.
Why drywall is not the best choice for walls: comparing alternatives
It’s rare that a redevelopment can be done without erecting new partitions, unless you decide to make a studio and are just tearing down the old walls. New walls can be built from piece materials, such as brick, slabs and blocks of various compositions - we have already talked about them in the article “From brick to glass blocks: what to build interior partitions from.” Or use sheet materials. There are three most popular today, and we are ready to tell you about all their pros, cons and features so that you can choose the best one.
Where are partitions with niches most often used?
When zoning a room, this technique is often used. The children's room is divided into a recreation and activity area. For studios of this kind, partitions between the kitchen and living room bring a non-standard compositional interpretation to the room. This kind of design can be made in different versions and styles. The geometry of the shelves emphasizes a certain style. Laconic rectangular niches will emphasize the simplicity of minimalism, arched ones are suitable for classics and oriental-style studios. Decorative items displayed in them will make the room more comfortable and “homey.” The partition will look more colorful and expressive if the shelves are highlighted with an additional color and decorated with wood, mosaics and other materials.
An example of the design of a partition with niches In combination with lighting, such a partition will immediately sparkle and become a decoration of the room.
What is the advantage of a niche made of gypsum plasterboard
One of the main advantages of plasterboard niches is the ease of their construction. The structures are lightweight, and their design can be very diverse. An additional advantage is the ability to use different materials for finishing. This can be anything from budget paint to expensive natural stone options.
Plasterboard walls, complemented by niches, can provide for the installation of household and electronic appliances, depending on where the structure is located - in the kitchen or in the living room.
Attention! If a home craftsman is wondering how to cover a niche in the wall with plasterboard, he must consider whether there are curved shapes in this design. If this is the case, you can purchase special arched drywall, which is much easier to work with when solving such problems.
Other mounting methods
To reduce the expected load, you can use special dowels. They are suitable for mounting on drywall in one layer, paintings, prints, and decorative elements. This type of fastener is called a spring crepe dowel. It can be a plastic butterfly dowel or a metal spring dowel. The principle of operation is the same, insert the dowel into the hole, when screwing the screw (bolt) into the dowel, the “ears”, the “wings” of the dowel move apart, creating a support platform.
Structure thickness
For partitions, a reinforced profile with a thickness of (50, 75, 100 mm) is used. If these are small decorative niches that do not serve as a load-bearing shelf, it is enough to take, for example, a 100 mm profile and make a frame for them. In this case, the width of the niche will be 125 mm (100 mm profile + 12.5 mm gypsum board sheets). In the case where the depth of the shelves is planned to be greater, 30-40 mm, you need to make a double frame and connect them with transverse bridges from profiles. The cost of metal structures increases at least twice.
Design of a partition with niches made of profiles If there is additional load on the niches in the partition, an aquarium, book racks or other objects with significant weight, it is recommended to reinforce the walls of the partition with timber, which is inserted into the profile.