For a comfortable stay in the attic during the cold season, it is important to take care of the insulation of the room in a timely manner. With the onset of cold weather, heat loss from the structure increases. When planning to insulate an attic with your own hands, it is worth considering many nuances. A feature of a sloping roof can be called the different angles of inclination of the slope; when insulating this type of roof, you should especially take into account important rules of thermal insulation and design.
Characteristics of a sloping roof
A sloping roofing system is a subtype of a gable roof, but with a more complex configuration. The roof received this name because of its shape; there is the largest number of broken lines and shapes. That is why designing it is quite difficult, and often it is completely impossible for an untrained user to cope with this task. However, having acquired certain skills and knowledge, you can do the work yourself. Externally, the roofing system looks more like a hipped roof; this effect is achieved due to the presence of many kinks, as well as the installation of rafters in two tiers. At the same time, the lower rafters have a steeper installation angle (from 60 degrees) compared to the upper row (less than 30 degrees). The width of the roof can also be considered as a feature, because in this case the optimal value of the parameter is 5-6 m. Thanks to this design, the attic sloping roof allows you to increase the under-roof space and obtain the most comfortable ceiling height.
In general, the rafter system of an attic roof does not differ in its set of elements from the gable roof that is familiar to many users. Here you also need to calculate and install the following details:
It is worth noting that the installation of a sloping mansard roof does not require particularly accurate calculation of the snow load, since this type of roof has main slopes with an inclination angle of 60 degrees or more. That is, the snow masses on the surface will not linger, and therefore will not be able to exert significant pressure. This is far from the only advantage of this type of roof. Also among the advantages, 3 positive qualities can be noted.
- A large under-roof space in which you can arrange a living room or utility room. Also, the attic floor allows you to significantly increase the total living space of the house, but it will not require as much effort and financial investment as in the case of adding a full floor.
- The broken mansard roof gives the entire building a presentable appearance, the exterior looks luxurious and original.
- Heat loss through the roof is noticeably reduced. Which ultimately leads to a reduction in heating costs.
Of course, speaking about the advantages, it is worth mentioning possible disadvantages. In particular, owners of attic floors with this type of roof should understand that despite the presence of a large under-roof space, some of the ceiling and walls may still have a sloping shape, which is why they will have to think through the interior design especially carefully. It is also necessary to purchase special roof windows, the cost of which is slightly higher than standard window systems. In addition, when planning to create a living room in the attic, you should take care of high-quality heat and waterproofing. If the listed difficulties are not a problem, then we can say that an attic with a sloping roof has more advantages than disadvantages. Of course, most problems can be avoided only if the roofing system is installed correctly.
Warm attic - additional living space
No matter how large the room is, there is always a need for one more room - a guest bedroom, a playroom, a gym, or just a convenient storage room.
According to regulatory documentation, an attic is a room formed by a facade and roofing. According to sanitary standards, the distance from the floor to the line of intersection of the wall with the roof should be at least 1.5 m, and to the ceiling - 2.5 m. At the same time, an area with a “high” ceiling (2.5 m or more) should occupy from 50 % of the total attic area.
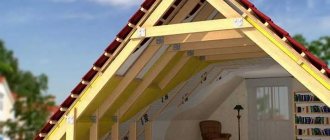
It is obvious that in private housing construction there are deviations from the standards. For example, the configuration of the attic space can be influenced by factors such as the shape and size of the roof: houses with a high roof have higher attic ceilings, but the floor area is narrower.
One of the successful options for using an attic space is a small living room for relaxing adult family members or children's games. Here you can retire to read or do handicrafts
To increase the size of the attic, they resort to various techniques: increasing the height of the lower tier of the sloping roof, making the facade walls higher. Interesting attic design options can be viewed on the Roofing Guide website.
However, with all the advantages of an additional comfortable room, there are nuances that increase the cost of construction and finishing work:
- window installation;
- ventilation equipment;
- hydro- and thermal insulation.
The last point is also important because literally everything will have to be insulated: the floor, gables, walls, often consisting of two parts - the facade and the roof. At the same time, the same requirements apply to thermal insulation materials as to insulation for residential premises. In addition to suitable technical characteristics, they must be absolutely safe.
An example of how the shape and height of the roof can affect the size of the attic - therefore, the features of the under-roof space must be taken into account when planning the living space
Instructions for insulating an attic roof
The dimensions of the attic are usually limited by roof structures. And often the attic is not surrounded by load-bearing walls with suitable thermal insulation. Therefore, the insulation of the attic roof must be carried out especially carefully.
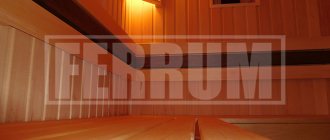
Attic roof in the process of insulation
Do-it-yourself insulation of an attic roof
Insulating an attic roof yourself is quite feasible. However, it is necessary to remember the requirements for the design of such a roof:
- roofing an attic roof involves the use of lightweight materials to reduce the load on the rafter system. For example, natural tiles are inappropriate for it;
- for insulation and insulation of the attic roof, you should also choose effective lightweight materials, which will reduce the weight of the structure;
- Ventilation plays a big role in the attic roofing system. Any failure in design or installation will lead to an increase in the level of humidity in the living room, a decrease in the properties of the insulation and damage to the elements of the supporting structure.
Attic roof insulation technology
Insulation of a roof of this type can be carried out in two ways: from the inside and from the outside. Each method has its own advantages and disadvantages, but external thermal insulation is considered the preferred method due to better results.
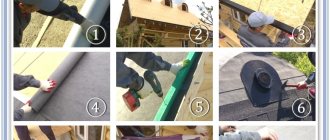
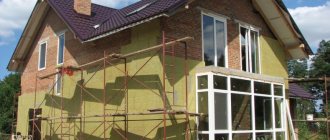
Insulating the attic roof from the outside
A private house with an attic floor in the process of insulation from the outside
- We hem the lower part of the rafters with plywood, OSB or edged boards.
- We lay a vapor barrier layer on top. Its fabrics and joints with the structure must be taped with foil tape. When installing this layer, it is important not to confuse the side of the material: the vapor barrier functions in one direction.
- The next layer is insulation. When laying it, it is important not to leave any voids.
- Next, we spread a water barrier over the rafters. We also glue the strips of material with special tape.
- Then you need to make a ventilation gap. To do this, a rail with a height depending on the type of roofing is mounted on the hydraulic barrier along the rafters. A wavy roof requires a lath of 20-30 mm, a flat roof - 50 mm.
- At the last stage, the sheathing and roofing are installed.
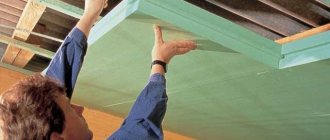
Insulation of an attic roof from the inside
The photo shows an attic roof being insulated from the inside.
- most insulation materials are simply inconvenient to install from the bottom up, and laying out and fixing rolled materials is almost impossible;
- Often the rafter system is reinforced with various connections and purlins, at the junctions of which voids remain unprotected by thermal insulation. This forms cold bridges, and accordingly, the insulation of the attic roof does not work well.
Internal thermal insulation of the attic roof occurs as follows:
- Starting from the bottom edge of the roof, we lay out the waterproofing film overlapping and secure the edges with adhesive tape. Near the walls, this coating should have a small reserve, and the excess should be removed after completion of the installation work.
- To ensure a ventilation gap, as well as a good fit of the film to the roofing material, we nail counter-battens to the rafters.
- Then we lay out insulation, for example, mineral wool, tightly, without gaps.
- Next, the entire space is sealed with a vapor barrier membrane. It is fixed with overlapping construction staples.
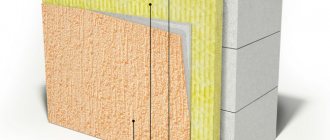
Waterproofing, vapor barrier
Most common types of insulation require protection from moisture, which can enter it from both sides. The top of the roofing may leak during rain or melting snow. From below, moisture will enter in the form of evaporation along with the warm air of the room. Wet insulation loses some of its thermal insulation properties and there is a danger of mold development, putrefactive processes in the rafters, and metal corrosion.
To avoid all troubles, the thermal insulation system provides hydro- and vapor barrier layers. They are located directly on the surface of the insulation layer, with a waterproofing layer on top and a vapor barrier on the bottom.
The main materials used for hydro- and vapor barrier are:
- Polymer-bitumen coating, which replaced roofing felt. Available in roll form. It is made of fiberglass and polyester.
- Waterproofing film. The most common material due to its low cost and ability to provide good protection from moisture. It can be produced in varying degrees of strength, with anti-condensation coating, reinforced, etc.
- Superdiffusion membranes made of nonwoven materials with increased vapor permeability, which reduces the requirements for necessary ventilation.
Modern materials have a valuable property: they provide protection against moisture penetration from the outside and the ability to let it pass from the inside. These materials include perforated films that can retain moisture and allow steam to pass through. In addition, such materials are given additional qualities, for example, protection from condensation and increased strength.
Another necessary measure when ensuring waterproofing is the creation of ventilation gaps. They are necessary to ventilate the surface of the insulating layer and remove excess moisture. The size of the gap between the insulation layer and the roof corrugated sheet depends on its design and the material used. The size of this gap can be from 2.5 to 5 cm.
The gap between the vapor barrier coating and the finishing material is left within 2-3cm.
There are certain rules for installing waterproofing:
- Laying the membrane starts from the bottom and runs across the rafters.
- The lower end is discharged into the gutter.
- Each next layer overlaps the bottom one by 10-15cm.
- The membrane should not be stretched. The best option would be to wrap around the rafters. With economical consumption of material, it is enough to have some sagging.
- The upper stripes converging at the ridge are fastened together.
This order allows all water falling on the membrane to be discharged into the gutter.
It is very important to remember that the entire hydro- and vapor barrier system will not work if the integrity of the fabric is damaged, the overlap laying technology is not followed, and there is no insulation of existing holes.
Attic roof ventilation device
Insulation of the roof above the attic requires a special approach, which is explained by the peculiarities of its design. Ventilation of a standard roof is ensured by the presence of an attic equipped with dormer windows. As for the attic, its ventilation space is only 10-15 centimeters.
When arranging such a roof during the installation of the roof pie, it is important to correctly make the ventilation gap. This space between the layers of waterproofing and insulation should help remove excess moisture and prevent overheating of the roof in winter and, as a result, the appearance of an ice crust.
As a result of the arrangement of ventilation, the entire structure will be provided with protection, which will extend the service life of the roof elements. On hot days, due to the presence of a gap, heat is partially removed from under the roof - this circumstance helps the air in the attic not to overheat.
Conclusion
In order for a pitched roof to fulfill its purpose and reliably protect the house not only from external influences, but also from increased operating costs due to heat loss, it must be well insulated. In this case, living in the attic will be as comfortable as possible without overpayments, and the need for major repairs will not arise soon.
About single-layer insulation - in the previous material. Owners of wooden houses will find the article about insulating a timber house with stone wool useful. The video shows how to choose and lay stone wool correctly.
Source
The process of insulating a sloping roof
The attic type of roof is insulated either from the inside or from the outside.
Each method has a number of features that are taken into account before starting work.
The method of externally laying an insulating layer is very popular due to the better quality of the result.
To understand how best to install thermal insulation when installing a roofing pie, you need to familiarize yourself with the step-by-step instructions for carrying out the work in advance. Only then will you be able to not only insulate, but also build a roof yourself.
External insulation
This process is not complicated and is carried out according to the following algorithm:
- First of all, the rafters on the underside are hemmed with plywood or edged boards .
- After this, a layer of thermal insulation is laid . The surface of the layer and the joints are glued using foil tape. It is very important to lay the vapor barrier on the correct side, because this material is capable of functioning in one direction.
- Next, insulation material is laid . In this case, you should avoid free space; you need to ensure that the insulation lies tightly.
- The next step is to lay out the hydraulic barrier on top of the rafter structure . Gluing is also carried out with specialized tape.
- The penultimate ones are the ventilation gaps . This process is carried out using a rail, which is placed on top of the hydraulic barrier. The height of the slats is selected depending on the parameters of the roofing. If the roof is of a wavy type, then the standard of the slats is 20-30 mm, if the roof is of a flat type, then 50 mm.
- The last thing to do is install the sheathing and lay the roof .
Considering that the material for thermal insulation does not have protection from precipitation, work should be carried out only in clear weather.
Insulation of an attic roof from the inside
At first glance, you can decide that this method of insulation is more reliable and practical due to the fact that precipitation does not fall on the material, because protected by roofing.
However, this method has disadvantages:
- It is very inconvenient to install most of the material from the bottom to the top, and it is impossible to fix rolled materials in some places;
- The rafter system contains elements to strengthen the structure, the junctions of which are not protected by heat-insulating material.
Stages of installing a heat-insulating layer internally:
- Installation begins from the bottom of the roof and a film with waterproofing properties is laid out overlapping and secured with adhesive tape. In places located near walls, the coating should have a larger margin, which is adjusted after completion of the entire process.
- The structure is equipped with counter-battens , which are attached to the rafter system with nails. This is necessary to ensure a ventilation gap and a tight fit of the layers to each other.
- After this, the insulation is laid .
- The last stage is the installation of a vapor barrier membrane , which is fixed with overlapping construction staples.
Teplofom panels for waterproofing
From the above it can be understood that protection from moisture is a very difficult and labor-intensive process. At the same time, there is a way to reduce the cost of time, materials and labor to a minimum. This is possible when using Teplofom panels. Why does this happen:
- All work on hydro- and vapor barrier will be reduced only to the installation of panels.
- This material is not afraid of moisture (moisture absorption is 0.1%), which means that no additional membranes are required to protect it. Accordingly, you will not have to lay insulation and film several times.
- The resulting surface is not subject to the risk of mechanical damage and is ready for finishing.
Options for insulating the attic from the inside with your own hands
Insulating an attic with your own hands is possible for two reasons. Firstly, it will be possible to reduce the heat loss of the building, which will lead to fuel savings when heating the room. The second reason is that air humidity decreases, resulting in the formation of a microclimate that is suitable for humans, but prevents the growth of fungus and mold.
In addition, the accumulation of condensation on wooden rafters leads to their rotting, which has a detrimental effect on the condition of the roof. For this reason, proper insulation of the attic is the key to long-term operation of buildings and a comfortable atmosphere indoors.
The process of insulation from the inside is carried out mainly according to the general scheme. But there is also a certain specificity. Often the reason for this is due to mistakes made when laying the roof and other aspects.
Insulating the attic from the inside if the roof is already standing
If the roof is already covered with waterproofing, then you can insulate it from the inside of the attic in two ways. The essence of the first: lay thermal insulation between the rafters, cover it with a vapor barrier, install the sheathing and install the cladding.
The essence of the second method:
- Along the crossbars and rafter steps, the markings should be pulled with a cord. The distance between the strips should correspond to the width of the selected insulation. Metal holders are fastened in the form of strips;
- Mineral wool is used to fill niches. To avoid it falling out, the end switches of the holder must be bent;
- Cover the mineral wool with a vapor barrier. Attach the membrane to the holders using special plastic latches;
- cut holes for windows, wiring and other utilities. Glue them with film, if necessary, fill them with sealant;
- install a metal profile on the plastic latches.
At the final stage, drywall should be fixed or sheathed with any type of finishing material. But this must be done only after the entire sheathing has been secured with latches.
Insulating the attic from the inside if the roof is metal
The disadvantage of a metal roof is the formation of strong condensation.
If there is waterproofing under the roof, then after covering the insulation, the gap between the ventilation holes is important.
It is better to use Penoplex boards as a material for thermal insulation, since they are moisture resistant. From the inside, insulation is laid on top of the rafter footings, and not between them.
You can also use mineral wool. But in this case, they are initially secured to the rafters with a waterproofing membrane. Suspensions should be installed on each rafter leg and a metal profile should be attached to them.
You will need to install insulation under the resulting sub-grid and cover it with a vapor barrier on top. Next, you need to attach the final cladding to the profile. The resulting ventilation space between the thermal insulation cake and the metal roof will completely eliminate the accumulation of condensation.
How to insulate an attic roof for winter living
Ventilation of the attic, even with an insulated roof, is carried out through inspection windows. This is an important rule if the attic is being prepared for winter living. The gables, roof and floor should be insulated in such a way as to create a “thermos”.
In this case, it is necessary to ensure that the gaps between the roof covering and the thermal insulation cake are maintained. Moisture will be removed through the ventilation space. If thermal insulation material was used to insulate the roof, then you will need to install a forced ventilation system for the attic.
How to insulate an attic floor with a gable roof
On an attic building there are simple and broken roofs. In the latter case, the structure has rafter connection points where it is necessary to bend the insulation. Therefore, it is important to use flexible material for broken roofs.
It is much easier to insulate a conventional gable roof. Due to the absence of complex areas with kinks, it is convenient to use rigid slabs. In addition, it is still permissible not to create a ceiling, but to only insulate the slopes.
Common mistakes
Insulating an attic is a costly and difficult task. To ensure that the result does not disappoint and that money is not wasted, scrupulous adherence to the technology of work is required if they are carried out independently and control over them in the case of work by third-party specialists.
The most common errors include the following:
- Absence or incorrectly installed layers of hydro- and vapor barrier. This leads to moisture getting inside the insulation, thereby reducing its thermal insulation properties and creating favorable conditions for the development of fungus.
- Failure to comply with ventilation clearance standards. Condensed moisture cannot be evaporated and the system becomes a breeding ground for fungus.
- Loose fit of insulation slabs to the rafters and non-compliance with the rules for laying slabs with overlapping seams, as well as poor-quality sealing of all kinds of technological holes. These shortcomings lead to the formation of cold bridges and reduce the effectiveness of the insulation system.
- Compaction of soft insulation when laid in cells between rafters. Such actions reduce the heat-shielding properties of the material, which affects the final result. If the height of the rafters is less than the layer of insulation being laid, then the best solution would be to install slats on the rafters to increase the depth of the cells.
- Mistakes include using roll insulation instead of slabs. This material is intended for horizontal surfaces, but on inclined surfaces it can sag and slide, creating gaps that are not protected from the cold.
- Even at the construction stage, all wooden roof elements must be treated with antiseptic agents. If the elements are metal, then use anti-corrosion agents. This will protect the roofs from destruction even if moisture gets into the insulation system.
Features of attic roof ventilation
Insulating an attic roof requires a special approach. This is due to its design features. If we compare the structure of an ordinary roof and an attic one, it is obvious that the main difference is the size of the ventilation space between the living spaces and the roof.
Ventilation of a conventional roof is ensured by the presence of an attic with dormer windows. The ventilation space of the attic roof is very limited - it is only about 10-15 centimeters.
attic ventilation diagram
Proper ventilation is extremely important when arranging the roofing pie of an attic roof
. The ventilation gap between the waterproofing and insulation helps remove excess moisture from under the roof, protecting the entire structure and extending its service life. In winter, ventilation prevents the roof from overheating and the formation of an ice crust on it. In hot weather, ventilation removes some of the heat from under the roof, thereby avoiding overheating of the air in the attic floor and the structural elements of the roof.
Sequence of cold roof layers
The technology for arranging a cold roof is much simpler than an insulated one:
- is attached to the rafters using a construction stapler ;
- strips are installed along the rafter legs ;
- The sheathing elements are fixed perpendicular to the rafters;
- is fixed - metal tiles.
Cold roofing is used for technical structures, garages, warehouses and other outbuildings.
Sequence of layers of roofing pie of a cold roof Source ria.com
See also: Catalog of companies that specialize in roofing materials.
Choosing quality insulation
You need to choose quality materials. Although it may seem that choosing materials is the easiest step, in reality this is not the case. On the construction market you will find a huge selection of thermal insulation, among which you need to find one that will provide the room with a stable level of humidity. You also need to avoid sudden temperature changes.
A good insulation should have the following qualities:
- low hygroscopicity (resistance to water absorption);
- low thermal conductivity (high heat retention);
- Fire safety;
- environmental friendliness (very important for residential premises), absence of toxic components in the composition.
It is also necessary to select a heat-insulating material that is vapor-permeable - it should not interfere with the escape of water vapor from the room. If you do not pay attention to this requirement, condensation will begin to accumulate in the room. But dampness is very harmful for the attic ceiling and walls.
The material should not lose its shape over time and should adhere well to any surface, even on inclined ones. Don’t forget about sound insulation, otherwise in heavy rain it will be impossible to stay on the top floor. Often, metal corrugated sheeting or metal tiles are used as roofing materials, which conduct sounds well and even amplify them. Therefore, without high-quality sound insulation, you will not be able to rest peacefully during heavy hail.
Each type of insulation has its own disadvantages and advantages. For example, many people choose ordinary polystyrene foam because of its ease of use and its low cost. But it is not “transparent” to the moisture that rises with the air from the room. Therefore, it is better not to choose it for roof insulation if you are going to use the attic space as a living room.
Traditionally, glass wool is chosen as insulation, but it quickly deforms and cakes, because of this its thermal insulation qualities also decrease. Polyurethane foam is also a popular material for insulation, but it has low vapor permeability and is unable to withstand fire. In this case, you need to carefully calculate its amount for the roof, because when it hardens, the structure of the material will expand and the structure will simply “crawl.” Therefore, it is important to evaluate the strength of the load-bearing elements of the roof.
Thickness calculation
The minimum thickness of insulation for an attic depends, first of all, on the design of the roof , on how much it can resist the transfer of heat from a heated to a cold source. This indicator is also influenced by the climatic characteristics of the development area and the heat-shielding properties of the insulation.
In order to take all these parameters into account together, the following formula is used to calculate the thickness of the heat insulator.
In some cases, for rough calculations you can use a more simplified version of the formula for the thickness of the thermal layer:
σ ut. = (R - 0.16)х λ jут , in which:
- σ ut . — heat insulator thickness, m;
- R —heat resistance of the structure for a certain climatic region, m2*C/W;
- λ ut — thermal conductivity of the insulation, W/(m*C).
An example of calculating the minimum thickness of mineral wool for the attic of a residential building located in the Moscow region:
R= 4.67 m2*C/W.
λ ut = 0.034 W/ (m C).
σ ut. = (4.67 - 0.16)x0.047 = 0.211 m.
Differences for seasonal summer and winter residence
Attics with year-round living are when residents are constantly in the house throughout the entire calendar year. They differ from seasonal premises in the presence of heating systems.
Some users incorrectly believe that the main difference between these two terms is the presence or absence of a thermal insulation layer in the roof slopes. After all, even with seasonal use of the attic, the roof must be thoroughly insulated.
The only significant difference in these options is the location of the thermal insulation layer:
- When constructing seasonal summer premises, a heat insulator is installed on top of the attic floor, and the roofing system remains uninsulated.
- When organizing a residential attic, insulation is installed in the roof slopes, and the attic floor is built using interfloor technology, placed between two heated floors.
Important ! The thickness of the insulation in both options is the same and is determined by the climatic characteristics of the area.
Types of thermal insulation materials
When planning how you will insulate the roof of the attic floor from the inside, it is important to choose the right thermal insulation layer. Mineral wool, polyurethane, expanded polystyrene and ecowool are actively used in construction.
Features of mineral wool materials
Mineral wool is thin fibers based on glass or basalt. The insulation blocks steam and condensation well, retains moisture, and is not subject to fire. Low weight, combined with environmental friendliness and high thermal conductivity, justify the use of mineral wool in private homes. When buying mineral-based wool, focus on its type:
- Glass fibers may cause itching and irritation if they come into contact with unprotected skin. The material is used only on an inclined surface;
- basalt fibers do not ignite at temperatures even 1000⁰С. But the chaotic arrangement of the fibers makes basalt wool hard, so it is produced in the form of slabs.
To properly insulate the roof of the upper floors, you will need a material with a density index of 25. Mineral wool should be laid between the rafter frame in a layer of 15-25 cm, depending on the climate of your region.
Durable polystyrene foam
Expanded polystyrene boards can be chosen to create thermal insulation for the surface of walls and roofs. The material is placed between and under the rafter system. Manufacturers offer two options for foamed polystyrene:
- tile foam with a granular structure. White slabs have dimensions of 0.5x1 and 1x1 m;
- penoplex (extruded polystyrene), which is homogeneous.
Foam-based polystyrene is an excellent raw material in terms of price and thermal insulation characteristics. However, durable material has a high cost and requires additional finishing with plasterboard sheets or lining. When using the material for an attic roof from the inside, there are risks of fire, release of toxins and formation of gaps if the wooden frame shrinks.
Polyurethane foam application technique
When thinking about how to insulate the floor under the roof, pay attention to liquid materials - polyurethane in the form of a foam mixture. Polyurethane foam is applied from a special container in a dense layer. The use of foamed polyurethane eliminates seams. On large areas, high-tech installations are used, which only specialists can operate.
Ecowool - technical characteristics
Ecowool is made from cellulose waste and is dense, crumbly cotton wool. The material is the best insulation due to its environmental friendliness and loose structure. Safety for human health, tightness of closing gaps and moisture resistance make it easy to use cellulose wool for the roof of the attic floor:
- Filling the material in dry form onto horizontal surfaces in the presence of ceiling beams.
- Applying a thick wet compound. Ecowool is mixed with an adhesive, and the resulting mass is applied to the frame with a spatula.
- Insulation by filling inside the roofing pie.
Cellulose cotton fractions have the ability to pass air, maintaining normal temperature conditions even in hot weather. The sorption qualities of the insulation ensure high-quality absorption of excess condensate, therefore, when thinking about the best way to insulate an attic roof, choose ecowool. When insulating the roof of your attic, carry out the work comprehensively - start with purchasing the material, planning events, laying hydro- or vapor barrier.
First of all, you will need timber, edged boards, preferably from coniferous trees, thin slats of wood and plywood, wide enough. You will use the timber for the mauerlat (laid along the perimeter of the ceiling), braces and rafter legs.
Broken roof under the attic floor
We do everything else from edged boards. Use thin wooden slats to lay the sheathing and counter-lattice. We connect the rafters using thick plywood. We connect all the parts using steel brackets, studs, screws, staples, and nails. To insulate such a roof, we use special insulation , waterproofing material and, finally, roofing material.
Answers to popular questions
What is the best insulation for an attic under metal tiles?
Metal tiles do not place any special requirements on insulation. All types of mineral wool and foam plastics are suitable. The main condition is a sufficient layer of insulation, reliable waterproofing and vapor barrier.
Soundproofing insulation should be installed under a metal roof. Basalt wool and polystyrene foam have these qualities. In addition, roll and block insulation materials with a soundproofing substrate are produced.
How to insulate an attic if the roof is without waterproofing
If there is no waterproofing, it should be installed. With a cold roof, the absence of a water barrier is not critical - if there is no difference in the external and internal temperatures, there will be no condensation, as well as ice dams.
The waterproofing film can be laid from the inside, securely connecting the joints. In this case, the need for ventilation under the roofing should be taken into account. Therefore, there must be an additional sheathing above the waterproofing film to create a ventilation gap. If there is no gap, the roofing material is laid on the rafters, then it must be removed.
Waterproofing is laid on top, connected without gaps, sheathing is made and the roofing is installed.
Roofing pie
- Construction of a residential attic space
- Installation of a roof insulation system
- Non-insulated roofing pie
- The structure of an insulated roofing pie
- Construction of a thermal insulation layer
A roofing pie is a system of layers of various materials that provide ventilation and vapor barrier, waterproofing and insulation.
Roofing pie diagram.