As energy prices rise, more and more attention is paid to the thermal insulation of homes. A significant part of the heat loss occurs through the cracks in the entrance doors: this means the gaps between the leaf and the floor or frame. As for interior doors, such defects noticeably worsen the aesthetic perception of the interior of the premises and the level of sound insulation between individual rooms.
- Self-adhesive tapes
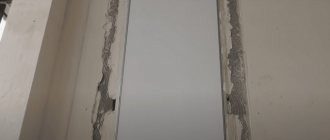
- Eliminating side gaps
Types of problems and damage
It is recommended to adjust the doors in advance, when no obvious damage is yet visible. In order for the structure to last for a long time, it is important to operate it correctly and carry out preventive measures.
All types of internal door problems are divided into two categories: damaged appearance of the product and improper functioning.
To correct defects in the decorative cladding, reconstruction of the canvas will be required. Such work is carried out in the same way as restoration of cabinet wooden furniture.
Malfunctions of the door are expressed as follows:
- The sash closes unsatisfactorily and loosely, resulting in abrasions on the floor covering. It is necessary to repair the hinges and adjust the position of the blade;
Important! When the sash often comes into contact with the frame, it is necessary to adjust the position of the leaf relative to the frame.
- Uneven gap around the circumference of the vestibule (slits appear on one side, and on the other the panel rubs against the frame);
- Sagging of the sash. Its own weight causes such deformation. If the deformation is not corrected for a long time, this will lead to distortion of the box;
- When the blade moves, a creaking noise is heard. In this situation, you simply need to lubricate the hinges. If the creaking does not go away, then it is worth checking the frame for distortion;
- The door doesn't open. If the humidity in the room is high, this will negatively affect the door frame. Moisture causes the frame to deform and misalignment occurs. A breakdown of the locking device can also lead to such a malfunction.
Sometimes a specific type of door deformation becomes a consequence of several factors, so you need to consider all the options for problems that arise with the doorway and be able to eliminate them yourself.
Without cracks - no way
There must be a certain gap between the door along the entire perimeter of the frame, otherwise it simply will not be able to open and close. The dimensions of the gaps are strictly regulated by the relevant GOST. The material used to make the canvas and the box is of great importance. For example, wooden products tend to change their size to a certain extent, depending on the level of humidity (the so-called “drying out” and “swelling”).
Recommended clearances in the doorway
Proper formation of gaps at the installation stage directly affects how convenient the door structure will be to use. In addition to the material of manufacture, the parameters of the gaps depend on the height, width and weight of the canvas. Certain errors are acceptable, usually within 1 mm of deviation in one direction or another.
A slight increase in the distance between the frame and the door is allowed in the following cases:
- The indoor microclimate is too humid and there is no ventilation.
- The material used to make the door block is natural wood or lumber, which is prone to absorbing moisture.
As for the clearance between the canvas and the floor (threshold), it is recommended within 20–25 mm.
To increase ventilation efficiency and ease of opening, this parameter can be increased to 40 mm.
Causes of defects:
- Incorrect door installation;
- Poor quality or weak loops for heavy fabric;
- Wear of loops or deterioration of their fixation;
- Building shrinkage;
- Poor fixation of the frame in the doorway.
Important! If the problems are related to faulty hinges, repairing the door will not be difficult. It is much more difficult to correct errors made during installation or eliminate the effects of shrinkage. We have to re-install the box and canvas again.
Cladding with cement screed
Advantages: this is the oldest and most universal method of finishing door openings. It is easy to do with your own hands, even for a novice builder. Many people choose this traditional method precisely because of its reliability, proven by more than one generation. All you need is to mix a solution of cement, water and sand. Spread the solution on the surface and carefully level it with a spatula.
You should get a perfectly smooth surface. Experts try to achieve a unique result, smooth as a chicken egg shell. After the surface has dried, it should be coated with paint, preferably acrylic-based.
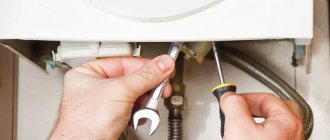
How to align and adjust a door frame after installation
To repair the inner door frame, you will need to remove the panel from the hinges. Next, measure and determine the location where the displacement occurred. To determine the sagging, you need to check the diagonal.
Removing the fabric from the hinges, photo
Remove decorative elements from the door structure and screw additional bolts into the door leaf. This manipulation will help to secure the structure more firmly in the correct position.
The old polyurethane foam will need to be removed and spacers wedged in.
Using a special knife, get rid of the old layer of foam
After this work, the structure can be foamed.
Foam the box again
Seal the gap at the bottom of the door
As a rule, all entrance doors are equipped with a threshold. Blowing from the bottom is eliminated by increasing its height or decorating the area of contact with the canvas with a special seal. Given the constant contact with water and cold air, it is recommended to use reliable rubber as a seal. An excellent option are special threshold slats of a combined type, equipped with nylon brushes. The presence of a special groove protects the home from the penetration of external moisture.
Installation procedure for the combined threshold strip:
- Cutting the strip and brush to the size of the threshold. It is important to ensure that the overhanging edge penetrates into the opening. You can use a hacksaw as a tool.
- Brush installation. In the correct position, it should exert some pressure on the bar.
- Screwing the brush onto the lower edge of the canvas (away from the home). For this, a screwdriver and self-tapping screws are used.
Restoration of the internal door frame
Restoration work is carried out without removing the door. This is not required for puttying and masking scratches formed on the surface.
One of the simplest repair processes is adjusting the locking of the lock - the latch. Rubbing the “tongue” against the end plate on the box is a common defect. There are many reasons for this type of problem to occur. The most common:
- A slight violation of the shape of the canvas or opening;
- Minor sagging of the sash.
To eliminate such a problem, sometimes a few gentle blows with a hammer on the end of the plate window on the rubbing side are enough. A more decisive and time-consuming method is to remove the plate and increase the dimensions of the recess in the frame, seal the old mounting holes and reinstall the plate.
Incorrectly or poorly supplied frames, shrinkage of the building, which led to direct deformation of the shape of the doorway, require dismantling the old structure and installing it again.
Dismantling the door product, photo
Important! If the dismantling process is carried out as accurately as possible, then all elements of the box can be installed again.
The removed trims reveal the mounting seam, and the hinges and end strip on the box, on the contrary, “hide” the fastening points.
After releasing the mounting seam, unscrew the fasteners and remove the box. If the frame is fixed with foam, then the dismantling process is greatly simplified.
Sometimes it happens that the mounting bolts cannot be unscrewed. In this case, they are cut off and the box is shifted slightly so that the new attachment points do not come into contact with the old ones.
The door frame is reinstalled, observing all requirements regarding levels in the vertical and horizontal planes and the size of the gaps between the door leaf and the frame.
Installation and fixation of the box
Important! Be sure to maintain a gap between the floor covering and the canvas for supply and exhaust ventilation.
The final step is hanging the canvas and checking the functionality of the structure, securing the end plate of the locking device and platbands.
Gaps in entrance doors
In practice, it is not always possible to initially install entrance doors correctly. As a result, cold air and dirt from the street begin to penetrate into the room. The reasons for this phenomenon may also be subsidence of the structure during operation and insufficient insulation of the canvas itself. How to fix the problem directly depends on where exactly the door is located.
Installation of the second door
This is the most optimal option for increasing the protection of the door block from blowing from the street. After installing the second door, an intermediate vestibule appears: the resulting internal air cushion reduces heat loss by an order of magnitude. If the home is located on the first floor of a multi-storey building, it is necessary to achieve automatic operation of the door to the entrance. Installing a door closer also brings good results.
Installation of a second entrance door
Insulating the front door
The material used for making entrance doors in most cases is steel sheets, which tend to create the so-called. cold bridges. The situation is aggravated by the presence of microscopic gaps in welds and in places where fittings are installed. Due to the fact that almost all metal doors have a void inside, good opportunities for additional insulation open up. As a rule, mineral wool or slab foam is used for this.
Operating procedure:
- Dismantling protruding fittings (lock, handles, peephole).
- Disassembling the door leaf. If individual sheets were fixed by welding, they are cut off with a grinder.
- Laying insulation cut to size for internal cavities. When using polystyrene foam, the joint areas between the individual slabs and the metal frame must be filled with polyurethane foam.
- Reassembling the structure.
To insulate non-removable panels, internal heat-insulating linings (standard size 1x1 cm) are usually used. They are screwed onto screws around the entire perimeter of the removed door. After tensioning the upholstery, it is additionally fixed in the area of the linings with special nails.
Repairing a door frame when fasteners are loose
Installation of platbands, photo
If the wood screws that hold the frame become loose, you can simply tighten them. Sometimes this method does not bring results, because the screws do not hold well in loose holes.
In this case, it is advisable to replace the fasteners. You can also equip old holes with plugs and install self-tapping screws in them.
If the door frame was fastened with nails, it is worth strengthening the structure with additional screws.
If the door frame is fixed in brickwork, then holes are drilled in the slopes and dowels are used for fastening.
If the door does not close tightly and the door vibrates in the frame, repair work consists of rearranging the locking device. For this purpose, unscrew the fastening screws and carefully remove the mechanism. To move the locking device latch, you need to expand its socket. This is done using a chisel, the old mounting holes are sealed, and the device itself is installed in a new location.
If the sash swings open and closes with difficulty, the leaf rubs against the threshold, which means the fastening hinges have become loose. To correct the situation, tighten all the screws so that the hinges stop moving.
Adjusting hinges, photo
Important! If the subsidence continues over time, the screws will need to be replaced.
Methods for making slopes
The outer side of the door is finished by master installers. But on the inside, everything is terrible. Before your eyes is a bare wall, bricks and a lot of possibilities for designing slopes.
The sloping part gives the doors a beautiful appearance, hides all fasteners and makes the entire structure stable.
Therefore, after the box is installed, you need to choose a finishing method, and there are not many of them:
- Finishing with platbands and additional boards;
- Plastering slopes;
- Gluing the material.
The division occurs according to different methods of forming the slope area, and choosing the material for cladding is not a problem. The most ideal option is to seal the slopes with concrete and then paint.
Finishing slopes with installation of finishing material on a special frame is beneficial when a decent amount of mortar is required for voids in the opening. Judging by the photo, using this method the slope will be flawless and even.
Door frame trims
if the platbands are worn out, have acquired an unpresentable appearance, or are moving away from the jamb in some places, this indicates the need to replace them.
New trims are purchased taking into account the immediate dimensions and type of connection.
The platbands are removed and the surface of the frame is sanded. When removing the platband, a gap may form between the wall and the frame. During repairs, this gap is foamed.
Algorithm for replacing the platband:
- Perform markings. The part is applied horizontally so that the upper edge deviates from the outer border of the vertical casing by approximately 5 mm, and the edge on the inside from the edge of the frame by 5 mm. If necessary, the structure is leveled;
- Holding the part, place a mark 5 mm horizontally from the inner edge of the frame. Similar manipulations are carried out with the other casing;
- The workpieces are cut at an angle of 45 degrees relative to the applied markings. After which they are fixed on the box;
- The vertical casing is also made and attached;
Important! The corners of the new design are also fixed with self-tapping screws.
Installation of the door and its adjustment should be carried out as accurately as possible so as not to deform the panel or frame.
Experts recommend that if you have wooden interior doors, you should do preventive maintenance, at least once a year, and then the door product will last a long time. If there are doubts about your own adjustment and repair, then it is better to entrust all manipulations to specialists.
Voted over 268 times, average rating 4.6
Comments
Unfortunately, there are no comments or reviews yet, but you can leave your...
Add a comment Cancel reply
We recommend reading
Miscellaneous Options for insulating a wooden entrance door with your own hands Owners of private houses are concerned with the question of how to insulate the entrance ...
Miscellaneous Types of sound alarms on the front door and additional features An audible alarm installed on the door becomes ...
Platbands, Miscellaneous The correct choice of platbands for installation on interior doors Refining defects or hiding them becomes the final...
Hinges, Miscellaneous Detailed algorithm for installing butterfly hinges on an interior door Hinges for interior doors are a mandatory element, without ...
Eliminating cracks around the door perimeter
Even after high-quality insulation of the door leaf, cold air will continue to enter the home through large gaps between the door and the frame. The easiest way to solve this problem is to use a special seal: thanks to it, you can achieve complete tightness of the door block and significantly reduce the level of heat loss. This material is presented on the building materials market in several varieties, the installation of which is slightly different from each other.
Insulating the door around the perimeter
Self-adhesive tapes
The simplest and most inexpensive option for sealing the door leaf around the perimeter. To make such tapes, rubber or plastic can be used. To simplify its installation, an adhesive layer is applied to one side of the tape. The width and thickness of the tape may vary, which allows you to choose the most optimal option for a particular case. It should be taken into account that this seal has to be replaced periodically (this is especially true for frequently closed entrance doors, which causes compression of the gasket material).
The procedure for installing self-adhesive tape is as follows:
- Preparation of the area to be finished (end of the door leaf). It is cleaned of dirt and degreased.
- Taking dimensions and cutting off the seal. It is recommended to cut the strips with some margin (5-10 mm).
- Gluing strips. It is more convenient to start work from the upper corner of the canvas. The protective film is not removed from the entire segment: 5–10 cm is enough. After this, the tape is applied to the doors and carefully glued, gradually removing the protective paper. During the gluing process, the strip must be pressed tightly.
- The areas where the loops are located are glued along the outer plane of the stopper. Corners must be trimmed carefully.
A cheaper option for insulating tape are products without a self-adhesive base. They are mounted in a similar way; nails or special glue are used for fixation.
other methods
A more reliable option for eliminating cracks around the perimeter of entrance doors is the so-called. "floor planks". According to the type of construction, they are wedge-shaped and external; according to the material used for manufacturing - plastic, metal or foam. They can be replaced with strips of felt, wooden glazing beads, etc. The main thing is to use screws or nails rather than glue as fastening.
Installation of floor strips