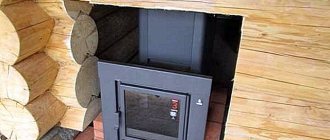
- How to insulate outside
If you are planning to build or repair a steam room yourself, then most likely you have wondered: what is the best way to insulate the ceiling in a bathhouse from the inside and how to properly cover it with your own hands, and also looked for examples with videos.
Insulation of different types of walls
The choice of how to insulate the walls of a bathhouse from the inside depends on the type of material from which it is built:
- If it is brick, stone or concrete products, thermal protection is required. The fact is that when there is no thermal insulation, the bathhouse will have wet walls and, as a result of temperature fluctuations, they will quickly begin to collapse. The thickness of the insulation should be selected taking into account the parameters of the supporting structures and the climate in the region. Most often, experts recommend a 10-centimeter layer.
- Is it necessary to insulate a wooden bath? On the one hand, the thermal protection of the building will not hurt, but on the other hand, wood can be called one of the best materials for the walls of the steam room and dressing room. Of course, insulation is required for baths made of timber, with walls no more than 15 centimeters thick. Sauna log buildings are thermally insulated when the cross-section of the log does not exceed 20 centimeters.
On the inside, walls of greater thickness are either not insulated, or thermal protection is provided with waterproofing and clapboard finishing. Lathing is only suitable if there are rubble on the walls.
Choosing thermal insulation material
Experts recommend using the following materials to insulate the bathhouse ceiling:
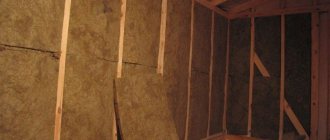
- Mineral wool is a classic version of thermal insulation, which is a chaotic interweaving of thin artificial basalt fibers. These fibers are responsible for retaining heat. The material also contains limestone, diabase and dolomite. Among the main advantages are durability and fire resistance, and among the disadvantages is a decrease in thermal insulation properties when wet.
- Ecowool is a material made from wood fibers made from recycled waste paper. An undoubted advantage of insulation is its environmental friendliness. In addition, it has a fairly low price.
- Penotherm is a type of foamed propylene with one foil side that reflects heat flow. The material is very light, but guarantees effective heat retention: thanks to it, you can reduce the heating time of the bath by 2-3 times.
Important! To treat the ceiling of a steam room, you cannot use organic insulation materials - jute, flax fiber, tow. They ignite quickly, so their use in high temperature zones is unsafe.
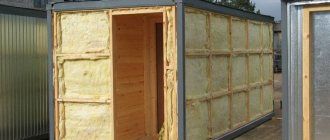
How to insulate a dressing room from the inside with your own hands
Photo. Insulated dressing room made of wood
Most often, foil penofol or isolon is used to independently insulate a wooden dressing room. This material allows you to inexpensively and quickly level out the temperature difference in winter between the street and a heated room. The role of additional heat protection can be played by the interior decoration of the walls and ceiling in the dressing room with wooden clapboard or other suitable materials.
It is worth remembering that the stability of temperature in the steam room and comfort in the dressing room depend on the correct choice of thermal insulation and the quality of the insulation.
It is important to know not only how to properly insulate a dressing room from the inside with your own hands, but also how to insulate a dressing room. As thermal insulation, you should choose a moisture-resistant material; if the choice fell on mineral wool or ecowool, then you need to take care of the vapor and waterproofing of the insulation
Polystyrene foam, extruded polystyrene foam, foamed polyurethane foam, mineral wool or glass wool are used as thermal insulation for the dressing room. Foamed polyurethane foam and expanded polystyrene should be considered the ideal material for a dressing room. Due to their high characteristics of moisture resistance and durability, these materials will provide reliable insulation of walls, floors and ceilings of any room.
Sequence of insulation work
- The very first stage of insulation will begin during the assembly of the log house, when an organic fibrous heat insulator will have to be laid between its elements: tow, jute, flax wool, dried moss or a combination of them.
Only after six months can this process be completed using a hammer and caulk (a special spatula), carefully sealing the ends of the fibers into the seam
True, synthetic sealants have also appeared for this purpose, but for a bath it is especially important to maintain environmental safety under conditions of heating and evaporation.
When laying a bathhouse, you can take measures to insulate the floors, especially if they are constructed of concrete. In this case, you will have to perform ground leveling work, pouring sand and expanded clay; pouring the base floor. How to insulate the ceiling and walls of a bathhouse? Insulation is carried out from the inside and outside, but after the process of shrinkage of the structure has been completed. Measures for insulating windows and doors, external and internal cladding work to preserve heat in the bathhouse premises.
How to get the job done
A frame made of timber is installed on the walls, maintaining a certain distance and location depending on the material. Insulation is laid between the slats, then a layer of foil polystyrene foam is attached on top of it, which should face the inside of the dressing room. Then everything is covered with finishing lining, which is sewn onto the sheathing. The variety of existing finishing materials allows you to decorate the interior of the bathhouse to the taste of the owners. Wooden components can be treated with bath varnish or special impregnation. Video instructions for insulating walls and floors in a bathhouse.
https://youtube.com/watch?v=nbsgA68I05Y
Purpose of the room in front of the steam room
In compact baths, the dressing room mainly serves as a changing room, where there is some special furniture. In structures of a substantial size, the dressing room can be:
The process of insulating walls in the dressing room
- a fairly spacious room, equipped at the request of the owners;
- combining a shower and a swimming pool in a bathhouse;
- hydrobox.
When choosing insulation material and floor covering, you need to pay attention to the functions of the dressing room and always remember that this room is exposed to strong moisture.
How to properly insulate a door
Door insulation technology
Large heat losses occur through door cracks, so you must take care of the thermal insulation of the wooden or iron door leading to the bathhouse.
Felt, basalt wool, and foil insulation can be used as insulation. There are several ways to insulate a door; below we present the most common:
- A frame of 15x20 mm slats is mounted around the perimeter of the door, which should be 10 cm away from the edge of the door leaf.
- A piece of hardboard is placed inside the frame and stapled.
- Felt or other material is pulled over the top of the frame and secured with nails, which should be 5 cm larger than the frame itself.
Foundation for frame construction
As a foundation for a frame dressing room, a lightweight foundation should be used: pile or shallow foundation.
Creating a shallow foundation is done as follows:
- The area is being planned and marked.
- In places where the walls of the building should be located, half-meter trenches with a width of 30 centimeters are dug.
- Sand is poured into the trench in layers and also compacted layer by layer with water wetting.
- Formwork is created along the perimeter of the trench.
- The base of the formwork is reinforced.
- The concrete solution is poured according to the level of the formwork.
- After the concrete hardens, waterproofing roofing felt is laid.
Insulation algorithm
Before starting work, you should prepare all materials and tools. The master will need:
- beam lath;
- foil;
- self-tapping screws;
- electrical tape and aluminum tape;
- roll paper;
- insulation;
- knife;
- screwdriver;
- building level.
It is important to follow the sequence - first insulate the ceiling and finish with the floor. All work begins with initial surface preparation
It must be cleaned of dust, mold and dirt, all holes must be sealed with polyurethane foam. Broken parts should be replaced with new ones.
Installation of insulation on the ceiling
Step-by-step algorithm for proper ceiling insulation:
- Covering the ceiling with overlapping roll paper.
- Fastening the bars on top of the paper. The distance between them depends on the size of the insulation.
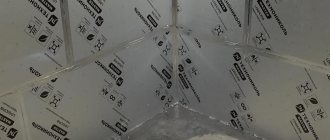
- Covering the frame surface with foil. Necessary for reflecting heat into the room. The joints are sealed with aluminum tape.
- Checking for leaks. You need to make sure that all joints are securely sealed and there are no gaps.
- Laying the insulator in the formed cells between the bars.
- Finishing the front part with clapboard.
It is recommended to lay the insulation in two layers with a slight offset. This will hide the joints and eliminate the possibility of a draft.
Installation of insulation on the wall
Work on thermal insulation of walls is similar to insulation of the ceiling
But in the process it is important not to forget about the ventilation inlets
- Fastening the slats to the surface. They should be in the form of narrow strips so that temperature changes do not change their shape. The panels must be treated with a special bath product.
- Foil laying. You can fasten it using a construction stapler.
- Laying thermal insulation.
- Clapboard finishing.
When laying, it is important to leave a gap between the heat insulator and the lining. Usually 2 cm is enough for sufficient ventilation
The finishing part is stuffed horizontally. This helps reduce heat loss.
Installation of insulation on the floor
The last step in insulating the dressing room is laying insulation on the floor
A large amount of heat escapes through it, especially in a building on stilts, so it is important to make high-quality thermal insulation. Most often, expanded clay is used as a material, which prevents the formation of fungus and condensation.
It is also environmentally friendly and lightweight.
In the case of wooden floors, the material is placed between the joists. When pouring concrete floors, expanded clay is placed between each layer.
Insulation of the floor in the dressing room is carried out according to the following algorithm:
- Filling the initial layer. Waiting for it to dry.
- After complete hardening, lay a layer of expanded clay 10 cm thick.
- Expanded clay chips are sprinkled between the layers of concrete.
- Pouring a layer of concrete onto a reinforced lattice.
- Execution of cement-sand screed.
It is also important to insulate doors with window openings. They are usually treated with a special silicone sealant.
The outer door is insulated with natural material.
Floor insulation
Expanded clay is a natural material, can be used in bulk or poured with concrete
Since the dressing room is used for changing clothes, people often stand on the floor with their bare feet. To protect health and ensure comfort, insulation is done. For concrete surfaces, you can make a wooden covering, but it is better to provide full thermal insulation.
It is necessary to choose a material that allows air to pass through well. Otherwise, condensation will accumulate, which can lead to the formation of harmful microorganisms. Expanded polystyrene, penoplex, polystyrene foam, and expanded perlite can be used as insulation. Polystyrene foam and polystyrene are laid on the subfloor. Perlite must be mixed with cement mortar. Glass wool, expanded clay, gravel, and boiler slag can also be used for insulation.
If the floor is insulated in the dressing room of a wooden bath, it is necessary to make a layer of waterproofing. The most popular type is roofing felt. Insulation is laid on top of it, and then another layer of roofing material. The finishing is made of wood
It is important to first treat the wood with special compounds against the formation of fungus and mold. Glass wool and stone wool, polystyrene foam, and expanded polystyrene are used as insulation for wooden floors.
The entire bathhouse can have a heated floor. There are different options:
Warm water floor. Placed on a concrete foundation. This is a safe and effective heating method, but you need to take into account that you will have to install a boiler. Electric floor
With this method, it is important to carefully make waterproofing to ensure safe operation. Cable and film construction can be installed
In the first case, energy consumption increases, but the system reliability is higher. The films are harmless and have high strength. The cost of film construction is higher than cable construction.
Floor insulation
Heat leaves the bathhouse not only through the walls, but also through the floor. Expanded clay is used for thermal insulation of floors. This is an inexpensive, effective and reliable material. Although you can use slag for work, expanded clay provides a better degree of environmental safety and has less weight.
If the floor in the bathhouse is concrete, then when installing it, each layer is laid with expanded clay. Here's how to insulate the floor in a bathhouse with your own hands:
- When pouring concrete, you need to wait until it is completely dry.
- A plastic film is placed on the concrete.
- Then you need to pour expanded clay. It is believed that the thickness of the layer should be twice that of the walls. If the room allows, it is advisable to increase it even more.
- Subsequently, they are laid out on a reinforced lattice.
- At the end of laying the floor, a concrete-sand screed is made.
Insulation of the floor in the bathhouse is carried out, if it is wooden, by pouring this material between the joists.
Before laying expanded clay, you need to lay a layer of roofing felt or vapor barrier film. When thinking about how to properly insulate a bathhouse, we must not forget about the reflective and vapor barrier layers.
When using expanded clay for thermal insulation, you need to take into account that its layer must have a flat surface. In order to ensure this, guides are used: a profile is attached horizontally to the floor, with the help of which it will be possible to control the uniformity of the pouring of the material.
Sometimes the bathhouse has an earthen floor. Here are step-by-step instructions on how to make it insulated:
1. It is necessary to trample the surface, making the earth denser. 2. It is recommended to impregnate the walls with a waterproofing compound. 3. Add a ten-centimeter layer of sand to the soil, pour water over it and compact it. 4. Lay the sand with roofing felt
It is important to ensure a 15 cm overlap on the walls. You can fasten the sheets using tape
For concrete floor
When thinking about how to insulate a bathhouse from the inside, you can use another method for high-quality thermal insulation of the floor.
Here's how to insulate a bathhouse from below:
- In place of the floor, a pit 50 centimeters deep is dug.
- Lay out a 5 cm layer of sand.
- Next you need to put 20 centimeters of polystyrene foam. Now you need to prepare a mixture of concrete with foam chips (1:1). And put a five-centimeter layer.
- Waterproofing is laid on top. This can be a layer of roofing material or a special vapor barrier film.
- Place a mixture of vermiculite and concrete. It is prepared in a one to one ratio. The thickness should be 5 centimeters.
- The top layer is a reinforced concrete screed.
A few important points
Before we move on to considering materials for insulation, let’s decide what kind of floor will be in your bathhouse.
*We take as a basis the option that you do everything initially. Although, as I wrote above, you can redo the floors. The technology is the same, but the costs are higher.
Depending on the design of your steam room, you should also focus on insulation. After all, what is ideal for wooden floors is sometimes not suitable for concrete. However, this statement also works in the opposite direction. True, there are options that, if used correctly, will serve you equally well in both cases.
In addition, it is worth considering the structure of the floor itself. If the floor of your bathhouse is made according to the “leaky” design (which is most often found in the southern regions), then most likely you should not worry about its insulation. Well, “dry” and concrete floors require an individual approach.
We insulate the steam room
The steam room in the bathhouse requires special attention. After all, it is here that the highest level of moisture and elevated temperature are observed during operation. Therefore, insulation, waterproofing and finishing of this room must be done with special materials.
The ceiling of the steam room is subject to maximum heating during operation (up to 150 °C). Therefore, the question of how to insulate the ceiling of a bathhouse is solved by using materials with high heat resistance.
If there is no attic or attic, insulation is installed in the following order:
- wooden lattice made of timber on the ceiling boards;
- sheathing elements;
- thermal insulation;
- vapor barrier.
If there is an upper room - an attic, an attic - the insulation scheme looks slightly different. A layer of clay at least 2 cm thick is applied to the ceiling boards. This will ensure moisture retention. All small holes, joints between boards, etc. are filled with bulk material. Typically, expanded clay or wood chips are used for this. The thickness of this layer is at least 20 cm.
https://youtube.com/watch?v=1BMehi4cwNU
A box-shaped base of rafter supports is mounted on the ceiling around the chimney. This will provide a gap of 20 cm between the pipe and the heat insulator, required by fire safety. A non-flammable heat insulator such as glass wool or mineral wool is placed inside the box. The main surface of the ceiling is covered with a layer of mineral heat insulator.
Insulating a bathhouse ceiling: step-by-step instructions and diagrams + choosing insulation
Bathhouse construction belongs to the category of structures with special operating conditions. The formation of a microclimate acceptable for the adoption of beneficial procedures, fuel consumption, and the time for warming up the premises depend on its proper design. The concept of “proper design” refers to a number of technological processes, one of which is the insulation of the bathhouse ceiling. After all, it is the insufficiently thermally insulated upper floor that contributes to the leakage of almost a third of the thermal energy.
The heated air, obeying the strict laws of physics, rushes upward. If there is no impassable barrier in its path, its further work will be aimed at heating the atmosphere. To stop such unreasonable spending, you need to erect a reliable barrier. Moreover, it must be done in such a way that it does not contribute to the formation of condensation on the wooden elements of the ceiling, so that this moisture does not favor the settlement of colonies of microorganisms that destroy building materials.
How to choose?
But the choice of insulation material cannot be uniform for the entire bathhouse as a whole. There are too many differences between individual rooms. In addition to the washing and steam rooms, you also need to place a locker room and a dressing room inside (often these rooms are combined into one if there is not enough space). The air in the vestibule is always cooler than in other compartments.
Paints and plasters, which manufacturers proudly call heat-protective, do not provide a high enough level of thermal insulation, and can only be an auxiliary element in it.
Bulk material is used mainly for roofing and flooring. It is much more difficult to lay it inside the walls, and for this you definitely need a well masonry. Brick dressing rooms are mainly insulated with foam plastic due to its ideal compliance with the required parameters and affordable price.
Frame fastening of insulation on a wooden beam is carried out for finishing:
- clapboard;
- plastic panels;
- boards;
- corrugated sheets and siding.
The installation pitch of the frame is determined by the width of the cladding being created. Considering the inevitable crumbling of foam when cutting, a certain supply of material should be reserved.
If the air humidity in the sauna waiting room is relatively low, it is permissible to use mineral wool. They attach it in the same way as polystyrene foam. If the spaces between the racks are occupied by communications, a layer of unedged board is placed above the frame, and thermal protection is mounted on it.
Given the insignificant thickness, such a coating will allow the most efficient use of useful areas. Where heating devices are attached, penofol should be left unfinished. It can also be used as part of underfloor heating. When placed under pipes or electrical cables, penofol increases heating efficiency.
When forming a slab foundation, the dressing room is insulated using wooden logs. The timber is connected to the slab using self-tapping screws; the gaps must be filled 100%.
In the case of a pile foundation, installation of all structures is carried out on beams made of steel or wood. They are treated, respectively, with antiseptics or anti-corrosion mixtures. The insulating layer must be covered with a vapor barrier in the form of a membrane that stops the condensation of steam inside the thermal protection.
The requirements for thermal insulation in a steam room will be significantly higher, but the following will help reduce the need for it:
- installation of solid double-glazed windows;
- formation of a high threshold with a low door;
- purchasing not a simple stove, but a heater;
- carefully thought out bathhouse configuration;
- high-quality ventilation.
Waterproofing material for a steam room should easily withstand even very intense heat. Kraft paper copes well with this task. The walls of the steam rooms are insulated with sphagnum (placed in the gaps of the crowns) and tow (bridging the cracks). Actually, insulation is achieved using building moss, extruded polystyrene foam, polystyrene foam and penoplex.
The advantages of synthetic materials are:
- resistance to mechanical destruction;
- long period of work;
- excellent heat retention.
It is chosen both because of its excellent practical qualities and because of its low cost. Expanded clay is also inexpensive, but it will have to be poured at least 30 cm inside the walls, which significantly complicates the work.
Ceilings can be insulated with clay; if they are filled with sawdust, soil must be placed on top of the insulation layer to ensure fire safety. Among modern solutions, experts recommend basalite, isospan, or overlapping layers of simple foil.
Installation of thermal insulation
To achieve the main goal - accumulation and “saving” of steam, you need to make 2 layers of PIP and 1 additional layer for thermal insulation. This measure will make the room warmer and more comfortable.
Experts advise placing layers perpendicularly. This arrangement will increase the strength of the entire structure and help avoid severe deformation. If you use mineral wool and clay, the process will take place in several steps:
- take an unedged board (5 cm) and attach it to the bottom of the beams;
- to support the filing, we fix the flooring along all the bases;
- tongue and groove slats made of aspen are attached to them (taking into account the gap for ventilation);
- We lay vapor barrier material on the outside of the roof;
- spread mineral wool 15 cm wide over the laid mixture;
- then we lay polypropylene film;
- We place boards on top of the resulting structure; this is the future floor of the attic.
If everything is done correctly, the end result should be an excellent steam room. All the steam will remain inside for a long time, and the steam room will not cool down for a long time.
Ventilation
The ventilation system allows you to maintain the quality of the air in the bathhouse, the correct thermal conditions, drying, and ventilation. Ventilation provides air exchange. It is carried out through ventilation ducts. Ventilation can also be provided by opening windows.
The size of the ventilation ducts is about 15x20 cm. The first duct is the supply duct, located next to the firebox, at a height of less than half a meter from the floor. Another channel, an exhaust channel, is made on the opposite wall at a distance of about two meters from the floor. A fan can be installed in this channel to speed up ventilation. The channels are closed most of the time with valves of the appropriate size.
Insulating the doorway
And of course, the proper effect of warming the dressing room will not be achieved without reliable insulation of the doorway.
And of course, the proper effect of warming the dressing room will not be achieved without reliable insulation of the doorway. A large amount of heat, so valuable for a bathhouse, will escape through an unprotected opening and cracks.
The most common option, in this case, is to install a thermal curtain. For this purpose, a sealing frame is mounted inside the dressing room on the door block. It is made of timber, which is wrapped in insulation. As a result of installation, a soft fabric is attached to the frame, which serves as a screen.
Functions of the waiting room
This room in the bathhouse can perform different functions, but the main ones are:
- Water procedures after the steam room. Everyone knows that after a steam room you need to plunge into cold water or douse yourself with it, as this has a positive effect on human health. If the bathhouse does not have a pool, then you can douse yourself with water from a barrel in the dressing room.
- Shower room. There you can wash off the dust in a day and don’t have to go to the bathhouse.
- Storage of utensils. You can store smells, gangs, brooms, etc.
Therefore, this room must be built as comfortable and warm as possible, so that you can relax there after a steam room, drink tea or douse yourself with ice water.
Lighting and furniture
There should be no bright light in the waiting room; the light bulbs should be covered. The light should be dim, promote relaxation and create comfort. Therefore, the lighting is preferably dim and unobtrusive. At the same time, of course, the level of illumination must remain sufficient. Modern lighting technology widely uses LED lamps. This type of device allows you to create very flexible and original solutions for lighting design of rooms.
Chandeliers with different types of lampshades are suitable for the dressing room; it is also possible to install wall lamps. If there are places in the dressing room where increased illumination is required, for example, a mini-kitchen unit, a table for making tea, it is worth highlighting local lamps to illuminate such an area.
In addition to lamps, it is worth paying attention to the placement of sockets and switches, since they are not installed in the washing room and steam room. Since the dressing room is also a relaxation room, this factor should be taken into account when furnishing
Of course, the size of the room determines a lot. If the dressing room is small, the set of furniture there is small: a table, stools or chairs, a hanger, a cabinet. If there is more space, then it is desirable to have a sofa, a comfortable wardrobe, a shoe closet, and a mirror. In addition to furniture, it is not prohibited to install a TV or stereo in the dressing room. The main thing is that these devices do not interfere with the rest and recovery of the body after bath procedures
Since the dressing room is also a relaxation room, this factor should be taken into account in the furniture. Of course, the size of the room determines a lot. If the dressing room is small, the set of furniture there is small: a table, stools or chairs, a hanger, a cabinet. If there is more space, then it is desirable to have a sofa, a comfortable wardrobe, a shoe closet, and a mirror. In addition to furniture, it is not prohibited to install a TV or stereo in the dressing room. The main thing is that these devices do not interfere with the rest and recovery of the body after bath procedures.
If the layout is done correctly, then the room must have a bench and a table.
Subtleties of the procedure: from A to Z
It doesn’t matter exactly when you decided to insulate the steam room - at the stage of building the bathhouse itself or after completion of construction. The main thing is to strictly follow the sequence of insulation measures and do not forget about the basic rules of insulation:
- Waterproofing is an essential part of the insulation process. Even if the material does not absorb moisture or form condensation, take full care of the waterproofing layer. Over time, pores may form in the insulation, and water risks “reaching” the outer coating of the bathhouse and accelerating its destruction.
- It is better not to skimp on material for insulating the steam room. The service life depends on this. Basalt will last 30 years, and foam plastic will last only 5-7.
- It is better to secure the insulation with screws or nails. Today there is a large selection of special adhesives, some of them are designed for very high temperatures, but, as practice shows, nothing more reliable and cheaper than a simple nail has yet been invented.
- It is imperative to insulate the floor. If there is no concrete screed, one is made. Top filling with cement or concrete will help extend the service life of the entire steam room and its base, in particular.
- The materials used for working in the bath should be marked that they can be used at elevated temperatures. When heated, some products emit substances that are caustic and dangerous to people. To avoid putting yourself and your loved ones at risk, always read the information on the packaging of the products you purchase.
- The interior lining of the steam room is not painted or varnished. Heating will contribute to the release of toxic fumes, and constant changes in temperature inside the room will lead to the layer becoming externally unattractive and will have to be renewed regularly.
Outside
It does not allow water to pass through, is resistant to temperature changes, durable and has low thermal conductivity.
Next, about insulating the walls of a bathhouse from the outside with your own hands.
This is why penoplex is considered one of the best synthetic materials.
To insulate walls made of logs and logs, natural materials are most often used; in turn, for a frame or bathhouse made of blocks, penoplex is ideal.
Attention! Penoplex has average fire resistance, and during combustion it releases toxic substances. That is why it is unacceptable to use it for internal insulation of a bathhouse.
Let's look at the process of insulating a bathhouse from the outside step by step:
Let's look at the process of insulating a bathhouse from the outside step by step:
- The first step is to clean the walls of any kind of contamination, such as paint residues, dust or dirt;
- Next, the surface of the wall should be coated with a primer in two layers;
- When the applied layers have dried, the vapor barrier layer can be fixed;
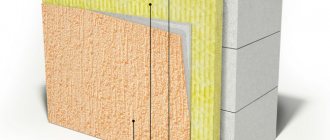
- Next, glue is applied to the foam sheet; the thickness of the insulation layer should be at least 7 cm;
- The sheet is attached to the wall and additionally secured with “fungi”;
- After the wall surface is completely covered with the first layer of insulation, you can proceed to arranging the second layer. To do this, the foam sheets must be placed in such a way as to overlap the seams of the first layer;
- When the glue is completely dry, you can begin sealing the gaps with sealant or foam;
- Next, you should strengthen the structure with a fiberglass mesh attached on top of the second layer with glue;
- The final stage is plastering the walls, as well as further finishing.
Don't forget about wind protection.
To protect the walls and the thermal insulation itself from precipitation, wind and condensation, waterproof, windproof membranes are used.
This protects the wall and thermal insulation.
They are laid on the outside of the insulating layer directly under the building's cladding and secured using a construction stapler.
Insulating the dressing room with your own hands
The choice of material for the interior decoration of the room depends largely on what function the dressing room will perform. Whether you just want to arrange a hallway or a dressing room here, or maybe a rest room, the decoration should be appropriate. In addition, the materials depend on the material of the walls of the bathhouse itself.
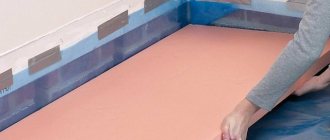
Mineral wool floor insulation scheme
In a log bathhouse, the dressing room is covered with clapboard, covering it with an antiseptic to prevent rotting and increase the fire safety of the room. Brick walls are usually plastered.
After this, the walls can be finished with tiles, stone, or treated with latex-based paint that has good adhesion and moisture resistance.
You shouldn’t forget about insulating the door and floor in the dressing room. Please note that there is high humidity in the room. Here, water often gets on the floor, which can cause rapid rotting of the floor, so it is necessary to install water drainage and waterproofing under the floor. You can put a layer of insulation under the boards.
Features of insulation products
Manufacturers offer various membrane films that protect materials from high humidity. Experienced builders recommend purchasing vapor barrier upholstery with a reflective foil layer that does not allow heat to escape. The following types with a foil layer are distinguished:
- polypropylene;
- kraft paper;
- roofing felt;
- membrane;
- foil;
- coating
This film is installed with a large overlap (10-15 cm), and the joints are taped with foil tape for construction work.
In specialized departments of stores there is a wide selection of waterproofing products - foil-coated kraft paper, construction membrane and other products. Although you can save money and purchase regular plastic film or roofing felt.
Insulation for walls
Expanded polystyrene is stable, does not rot, does not allow moisture to pass through
Usually baths are made of wood. It is environmentally friendly, and it is easy to breathe in such a room. Less commonly, buildings are made of brick, foam blocks or cinder blocks. The latter material already has good thermal insulation properties due to the porosity of the block structure, but in winter the walls freeze. Brick buildings are practically never made.
The following are used as insulation materials for the wall:
- mineral wool;
- fiberglass;
- Styrofoam.
It is recommended to make a layer of polystyrene foam on top. It is highly durable, cannot be compressed, lasts a long time and does not rot.
A timber frame is attached to the walls. Each part is placed at a certain distance, which depends on the insulation material. A heat insulator and a layer of foil polystyrene foam are placed between the resulting slats. The finishing layer is applied on top.
Vapor barrier: which is better?
membranes, foil and foil materials, films can be used as a vapor barrier In principle, if there was no need to protect the thermal insulation layer, then the need for vapor barrier would disappear - the matter would be limited to ventilation and that’s all.
The main battles, of course, are over
foil. We recommend reading our article, which provides arguments regarding which vapor barrier is best for a steam room in a bathhouse.
In general, the need for foil, as well as the harm from it, cannot be considered unambiguous statements. Because a lot depends on what bath regime a person prefers. And it turns out that what is good for one is detrimental for another.
If we talk exclusively about vapor barrier, without reflecting infrared radiation, then foil is an excellent insulator; it does not allow steam to pass through completely. True, condensation falls on its surface and rolls down, but that’s why we leave the ventilation gap in order to ventilate the lining and prevent it from rotting from this moisture.
Membranes are different: single- and multi-layer, single- and double-sided, multifunctional... The essence of their action is not to allow steam to pass to the thermal insulator, but to pass in the opposite direction, allowing it to release absorbed water vapor from somewhere else.
Multifunctional membranes also act as both a heat and water insulator, and therefore are expensive. In multi-layered ones, moisture accumulates between the layers and then gradually evaporates.
Films are also different, so it is best to ask sellers what temperature they are designed for. You need ones that can withstand 100 degrees and above.
Finishing inside the dressing room
Typically, the finishing material here is lining, and both coniferous and deciduous wood can be used. But even those that successfully resist moisture require mandatory treatment with a fire retardant and antiseptic.
Covering the floor
So:
- Beams are placed on the waterproofing, their thickness is 3-4 cm, the pitch is from 30 to 40 cm.
- The floorboards are attached to the beams using the tongue-and-groove method; near the walls this is done with self-tapping screws, the heads of which must be deepened.
- Rubber mats are used as an additional covering.
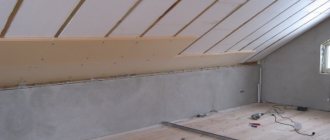
We are working on the ceiling and walls
First they tackle the ceiling, then the walls. The work goes according to this scenario:
- the sheathing is installed;
- the first element is attached to the wall opposite the entrance using a nail driven in at an angle of 45°;
- after checking the level, the following parts are installed;
- beams, the thickness of which is 4 cm, are attached to the wall;
- the covering starts from the corner, the actions are similar to ceiling installation;
- The last stage is fastening the skirting boards and installing the platbands.
The dressing room is ready, now all that remains is to think about how to decorate its interior. Others believe that we should not forget the traditions of our ancestors, while others strive for novelty in everything.
It’s not difficult to build a dressing room in a bathhouse with your own hands, and if you built the bathhouse yourself, then the operation won’t even take you much time.