How to properly clean the drain in a shower stall with your own hands?
The drain is not such a complex product, it is simple in its design, like a nail, it is difficult to install, the screed must be correct, plus the drainage angle, plus a smart tiler who knows that the drain should be just below the level of the tiles.
You can go from simple to complex. You need to remove the ladder grate, it can be easily removed, if not, then bend the wire with a hook at the end, insert it into the hole or slot of the ladder grate and pull it towards you (up).
The grate has been removed, there is a kind of jumper in front of us, if you pull it towards you, you can pull the drain out of the sewer pipe. True, sometimes the elastic band “sticks” and it’s difficult to pull the ladder out; try swinging it from side to side and pulling it up at the same time.
Normal drains are equipped with so-called traps; when you remove the grate, clean them; hair and all that usually collect there, and they clog the drain. You can use a short wire, but if the traps are clogged, then most often a finger is enough.
A more difficult option is cleaning the pipes that lead to the ladder. It is not possible to disassemble them, they are under a coupler, all that remains is to work with a special cable, there are cables with a brace at the end, and there are ones for a drill.
The cable can be inserted both into the pipe that goes under the drain, and into the pipe that connects to the drain pipe of the drain.
I don’t recommend pouring any chemicals; you can simply “kill” all the plastic pipes and end up with expensive repairs, including removing the screed and making a new one.
Well, the last option, maybe you will be lucky. The drain has been cleaned, now we go to the farthest point of the general sewer system, for example, to the kitchen, open the hot water tap and pour for an hour, boiling water dissolves the fat in the pipes, don’t worry about the pipes, they can withstand this temperature.
When independently arranging hygienic premises in a country house, in a house, in an apartment, we most often strive not to save money, but to remodel the space to suit personal requirements. That’s why we often choose not ready-made proposals, but install a shower drain in the floor under the tiles and build a unique shower stall. With all the desire to achieve an ideal result, not all of us know how this work is done. Do you agree?
We will share with you all the subtleties and nuances of installing a shower without the usual tray and standard designs. We will tell you about the types of plumbing drains, guidelines for their selection and the materials required to implement the idea.
The article we presented contains all the answers to the questions of independent craftsmen and customers of construction team services. The process of constructing a shower with your own hands is described in detail. Diagrams, photos and video selections will greatly facilitate familiarization with the information.
How does a shower drain work?
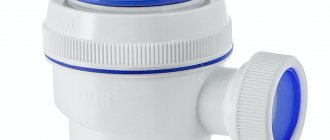
Shower drains (shower drains, drain drains) are a plumbing device that provides collection of waste water in shower stalls (showers) and drainage of water into the sewer system. ... The drain device forms a water plug that blocks sewer evaporation without mechanical valves.
Interesting materials:
Where can a conscript go to serve? Where can you put an old sofa? Where can you get from Kaliningrad? Where can you go by bus from Moscow? Where can you go by swallow from Moscow? Where can you go by train by sea? Where can you go without a passport from Russia? Where can you travel without a passport from Russia? Where can police officers travel abroad? Where can military personnel travel abroad?
Where is the best place to place the device?
The drain in the bathroom can be anywhere. Therefore, before choosing a ladder, you need to decide where exactly it will be installed. There are three installation options:
- Center. However, it may have a slight bias in one direction or the other.
- Corner. This option has its advantages. For example, it is practically invisible, and the slope should not be large. SNiP provides for its implementation in two planes. This ensures that water flows exactly to the corner where the drain is installed.
- Near the wall. In this case, the slope needs to be made only in one plane. This device looks great in the shower, passes used water well, and practically does not clog.
Replacing an old siphon: features
The specifics of replacing old sewer drainage fittings are no different from installing new ones. But there are some features for replacing the siphon, depending on the height of the pallet itself.
How to change the drain in a cabin with a high sump
Replacing a high pan drain is an easy task since it is located within easy reach. If it is a pipe system, unscrew one side, lifting it up to drain any remaining water.
If the fittings are made of solid stainless steel, unscrew them on both sides - from the drain into the sewer and the outlet from the pan. Replacement occurs in the same way as described above.
How to remove in a cabin with a low tray
It's worth being smart with the low position of the tray. If the siphon is in a box, then repairs are usually made. If the fittings lie on the floor, resting against it, it is important not to damage the attachment points of the pipes from the sewer and the pan. All work is carried out carefully, rags are used to absorb dirty water.
In the case of a tray with a water seal
A water seal is a practical solution to get rid of unpleasant sewer odors. At the same time, the water plug becomes an obstacle to the passage of air. The valve structure consists of 2 coaxial cylinders of different sizes, located one inside the other.
- The water is shut off.
- The elbow is removed from the sewer outlet.
- Using an adjustable wrench, remove the washer from the pan from the thread.
- The new siphon is unpacked.
- The drain valve is removed and its upper part is mounted on the outside of the shower tray, and the lower part is mounted to the bottom.
- The sleeve is unscrewed and treated with silicone.
- The siphon cover is attached to the drain outlet of the pan. The threads must match.
- An overflow is installed and the elbow is connected to the sewer.
Features of dismantling and replacement
Regardless of the type of siphon used, before changing it, you will need to stock up on sealing collars, as well as prepare the appropriate plumbing tools. Depending on the complexity of the device being replaced, you may need:
- adjustable wrench - in all cases;
- a set of screwdrivers (for removing decorative coating);
- metal scrapers (spatulas) necessary for dismantling the tiles.
The last two positions will be required if you have to disassemble the pedestal base to access the siphon.
With the first of the previously discussed siphon location options, all that remains is to buy a new device and install it in its original place, not forgetting to install new sealing gaskets.
In the second situation (manually controlled siphon), you should be well prepared for installation work by dismantling the existing decorative coatings. After removing them, you will be able to get to the siphon to be replaced.
In the case of automatic devices, the work ahead is the most complex and unpleasant, and they need to be given special attention.
To access the automatic siphon you will need:
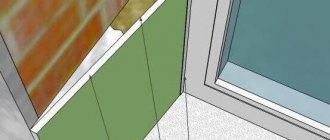
- Completely disassemble the cabin tray, if its design allows this.
- If you can’t remove it, try to disassemble the pedestal located underneath it (photo on the left).
- But first you will need to remove all the tile trim using a putty knife, and then remove some of the bricks or concrete blocks.
Only in this way will it be possible to get close to the device to be updated, and then remove it and replace it with a new one.
In conclusion, we note that it will be much easier to update the siphon if you take care in advance of taking dimensions at the place of its installation. In this case, no additional modifications or adjustments will be required.
Are you renovating your bathroom and want to connect the shower stall yourself? Agree, the comfort of taking water procedures and protection from accidental flooding of the bathroom largely depend on the quality of the installation and the serviceability of the drainage equipment.
Let's figure out how to choose the right drain for a shower stall, what parameters to focus on when purchasing a device. We will also provide a step-by-step technology for arranging a shower drain system.
The instructions for assembling and installing the equipment are accompanied by visual photographs for a better understanding of the process. The article is supplemented with videos about the nuances of installing shower drains.
Product installation rules
So, the shower drain is mounted so that its surface does not rise above the floor covering. SNiP provides for an optimal slope height, which is 1 cm for every meter of area.
If the floor is located on cold ground, it will require additional insulation. This will help avoid cracking and deformation of concrete due to sudden changes in temperature.
The slope is made by changing the thickness of the concrete screeds
Please note that during installation of the ladder you need to pay attention to the aesthetic design of the floor. That is, the product should be removed from the walls so that the distance is a multiple of the size of the purchased cladding
In this case, the thickness of the seams is taken into account.
Work sequence
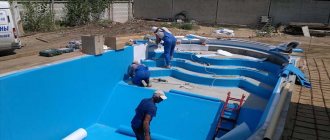
So, a drain in the shower is the optimal solution for designing a drain. You can install it yourself. This process involves the following sequence of work:
- Measuring the location of the ladder. For this you will need a tape measure.
- Connection of the product to the sewer drain. This is done using pipes. Their slope should be about 3 cm.
- Installation of the thermal insulation layer.
- Pouring concrete solution. According to SNiP, the layer should not exceed 4 cm. That is, it is necessary that the solution reaches the flange of the drain. If the shower drain is installed without a thermal insulation layer, then it is necessary to pour out the appropriate amount of concrete mortar. After this, it needs to be given time to dry thoroughly.
- Since the drain in the bathroom must be waterproofed, a gasket for the flange must be made from a special rolled material. Its diameter should be slightly larger than the size of the part.
- Attaching the top of the flange. It is simply laid on the waterproofing and fixed to the lower component.
Using special guides, a slope is formed in the floor
Pay attention to the waterproofing, which is partially laid on the walls to create a kind of trough
- Protection of the screed from moisture. The waterproofing film should extend slightly onto the walls.
- Siphon installation.
- Installation of guide rails, which are made of plastic. They are needed to ensure that concrete is poured correctly. Thanks to them, you can set the drainage slope of the surface.
- Pouring the second layer of concrete. Please note that this must be done so that the surface of the screed is slightly lower than the height of the siphon. Because later you will need to lay the tiles.
- The grille installed above the ladder can be protected using ordinary tape.
- Laying tiles.
- Grouting tile joints and sealing joints.
- Installation of protective grille.
You can do this work yourself. If you take into account all the above nuances, your shower will not only be beautiful, but also practical.
How to install a shower drain in a floor under tiles - installation guide
Cleaning glass doors
Most hydroboxes are presented with glass walls, which, with frequent contact with water, lose their original appearance. Glass models can be safely washed using special products to remove dirt from the mirror or glass. They need to be sprayed over the surface of the product, wiped with a sponge and wiped dry. You can use a special scraper to clean the glass cabin. It has a thick elastic band on one side and a sponge on the other.
A homemade solution is excellent for cleaning glass. Dilute 5 drops of ammonia in a glass of water. This product is perfect for removing soap stains. Some housewives also add 100 ml of glycerin, which helps protect the surface of the cabin from moisture.
Review of prices for different equipment models
The table provides a reference overview of prices for domestically produced models based on the results of monitoring offers from online construction stores.
| Type of equipment | Material | Average price, rubles |
| Horizontal with water seal | stainless steel | 2900 |
| plastic | 2200 | |
| Vertical with water seal | stainless steel | 4900 |
| plastic | 3700 |
Removing a clogged shower stall
Removing a blockage can be a rather long and literally dirty undertaking, which does not necessarily end with the desired result. If independent attempts to clear the drain are not effective or you basically do not want to do it yourself, you can order the removal of the shower blockage from the SES.
Sanitary service "Des Group" has been providing sewer cleaning services to individuals, companies and organizations throughout Moscow and the Moscow region since 2014.
Calculator
Calculate the cost of sewer cleaning
- All services are provided under a contract.
- You can see the result of the treatment immediately when removing the blockage.
- Cleaning methods are selected individually for each situation; the treatment does not harm the pipes.
- It is possible to eliminate blockages and dirt of any complexity.
- The work is carried out by experts who have special training to work with utility networks and plumbing.
To clarify the cost of the work and ask other questions you are interested in regarding the service, you can call the SES contact numbers.
Best answers
Pavel N:
Pour in Mole, it will dissolve your hair
Dovahkiin:
This cap is threaded. You just unscrew it and that's it. And then with a plunger.
Zhanna Korabut:
We had this thing in our shower, it unscrews, under it there is a regular drain, twist it, select the hair + Mole
Tane4ka:
Nowadays these are everywhere on modern plums. She stupidly wriggles out. Unscrew it, and there is a ball of your hair. I have the same problem at home, my daughter has braids. We unscrewed it once and don’t install it again.
Vladimir Petrov:
First, work with a plunger, then use tweezers to remove all the hair. And then pour baking soda into the drain and fill it with vinegar. Wait about five minutes and pour hot water over everything
Zaretskii Kostya:
Why do you need to twist and remove something? Does the water leave at least a little or not? If so, pour out a couple of bottles of “Mole” all night and rinse with hot water in the morning. If it doesn’t help completely in one go, repeat it the second night and that’s it. Or immediately buy some drug that’s cooler than “Mole.” The main thing here is that you don’t skimp on the amount you pour, and everything will work out.
Zhandos Zhandosov:
I do not even know
irina sichkova:
I found an interesting thing, similar to a plunger, only more serious, it’s called a “pneumatic plunger”, kerntool, I watched a review on YouTube, now I want to buy one for myself and I advise you to try it
Igor Chekerda:
Try pouring mole, but it’s not certain that it will help. Mole against fat. Most likely mechanical cleaning is needed. You probably won't be able to do it on your own. I recommend plumbers from santehnik-home /ustranenie-zasorov/. They do it in good faith.
Mirror
Many showers come with built-in mirrors, which require proper care to keep them clean and looking great. To eliminate stains on a mirror, you can use several methods:
- Apply lemon juice to the surface of the mirror, leave for 10 minutes and thoroughly wipe the surface with a soft cloth.
- You can mix water and ammonia in equal proportions. This product is ideal for polishing mirrors. You can use crumpled newspapers to rub the surface and remove streaks.
- Alcohol-containing products help deal with black stains. You can create a solution of water and vodka in a ratio of 10: 1. You need to moisten a cloth with this product and wipe the mirror. Crumpled newspaper will help eliminate stains.
Basic operating rules
To keep the shower stall clean and fresh, there are a number of rules:
- After taking a shower, rinse the walls and tray first with hot, then cool water to completely clean the shower stall from soap stains.
- Clean the walls of the box from moisture with a rubber scraper.
- Use a soft cloth to wipe the entire cabin dry.
- Clean the shower weekly with special gels.
- Clean your plumbing fixtures thoroughly every month, brushing every hard-to-reach area.
- Metal parts are washed and thoroughly dried each time after use.
Such regular maintenance will ensure that the cabin retains its original, radiant appearance. However, if the plumbing fixture is in a state of disrepair and has acquired an unpresentable appearance, prevention will no longer help: a more serious impact on the pollution will be required.
Drain care
The rules for operating a siphon are ensuring a constant temperature in the room, cleaning pipes and monitoring the temperature of drained water:
- hot water above 50 degrees will damage and deform the plastic siphon;
- if the room temperature is below 0 and water remains inside the system, the pipes will freeze and burst;
- Do not clean pipes with non-specific products that contain toxins. They will not wash out completely, and for this reason the person taking the shower runs the risk of inhaling toxic fumes;
- If the system is a pipe or bottle type in a house where there is no constant heating (dacha), then before wintering you need to first “mothball” the drain by unscrewing the siphon, pouring water out of it and covering it with a rag.
How to disassemble the siphon for cleaning
Sometimes additional cleaning of the siphon is required. To do this, you do not need to have professional skills, follow the recommendations:
- place a container under the siphon into which the water will drain;
- rinse the pipes with warm water and soapy water;
- Unscrew the nut from the outlet from the pallet, holding the bottom;
- lift the unscrewed side as high as possible so that the remaining water flows into the sewer;
- if it is a bottle type, then you can unscrew only the lower part of the trap - the bottle located at the bottom. If the siphon is a pipe type, unscrew the second nut connecting the device and the sewer outlet;
- clean and wash the pipe under running water;
- install the siphon in its original place.
It is easy to identify a malfunction of the siphon - if it is clogged, the water drains more slowly and you will notice the smell of the sewer. If any part of the device is deformed, then a leak forms, water stands under the tray, and a wet spot is visible after taking a shower.
Choosing a high-quality and reliable siphon for a shower stall is not a problem, knowing what to look for. Recommendations for choosing the required system should be considered individually, since the design of the tray, as well as the overflow itself, is different. Therefore, when purchasing a booth, you must immediately decide on the choice of siphon.
Trays with built-in siphon
Many samples of products called shower cabins have been developed, and there are no less options for their installation. However, this diversity comes down to the following options:
- A tray with a high pedestal, which has an inspection hatch that gives free access to the siphon. In a booth with this design, you don’t have to disassemble the tray to remove the siphon.
- The same option, but without a hatch. If it is necessary to replace the siphon, you will have to remove the decorative panel (aka apron, screen) or tile trim.
The available option involves fixing such a panel with latches, but a design with rigid fastening with self-tapping screws is also possible.
- And finally, the most inconvenient option for locating the siphon is to install it in a non-removable part of the pallet, which means you will have to remove the base (pedestal).
To facilitate this procedure, before purchasing, find out from the seller the details regarding replacing the siphon in a shower stall of this type. You will also need to understand the types of siphons to be replaced.
Preventing shower blockages
Preventive measures will not get rid of blockages on their own, but they will significantly reduce the frequency of their occurrence.
- Flush the shower drain once a week with 2 kettles of freshly boiled water or tap water if it is hot enough.
- If you drop foreign objects into the drain - cotton swabs, rubber bands, hairpins and the like, they must be pulled out immediately; they themselves will not go anywhere and will not leak away.
- Once a month, you can carry out preventive cleaning using special chemicals, according to the instructions indicated on the package.
Since hair is the key contaminant in a shower stall, a protective filter or sieve on the drain is a must. They will not get rid of blockages, but will slow down the pollution of the drain. If you don't want to keep the net in the drain all the time, use it only when you wash your hair, and then throw the accumulated hair in the trash.