During the renovation process, most wall cladding problems are associated with their uneven surface. This problem can be solved in two ways - leveling with plastering or plasterboard construction. Constructing a plasterboard structure using profiles is a very labor-intensive method that requires certain experience, skills and the availability of construction tools. However, it is possible to cover the wall with plasterboard without these profiles - by gluing it. There are several methods for gluing drywall to a wall, so let’s look at all their nuances and advantages.
Peculiarities
A universal building material - plasterboard - allows you to independently level walls, mount an interior partition and much more for little money and in a short time.
A sheet of drywall consists of two layers of cardboard glued together with a layer of gypsum. Standard sheet size is 2500x1200x12.5 mm. Such a sheet has an area of 3 square meters and weighs about 30 kg. You can find drywall in other sizes on sale. In practice, two options for fastening plasterboard sheets are used:
- using a steel profile;
- using special glue.
The first method involves installing a special metal structure for further fastening of plasterboard boards. This requires additional financial costs, as well as at least minimal installation skills.
To work with the second method, it is important to know how to glue the slab to the wall. Gluing plasterboard sheets can be done on any wall surface, you just need to remember that plasterboard is basically paper (albeit quite hard), and like any paper, it is afraid of moisture. Therefore, drywall is intended only for interior decoration.
Required materials and tools
Set of tools
To level walls with plasterboard using one of the adhesives, you will need much fewer tools than if a frame was attached to the wall. The list of everything necessary consists of the following items:
The simplest set of tools for frameless fastening of drywall to the wall
- A plumb line, a building level and a rule, preferably 1500 mm long, to control the evenness of the original wall and the created vertical plane.
- Electric jigsaw or sharp utility knife - for cutting drywall.
- Rulers of different lengths, a square, a tape measure and a simple pencil - for marking.
- Wide, medium and narrow spatula, as well as possibly a trowel (trowel) - for applying and distributing the solution.
- Construction float – for processing putty surfaces.
- Roller and brush - for treating walls with primer.
- Rubber hammer - for adjusting plasterboard sheets glued to the wall.
- Electric drill and mixer attachment - for mixing the solution.
- In some cases, a screwdriver will be required for additional fixation with self-tapping screws.
Drywall prices
drywall
Necessary materials
Now it is necessary to consider the materials that will be required to prepare the surface of the walls and for high-quality installation of drywall:
- Primer solution with antiseptic additives.
- Gypsum-based putty mixture, base and finishing.
- Dry construction mixture - drywall adhesive, or polyurethane foam.
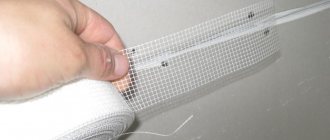
- Serpyanka mesh tape - for sealing joints between sheets.
- Long self-tapping screws may be required to level the wall by adjusting the plasterboard sheets. The size of the fastening elements will depend on the flatness of the surface, taking into account the fact that they must be recessed into the wall by 50÷60 mm.
- One of the leveling technologies will require pieces of foam rubber - this will be discussed in due course.
About some materials - a little more detail.
Drywall
produces not only a variety of building and finishing mixtures, but also plasterboard sheets for various purposes - this is a simple, moisture-resistant, fire-resistant and moisture-fire-resistant finishing material:
The main types of drywall used for interior decoration in various operating conditions
- Ordinary drywall (GKL or, according to the Knauf proprietary classification - GSP-A) is used for rooms with normal humidity.
- Moisture-resistant sheets (GKLV or GSP-N2) can be used to level walls in bathrooms or bathrooms. After treating such a surface, ceramic tiles will fit perfectly on it.
- Fire-resistant sheets (GKLO or GSP-DF) are used for finishing walls around fireplaces, stoves, and chimneys.
- Fire- and moisture-resistant plasterboard (GKLVO or GSP-DFN2) is well suited for finishing walls in boiler rooms of private houses, in attic and attic spaces.
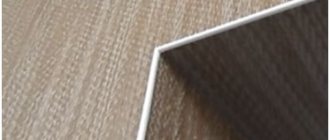
Here we can also briefly talk about cutting plasterboard slabs, which does not require much effort, experience or special tools - it is enough to have an ordinary sharp stationery knife on hand. The cutting process takes place in the following order:
Cutting plasterboard sheets is not difficult at all – you only need to be careful and precise in your movements
- The sheet is placed on a solid base - this can be a large table, floor or several stools placed side by side at some distance from each other.
- Then, using a tape measure or ruler, the sheet is marked, and the necessary lines are drawn with a simple pencil.
- The next step is to follow the drawn line, also along the ruler, with a knife, which should cut the top layer of cardboard.
- The sheet is moved to the edge of a hard surface and laid on it along the cut line.
- Then, pressure is applied to the edge of the drywall that extends beyond the base, which will cause the sheet to break along the cut line.
- The last step is cutting the cardboard on the other side of the sheet.
Calculator for calculating the required amount of drywall
Naturally, it is important for every owner starting such work to know how many sheets of drywall he will need to fully cover the walls. The convenient calculation calculator below should help him with this:
Go to calculations
Dry construction mixture - assembly adhesive for drywall
A few words need to be said about the adhesive composition for installing drywall sheets. The most popular for working with drywall are also German dry mixes, which have long been presented in a wide variety on the construction market and have earned the best reviews.
To work specifically with drywall, technologists have developed and craftsmen everywhere use a special composition - “Knauf-Perlfix”.
It is most convenient to use a special gypsum-based mounting adhesive - “Knauf-Perlfix”
This composition is made on the basis of gypsum, which is enriched with plasticizers, which ensure good adhesion of the solution to various materials and excellent strength of the coating after it hardens.
In principle, any adhesive mixture for frameless installation of a hyposkaton must have the following qualities:
- The setting time of the glue should be minimal.
- The composition should not shrink significantly during hardening.
- The freshly mixed solution should be homogeneous and plastic, easy to apply to walls and sheets of drywall using a spatula.
- The gypsum-based adhesive mixture should not expire, as it has a fairly “modest” shelf life. Usually it does not exceed six months from the date of manufacture of the mixture, so you must pay attention to this point when purchasing. It is not recommended to purchase such gypsum mixtures in bulk!
The mixed solution of gypsum-based glue must be used within thirty minutes, so you should not prepare it too much, because there is no way to “revive” it or dilute it after it has begun to set.
If possible, it is recommended to purchase all materials from the same manufacturer, as they interact perfectly with each other. But a solution made from Knauf mixtures is also perfect for drywall produced by other companies.
Prices for drywall adhesive
gypsum based adhesive
Polyurethane foam
This popular material today has versatile characteristics, and it is chosen based on the area in which it will be used. Polyurethane foam can have a different expansion coefficient and is intended for internal and external use, so when purchasing it at a hardware store, you should definitely study the data located on the packaging or in the certificate that the seller must have.
When choosing polyurethane foam for working with drywall, be sure to read the included instructions
In terms of its composition, polyurethane foam can be:
- One-component, ready to use. This mixture is sold in cylinders and is under pressure. It is made on a polyurethane basis.
- Two-component compositions are mainly used by professional craftsmen, as they require special equipment and precise adherence to proportions when mixing its constituent substances.
For household independent use, single-component foams are used. They consist of the following substances:
- Isocyanate, polyol prepolymers, which are the basis of the material.
- Additives - catalysts, stabilizers, substances that increase adhesion and regulate the coefficient of mass expansion.
Polyurethane foam has high performance characteristics, which are due to its following properties:
- Excellent adhesion to any materials - concrete, stone, wood, brick, metal, as well as polymer compositions.
- The temperature resistance of high-quality foam is from -40 to +90 degrees.
- The material does not conduct electric current - it is an insulator.
- Foamed polyurethane has high sound absorption rates.
- Relatively high speed of installation and drying, which varies from 8 minutes to a day.
- Non-toxicity of foam after completion of polymerization of substances.
- Low flammability of foam (fully fire-resistant materials are also produced).
- Moisture resistance.
- Shrinkage not exceeding 5% during operation.
- High strength - compression rate within 30÷50 N/mm².
- Very good thermal insulation properties.
- Elasticity and plasticity, allowing you to tightly fill various cracks and gaps. This quality of the foam prevents the destruction of structures during shrinkage of the structure.
The hardened polyurethane foam will serve as a kind of damper during deformations of structures
- An important parameter is the ability of the foam to expand. This process occurs in two stages - when the composition leaves the cylinder, and during the solidification period. For high-quality filling of gaps, the second stage of increasing the volume is especially important. However, here you need to feel the difference. For high-quality professional foam, the primary expansion is the main one, and the secondary expansion will be no more than 30-40%. But for household-grade spray cans, the situation is exactly the opposite - when applied, it may often seem that there is not enough material, but after secondary expansion, excess consumption becomes visible, which, by the way, can also result in deformation of the structure being created if there is no free exit for the foam. Therefore, it is much safer to use a professional-grade stump by purchasing a special gun for it - visual control of application becomes more objective.
— Another important selection criterion is the viscosity of the mixture, that is, its consistency, since this indicator directly affects the adhesion of the foam to the wall surface.
It must be remembered that the viscosity of the working substance decreases if the ambient temperature is below +5 or above +30 degrees, which will certainly negatively affect the quality of the foam, and therefore the results of work.
Polyurethane foam is available in cylinders with different volumes:
— 1000 ml — a professional version of the mixture, designed to fill large areas. The output is 85÷100 liters;
– 750 ml – 50÷65 liters;
— 500 ml – up to 40 liters;
- 300 ml - 30 liters.
In order not to run into low-quality material, it is recommended to purchase foam from well-known manufacturers that have earned a good reputation - these are Ceresit, Soudal, Tytan, Penosil and others.
Types of glue
The choice of adhesive solution directly depends on the appearance of the surface on which the drywall will be glued.
In construction stores you can find special adhesive compositions that can be used when working with drywall.
- Ceresit is a tile adhesive, but it also glues plasterboard sheets well.
- PerlFix - allows you to glue drywall to porous surfaces such as brick walls. An inexpensive and easy-to-prepare composition that can be easily used for DIY repairs.
- Fugenfuller is a dry putty, diluted with water, mixed by hand, and applied thinly with a roller.
- Silicone glue. It is used when it is necessary to stick ceramic tiles or a mirror onto drywall.
- Knauf Fugen. This composition is used for gluing gypsum boards to wall surfaces that do not have defects. Has a plastic consistency. It is applied very thinly.
- Polyurethane foam. Convenient and easy to use material, inexpensive. For this reason, it is most often used when working with drywall.
GVL
GCR is a material consisting of a gypsum core and 2 sheets of cardboard. The elements are connected using glue. Cardboard is used as a reinforcing element. It also gives shape to the material.
GVL are gypsum fiber sheets. They consist of a mixture of gypsum and fluff pulp. Waste paper is mixed with water and sheets are made under a press, which are then dried. They are used to level surfaces and frame frames. GVL is a more durable material. Unlike drywall, it can be used to finish floors.
Finishing gypsum fiber board walls in a wooden house is more labor-intensive. Before screwing the screws into the gypsum fiber, you need to drill holes.
Otherwise, it is impossible to tighten the hardware due to the high density and strength of the sheets. Heavy objects can be hung on a wall covered with gypsum plasterboard: shelves, mirrors. This material is suitable for finishing a bathroom in a wooden house. GVL is not flexible, so it cannot be used for arranging shaped elements.
Scope of application
Surfaces intended for gluing gypsum boards are conventionally divided into three groups according to the material from which the wall is made.
- Aerated concrete slabs. They have a relatively smooth surface. The irregularities are small, no more than half a centimeter. Drywall can be glued to aerated concrete using any glue. The most common is polyurethane foam.
- Wall made of foam blocks. The surface of the foam block must first be well treated with deep penetration soil. Allow the foam block to dry well for 12 hours. Make holes with a diameter of 2-2.5 cm in the drywall every 40 cm, apply PerlFlix glue to the wall, then glue the drywall, and remove the excess glue that comes out through the holes with a spatula. This will ensure good reinforcement, which is important when using foam blocks.
- Brickwork. When gluing brick walls, apply depending on the appearance of the surface. For even laying, any glue can be used. For uneven brick surfaces, PerlFlix is ideal. Glue is applied to the sheets pointwise around the perimeter. The thickness of the glue layer varies from 5 to 30 mm, the distance between the “dots” should be approximately 30-50 centimeters.
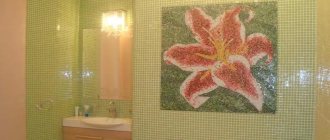
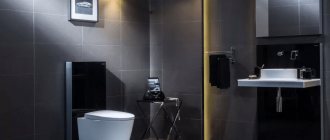
For the kitchen and bathroom, special moisture-resistant plasterboard is used.
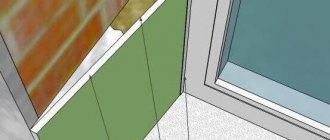
If necessary, drywall can be glued to a layer of insulation, for example, penoplex. In this case, the insulation is glued directly to the wall using any tile adhesive, and after drying, drywall is glued onto it.
On a note
Remember, if the wall’s unevenness reaches 10 cm, it is not allowed to glue drywall onto the Volma mixture, since the end result will not be of high quality: the sheet will not be able to fit tightly to the surface, and the adhesion strength will be impaired. And the glue consumption will be unreasonably high.
Correctly taking measurements of walls before gluing gypsum boards is the basis for high-quality installation
In such cases, it is recommended to carry out a standard installation of a metal or wooden frame. This installation method will allow you to additionally insulate plasterboard walls and hide cables and pipes. When using the adhesive method, it is not possible to carry out such work, or great efforts are required to drill special grooves for electrical wiring.
source: //gipsohouse.ru/walls/4158-kak-kleit-gipsokarton-na-steny.html
Among the many building materials intended for wall finishing, plasterboard
. It is environmentally friendly, as it consists of natural ingredients (gypsum and cardboard). In addition, gypsum boards allow you to achieve a finish that was previously beyond the capabilities of even the most qualified specialists. After installing the sheets, the surface becomes perfectly flat and ready for further work without first eliminating height differences. The material is in good contact with various types of finishes. But to do this, you need to choose the right adhesive for drywall, which will ensure maximum adhesion of the surface to the finishing components.
Cladding with plasterboard sheets: advantages
Facing with HA sheets is carried out in the following cases:
- surface leveling;
- improved heat and sound insulation;
- hide wires and pipes;
- surface decoration - creating niches, shelves, design with figured elements.
The plasterboard sheet has a flat surface; when mounted on a wall, it does not deform, but remains flat. This is convenient for subsequent painting, laying tiles, and wallpapering.
In various rooms with high humidity and high temperatures, the following types of gypsum boards are used:
- An ordinary room with moderate temperature changes is a gray gypsum board sheet.
- Wet room: bathroom, corridor in a private house, balcony, attic, kitchen - green sheet of plasterboard.
- A room with a working fireplace, a Russian stove, with a rough stove - pink gypsum board.
On the construction market there are types of floor plasterboard and facade plasterboard for outdoor work.
There are methods for attaching sheets to the surface - frame and without frame. In the first case, profiles are applicable. For the second method, you need to choose the right adhesive composition.
Advantages of gluing gypsum board to the surface:
- installation is easy and quick;
- less expensive method compared to frame;
- this method does not take away extra centimeters.
The negative side is the inability to hide wires and communications behind the casing.
We recommend: Do-it-yourself induction heating boiler: how to build a homemade unit
Gypsum-based mastic
Gypsum adhesive mastic means the base contains glue and lime. The glue is filled with the required amount of water and left for about 15 hours. During this period, its granules swell. After this time, 1 kg of lime is added, which must first be diluted with liquid, bringing it to a thick state. To achieve this consistency, the mixture is boiled using the steam bath method. You can resort to the services of a regular gas stove, setting the fire to low. After reaching the desired consistency, gypsum is added. This type of mastic has good adhesion properties. Setting time varies from 40 to 50 minutes.
Gypsum sawdust is prepared on the basis of sawdust and gypsum. Glue for plasterboard sheets of this kind has the consistency of food sour cream. To achieve this appearance you need to: mix sawdust and building gypsum in a ratio of 1 to 4. Next add a glue solution (1 liter of water per 25 g of dry mixture). The setting time for this ingredient is 1 hour.
Sulfate-alcohol mastic - in production, sulfate-alcohol stillage and water are used in a ratio of 1 to 4. Gypsum is added until the consistency of sour cream is achieved.
Special glue
Most hardware stores sell specialized drywall adhesives. It comes in 750 ml bottles. Experts recommend using it in the ratio: 1 cylinder per 15/sq. This substance should be applied along the entire perimeter, and then coat the remaining surface, forming stripes every 25-30 cm.
Its peculiarity is its fast setting. But use is permissible only in cases where there are no large differences in elevation.
Preparing the walls
- To choose the method of wall cladding, it is necessary to determine the curvature of the walls using a water level or plumb line.
- Protruding nails, screws, etc. are removed from the wall.
- The base is cleaned from the remnants of the old cladding to clean brick or concrete.
- The wall is cleaned of dirt and primed to increase adhesion.
- Lines are drawn on the floor along which the position of the sheets will be adjusted. In case of strong curvature, lines are also drawn on the ceiling, which will ensure high-quality installation of the sheets in the same plane.
Moisture-absorbent materials are coated with an agent that reduces absorption.
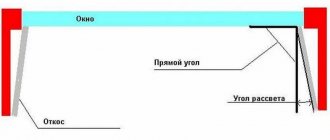
Marking
With the adhesive installation method, plasterboard sheets are usually installed vertically, which must be taken into account when marking the internal space. This is true for apartments with standard wall heights - one sheet 2.5 m long is just enough to cover the space from floor to ceiling. If we are talking about “Stalin” buildings or private houses, where the wall height often exceeds 3 meters, this rule does not work, so the sheets can be installed horizontally. The marking is carried out in such a way as to minimize the number of joints and symmetrically glue entire gypsum boards.
If the installation of drywall is carried out for the purpose of leveling the walls, you need to do the following:
- find the two most prominent areas and draw a line between them;
- retreat a distance equal to the thickness of the sheet from the first line and make a control mark;
- Using a building level or plumb line, transfer both lines to the ceiling.
Useful tips
Recommendations for working with adhesive and drywall will help you complete all the work efficiently - the walls will be perfectly smooth, and the fastening of the sheets will be very strong:
- Finish all work with electrical wiring before starting to level the walls using plasterboard.
- Drywall cannot be glued to lime plaster.
- Glue the sheets exclusively to the supporting base, and it should not delaminate or crumble.
- Dowels will provide additional fastening strength. Use 4-5 pieces per stove.
- Glue plasterboard to the walls at a temperature of +10˚ C.
- Leave the drywall to sit in the room where it will be attached to the wall for 2-3 days.
- Cut the plasterboard so that there is a gap of 10 mm at the bottom. This will protect the drywall from absorbing moisture from the floor.
- You can use different gluing techniques even on the same wall.
- If the base is made of gas silicate blocks, then apply the glue not to the plasterboard, but directly to the surface of the wall.
The frameless method of fixing gypsum boards to uneven walls has its advantages. To ensure long service life of the structure, the adhesive mixture and gluing method are selected correctly and the entire process is carried out according to a given algorithm.
Step-by-step instructions for gluing drywall to a flat wall
GKL adhere perfectly to surfaces whose unevenness is no more than 4 mm. Drywall is attached to such bases as follows:
- Start finishing from the corner.
- Make the solution according to the instructions on the package (Fugenfüller putty is most often used). Do not dilute a lot of adhesive at once, as it has a short shelf life.
- Apply glue to the gypsum board along the perimeter (along the edges) using a notched trowel. Make one or two stripes in the middle of the sheet. The application must be continuous if you plan to subsequently hang shelves on the wall. The glue should not come out at the joint.
- Place 2-3 pads on the floor along the wall, which will provide a 10 mm gap between the floor and the edge of the gypsum board. The support should not be solid, since air access is necessary for the adhesive to dry.
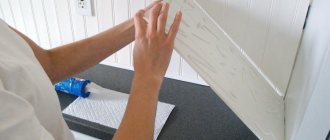
- Lift the plasterboard and press it against the wall, placing it on the spacers. It will be more convenient to take the sheet if it lies on the floor on 2-3 wooden blocks.
- Using a fist or mallet, align the gypsum board vertically, using the lines previously drawn on the floor as a guide.
- Install all the sheets in the room in a similar manner. Periodically check the evenness of the gypsum boards relative to each other using the rule. The seams should be tight and even.
- Don't forget about the holes for sockets and switches.
- The adhesive composition dries in approximately 3-4 days. After the glue has completely dried, remove the spacers and seal the cracks with sealant.
Advice! If gypsum board is used to level a wooden wall, then nails with wide heads can be used.
Common mistakes
The most common errors include:
- laying sheets of drywall with the front side facing the wall. They should be positioned with the front side inward. When the front sides of the sheets are combined, a recess is formed at the joints, which is convenient for treating them with putty;
- the formation of cross-shaped seams leads to a deterioration in the strength of the material. Plasterboard sheets must be installed with offset seams;
- the location of the screws is close to the edge. When temperature changes occur, the metal expands and breaks the plaster. The fasteners should be located at a distance of 10-15 cm from the edge and always not opposite each other on adjacent sheets, but offset;
- The screws are screwed in incorrectly. The cap should not stick out from the sheet, this will make it difficult to putty the seams. The level of the hardware can be checked with a spatula. If, when passing the spatula along the surface of the sheet, the head touches the canvas, then the self-tapping screw must be tightened;
- the absence of a compensation gap from the floor and ceiling can lead to the formation of cracks at the joints. The gap should be 30-50 mm.
How to fix drywall
The choice of installation technology depends on the degree of deformation of the base.
On flat walls
Concrete and plastered walls are ideally smooth. Gluing drywall to them is done without a profile.
- First, wiring is laid in the concrete wall, if necessary. In order not to create interference, a groove of the required size is made in the base, a wire is laid in it, and the empty space is covered with cement mortar. Holes for sockets and switches are made in the right places.
- The base is cleaned and primed. It is better to apply strengthening mixtures to a concrete or plastered base. A surface painted with oil or other dye must be pre-treated with an adhesive mixture with quartz filler.
- The material is cut to size, holes are made for sockets, if necessary. Conventional crowns are used, which are installed on a low-power screwdriver.
- The glue is mixed; its volume should be enough to attach a maximum of 1-2 sheets of gypsum board. For economical consumption and good adhesion to the surface, the mixture is applied with a spatula with a tooth height of 0.8-1 cm. Excess glue is immediately removed.
- Drywall is coated with glue and applied to the prepared base.
- The structural elements are lifted and wires are pulled under them into the cut holes.
- The sheet is carefully pressed against the wall and tapped over the entire surface for a more reliable adhesion. You can place a board on it and lightly tap it with a mallet.
We recommend: How to calculate the volume of a pipe m3 using the formula, what dimensions you need to know when calculating on a calculator
For moderately uneven walls
The technology is suitable for walls whose level curvature does not exceed a couple of centimeters.
- The base is prepared and primed. Electrical wiring is laid in the same way as the previous method. Drywall sheets are prepared in the same way.
- The adhesive mixture is being prepared. If there are uneven conditions, the consumption will increase. The composition is not applied with a notched trowel, but dotted or in heaps on the base. The mixture not only fastens the material, but also levels the walls.
- Drywall is laid on the lining and treated with glue. The points are placed along the perimeter in increments of 0.25 m; in the center of the sheet, the increment increases to 0.4 m.
There should be no uncoated areas on the back side of the gypsum board.
Gluing begins from the most uneven area. If the base is gas or foam concrete, then the glue is applied not to the sheet, but to the wall for more reliable fastening.
- If there is wiring in the wall, its ends are pulled into pre-made holes in the drywall. Afterwards, the gypsum board is pressed against the wall, its surface is leveled.
Big bumps
- Cleaning the surface of peeling pieces of plaster and old finishing; there should be no elements left on it that could fall off over time.
- The wall is primed. The soil strengthens loose areas and reduces the absorbency of the material. On surfaces with large uneven surfaces, the primer is applied with a paintbrush rather than a roller in order to better distribute the solution.
- Beacons are being prepared. Drywall is cut into strips 0.1 m wide. The number of strips depends on the area of the cladding. They are located along the perimeter of the base, as well as in vertical stripes in increments of 0.4-0.6 m.
- Markings are made along the perimeter of the base, beacons are placed along it and “sit” on glue, the layer of which is adjusted depending on the depth of the differences. It’s better to start by gluing the beacons horizontally, and after half an hour start working on the vertical elements.
- When gluing vertical posts, the level of the individual strip and the entire surface is controlled. The position of the guides can be adjusted until the mixture has completely hardened.
- After the glue that fixes the beacons has dried, the adhesive composition is applied to the gypsum board sheet along the width of the located guides. When the beacons are positioned correctly, the plasterboard almost immediately lies flat on the surface.
- The procedure is repeated with each sheet.
To save material, beacons are made not in stripes, but in dots. Then the upper elements are first set up, a plumb line is hung from them for vertical control, and the glue is coated not with the drywall, but with the wall.
What adhesive compositions are required for concrete floors?
It is rare to find monolithic walls with obvious and serious deficiencies that occupy a significant area. The sticker does not cause problems in most cases.
You can choose any variety of materials to install drywall with glue:
- Polyurethane foam.
- Polyurethane adhesive.
- Cement adhesive that helps to adhere tiles.
- Acrylic types of putties.
- Plaster putties.
- Gypsum adhesive, which is originally intended for plasterboard sheets.
For all these compositions, the size of the seams will be minimal, while the connection between the materials will be as strong as possible. Installing drywall with glue is as simple as possible.
“Betonkontakt” also has good characteristics. This is a type of primer with acrylic polymers and quartz filler. The presence of special additives and additives in the composition guarantees reliable adhesion to any surfaces, even the most difficult and dusty ones. You can glue drywall with another type of glue.
Finishing
Of course, installation of gypsum boards is not the final stage of interior finishing. Usually the walls are painted or wallpapered. Despite the smooth surface of drywall, the sheets need preparation before final coating.
Here is a step-by-step diagram of the work:
- If there are no factory chamfers on the edges of the sheets, they are cut out with a knife. The joints between the sheets are filled with a special putty for gypsum board joints. To do this, the composition is mixed in accordance with the manufacturer's instructions, and the joints are evenly coated using a narrow spatula.
- While the composition retains its plasticity, a reinforcing tape is pressed into it, which will be covered with a second layer. Read more about sealing seams here.
- Repeated puttying is carried out after 10–12 hours, when the first layer hardens. After this, the protruding surfaces are cleaned with sandpaper.
- Now the sheets need to be primed and wait for the composition to dry completely.
- Then the first layer of putty is applied, which must also dry.
- If the surface does not meet the requirements, priming is performed again and a second layer of the mixture is applied.
- After drying, the surface is treated with fine-grained sandpaper.
- At the final stage, another layer of primer is applied to the putty, wait until it dries and begin finishing the room.
You can learn in detail about all the stages of gluing drywall to the base by watching the video. The workflow is clearly presented here, which will be useful for novice craftsmen.
If after reading the article, viewing photos and videos, you still have questions, ask them in the comments: a gypsum board installation specialist will answer you.
Ceiling finishing
The base must satisfy the following conditions.
- Not made of wood. You cannot stick it on a wooden base, since the material can change its size, which will cause the sheets to quickly fall off.
- The base is level. If it is difficult to make a perfectly flat ceiling, you can level it with plasterboard beacons. The guides glued in advance will serve as a leveled frame.
- The concrete ceiling should have notches for better adhesion.
- There should be no condensation on the ceiling, it should not freeze or become damp. If the apartment is regularly flooded from above, this finishing method is not suitable.
- There are no greasy stains, the ceiling is not painted with oil paint. The base must be cleared of elements poorly fixed to it.
For the ceiling, plasterboard of minimal thickness and Perlfix glue are selected.
You can prepare a homemade composition from alabaster (58%) and bone glue (2%), diluted with water (40%).
First, the evenness of the ceiling is checked, and areas of strong differences are tapped with a mallet. To avoid the formation of cross seams, it is better to paste the ceiling in a checkerboard pattern. When gluing near door or window openings, the entire surface of the drywall is coated.
What you need to prepare for work
Tools
- Drywall knife, spare blade block.
- Drywall saw or electric jigsaw.
- Strong thread to create a level plane, nails or screws to secure to the wall.
- Construction level, plumb line, pencil, scraper for cleaning the edges of the sheet.
- Drill and whisk for solution, bucket for mixing.
- Spatula, hammer, rubber mallet, pliers, Phillips screwdriver.
Materials for work
- Sheets of wall plasterboard.
- Dry glue for working on drywall. It is allowed to use starting putty with the addition of building gypsum or PVA glue in an amount of 10%.
- Water and primer for surface adhesion.
- Dowels ranging in size from 80 to 120 mm.
- Mesh for gluing serpyanka seams and glue.