The last characteristic of this list was discussed a lot and fiercely on FORUMHOUSE, the conclusion is: “it does not add health.” Laminate emit formaldehyde even at normal temperatures, and as the temperature rises, the emission also increases. But many manufacturers have developed a special coating that is resistant to constant heating - such a laminate does not crack, does not form cracks, and behaves much better than a wooden floor, which is why people still choose it.
There is also now a laminate with enhanced environmental safety properties, E0. It is less common on sale than the more dangerous E1 and E2, but when choosing a laminate, you must take into account that a real, non-counterfeit product is quite expensive.
Which laminate to choose for hydronic underfloor heating?
Laminate flooring for water heated floors must meet certain requirements:
- The laminate must be durable and resistant to high temperatures (it is important to note that water-heated flooring is a low-temperature system). Such material will withstand various mechanical and temperature loads, will not deform, and gaps will not appear between the panels. Almost all brands of modern laminate flooring meet this requirement.
- The material must have high thermal conductivity. It has a low thermal resistance coefficient (CTR), not exceeding a value from 5 to 10 m2 K/W. Such a system will not overheat, the lower part of the laminate will not experience a large thermal load, and heat will quickly flow into the room. It is recommended to buy material that has a minimum content of formaldehyde (class E1, E0 or class 32-33) - a toxic substance that can be released from slabs at high temperatures (above 30 degrees). Choose laminate flooring labeled H2O.
- The coating must have increased water resistance.
- It is recommended to use plates with a thickness of 8 mm or more.
Marking – “permissive” sign from the manufacturer
Not all types of laminate will be suitable for laying over a heating system. Conventional lamellas have high thermal insulation characteristics. When heated, they will “block” the heat and may crack from the heat.
Special models are used for laying on the heating system. They are indicated by a snake-shaped pictogram; it can be found on the packaging or in the technical documentation. The maximum temperature to which the surface of the material can be heated is often indicated; in most cases it is 28 degrees.
Pictograms that “allow” installation on top of coolants
Additionally, the technical documentation indicates which type of heating system is best to lay laminate on. This may be indicated on the same labeling, for example, for a water system it is assigned “H20” or “Warm Wasser”. This is important, because not all coatings for installation on a water circuit will be suitable for electrical systems and vice versa.
Which underlay to choose for laminate?
It is recommended to lay laminate on a substrate. The substrate should conduct heat well, be 1.5-3 mm thick and have an average density, such as a special substrate with perforation.
Main functions of the substrate:
- The backing eliminates knocking and creaking noises that occur when walking.
- Makes the floor warmer. The substrate has a heat-conducting function; when purchasing a substrate, you need to take into account its characteristics so that the heat does not escape under the floor. The total TRC (thermal resistance coefficient) consists of the laminate and substrate coefficient indicators, it should be no more than 0.15 m2 K/W
- When laying laminate plates, the underlay levels the surface of the floor, as it is able to compress and stretch in the right places. It absorbs external pressure, taking into account that the laminate plates may move slightly at the attachment points.
- Using 3 mm polyethylene, you can reduce the echo of the laminate from 15 to 17 dB, using felt and polystyrene - by 20 dB.
- The substrate provides moisture insulation using a special film made of polyvinyl chloride, polyisobutylene or polyethylene with a thickness of 200 microns. In modern models, these materials are included in the structure of the laminate; sometimes they are purchased separately.
Types of substrate
The following types of substrates are suitable for residential premises:
- Polyethylene (cheap, used if the floor is flat).
- Expanded polystyrene (with high thermal insulation, moisture resistance, immunity to temperature fluctuations and mechanical stress).
- Cork (does not mold, does not wrinkle, retains heat well and absorbs noise). However, they are expensive and can leak moisture if you do not put plastic film under it.
- Bitumen-cork and combined substrates, consisting of several materials, have good characteristics, but there is a drawback - a fire hazard, therefore they are rarely used in residential buildings.
Important note! Do not confuse underlayment for water heated floors and underlayment for laminate flooring. Remember that the substrate is not a proper insulator.
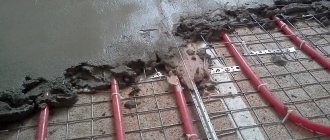
Installation of pipes on a concrete floor
If you decide to make a water-heated floor under the laminate yourself, you should know the procedure. Laminate can be laid on both concrete and wood surfaces. Let's look at the technology for laying water-heated floor pipes on a concrete base.
- The work should be done before installing the doors and finishing plastering the walls.
- You need to make sure whether the height of the doors in the living room allows you to install a heated floor, since its height is at least 14 cm (the height of the doorway is approximately 220 cm). It doesn’t hurt to calculate the heat loss at home using a calculator on the Internet - it should not be higher than 100 W/m2.
- It is necessary to make a niche in the wall and install a manifold cabinet above the floor, where there are no wires. If there is automation, then you need to make recesses for the electrical wiring and connect the main pipeline with the return supply. You can use an easier option: install a manifold cabinet on the wall, closer to the center of the house, and run pipes to it. If there is a project, then act according to it.
- Prepare the rough surface to avoid air pockets and traffic jams: remove debris, seal cracks, level the floor, removing differences (the norm is 5 mm). If this is not done, the hydraulic resistance in show jumping will increase.
- Waterproofing polyethylene film placed on the surface provides good protection from moisture.
- Install a damper tape with a width of 6 to 12 mm along the perimeter of the walls at floor level. This polyethylene tape helps compensate for the expansion of the screed due to heat.
- Lay insulation (expanded polystyrene, its density is 30 kg or more per cubic meter of surface area) with a thickness of 5 to 10 cm.
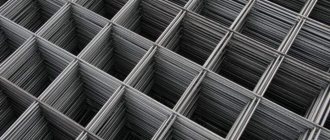
- Place a poppy mesh, polystyrene or special tape on the floor.
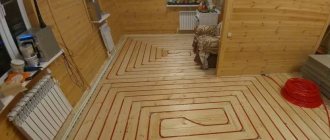
- Lay pipes without joints with a diameter of 16 to 20 mm in a “snake” pattern in narrow passages, and a “snail” pattern in rectangular rooms. The “snail” method has a number of advantages: less pipe needs to be bent, 90 degrees, there are almost no hydraulic losses, heat is evenly distributed.
You need to start laying the “snake” from the cold wall to the warm one, in steps of 100-300 mm. Pipes are placed 150 mm or more from the walls. If the pipe has a diameter of 16 mm, then the length of the loop is up to 100 m; if it is 20 mm, then 120 m. When laying in a “snail” manner, visually divide the surface into the main and edge zones. The step along the edges of the floor will be more frequent (10 cm), since there may be cold walls there; in the rest of the area – a step of 20 cm. If the room is large, then use 2 pipe loops. - Install a collector block and a heated floor mixing unit in the manifold cabinet. Connect the Euro pipe to the manifold outlets with cones, without confusing the supply with the return.
- Take a photograph of the floor surface with laid pipes so that you don’t disturb them later with screeds.
- We perform pressure testing of the system in this order: first we close the ball valves in front of the mixing unit, then we set the pressure with the pump, 6 atmospheres is enough, and check that everything is working properly.
- The cement screed (cement-sand mortar or semi-dry mixture) is poured under a pressure of 6 bar. It should be no higher than 4.5 cm from the top of the pipe. After 3 days, the operating pressure value is established, and only after 20-28 days do we supply heat to the pipes.
- After the screed has hardened, we set up the flow meters (the temperature should be the same on all return pipes) and set the necessary parameters on the pumping and mixing unit.
- If there is automation, then we install drives, a thermostat and controllers.
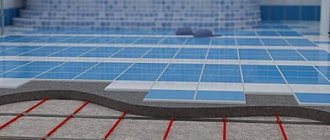
- We lay the underlay and laminate on the flooded water-heated floor.
How to install a dry floor on a wooden base?
A floor without screed can be made using two systems:
- Polystyrene plates;
- Wooden slats and modules
Polystyrene mats, smooth or with bosses, are laid on the wooden surface. If they are smooth, then you need to cut holes in them for laying pipes. This dry floor installation system is not very expensive and is very convenient. Most often, ordinary polystyrene foam up to 4 cm thick or expanded polystyrene is used. If the slab has bosses, that is, protrusions no higher than 25 mm, then polyethylene pipes (diameter 16 mm) are placed in the grooves and secured with mounting locks.
Modules can be bought in a store and assembled at home. The pipes are laid in recesses on the surface. The rack system is made from planks 2 cm thick and 130 cm wide with a pipe pitch of 150 mm (MDF or chipboard material). Often metal plates are also installed, which create a continuous warm field. At the end, the underlay and laminate are laid on the surface of the heated floor pipes.
Wet areas
Laminate is rarely used in wet rooms, but there are still fans of such solutions. In such conditions, it is not recommended to use infrared heating mats, since they are not covered with screed and all electrical elements are open to water.
Waterproof laminate is distinguished by the presence of water-repellent additives in its composition, which reduce the speed of inscription. Like regular laminate, it will warp over time when exposed to water. We discussed this issue in more detail in a separate article.
Installation of dry heated floors
If you have your own home with an autonomous heating system and want to install a heated floor on a wooden base, then this is possible. “Dry” technology is used, based on the use of heat-exchange profile metal plates. However, many argue that this method is ineffective; it is better to use the method with pipes filled with screed. It will be necessary to create grooves for pipes and install special equipment.
The process of assembling dry heated floors is much simpler than using concrete. Certain requirements must be observed during installation:
- Replace worn boards and clean the floor from dirt.
- Apply antiseptic impregnation.
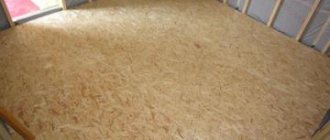
- Seal the cracks with wood putty, apply a thin screed where there are large differences in floor level, or cover the entire surface with plywood or OSB sheets, fitting them tightly together.
- You can place the insulation under the floor between the joists.
- Spread a polyethylene film (thickness 200 microns) for waterproofing, and use tape to connect the joints.
- Place the damper tape along the edges.
- Place the mats tightly against the walls and secure with locks.
- Apply glue to the joints and let dry.
- Mark the laying of pipes, the diameter of which is 16 mm per 80 m of the length of the “snake” contour and 20 mm per 100 m of the “spiral” contour.
- Place heat distribution plates made of metal (aluminum, steel or copper) in the grooves or between the bosses, and place pipes in their holes. Do not leave gaps between the plates. To level the entire system, place polyethylene backings at bends.
- Cover the entire system with a special film, fasten the pieces with tape.
- Lay gypsum fiber board or plywood and fasten the sheets together with self-tapping screws. Use a checkerboard pattern when laying 2 layers, connect the joints with PVA glue.
- Place the underlay on the water-heated floor, then the laminate plates.
Useful tips
Regardless of which system you choose, it is important to follow a few simple tips:
- PCB must be dried, with a maximum moisture content of 1.5 percent. Before installing the lamellas, warm up the floor, check the correct connections and the functioning of the entire system. You need to start heating 14 days before laying the lamellas.
- When the laminate flooring is completed, you need to turn on the heating according to the same scheme as for drying - a maximum of 5 degrees per day. It is allowed to heat the floor up to +27 degrees.