A stylish interior is as important for the bathroom as it is for other rooms in a house or apartment. Not the last place in this matter is occupied by the location of the washing machine. It is quite large, and the influence of the machine on the design cannot be overestimated. Below we will tell you how to arrange and cover it in such a way as to preserve the idea of arranging the bathroom and save maximum space.
How to sew a cover for a washing machine with your own hands
For these purposes, you can choose any fabric, preferably waterproof. If your goal is only to protect the washer from dirt, then you can choose regular oilcloth.
How to sew a case with your own hands? Measure the washing machine, leaving a small allowance. Do the work step by step, start by making a pattern. It must be taken into account that the front hatch and rear wall must always be freely accessible. You should also be able to use the control panel easily. To do this, provide folding curtains.
Consider the location of pockets, hooks, and Velcro that will hold the curtains.
Placement under the sink
In a small bathroom, the optimal solution is to install a washing machine under the sink. To do this, purchase a specially shaped washbasin, where the drain hoses and siphon are located not in the center, but at the back wall, leaving space for installing the device. Many manufacturers offer ready-made sink-machine tandems, and this is the most convenient option.
Using both the machine and the washbasin should be comfortable, so when choosing products yourself, you need to take into account the following nuances of this combination:
- The sink area should be 5-10 cm larger than the machine in size and completely cover the body of the device from water splashes.
- A gap of about 3 cm is required between the washbasin and the top side of the machine.
- The siphon must have two pipes and be located behind the machine.
- You should choose a compact, built-in model with front loading. The optimal size of the device is a height of up to 70 cm and a depth of 35-40 cm.
- The sink should be mounted on brackets without resting directly on the device.
If desired, the machine can be closed with a decorative door or curtain that matches the color of the walls or furniture.
Purpose
Products that fit onto washing machines are designed to perform the following functions:
- decorative,
- protective.
Most often, modern household appliances are offered to customers in black, metal and white, as well as in their combinations. With the help of accessories for the “washing machine” you will be able to diversify the usual appearance of the product and successfully fit it into the interior of the room.
For example, a marble-colored mantle will look good in a classic interior, while a floral design will look good in a Victorian-style room.
With the help of such textile products it will be possible to create a cozy atmosphere in the room and complete the previously created design. Moreover, it is worth knowing that there are absolutely no restrictions on the materials used to make car covers, as well as on their design.
But regardless of the material and type of cover, it must still fulfill its main purpose - to protect the washing machine from damage and allow it to fit beautifully into the interior.
With the help of a cover for a washing machine, you can achieve the following goals:
- protect the device from contamination, such as water marks or spilled detergents and cleaning agents,
- if household appliances are installed in the kitchen, then a protective device will help prevent oil, grease and brightly colored foods from getting on its surface,
- The cape protects the device from chips, dirt, scratches and other damage,
- prevents the penetration of water, debris, dust or household chemicals into the machine, because the surface of the device is often used as a shelf for a variety of detergents,
- it is possible to improve sound insulation,
- protection from children - the cape prevents small children from pressing buttons, as well as from coloring its walls with felt-tip pens,
- A waterproof cape is very helpful in cases where the panel is frequently exposed to water.
A carefully thought-out design of a protective product for a washing machine will allow it to harmoniously fit into the interior of any room, becoming a real decoration for it.
Features of repair and replacement of fasteners
All installation work on connecting water must be carried out with the supply to the apartment (house) shut off. There is an inlet tap in most residential premises. Where it is absent, a cut-off is made for the entire riser or in the well.
No repair work can be carried out while the machine is plugged in.
When going for new door mounting parts, you should take the old unit with you. Even on machines of the same type from different series, discrepancies occur. Sometimes it’s millimeters, but it’s impossible to replace it.
When repairing a drum or door, you need to check, at least superficially, the remaining components, open and clean the pump filter, and check the heating element for scale.
Installation, connection, fastening and ongoing minor repairs of components can be done even by a not very experienced person. As a rule, all it takes is a wrench, a screwdriver and some care. Here, as elsewhere, it is important not to overestimate your strength. If the breakdown is obviously related to the electrical part or electronics, it is better to seek the services of a specialist.
Did you manage to solve your problem using the recommendations from the article?
Yes!
46.8%
No. More answers required. I'll ask in the comments now.
37.47%
Partially. There are still questions. I'll write in the comments now.
15.74%
Voted: 718
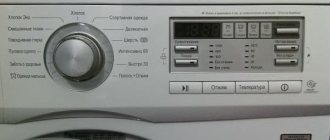
Electrical connection
How to connect a washing machine to electrical power correctly? To do this, use the following algorithm:
- The power of the washing machine is large, so it is advisable to install a separate switchboard line.
- Provide the outlet with grounding to eliminate static.
- Selecting a protective fuse. To do this, the power of the equipment (indicators from the technical characteristics) is divided into 220 V. The result obtained shows the amount of current consumed.
- Selection of RCD. Based on the current strength, it is selected by an order of magnitude higher than the nominal value of the machine. For a 16A machine, a 32 A RCD is suitable. Based on the current leakage, other characteristics are obtained. Devices connected to a separate line accept a value of 10 mA. Based on these characteristics, a 3.5 kW machine is compatible with a 16 A, 32 A, 10 mA machine.
- Socket. The socket for the machine is selected based on the markings on the back side. So, they find out the permissible voltage for which it is designed. If there are no markings, you have purchased a dangerous counterfeit and the socket should not be used.
Advantages and disadvantages
Like any thing, washing machine covers have their advantages and disadvantages, which are worth noting separately.
The advantages of using covers include:
- protection of the device from mechanical damage,
- child protection,
- protection against water ingress,
- giving a decorative look to the room.
Disadvantages include:
- deterioration of air circulation, which impedes the outflow of heat,
- the likelihood of mold and rust.
Since the advantages of using a cover are much greater than the disadvantages, many people use such a cover to protect their washing machine. And the correct use of covers will help to cope with the shortcomings.
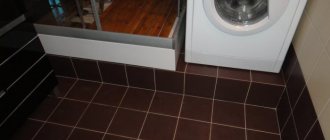
Placement under the countertop
A washing machine under an elongated countertop with a built-in sink looks harmonious and discreet. It is important that the depth of the machine body is slightly less than the width of the tabletop or coincides with it. There should be a small gap in height between the machine and the board so that vibration of the operating unit does not destroy the entire structure. Next to the machine you can provide a roll-out shelf for detergents and a drawer for linen. If the equipment does not match the color of the rest of the furniture, it is covered with a sliding door or curtain.
Examples of wall-mounted machines
Wall-mounted machines from the Korean manufacturer Daewoo can be considered ideal in terms of price/quality ratio. Chinese models from the Xiaomi brand are also quite popular. We'll tell you what you can choose from.
- The Daewoo Electronics DWD-CV701 PC washing machine has already been mentioned as one of the highest quality and affordable. The weight of the machine is only 17 kg, the width, depth and height are respectively 55, 29 and 60 cm. A maximum of 3 kg of things can be loaded into the drum per cycle. The machine is equipped with a digital display. The maximum permissible spin speed for the “wall” is 700 rpm. Six special modes include programs for washing children's clothing, delicate fabrics and cotton. The case is protected from leaks, there is a control system for imbalance and excessive foaming. The cost of the model is about 21,000 rubles.
- Incredibly stylish Xiaomi MiniJ Wall-Mounted White. Front machine for 3 kg of laundry. It is possible to control the cycle from a smartphone via a Wi-Fi network. The machine is equipped with a reliable inverter motor - due to this, almost silent operation of the washing machine is achieved. The weight of the device is 24 kg, dimensions are 58x35x67 cm. The maximum acceleration during spinning is 700 rpm. There are 8 special programs recorded in the memory, including a drum self-cleaning mode. There is a delay timer for the start of washing. The average price of a “wall” is 42 thousand rubles.
- Machine Daewoo Electronics DWD-CV702W. Another wall-mounted front camera for 3 kg. It can handle spinning a little better - speed up the drum to 800 rpm. Equipped with a digital display and partially protected from leaks. There are 6 washing modes programmed in the memory. Energy consumption class – “A”. Price approximately 23,000 rubles.
If a three-kilogram load does not suit you, you will have to hang a standard 5-7 kg front camera on the wall. Usually a narrow model is chosen, with a depth of 40-45 cm. We will tell you how to proceed in this case.
Stages of installation work
Once your new machine is delivered from the store, it is stripped of any packaging materials and shipping fasteners. Then the height of the legs is adjusted, and the machine is connected to communications. From this moment you can start the first wash.
Step #1 - Removing the Shipping Bolts
To prevent the moving parts of the washing machine from being damaged during transportation, they are secured with special fasteners (bolts, bars, brackets).
If they are not removed when turning on the machine, the owner of the equipment will be disappointed. It will inevitably fail. To prevent this from happening, the bolts are unscrewed, the plastic spacers are removed, and the brackets are removed.
Bolts are used to secure the drum during transportation. Before turning on the washing machine, the fixing parts are removed. If this is not done, the chassis will break.
Fasteners should be packed in a bag or box and placed in a safe place. They must be saved in case of moving or delivering the equipment to a repair shop.
Special plugs supplied with the device are inserted into the holes for the bolts.
Step #2 - connecting to the water supply system
The machine is connected to the cold water supply using the included flexible hose. A hard connection is not recommended, since vibrations will affect the pipes, gradually destroying them.
The reliability and durability of the connection to the water supply depends on the quality of the parts and the experience of the person doing the connection. When connecting to a metal pipe, a connection is made into the water supply using a crimp coupling or a mortise clamp.
A filter is inserted into the water inlet, which is included with the unit. The nut connecting the hose to the machine is screwed in by hand. The rubber seal ensures tightness. The second end of the hose is also manually (without keys) connected to the cold water tap.
The hose is connected to the water supply through an embedded pipe or tee. As a rule, it has a filter to purify water from contaminants. It is connected to the machine using a conventional threaded connection.
Step #3 - arrangement of drainage of used water
The temporary and simplest solution for organizing water drainage is to place the end of the hose into the bathtub or sink. Typically, waste water is drained into a siphon located under the sink through a splitter.
Experts do not recommend lengthening the drain hose, as this will quickly wear out and create an increased load on the sump pump.
The hose must be long enough to allow it to sag and form a loop. The water that will be in the fold will block access to the unpleasant odor coming from the sewer.
To properly connect to the sewer line, you need to connect the drain hose. This is done in one of the following ways: directly into the sewer or through a drain in a siphon under the sink.
To prevent water from draining by gravity and the spread of unpleasant odors, a water seal is created by bending the hose. Its upper level should be 60 cm above the floor plane. Detailed instructions for connecting a washing machine to the sewer and water supply are given in the following article.
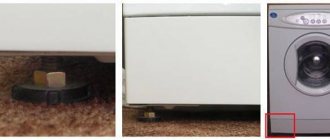
Step #4 - adjusting the legs according to the level
The rotation of the drum should be smooth, without distortions. This is achieved due to the strictly horizontal position of the upper plane.
The inspection is carried out using a building level. If the deviation is more than 2°, the legs will need to be adjusted. This is done by twisting them.
If the machine is not placed in a strictly horizontal position by adjusting the legs, it will “jump” and make loud noises, creating discomfort for others
To prevent the tightened nut of the leg from unscrewing, it is secured with a lock nut. Correctly aligned supports are one of the prerequisites for the correct operation of the washing machine.
Strong vibrations can lead to breakdown of individual parts of the machine and disable the unit. You should not level the position of the machine by placing pieces of wood, linoleum or other spacers under the legs, as they can easily jump out during operation.
Step #5 - connecting to power supply
The optimal solution is to connect to the panel using a three-core cable on which a circuit breaker is mounted. Protection against short circuit to the housing is provided by an RCD device.
The outlet also has special requirements. It is mounted above the floor level at a height that will not allow water to enter in the event of a leak - not lower than 30 cm. In addition, it must be grounded.
We recommend that you familiarize yourself with the principles of installing an outlet for a washing machine, which is supposed to be installed in the bathroom.
Correct placement of the outlet directly affects the performance of the washing machine in the future. Indeed, in the event of flooding, the equipment will be deprived of power supply, and the electrical point will require resuscitation work
Step #6 - Verify installation is correct
If all the steps have been carried out step by step, taking into account professional recommendations, and the machine is connected to all communications and the plug is inserted into the socket, then it’s time to test its performance.
And at the same time make sure that all actions are performed correctly. To do this, water is supplied and the operation of the unit is checked. those. it starts - washing without laundry. If leaks are detected in the hose connections, the nuts are tightened.
Compliance with a strict sequence of installation work, taking into account professional recommendations, is a guarantee that the machine will be installed correctly and its operation will not cause problems
Another important point to remember is preserving the packaging from the new washing machine. The fact is that it must be stored for 7 days in case of exchange if the machine turns out to be faulty, defective or damaged. The reason for the return may also be a discrepancy between the dimensions.
Pros and cons of a mounted unit
A mini wall-mounted washing machine has several significant advantages over its floor-standing counterparts:
- Quiet operation . One of the main complaints about washing machines is the loud noise during the spin cycle. The wall-mounted model makes sounds when operating, but they cannot be heard in the next room. You can do laundry at any time of the day without the risk of waking up your family.
- No vibration . Another problem that washing machine owners face is vibration. For a suspended model this would be truly dangerous, because... the structure may simply fall off the wall during the spin cycle. To minimize vibration, the developers of mini-units used special seals.
- Easy to clean. Floor-standing models eliminate the possibility of cleaning underneath them. To clean the floors, I had to move bulky equipment. There are no such difficulties with a suspended structure: nothing interferes with general cleaning.
- Ease of loading . To put laundry in the machine or get it out after washing, you don’t have to bend over, which is inconvenient, and it’s also painful for older people with bad backs or pregnant women. If you install the mini-machine correctly, you can load things with maximum comfort.
- Economical . Washing programs are reduced, so water and energy consumption is minimal.
- Ergonomic design . The models are compact and stylish looking. The design is designed so that the device does not clutter up the space, and thanks to the rounded corners it is impossible to get hurt on the machine.
The disadvantages include a small drum volume and not the highest quality of washing. Such models are really not suitable for a large family, and they wash and spin sometimes worse than floor-standing machines of class A. But small-format equipment is indispensable if you need to quickly put things in order after a working day.
By and large, the main disadvantage of a wall-mounted washing machine is its high cost. Poor people who don’t have to wash things in large quantities can afford such a purchase.
Installation and connection may be difficult. It is difficult to install a mini-machine yourself, even despite its low weight and the presence of manufacturer’s instructions. There are few specialists with experience in such work, because the model appeared recently and is not particularly popular. This automatically leads to an increase in the cost of the service.
The compact electric assistant is ideal for a bachelor's apartment. Single people who keep their house in order rarely accumulate mountains of laundry. They usually prefer to wash things as they get dirty. The drum volume is sufficient for a set of casual clothes or bed linen.
In small apartments, sometimes there is not a single extra square centimeter, and there is simply nowhere to install a washing machine. A wall model can be a real salvation
The hanging model is indispensable for families with small children, where mothers have to wash soiled things after every walk. However, you can hardly rely solely on the mounted baby. It is advisable to also have a voluminous standard model for washing bedspreads, bed linen, and blankets.
Using a curtain
A simple and affordable way to disguise a washing machine is to use a decorative curtain, behind which you can hide both the unit itself and the plumbing lines. The curtain is chosen to match the tone of the wall tiles - variegated or plain, depending on the pattern on the tile.
It is better to choose curtains made of vinyl or textiles impregnated with a hydrophobic composition. They are more durable and have dirt-repellent properties. The curtain is hung on hooks or eyelets, installed on a straight or circular rod.