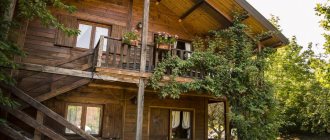
Garden gazebos are a wonderful element of small architecture, especially if they are made of wood. Small architecture can be a decorative element, as well as a place of relaxation for the whole family. If there is enough space in the garden, then wooden garden gazebos made of timber are the ideal choice. You can buy a garden gazebo ready-made or designed according to your own idea. Decide for yourself which solution will be the best.
What features does a timber gazebo have?
A wooden garden gazebo can have different shapes, sizes and uses. Ranging from small lightweight structures that can accommodate basic garden furniture such as a table and chairs, to more architecturally complex mini-models. Garden gazebos can have full walls, be without them or feature built-in pergolas. The latter solution will allow you to plant climbing plants and enrich the aesthetic experience while relaxing in the open landscape.
Regardless of the location and size of a wooden gazebo, it can serve as an outdoor dining area in the garden, as well as a children's playroom. In addition to their unmistakable decorative qualities, wooden gazebos can become a favorite place to relax after a hard day at work. In many cases, the garden gazebo is the most visible and visited place in the garden. Its main function is, first of all, relaxation, as well as shelter from excessive heat on summer days or from rain in cloudy weather. Out of season, a gazebo, especially one with full walls, can be used to store gardening tools and other less-used items. The gazebo can even stand in a small area.
Design
To decorate wooden buildings in the country, use elements that match the style:
- grilles made of wooden slats installed instead of glazing;
- carved details;
- elements imitating an aged surface;
- thin curtains for draping open openings.
Particularly attractive are buildings with ceiling chandeliers located in the center of the room. They are usually placed above the dining area. Summer houses are often decorated with hanging and wall sconces. Lamps that imitate antique wood or metal are very good. In a small summer building, large decor and pompous details are inappropriate. They take up too much space and overload the space.
Usually, in summer country buildings, a barbecue area or barbecue is installed. The choice is made in favor of simple models made of ferrous metal or brick stoves. They combine well with wooden furniture. When decorating a summer house, the space is not overloaded with decorative details and proper lighting of all areas is organized.
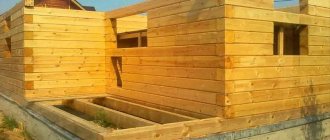
A summer building made of timber decorates the yard and makes relaxation at the dacha more comfortable. The correct shape of the building material makes the gazebo aesthetically pleasing, durable and comfortable. It combines well with any landscape design. It takes very little time to build it.
Gazebos made of timber 100x100: photos of closed structures
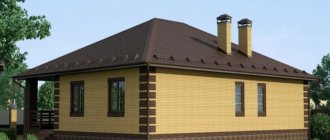
A closed gazebo is a garden house that can be used as a relaxation area throughout the year. Hexagonal, octagonal and even ten-sided enclosed gazebos are available. Companies specializing in the assembly of such structures often offer many additional options. An enclosed gazebo can be equipped with lighting, heating and specially selected furniture that will fit perfectly into a small interior.
You can choose from a variety of gazebos, from bright and cozy ones that are a nice little corner, to massive sizable ones that can become a meeting place for several people, even in winter. Often, manufacturers of timber gazebos offer to use an electric fireplace inside. In the case of garden houses, it is worth taking advantage of the offers of manufacturers who guarantee expert advice, assembly and, if necessary, can customize the appearance and functionality of the garden structure to suit your needs.
Installation of vertical posts, top trim
Using metal corners, vertical support posts are secured to the frame and are leveled. Diagonal rigidity and protection of the gazebo from folding will be provided by:
- covering the frame with sheet materials (wood boards or plywood);
- jibs in the frame itself.
The jibs are installed at an angle of 45-60 o, cut into the upper and lower trims. For fastening, only nails are used - hardened self-tapping screws do not work well for cutting.
Note!
Mauerlat is an element of the roofing system of a building. It represents a beam or log laid on top along the perimeter of the outer wall. Serves as the extreme lower support for the rafters.
Installed to evenly distribute the weight of the roof and reduce the load from accumulating snow. Fasten the harness to the posts with metal corners. They are made similarly to the lower harness from the same material.
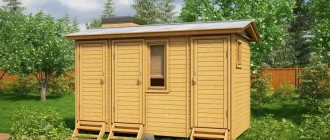
Gazebos made of timber for an open-type dacha
Open garden gazebos are the second main type of garden architecture. With these options, there is sure to be something for everyone because there is a wide variety available in the market. You have the opportunity to buy a ready-made gazebo in the chosen shape and adapted to an individual size and price.
Most preferably, octagonal and hexagonal arbors are represented. Usually these are light openwork models with windows, in the interior of which you can place basic garden furniture - a table and benches, additional chairs. This type of airy wall offers the opportunity to make the entire look attractive by planting climbing plants such as roses or ivy. Among the constructive solutions for open gazebos, we should highlight gazebos made of timber on stilts, walls with a pergola and much more. Among the types of open wooden gazebos, you will often come across small garden options. These are very easy to assemble structures, based on four piles or columns and openwork walls, which also act as pergolas.
Foundation
Having chosen a scheme and purchased the necessary material in accordance with it, construction should begin.
First you need to plan the land plot and prepare the foundation for the future building. For this, as a rule, a columnar foundation is used:
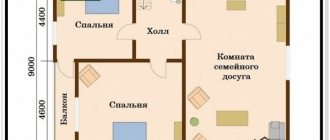
- It is necessary to remove the top fertile layer from the ground and make a drawing of the future structure of a 3×3 wooden gazebo on the ground itself.
- In the corners, in the center, as well as along diagonal intersection lines, holes should be dug for laying foundation columns. Their depth should be about 50 cm. There will be 9 holes around the perimeter, the distance between each one will be about 1.5 meters.
You should end up with 9 pillars at the same level, which evenly protrude from the soil. For accurate measurements, you can use a building level.
- A 20 cm thick sand and gravel cushion should be poured onto the bottom of the holes and compacted.
- Next, the brick is placed in the holes and strengthened with mortar. On top of the base you will need to lay two bricks on each pillar. If you use metric measurements, the height of the post should be 25 cm above the ground.
- After this, you need to install all the pillars level. To do this, you need to install reinforcement D 10-12 mm in the corners and fix it with mortar. Installation is carried out to a depth of 20 cm, so that another 20 cm is on top.
The line for drawing out the plane can be attached to the installed fittings
- The upper part of each pillar needs to be coated with mastic, and roofing material should be laid on top in a couple of layers. Then the holes can be filled with sand and gravel mixture and compacted.
Photos of timber gazebos with barbecue
Open gazebos are often equipped with barbecue facilities. These are large buildings made of timber that can accommodate about a dozen people. The roofs of this type of gazebo have ventilation, which allows smoke to escape from the barbecue or stove. Garden gazebos for barbecues can be purchased ready-made, but it is best to install them based on the individual needs of the garden.
Project development
Any builder knows that the main task before starting any work is to plan everything carefully. Preparation is an important part, so it should not be neglected. If you think through all the details in advance, you can not only significantly reduce all costs, but also simplify your task during construction, and also speed it up.
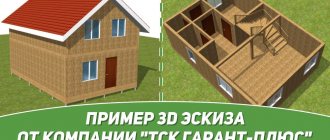
First, you need to make drawings of your future gazebo so that you know what it will look like and what kind of design it will have.
Transfer all your fantasies to paper, taking into account all the desired sizes. If design is not your strong point, or you cannot decide on a design, take help from the World Wide Web, where everything has been done for you a long time ago. There you can find many ready-made drawings and choose the one you like the most. Design
Also at the design stage, you need to decide on the following questions:
- Selection and preparation of the material from which the gazebo will be built.
- The type of foundation that needs to be built. Heavy closed gazebos must be built on a solid monolithic, strip or slab foundation.
- What type of roofing is ideal for your chosen gazebo?
- The choice of building architecture, since it can be different, it is better to choose one that would harmoniously combine with the overall picture of the design of a summer cottage or house.
- If the construction of a barbecue or barbecue is planned, it is necessary to plan the type, placement and design in advance.
- Each closed gazebo with barbecue or barbecue must be equipped with a good ventilation system and chimney, as this is clearly stated in the fire safety rules.
- In order to eliminate various misunderstandings in the future when installing lighting fixtures and installing a washbasin, it is important to design the electrical and water supply if you want to have communications in the gazebo.
- At the design stage, it is important to consider the glazing option and window design.
DIY gazebo made of timber: garden pavilions
When searching for a gazebo design to suit your garden, you will also come across the term garden pavilion. Garden pavilions made of timber are nothing more than a large and spacious open gazebo. It is very well suited for large gardens, enriching the architecture of the backyard landscape. A garden pavilion consists of a roof on four pillars or pergolas, so it is easy to make it yourself.
Roof of the gazebo-pavilion made of timber
The simplicity of the assembly design allows you to change its position depending on your preferences. In addition to wooden pavilions, there are also pavilions with fabric canopies, the so-called garden tent. The fabric is stretched over a steel pipe or wooden structure. You can also find solutions based on polyester or plastic.
Fastening roofing material
Each roofing material has its own installation characteristics. Installation of roofing shingles involves the use of:
- copper or galvanized nails;
- copper drainage products and sheets.
Copper matches the color of the roofing shingles. Reed involves attaching sheaves to a solid base made of waterproof plywood, sheets:
- chipboard;
- Fiberboard.
How to care for a gazebo made of timber?
When you have a beautiful wooden gazebo in your garden, you must remember to care for it properly. A garden gazebo lasts for many years, so it is worth taking care of the wooden structure. In principle, such garden architecture is protected from weather conditions by the manufacturer. Even if the wood elements have been previously impregnated, subsequent maintenance is important.
It's worth buying wood preservatives. The product is applied to well-cleaned wooden elements in sunny weather. Do not soak or store wood outside in high humidity conditions as this will be ineffective.
You can choose, for example, wood oils. They protect and care for the wood without changing its natural character. Wood oils are designed to protect your garden gazebo from adverse weather conditions. In addition, such preparations prevent cracking and contamination. Often the components of wood oils are natural waxes. Another way is to apply paint. Varnish protects wood not only from water, but also from scratches. It provides longer lasting protection than wood oil, but the natural material does not look as natural.
A garden gazebo is certainly not only a decoration for the yard, but also a very practical solution. The gazebo must be selected in shape and size for the place where it will stand. The design should not overload the landscape, because it affects the aesthetics and its decorative effect. Before making your final choice, think about what functions the gazebo will perform in your garden and whether it is enough to simply install a pavilion made of timber, or maybe you should invest much more in arranging your garden?
Step-by-step instructions for building with bricks
Building a foundation for a gazebo is not difficult. First you need to choose a suitable fundamental structure, because there are only a couple of types that are suitable for brick structures.
If your gazebo has only a couple of columns that hold up the roof, then you can get by with a simple columnar fundamental structure. If you want to build a closed gazebo, then you should think about a more reliable foundation, strip or monolithic. Consider the construction of a strip foundation structure of a brick gazebo:
- First of all, you need to prepare for work. Choose a place to build and move on to the foundation. Clear the selected area and level it as much as possible. Mark the future fundamental structure along the thread.
- Then you need to dig a trench. To fill the foundation, you need to dig a trench of at least 50 centimeters.
- Next comes backfilling. Before pouring the fundamental structure, it is necessary to partially backfill the trench. To do this you will need bricks, granite rubble or pieces of cinder blocks.
- At the end, the solution is poured. Pour concrete solution into the already formed trench. Then move on to creating a reliable reinforced belt.
Important! The work is completed. All that remains is to wait until the foundation hardens and move on to creating the walls. It will harden for about 20 days, at a temperature of 20 - 25C.
Creating a floor
The floor in the building must also be reliable and strong. Therefore, a concrete floor is the best solution in this case. Laying the flooring is a simple matter of pouring mortar. All manipulations associated with pouring the floor can be easily completed in one day.
Step-by-step work:
- First you will have to level the surface of the earth. Grab a small shovel and start working! Also make a shock-absorbing cushion of sand or gravel. Remember that the area under the brick grill is deepened by 25-30 cm so that the concrete underneath is thicker.
- Afterwards, reinforcement is performed for the future barbecue structure. Your building must have a durable floor. For a reliable tie under the grill, take the 14th reinforcement.
- Place it at a distance of at least 3 centimeters from the surface of the ground.
- Then make a screed. Prepare a solution of crushed stone, sand and cement composition. After mixing, screed the floor of the building with a thickness of 10 - 15 centimeters.
You can also lay decorative tiles on top of the concrete screed.
Construction of columns and walls
After the strip foundation structure has completely hardened and is moisture insulated, begin laying out brick columns and walls. As a solution, you can use a cement-sand mixture with a ratio of 1:3. After the first brick layer has been laid, it is best to make an additional layer. layer of waterproofing. The first rows of brickwork need to be measured; to do this, use plumb lines and levels. Detailed job description:
- First you need to form the columns. Take a pipe of the required diameter and cover it on four sides with bricks. Columns are erected to the entire height of the building, right up to the roof.
- Next you will need to reinforce the columns. After removing the pipe, the space between the bricks must be filled with the mixture. This must be done to avoid distortion.
- Then you need to start laying the walls of the building. Lay out the walls to the required level where the window will be installed in the future. Make the top type of brick trim. To do this, install a corner or channel between the columns, on which lay the top row of brick materials.