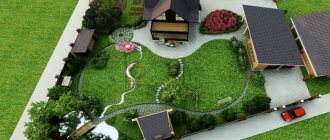
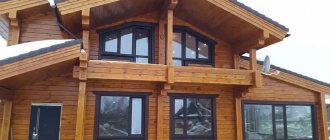
The faster industry develops, the more people try to get closer to nature. He surrounds himself with nature not literally, but by creating the illusion of being in the air, even if he is relaxing in the living room. This is the desire not only to live in a house that is built from natural raw materials, but also to come up with an appropriate interior design. Therefore, everyone strives to use hand-made wooden decor in their home in order to feel like a real owner.
The fashion for wood appeared a long time ago, but now not everyone can furnish their own home in the style of the TV series “Twin Peaks”. The room should not be oversaturated with wooden furniture, furs and animal heads. This already speaks of the bad taste of the owners. These blanks are available for forest areas, but for steppe areas, finishing a house in this style will cost a pretty penny. There is an option to dilute the usual surroundings with rare inclusions of wooden cuts, which result in absolutely any image. You can create such a design yourself, spending only on fastening materials.
Advantages of decorating the interior with wood cuts
Wood cuts surprise at the same time with their visual appeal and the complexity of their creation from a technical point of view.
Now let’s see what advantages wood finishing has:
- Durability. If the wood can be properly processed and is protected from moisture and various mechanical damage, then it will last quite a long time. If it is a whole wooden wall or floor, then you can save on annual repairs.
- Thermal insulation. Firewood is a source of heat not only in a fire. The raw material has the ability to maintain temperature, so for a cold concrete apartment this is the best type of insulation, albeit partial. In winter, such an insulated floor will warm any feet.
Decorative tree made from branches
- Uniqueness. You can, of course, hang wallpaper with images of wood cuts, or lay laminate flooring, but in such pictures a pattern is used - a simple repetition of one module. Natural finishing with saw cuts is a composition where each element is unique. The pattern on the saw cut and its shape are unique.
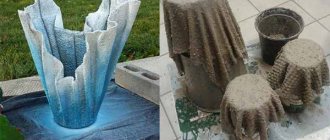
Flowerpot
In order for all the pots to be identical and original, you can make a flowerpot with your own hands. You will need a minimum of effort and a maximum of desire and good mood.
Flowerpot made from branches
To do this you need:
- Dry twigs.
- Saw on wood.
- A skein of twine thread.
- A piece of burlap.
Step 1:
To begin with, take dry twigs and use a wood saw to make them all approximately the same length.
cut the branches and tie them together
Step 2:
Then we wrap the flower pot or flowerpot with a piece of burlap. Secure it with any glue.
Step 3
Take the previously prepared branches, tie them together with twine so that the branches do not fall apart (see photo)
We wrap a piece of burlap around our old flowerpot
Step 4:
Then tie these branches around a pot or flowerpot and secure it with a bow.
Use a rope to secure the branches around the flowerpot
Creating a designer wall
For decoration, it is advisable to choose one side of the room. The design of all planes is a sign of bad taste, and the room will look overloaded. Any room needs to be given air, and it’s not about the windows. It should breathe space, and light empty planes give this effect. Only one “woody” edge of the room will become a kind of accent, which will become its mood. You can lay out the “wood puzzle” yourself, and now we’ll talk about how it’s done.
Everyone has a dead tree in their yard that needs to be removed. Now it's time to chop it down. We take a branch and cut it into bars of medium thickness. You can remove the bark from the resulting “pancakes” and then sand it. Thanks to this, you will not drive a thorn when touching the wall. The resulting wood layers should be treated with a special insect repellent, and then placed on glue. It is advisable to varnish the resulting relief - varnished wood can last a long time.
On a note! Create a composition from branches of different sizes, starting from a massive trunk and ending with the thinnest branches. The composition breathes due to the voids formed between the cuts of different sizes.
Preparation of material
To prepare high-quality parts, you will need to know how to use a hacksaw or circular saw to get a neat cut of wood.
Material procurement procedure:
- selection of wood (knots, branches, logs),
- removal of bark and sawing in the transverse direction,
- grinding the cut, drying, polishing,
- treatment with compounds to reveal the texture of the pattern,
- treatment with anti-rot compounds, varnishing.
Working on blanks will require time and skill. The result will be beautiful parts for making a wide variety of products. There are many options for products made from end-cut wood, ranging from crafts for children to home or garden interior items.
For further work you need a jigsaw and glue, and additional decorative elements if necessary.
Wall panel - a piece of nature in the interior
You can find a panel made from any components, but you haven’t seen a canvas made of wood, have you? Contrasts are welcome here, so feel free to even use hemp. The picture should not look like a pattern, but a full-fledged composition with a dominant and secondary elements. Make tonal gradations and place accents using tone. For the proposed product specifically, it is better to leave the bark - it will make it more attractive. The careless terrain will create the atmosphere of an endless forest and transport you into it.
It is advisable to sketch out a rough sketch, but if you like to improvise directly during the work, then go ahead. For a bright contrast, assemble the canvas frame from simple planks, this will give the picture lightness. The cuts are sanded on the side that is adjacent to the wall for better gluing. Leave the other side untouched - this will add naturalness to the overall picture. The wood cuts limited to a frame in the interior will look like a window overlooking the forest. The frame collects the composition into one whole and groups it.
Option #5. Branches for bouquet decoration
Floral arrangements always evoke special admiration. And there is nothing surprising in this, since each such composition is unique. Let's look at how to decorate a bouquet in an original way using branches.
Stylish bouquet decoration with branches
To work you will need:
- the branches themselves (including those with leaves);
- decorative tape;
- flowers;
- pruner;
- wire cutters;
- decorative wire.
What you need for work
Step 1. First of all, the branches are cut - they should ultimately have the same length. Then a couple of pieces of wire (also the same length) are cut and folded in half. A stick is placed between the pieces of wire; one turn must be made on each side. This way it will be securely fixed.
The sticks are fixed with wire
Step 2. The remaining sticks are added one by one.
Forming a path from sticks
Step 3. The ends of the wire are securely fixed. The result will be a kind of path made of sticks.
Ready-made path made of sticks
Step 4. The finished path is laid on the table, branches with leaves and flowers are evenly distributed on it (as in the image below). The distance between them should be small. After this, the track curls, but not very tightly.
Distribute flowers and twigs with leaves evenly
Step 5. The ends of the track are connected using a small piece of decorative wire.
The path is twisting
Step 6. The composition thus obtained is decorated with a bright satin ribbon.
The composition is decorated with ribbon
Step 7. The finished composition is placed in a low glass container filled with water. Thanks to this craft, even the simplest and most monotonous interior will be transformed, filled with freshness and lightness!
Place it in a low glass vase with water.
Difficulties in laying out a modular floor
This type is quite complex, so it is better to be patient and get to work. Choose thick trunks to avoid the formation of large voids when laying out circles. Hardwood logs are selected to make the floor, because the floor is exposed to impact every day.
There are two reasons that will make you sweat:
- Solution. If you put all the parts on glue, then the floor will not last long, even if you cover it all with varnish. Modules will begin to fall off due to constant pressure. You will have to use a solution, possibly cement-based.
- Leveling the surface. If the thickness of each element does not play a big role in the design of the vertical plane, then for the floor this is the main condition. It is necessary to adjust all the modules to the overall thickness, and start grinding after installation. The procedure will take quite a long time, because achieving a smooth surface is not easy.
Next, start covering the finished surface with varnish. It will protect it from pests and external influences. The floor is easier to clean, and it will last longer in a “protected” state. An unprotected surface can be attacked by pests or it will simply begin to rot due to excessive moisture.
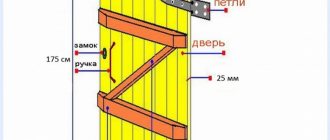
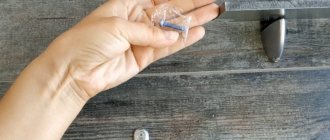
Hangers
To create this functional decor you will not need a lot of materials, and the practicality of such a product is difficult not to appreciate. So, you will need a wooden frame and several tree branches with knots.
Stages of work:
- You need to assemble a wooden frame of the size that will be needed for the future shelf. You can take a ready-made open shelf as such a frame;
- Now the frame needs to be fixed to the wall;
- Cut the branches into several parts according to the height of the shelf;
- Place each branch with the branch facing forward so that you can hang something on it, like on a hook.
There is another option for creating such work:
- Draw a tree with spreading branches on the wall;
- Now you need to select the material according to the drawing. You can cut out elements of the required size from the boards;
- The material must be prepared for use: sanded, treated with a special compound or varnished;
- Next comes installation of the material directly on the wall;
- All that remains is to attach the hooks to the branches.
The first option is more compact, the second will require more space.
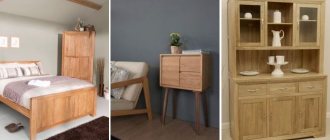
Creating home comfort with homemade furniture
Furniture looks completely different depending on the type of raw materials available. Tables and chairs are made, since the silhouette of the cut itself already resembles a small table or chair.
There are two basic principles for creating furniture:
- Modular - assembly of an element from small parts (modules). Actually, we are already familiar with this method. It allows you to create a product of absolutely any shape. Here it is also necessary to achieve a perfectly flat surface. Dishes will be placed on the table, and to prevent them from overturning, the surface of the table must be perfectly polished.
- Solid - a solid element is taken as a basis. This option is much simpler than the previous one in technical terms, but it is more difficult to find a large diameter bar. Things are better with chairs, but if you want a table where the whole family can dine, you will have to tinker with finding a large-diameter cut. The price of a dimensional cut is quite high.
It doesn’t matter what principle you apply to creating a product, the main thing is to immediately assess your capabilities so as not to spoil the material. Any method is good, because wooden furniture is famous for its strength and durability.
Frame for photo or picture
For the product we will need:
- White cardboard 2 sheets
- Polyurethane adhesive such as Strongman or Dragon
- Branches along the width of the future frame
- Photograph or drawing.
You should show your child how to measure the same distance from each edge of the cardboard sheet so that he can outline the frame.
The next step is best done by an adult. Use a utility knife to cut out the resulting window. We get the basis for attaching the twigs.
It is better for an adult to adjust the branches to the intended size. The frame can be made of short or long sticks, alternating them in a certain order. You can trust your baby to pick up and arrange twigs - an excellent exercise for fine motor skills.
We apply glue to the first rod from the bottom side and secure it to the cardboard base. Apply glue to subsequent sticks from the bottom and sides, which will be in contact with the previous rod. We cover the entire surface of the cardboard base.
We attach a photo or drawing to a single sheet of cardboard, and glue the finished frame on top.
Kitchen ideas based on semicircular cuts
This figure is an unusual piece of decor and a reliable assistant in the kitchen. The material can withstand high temperatures and does not heat up as much. From saw cuts you can create simple one-piece stands and modular ones, the material of which is easier to find. Everyone has seen such stands in a store and thought “No, you can’t do this yourself” - a wrong opinion. Why pay more if you do it yourself?
The kitchen will be complemented by fancy semi-circular shelves, which can be put together from solid cuts of wood, dividing them into two parts. The illusion is created that the “round block” is in the process of sinking into the wall. An interesting technique is if the shelf is round, this creates visual movement. The effect is achieved due to the dynamic relief on the bark. Cookbooks or personal collections of the housewife's recipes will harmoniously be placed on the shelves. And the product will withstand quite a lot of weight, even if its dimensions may not inspire confidence.
Remember! If this is a stand specifically for dishes, then it is better to make it one piece. Joining small parts involves gluing, and glue is not compatible with high temperatures. The stand will simply fall apart into several parts.
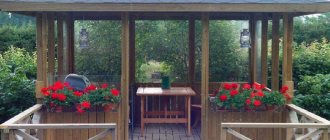
Bench
DIY wooden crafts for the garden have always been very popular. At the dacha you can always find a large amount of wood, which is perfect for creating something.
To increase comfort or equip a small gazebo, you need to make a bench. For a small bench, 2-3 classic-type pallets are quite enough. You will also need:
- Hammer
- Nails
- Sandpaper
- Dye
- Wood varnish
Initially, you need to disassemble one pallet by removing the support bars from it. This blank will serve as a backrest for the future bench.
The existing beams must be vertically attached to the whole pallet, forming legs. At the bottom between the legs you need to place a support bar, this will increase the reliability of the structure.
On one side of the tray with legs you need to make a small cut at an angle, this is done so that the back is attached to the base at a slight angle, this will increase comfort.
Also, the backrest is attached to the base by armrests on both sides.
All joints must be securely fastened with nails; the use of self-tapping screws is allowed if additional equipment is available.
When the structure is assembled, it needs to be sanded; it is recommended to use a grinding machine, this will save time and improve the quality of the work performed. Next, the bench is painted and varnished. After drying, it can be used for its intended purpose.
Wood detail as an accent in the interior
Small inclusions of “forest” in your usual surroundings will mentally bring you closer to nature. Saw cuts in the interior are used as decoration and perform certain functions.
We create fancy accents with our own hands:
- Watch. The unusual use of sawn wood in any interior looks nice. Especially if it is an uneven circle with bark on the surface. The bark is fixed, because it can deteriorate over time. The more careless the wooden “pancake” looks, the more interesting the watch will be.
- Flower vases. Give free rein to your imagination and use different types of branches. An ornament made with your own hands from small branches looks expensive, and no one will guess that the vase cost you pennies. It will harmonize with the design and will resonate with items with similar decor.
Remember! There should be few things made from identical material in the room. They should resonate with each other, but not look like too much.
- Frames for mirrors. When creating a product, it is important to adhere to rhythm or metricity, but chaos will be inappropriate. Alternate large cuts of wood with small ones, or make the entire frame from circles of approximate size. Any of the options will be correct.
Making a floor from saw cuts yourself is quite possible. Not to mention small interior items that can be made in a minute using wood, glue and your imagination. Surprise your friends with a tastefully decorated home and make your life more comfortable. This is an environmentally friendly product that will benefit your health. If the product is made of pine needles, then the light pine aroma can even help you treat a cold.
If you can handle the floor, then decorating an entire wall with wood will seem like a matter of five minutes. You will need to use your own taste and knowledge of composition, although most people trust their instincts.
Everything will work out, just “assemble” these products and secure them with glue, or simply cut out a solid object. Create an image in your head and try to bring it to life. You do not need special knowledge or skills; adhere to the basic rules for choosing materials and processing tools. After all, why spend a lot of money on a designer’s work if you can handle this task yourself without spending a penny.
Crafts and toys for children
You can make many different crafts from saw cuts for a school exhibition or kindergarten.
Toys made from this material look original: stylized animal figures, play furniture.
Many ideas for New Year's crafts from saw cuts can be found on the Internet: snowmen, snowflakes, flowers, decorations with a pattern applied to them.
From coniferous wood cuts you can make unusual Christmas trees that will not only decorate the room for the holiday, but also fill the house with the aroma of pine needles.
To make a classic triangular-shaped Christmas tree, you will need a frame of thin slats. Round blanks should be placed inside the frame, the voids should be filled with transparent glue or epoxy resin.