Are you just about to build your house and are looking for an unusual and energy-saving project? Then it’s time for you to think about a pitched roof, which is also called asymmetrical or asymmetrical. This differs from a regular roof in that its two slopes have different lengths or angles of inclination.
Most often, a gable roof with different slopes is implemented when it is necessary to create a single complex from a house and an extension, although recently the classical canons of roof construction have begun to be forgotten and about ordinary architectural tasks. Want to know why? This is interesting!
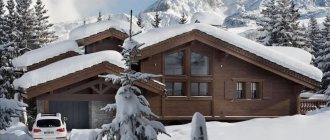
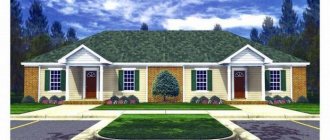
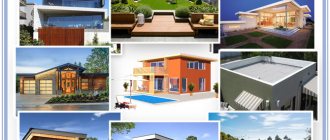
One-story houses
Photo: trendir.com
The project of the original small cottage in the photo was implemented on the island of Terschelling in the Netherlands. This is a summer house made of cedar beams, designed for relaxation by the sea. It stands out against the backdrop of the dunes with its very unexpected design. This type of architecture is a good example of how the topography of the landscape determines the height of the house - the sea should be visible from the attic windows.
The small summer house in the photo is a wooden architecture originally from Austria. The building is “dressed” in wood from the tip of the roof to the ground - the plank cladding of the facades extends to the roof and looks very unusual. The cottage's gable roof has no overhangs and perfectly completes its minimalist appearance.
Photo: Chartered Architect
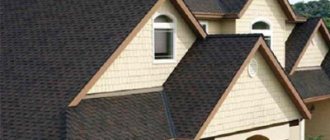
The most common version of a wooden prefabricated house in Scandinavian countries is a cubic-shaped cottage with a gable roof and a glazed pediment.
Photo: trendir
Two slopes with different slopes are a rational solution for a small frame house with an attic, allowing you to illuminate the attic space and organize a full-fledged bedroom or children's room there.
Photo: Painted Rusted Roofing
The gable seam roof is organically woven into the design of private houses, bathhouses and gazebos in country style, sheathed with colorful rustic boards.
Another example of architectural harmony is a one-story log house under a colorful seam roof with fragmentary rusting, made in production conditions.
See also: Cottage interior design: 60 photos in a modern style
Basics of geometry
To understand how such a roof is constructed, you need to consider these properties and compare photos of the two types of structures. Since we are talking specifically about the gable variety, in a profile section this shape always forms a triangle. The upper ceiling of the building is the base of the figure and serves as the supporting surface of the structure. The roof slopes are the sides of the triangle.
Looking at the symmetrical roof (first photo), you can see that the inclined surfaces are equal in length and are at the same angle to the base of the triangle. The ridge, hiding the intersection of the slopes, is located exactly in the center of the building and passes through the axis of symmetry. A multi-slope design is characterized by different lengths of slopes and different angles at the base (second photo). This concept is the result of a geometric transformation. There is a proportional relationship between the elements of the triangle. If you change one, all the others are changed.
Photo No. 1 - gable roof with identical slopes
Based on this dependence, the roof structure under consideration has two main parameters: the length of the slopes and the slope. Using this name, the latter value would be correctly calculated as a percentage. To do this, you need to calculate the tangent of the angle at the base of the roof, multiplied by 100%. However, for convenience and quick understanding, degrees are most often used as a unit of measurement. Thus, each slope of an asymmetrical roof is characterized by a separate length and slope.
Photo No. 2 - roof structure with different slopes
Two-story houses
The versatility of a gable roof lies in the fact that it can complement the architecture of a house built from any material: wood, brick or concrete.
Photo: proroofingsv.com
For private estates that include several buildings, multi-level gable roofs with the same slope are best suited.
The gable roof of the main house can be combined with the hip roof of an extension - porch, veranda, terrace or garage.
See also: Hip roof: 65 photos of private houses
How to calculate the angle
The slope of the slope is used when calculating the elements of the rafter system. It is defined in degrees or percentages, so you need to do some math.
A gable roof in cross-section is an isosceles triangle (if the slopes are the same). It can be conditionally divided into 2 right triangles. One of the sides H is the height to the level of the ridge, the other L is half the span of the house. They are measured against the finished walls and gable. It is necessary to calculate the length of the rafter B, which can be found based on trigonometric formulas.
Tangent of the slope angle relative to the horizontal:
tgα= H/L
Using the Bradis table or using an engineering calculator, we find the corresponding angle value in degrees. For example, the roof height is 3 m, the width of the house is 9 m, half the span is 9/2 = 4.5 m.
tgα=3/4.5=0.6667
This tangent corresponds to an angle of 34°, that is, the roof has an average slope. You can use the cosine function and calculate the length of the rafter as B= L / cos 34° = 4.5/0.829 = 5.42 m.
Also, information about the angle of inclination is needed to navigate roofing materials.
To calculate the length of the rafters (and check), you can use the second method - the Pythagorean theorem:
B²=H²+L²= 9+20.25=29.25, from where B =√29.25=5.41 m is the length of the rafter (without overhang).
To prevent precipitation from getting on the walls, you need to add at least 40 cm for overhang. We obtain for our building a minimum rafter length of 5.81 m with a slope angle of 34°. For convenience, you can take B = 6 m, which corresponds to a standard board.
Ultra-modern gable roofs
Photo: homedit.com
The architecture of the one-story house is created on a contrasting combination of ultra-modern metal frame with continuous glazing and reed roofing. Metal beams seem to grow from under the thatched roof and symbolize the symbiosis of progress and tradition.
Photo: contemporist
The originality of the modern cottage in the photo lies in the absence of any covering on the gable roof. Both the walls and the roof of the house are cast from monolithic concrete. An interesting detail of the architectural concept is the square and rectangular slots in the roof slopes, which provide access to light onto the balconies and terraces.
Photo: Daily TV-Shows for You
Rusty metal in the design of the house in the photo is not a sign of neglect of the building, but a stylish trend of recent years that came to us from America.
The cascading roof project in the photo was created on the basis of a gable structure and implemented using artificially aged corrugated sheeting.
See also: Beautiful interiors of cottages: 60 photos inside country houses
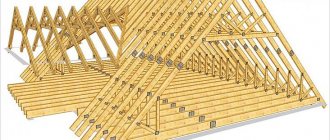
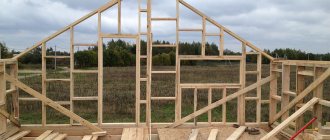
Types of rafter systems and their installation
The choice of roof truss design is determined by the configuration of the building. If there are no internal capital partitions, a hanging rafter system is constructed.
If there are permanent partitions, it is necessary to use a floor installation scheme.
Manufacturing of rafter pairs
This is the name of a pair of rafter legs connected into an arch with the installation of a spacer element in the form of a tie for a hanging system or a crossbar for a decking system.
Installation of rafter pairs is carried out in three ways:
- Assembly is done at the top after installing the translations. They are covered with plank flooring nailed down.
- The formation of rafter pairs is carried out on the ground in the immediate vicinity of the house. Only blanks that represent a rigid triangular structure are assembled. Lifting of products is carried out when the rafter pairs are ready for the entire system. For this purpose, it is possible to use lifting devices in the form of a manual or drive winch, which represents certain inconveniences and additional costs. On the other hand, assembly on the ground is much easier and more accurate.
- The roof is assembled directly at the installation site in detail.
In any option, the rafter legs are mounted according to the template, which is the first truss. For higher assembly accuracy, it is advisable to fix the parts of the next pair to the previous pair with clamps.
When assembling rafter systems on the ground, all structures are made according to a template, which is the first manufactured truss. This makes the installation more accurate
Procedure for installing the rafter system
Prefabricated roofing elements are installed in the following sequence:
- First of all, you need to install the front rafter pairs and secure them with temporary fasteners. The most important point is verticality, which is checked with a plumb line. This installation procedure is possible when all rafter pairs are at the top.
Front rafter structures are installed first - A construction cord must be pulled between the opposite front structures to control the coincidence of the supporting surfaces of subsequent rafter pairs.
- Next, trusses are installed alternately, one on each side. Each arch is carefully installed in its place, its location in space is verified in all planes, and then standard connections are installed with the previous rafter pair. Intermediate trusses are mounted one on each side and connected with standard jumpers to previously installed structures
- After installing the last arch in the middle of the roof, you need to install all the connections according to the project and attach the ridge beam.
- It is recommended to connect parts using metal plates - flat and in the form of corners. It is better to connect the most loaded units with bolts, the rest with self-tapping screws. Nails are used only for initial fixation during installation. The rafter legs are attached to each other and to the Mauerlat using metal corners
Fastening rafter system parts
To reliably connect the elements of the roof frame, various auxiliary elements are used, made of galvanized steel up to 1.5 millimeters thick.
The use of additional fasteners ensures a strong assembly of the rafter system
When assembling using additional connectors, labor productivity increases and the strength characteristics of the structure increase.
Special fastening devices are used to connect roofing elements of wooden buildings. Thus, the upper joint of the rafters is often connected using a hinge. This is due to frequent movements of the building, including seasonal ones.
The hinged connection allows you to avoid large stresses at the junction of the rafters during seasonal movements of the log house
For the same purpose, sliding fastenings are used on houses made of this material.
A reliable sliding connection of the rafters with the Mauerlat relieves this unit from stress during deformations of the structure
Video: quick production of rafters
https://youtube.com/watch?v=Sgqey_eGAaA
Roof insulation
Before installing the sheathing, the roof is insulated. For this:
- The internal sheathing is filled from the attic or attic side.
- The vapor barrier film is stretched.
- Insulation is being installed.
- A moisture-proof film or membrane with one-sided permeability is laid.
Thus, in addition to insulation, a ventilation system for the under-roof space is created. It starts working after installing the coating.
It is more convenient to lay the insulation layer on the outside on the internal sheathing with a vapor barrier coating
In certain conditions, roof insulation can be done from the inside; this is not so convenient, but you can safely work in any weather conditions. The formation of the roofing pie is done in the reverse order. Each layer of insulation as it is laid must be strengthened in the openings between the rafters.
broken roofs
Broken gable roofs are usually used if the cottage design includes a balcony, porch or veranda. In this case, one of the slopes turns into a flatter plane above the extension.
Broken roofs of bright colors are colorfully combined with the rustic style of houses built from logs and timber.
"Fundamental" questions
If the foundation was not originally shared with the house, then make it as strong as the scale of the extension requires. For a massive stone veranda, it is better to build a strip one, for a log house - a columnar one, and for a frame - a perimeter beam.
Here is a good example of how to build a strong columnar foundation:
- Step 1. We dig holes in the ground up to 1 meter deep.
- Step 2. Next, we install pipes from rolled roofing felt in them.
- Step 3. We pour sand inside these pipes and then pour concrete. In the process, we pat these pipes on the sides, thereby replacing the work of the vibrator.
- Step 4. Now we install the ceiling. To do this you will need 6 bars 50x150 and 8 bars 50x100 two meters each. We make the ceilings along the contour, and in the middle of the beams, with a span between the boards of about 1 meter.
- Step 5. Now we lay down the floor boards, for which it is most convenient to use a regular inch.
Here's what it looks like in practice:
With walls it’s even easier; such a veranda is built no more difficult than any other extension:
Gable hip roof
A gable hip roof is also called a half-hip roof - it has truncated slopes and is optimally suited for regions with difficult weather conditions: heavy snowfalls, showers, winds.
An important feature of half-hip and hip roofs is the complex design of the rafter system, which significantly increases the cost of building a private house, especially if it has a complex layout, as well as extensions, bay windows, and balconies.
Influence of weather conditions on design calculations
Technological features come from the same geometric parameters. How the structure will withstand weather conditions depends on the slope of the slope. It is based on climatic data that the angle value that will ensure the reliability and durability of the roof is determined. A reasonable step when planning is to study the wind rose for the last 2-3 years in the local area.
From it you can judge the strength of the wind and its most frequent direction. On the side of the roof, where gusts come from in most cases, it is recommended to install a slope with a smaller angle of inclination. This will reduce the load on the supporting structure and also reduce the noise created by vibration of the roof.
Precipitation affects the calculation of slopes. In dry and warm areas, the angles may be the smallest and the lengths the largest. Areas with heavy precipitation require steeper slopes from the structure so that all moisture and solid precipitation leave the roof as quickly as possible, do not stagnate and do not create unnecessary loads. Roof angle ranges vary widely, from 11º to 70º.
Choosing a roof structure depending on the roof slope
Houses with an attic
Projects of houses with an attic are distinguished by the practicality of the planning solution - in such a cottage the entire internal space, including the attic space, is used to the maximum.
Window openings can be cut into the plane of the attic roof or be designed in the form of dormer birdhouse windows, as in the photo.
Photo: metalroofingsalesinc.com
The house with attics in the photo attracts attention with its modern appearance with echoes of rustic style. Here attics are provided not only above the first floor of the main building, but also above the garage.
See also: Beautiful mansard roofs of private houses: photos, design examples
Roofs from Ondulin
The gable roof made of green Ondulin looks harmoniously paired with wooden facades made of timber.
The two-story house with an attic in the photo was built in Colombia, and its modern architecture, which has some ethnic motifs, is successfully emphasized by a gable roof made of brown Ondulin.
The house on stilts in Malaysia is an interesting example of how traditional island architecture is combined with modern roofing such as Ondulin. The soft green facades of the cottage subtly harmonize with the darker, green color of the gable roof.
The architecture of a spacious two-story mansion in the Philippines received a second wind thanks to the renovation of the roof using terracotta-red Ondulin.
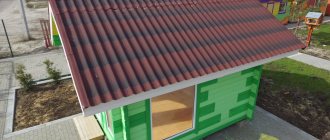
Ondulin is widely used in the construction of children's playgrounds - gable roofs for slides and children's houses can be easily assembled with your own hands.
A gable roof made of green Ondulin will add a cheerful accent to the design of a playhouse for children built on a country plot.
See also: Ondulin: Beautiful photos of house roofs, types of roofs
Instructions for performing work
Before making a pitched roof, you need to choose the right lumber for the rafter system and sheathing. In this regard, we will give the following recommendations:
- for a span of up to 4.5 m wide, rafters made of 15 x 5 cm timber are suitable, up to 6 m - from 200 x 50 mm boards, spliced in pairs or lengthwise;
- timber 150 x 50 mm will be used for the wall frame (mauerlat) and the beds;
- cross-section of racks, struts and purlins – 10 x 5 cm;
- the sheathing is made of boards 20-25 mm thick and 10-15 cm wide.
For waterproofing, you will need roofing felt and a superdiffusion membrane, and for laying the finishing coating, metal tiles, corrugated sheets or other roofing material. If we are talking about a residential building, do not forget about insulation: prepare mineral wool of the required thickness (or other insulation) and a vapor barrier film.
Laying the Mauerlat
The strapping beam should be placed on 2 opposite walls, where the rafter legs rest. If it is planned to support the layered system on internal partitions, then a board called a bench is also laid on them. The exception is log and frame houses, whose walls are ready for the installation of rafters.
The technology for laying Mauerlat on walls made of different materials looks like this:
- Studs are pre-embedded into the brickwork, onto which the strapping beam is attached. Before installation, the stone wall is covered with 2 layers of roofing felt. If the studs were not installed, then the Mauerlat is secured with anchor bolts or pulled together with steel strips.
- Before installing the Mauerlat, porous walls built from aerated concrete should be tied with a reinforced concrete belt, as done in the diagram. The studs for fastening are placed into the monolith during pouring.
- In wooden extensions (verandas, terraces) built with your own hands, to support the rafters you need to attach a second board of the same width to the top trim beam of the wall. To install the upper end of the rafter leg, you need to screw a horizontal beam 15 x 5 cm to the wall of the existing building. This operation is demonstrated in more detail in the video below.
Installation of rafters step by step
Before building the frame, you need to determine the actual length of the rafters, taking into account the extensions beyond the walls that form the eaves overhangs. However, the canopies can be extended after installation by nailing boards cut to size to the rafter legs - the so-called fillies. The minimum length of the roof overhang is 300 mm.
Then proceed in this order:
- To increase the internal partition to the height of the inclined plane of the roof, assemble a frame from vertical supports connected at the bottom by a plank and at the top by a purlin. The location of each rack must coincide with the pitch of the rafters that will rest on them. For stability, secure the frame with struts.
- Try the rafter in place and cut it from below at three support points in order to increase the area of contact with the Mauerlat and the beds, as shown in the photo.
- Install the rafter leg and attach it with self-tapping screws to the steel corners. Repeat the operation at 3 points, then move on to the next beam.
- Trim the legs of the eaves overhangs, and then sew them up from the bottom and sides with clapboard. It is more convenient to do this before the roof covering is laid.
If the side gables are not laid under the slope of the future roof, then they should be covered immediately after assembling the rafter system. Otherwise, you will then have to do this work from ladders or build scaffolding. For installation of a truss system for a pitched roof of a large building, see the next video:
Lathing and finishing coating
Before laying the boards on the roof slope, the rafter system is covered with sheets of super-diffusion membrane, which provides protection from wind and moisture entering the attic space. The canvases must be laid horizontally, starting from the bottom, and secured to the upper plane of the rafters with counter-lattice bars with a cross-section of 5 x 5 cm. The membrane should sag slightly between the rafters to drain water, and adjacent canvases should be glued together (the overlap is 15 cm).
The sheathing boards are nailed to the rafters in increments depending on the type of roofing:
- under metal tiles – 35 cm;
- for corrugated board and slate – 50-60 cm;
- Under shingles, bitumen and ceramic tiles, the sheathing is continuous.
The last step is the installation of coating and insulation (if necessary). Thermal insulation of a pitched roof is best done along the ceiling, leaving the unused attic cold. How to properly insulate ceilings is described in our guide.
Roofing from Onduvilla
Onduvilla's uneven terracotta-brown shade, combined with its characteristic relief, perfectly imitates the appearance of a classic ceramic tile roof.
The natural brown tones of Onduvilla perfectly set off the white facades and subtly combine with wild stone masonry, such as slate.
You can always choose a color for the roof from Onduvilla that will harmonize with the brick walls, be it beige, peach, terracotta or red brick.
The house in the photo with a gable multi-level roof made of sandy yellow Onduvilla subtly harmonizes with the surrounding nature: both due to the configuration and due to the tint palette.
Roofing from Onduvilla can emphasize the originality of Russian architecture - in the photo you see a log house with a green gable roof, which seems to merge with the natural environment.
The gable roof from Onduvilla became the logical conclusion for the design of a timber mansion built in the UK.
The photo shows a cottage community in China, where all the houses are covered with Onduvilla.
A wooden house made of pine beams, white joinery and a brown gable roof is a traditional combination for a country cottage in a country style. In this trio, an important place is given to roofing from Onduvilla under classic tiles.
The gable roof from Onduvilla became a successful addition to the painted facades of a summer house built in Korea.
See also: Beautiful brick cottages: 60 photo ideas
Metal roofs
Photo: nikas-trade.com
Metal tiles almost reliably imitate their ceramic counterpart, but at the same time they are much cheaper. Gable roofs made of metal tiles not only look catchy, but also harmonize perfectly with brick and log facades.
The photo shows a private house with a roof of an interesting two-level design, implemented using metal tile roofing.
Many color and texture varieties of metal tiles allow you to choose a roof for any architectural style: classic, modern or rustic.
Corrugated roofs
A gable roof made of corrugated sheets is a budget-friendly type of metal decking that has good wear resistance and a fairly beautiful surroundings.
Photo: cortenroofing.com
In the architecture of modern cottages, corrugated sheeting is often used not only as roofing, but also for cladding facades.
A fashionable trend in individual construction is gable roofs made of rustic corrugated sheets, which are subject to artificial rusting and aging.
Green gable roofs
Photo: Greenroofs.com
A green gable roof is an excellent option for a wooden country house - this way the building completely merges with the natural environment and looks simply charming.
Photo: mychickentracktor.com
In addition to its aesthetic appearance, a green roof has many advantages - it protects the house from cold and heat, purifies the air, and absorbs extraneous sounds. On such a roof you can create a small vegetable garden or flower bed.
In Iceland, on the Faroe Islands, houses are traditionally covered with a layer of peat and a green lawn is grown, and to make the grass easier to cut, the roof slopes are made quite flat.
Even the two-story office buildings in Tórshavn, the capital of the Faroe Islands, boast green roofs that set off the reddish-brown facades in an original way.
Photo: The Family Adventure Project
Black houses under gable green roofs - this architecture has a deep meaning. In the Arctic Circle, where the sun is a rare visitor, black walls absorb thermal energy as much as possible, and the soil cover on the roof helps retain heat inside the building.
See also: Beautiful roofs of private houses: photos, design options, views