Drilling wells is most often required when installing a water well, but in addition, periodically such work is needed: installing metal poles under a fence (gazebo, pergola), creating a field for collecting heat from the ground when installing an earth-to-air heat pump, when installing a columnar foundation and many other construction works. A small-sized drilling rig will facilitate and significantly speed up the processes. Having some welding skills, you can do it yourself.
Homemade drilling rig
Advantages of a DIY installation
- Relatively low cost. Ready-made drilling rigs are several times more expensive than their homemade counterparts. At the same time, a homemade mechanism will be in no way inferior to a more expensive factory-assembled installation.
- The technical characteristics of a homemade unit are fully consistent with factory-made equipment.
- Compact size and relatively light weight.
- Ease of use and maximum mobility. With the help of a small homemade installation, it will be possible to drill even in the most inaccessible areas.
- High speed of assembly and disassembly.
- Ease of transportation - a disassembled homemade drilling rig can easily be placed and transported in a light trailer.
How to choose a company from which to buy MGBU?
Purchasing small-sized drilling rigs is an investment in the development of your own business, therefore, a lot of money. MGBU, the price of which, of course, is not cheap, is not bought for one-time work. Therefore, the company supplying such equipment must meet certain requirements that help you choose the best and highest quality:
- extensive experience in this market niche;
- large base of regular customers;
- optimal cost of equipment;
- sufficient range of products;
- impeccable customer service.
- We are the only ones who can provide testing of MGBU, before purchasing MGBU and after purchasing MGBU.
The Drilling Technologies Plant offers you the largest selection of equipment with which you can easily and quickly drill wells with a small-sized installation . Our company is not only ready to sell new equipment to those who need it, but also to modernize existing equipment, optimizing working conditions. To ensure that it works like a clock, we provide warranty and post-warranty service for drilling rigs. In addition, we have both ready-made technical solutions and innovations developed specifically for each specific case.
Any drilling rig that is sold with enviable frequency is very popular. The quality is beyond doubt, and customer service is beyond competition. Any citizen of Russia, be it a legal entity or an individual, has the opportunity to buy MGBU.
Another advantage of cooperation with our company is the possibility of obtaining turnkey technical solutions. This is where our most valuable resource comes into play - experienced employees and advanced technologies, which were developed jointly with our foreign partners. Companies from Germany, Italy, China, Holland, Canada, etc. have long been helping us develop the highest quality Moscow State Budgetary Institutions of the Russian Federation.
Anyone who wants to develop and grow, increase income from their own labor and improve their level of qualifications, and most importantly, keep up with the times, several steps ahead of their competitors, should contact us. Help and support are guaranteed, and the cost of the equipment is quite reasonable.
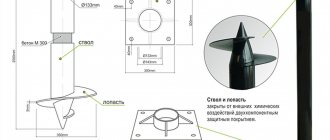
The simplest design of a screw MGBU
Screw mechanisms are a more complex device than impact devices. The most important working unit of such a machine is a rotating spiral screw. To make it you will need to take a piece of steel pipe d 100mm. The petals of the auger are welded in the form of a spiral at the bottom of the pipe, and two sharp knives are welded at the very bottom end. The petals and spiral are made of sheet steel, 3-4mm thick.
A thread is cut on top of the pipe so that a fastening coupling and a special tee can be attached to it. A tee is a special device for turning a drill in the form of a metal coupling, to which pipe-levers are welded horizontally on both sides. It is screwed onto the upper end of the pipe with a screw at the end.
As the auger rotates, it will go deeper into the ground. And when it protrudes above ground level, the tee with levers is screwed together, and a fastening coupling and the next pipe are installed instead. The drill is placed on top of it again, and the whole procedure is repeated from the beginning.
§ Drilling swivel, rods and locks
At first, it is recommended to purchase a ready-made drill swivel and drill rods. In the manufacture of these parts, processing accuracy is very important, since the loads on these units are large. We do not recommend making a swivel from improvised means. One slightest inaccuracy and it will fail.
If you decide to order a swivel from a turner, you will need to find a qualified specialist, and preferably with modern CNC machines. The swivel and locks will require strictly defined types of steel. For locks – 45 steel. For the swivel – 40X. Download a drawing of a homemade drill swivel:
Attention! Private traders will not do high-quality hardening! After hardening, grinding will be required. Use HDTV hardening, but this is an expensive procedure.
You can save money by purchasing ready-made units, but finding a suitable specialist will take a lot of time. But it's worth it - homemade parts are much cheaper than purchased ones. To get started, purchase parts for samples. Turners work better when they have drawings and templates on hand.
If you have factory samples, it will be much easier to check the quality of work. For example, if a turner made drill rods (locks), then you take factory-made and home-made parts and screw them to each other - check the quality of the thread. The match must be 100%!
Do not buy spare parts by delivery. This is necessary so as not to buy a marriage - this, unfortunately, happens. And most importantly, if you order delivery from afar, you can wait more than one month.
We recommend making the threads on drill rods trapezoidal - it is no worse than a conical thread, but if you then order turners, it is more difficult to make a conical thread.
If you make or buy locks for drill rods separately, then take simple suture pipes for the rods if you are drilling no deeper than 30 meters (3.5 mm thick and an internal diameter of at least 40 mm). But a professional welder must weld the locks to the pipes! In vertical drilling, the loads are high.
To drill deeper than 30 meters, you need to take only thick-walled pipes (with a wall of 5-6 mm). Thin rods are not suitable for great depths - they will tear. Download the drawing of locks for drill rods:
Advantages of do-it-yourself manual drilling
Manual drilling with self-made devices has the following advantages over automatic drilling methods using special drilling equipment by individuals and organizations:
Cheapness. Making a drill with your own hands from scrap materials and drilling a well without the involvement of third-party assistants, specialists, or organizations is the most profitable option from a financial point of view if other methods of employment in your free time do not bring monetary income.
Versatility. Independent manual drilling work is universal due to the following features:
- Manual drilling in many situations is the only possible option for carrying out work, if entry into the site of special equipment is impossible or the well is located in a built room.
- Narrow borehole channels are laid manually without the use of casing columns of standard diameter, which significantly reduces the cost of organizing and equipping water supply on an individual site.
- Drilling is carried out manually to a depth of 5 to 35 m, which corresponds to the characteristics of an Abyssinian and sand well.
- The drill made can be used for other economic purposes, if it is necessary to make holes in the ground - when constructing fences, planting garden plants, installing pile foundations and other household work. If it is no longer needed, the structure can always be disassembled and used on the farm at your own discretion.
Flexibility of application. Depending on the depth of the water layer, the quality of the soil and the dimensional parameters of the borehole channel, various drilling technologies, designs of drilling devices or combinations thereof are used. With individual manufacturing, there is always the opportunity, through experimentation, to independently make a drill for a well, the most convenient and effective for specific conditions.
Of course, you will have to pay for the low cost of the manual method in the speed of work and intense physical labor, the latter being to some extent useful in terms of improving health.
Carrying out measurements and arrangement of the site
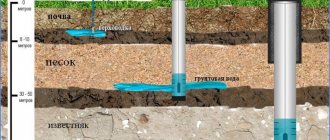
The first stage of work is to calculate the groundwater level. This is required to determine the complexity of drilling and prepare the required number of pipes.
The most accessible way is to contact the appropriate service to obtain a geodetic map of the area. You should also decide on the water source that will be used to collect the drilling fluid.
The required volume of fluid for flushing during drilling is determined taking into account the composition of the soil and the size of the well; on average, it ranges from 5 to 21 cubic meters. m of water.
The next stage is preparation of the work site. Manual drilling involves removing soil from the borehole channel and constructing containers for the flushing solution - two pits, the size of which is 1 cubic meter.
One container is intended for draining liquid and removing impurities, the second is for pumping water into the drilling rig. The pits are connected to each other by a trench, which ensures free flow of liquid. Prepared pits prevent dirt from spreading across the site.
The drilling device is mounted level to avoid even a slight slope. The pump inlet hose is installed in the first pit, and the outlet hose is located towards the swivel. Through it, the flushing solution enters the well string.
For this reason, such drilling technology is quite simple and economical.
How to make a support and assemble the installation
The frame of the auger installation is made approximately as follows;
- weld a quadrangular base from a profile pipe;
- install three racks made of 25 mm pipe;
- put pieces of pipes with a diameter of 32 mm on the posts;
- weld a horizontal carriage under the gear motor to these elements;
- A triangular frame is welded to the upper ends of the racks.
When installing the installation, the supporting pillars of the frame are fixed exactly in the middle of the sides of the rectangular base. This will subsequently ensure the stability of the tower. Next, the portable structure assembled in this way is installed at the well drilling site. An electric winch is mounted on the top frame of the tower. A gear motor is installed on the carriage.
Then the pump hose, motor and drill are connected through a swivel. The water pump for an auger drill must be powerful enough. Otherwise, the drill will subsequently begin to get stuck in the ground. After assembling the installation, you can connect all the necessary equipment to the electrical network and begin the actual work of hydraulic drilling the well using standard technology.
Manufacturing of auger installation
To manufacture the auger, pipes with a diameter of 100 to 120 mm are used. The process consists of the following steps:
One of the options for manufacturing an auger drill
- A thread is cut at the upper end of the element.
- At the lower end, inclined cutting knives are welded.
- The upper end of the drill is inserted into the chuck of the unit.
- Bring the lower part of the auger to the ground surface and turn on the electric motor.
Intermediate links are used to operate the screw. They screw into each other as they go deeper into the soil.
Types of drilling rigs
Mini drilling rig
The units under consideration are classified according to the characteristics of well drilling methods.
Thus, when performing percussion-rope drilling, the soil is destroyed by a heavy load tied to a support frame, the ribs of which in most cases are connected into a pyramid. The weight is simply lifted up and thrown down as many times as necessary to create a recess of the desired size.
Drilling wells using the percussion-rope method
Rotating drills are both simpler and more difficult to use. Such equipment requires much less physical effort on the part of the performer, but the design of such drilling rigs is more complex - many of the components of the system simply cannot be made with your own hands without special equipment and appropriate skills.
Well drilling diagram
As a result, some of the necessary elements have to be purchased or ordered. However, the cost of this is still significantly lower when compared with the cost of a factory-assembled installation.
In general, there are 4 main types of drilling rigs, namely:
- units operating using the shock-rope method. Externally, this design looks like a frame with a triangular base. A strong cable with a bailer is attached directly to the frame;
- screw-type installations. When such equipment is used, earth excavation is carried out using a special auger. The hole in the ground is not washed out during the drilling process;
- rotary units. They operate using the principles of hydraulic drilling;
- rotary hand mechanisms. The simplest type of installation. The design does not include an electric motor - instead, physical force is used. It requires irrationally large labor costs, so it is used extremely rarely.
DIY drilling methods
There are three categories of devices for sinking to identify water:
- Shock-rope;
- Rotary screw;
- Rotary (with hydraulic drilling technology).
They are equipped with different types of drives. If the unit is manual, then the main driving force for it will be muscular. Mechanical devices have a motor (electric, gasoline).
Impact-rope drill
Installing a percussion-rope tool is the best way to construct a water mine. Any summer resident can do it with his own hands. The principle of operation of such models is that a chisel (sloping inside) is deepened into the ground. It rises to a certain height, then drops sharply. This allows you to make a hole in the soil. The earth from the hole falls inside the flat part of the tool. After it is completely filled with soil, the chisel is pulled out and cleaned. Then the operation is repeated. This type of work is long and tedious. The advantage is the accessibility and simplicity of a small device. More powerful units are presented below.
Rotary screw device
The rotary type unit is more convenient to use than the previous one. The auger apparatus has a rotary drill, which throws the soil upward. It is difficult to install such a structure, even according to drawings. Parts for making the installation must be ordered in stores or purchased secondhand. If you manage to make your own unit, it will cover all the costs.
Rotary drill
Work with this drilling rig is based on two simultaneous actions: rod movement and soil erosion. The unit has a complex structure. It requires parts that cannot be made independently; it is better to buy them.
These are pumps, swivels, pumps, etc. The installation for a rotary drill is difficult to assemble, although it is possible to make an impact or rotary drill, which have a simpler design.
Drill for percussion-rope drilling
You can drill a well on a site not only by rotating the drill, but also by the percussion-rope method. This type of work requires a special installation, which can also be made independently from scrap materials.
Having such equipment, all work can be performed without any assistants at all, so we will also consider the process of making an impact drill.
To drill a well using the percussion-rope method, you don’t need much: a stable tripod frame, the impact drill itself, a strong cable and a winch
To understand what and how we will make, let us consider in general terms the essence of shock-rope work.
From a great height, a projectile pipe - a bailer for a well - is dropped into the location of the future water intake point designated with a shovel or auger. An eye for the cable is welded to the drill at the top.
A hole is cut in the top side to extract the drilled rock.
The lower edge is sharpened or equipped with teeth that optimize soil loosening. A ball or petal valve is installed inside the pipe 5–7 cm above the nominal bottom to capture and hold loose rock.
A bailer is an indispensable tool when digging through loose sand, pebbles, and gravel deposits. It is often used in combination with other drills. They alternate with an auger or glass, which is not capable of removing loose and water-saturated deposits.
Loose soil particles are retained inside the bailer thanks to a valve located at the bottom of the housing. The auger, bell, and glass do not have such advantages.
Rarely is only one drill used to drill a well. Most often they are used in combination: clayey rocks are drilled with augers or glasses, loose and water-saturated rocks are drilled with a bailer
The procedure for dropping the drill is repeated many times. The result of the process is a body that is one-third filled with soil and a hole in the ground that increases by 30-40 cm.
The filled bailer is removed from the barrel using a winch, turned upside down with the hole and cleaned with blows of a heavy hammer.
Then the process of percussion-rope drilling is resumed and repeated until a well of the depth that was planned to be obtained is formed at the site where the drill fell.
It is not necessary to buy a ready-made installation - you can make your own bailer for drilling and cleaning.
If you make such an impact drill heavy enough, then with this bottom it will cut the soil like butter and will not allow it to spill out of its cavity back
In this case, there is no point in creating one drill, so we will tell you how to build the entire drilling rig along with the projectile.
- We select the place where, according to our calculations and assumptions, the well should be located. We mark it out by making a small depression using a regular shovel.
- We install a tripod 2-3 meters high above the hole. We equip the top of the tripod with a well-fixed block for the rope. You will also need a winch, which we attach to the supports. It's good if you have an electric winch, but a manual one will also work.
- We prepare the impact drill itself. For this purpose, we will need a thick-walled pipe, the diameter of which corresponds to the size of the shaft of the future well.
To make a drill, we take a strip of thick metal and weld it to the upper end of the pipe, placing it perpendicular to the longitudinal axis of the projectile.
Along the center line of our pipe, in a welded metal strip, we drill a hole corresponding to the thickness of the rope on which the projectile will be attached.
The lower end of the pipe also needs processing: you can make a serrated or ring sharpening on it. If you have a muffle furnace, you can harden the drill in it after the sharpening procedure.
The drill for percussion-rope drilling is not so easy to clean from the soil that has accumulated in it. To speed up this routine operation, you can make not a window-hole, but a vertical slot passing through almost 2/3 at the top of the pipe.
The bell is part of the impact drill. It is easily cleared of soil and can be replaced, for example, with a chisel if a stone is encountered while drilling a wellThe heavier the drill, the faster you can achieve the desired result, but it is also necessary to take into account the power of the winch, which will have to pull the drill with soil from the wellbore.
So, if its power still allows, the projectile can be made heavier by placing removable metal weights in the upper part of the pipe.
You may also be interested in information on well construction, flushing after drilling and winter insulation, discussed in our other article.
What drilling equipment is needed for drilling water wells?
This issue requires deeper consideration, since there are four main drilling methods:
- shock;
- screw;
- rotary
- with washing.
Each of them involves the use of special equipment for drilling aquifer wells.
Percussion drilling
The main tool for drilling a well is an iron pipe to which a bailer is attached. The impact part is a kind of scoop that selects rock to the surface. Loosening of underground layers is carried out by blows, when a pipe with a bailer, raised to a height by a winch, is released under its own weight into the pit.
To complete the work you will need:
- metal tripod;
- pipe with bailer;
- cable with hook and winch;
- set of casing pipes.
The process is labor-intensive, and the mobility of the layers requires speed.
Auger drilling
The method is suitable for soils with a high sand content. As drilling equipment for shallow wells, a cut is used, which is crowned with a cutter. Helical blades surround the rod. The loosened soil rises outward along the auger as a result of rotation according to the principle of a meat grinder.
To carry out the work, you will need a special drilling auger rig, on which all the necessary elements, equipment, and tools are attached. You can make an auger yourself from an ice ax by welding a T-shaped handle to the working part. But this is how an Abyssinian well is drilled if the soil is soft and loose enough.
Rotary drilling
The drill is driven by a hydraulic or electric rotary unit mounted on a frame. At the end of the impact tool is a carbide bit that breaks up the rock.
Artesian wells are sometimes drilled with a different tool. So, if the soil is clayey, loose, soft, a spoon drill is installed instead. This is a pipe with a spiral thread. When you have to work with loams, the working unit is a coil drill. It works on the principle of a corkscrew. The choice depends on the type of soil. You will need equipment for washing the pit and a supply of water.
Drilling with well flushing
In one hour of work you can drill more than 13 meters. At the same time, aquifers lie at a horizon of 40 meters. This method is used for drilling wells in sand. To carry out the work, it is necessary to organize two flushing fluid supply circuits:
- Direct flush. The washing solution is fed into the pit, washing out the rock. The waste liquid, along with the eroded soil, is thrown to the surface.
- Backwash. The washing composition is fed into the excavated pit to wash the soil. The liquid is pumped to the surface by a mud pump.
The solutions are supplied through pipes and hoses of the drilling rig. The technology assumes that the supplied liquid washes out the rock, cools the equipment, and also helps ensure that the casing pipes are freely placed in the pit.
How to make a high-quality drilling rig yourself?
The most common reason for using drilling equipment is to extract drinking water.
A particularly urgent task is to drill drinking water wells at significant depths.
Many summer residents and owners of private estates prefer to involve professionals and special drilling rigs to solve the problems under consideration, however, it is possible to obtain high-quality results without the involvement of specialists and professional equipment.
Since prices for such services start from one hundred thousand rubles and above.
Thus, it is quite possible to make a drilling rig with your own hands, and then do all the necessary work yourself. The relevance of handmade production lies primarily in the price.
It is quite possible to make drilling equipment yourself. So, below we offer all the information necessary for the production of the type of installation in question. First you need to prepare tools and materials.
Swivel homemade drilling rig drawings
Tools and materials:
- A hacksaw for metal, or an angle grinder with a disk for cutting metal;
- Adjustable wrench No. 1;
- Tools for cutting external inch threads - dies;
- Half-inch diameter steel pipe;
- Cast iron sanitary cross;
- A half-inch diameter squeegee.
After all the tools and materials have been collected, you can begin work, the intricacies of which will be discussed further. The procedure for manufacturing a mini drilling rig begins with the preparation of pipe sections of the required diameter, which will subsequently serve as the main elements of the device.
Diagram of a support for a homemade drill
Algorithm for creating a manually driven system:
- To fix the pipes in a cross, a thread should be cut at their ends, the length of which will be 2 cm;
- You will need to weld steel plates on the end side to several sections of pipe of varying lengths. The pointed plates will play the role of tips;
- To simplify drilling, as well as remove soil from the work site, a constant supply of water is provided to it;
- To solve this problem, a hose from a pump or water supply is connected to one of the holes of the cross using an adapter of the required diameter;
- Next, all parts must be installed in the holes of the cross on the thread using plumbing PVC tape or hemp fiber;
- You will need to attach the most insignificant section with a tip to the bottom of the pipe by means of a bend;
- Upon completion of drilling a well, the depth of which reaches one meter, it is necessary to replace the tip with a piece of pipe of greater length.
Of course, creating a compact drilling rig with an electric drive is an opportunity to simplify the work. An automatic drilling mechanism powered by electricity is much more efficient, works better, and makes holes in the soil faster.
Double-support hand-made drill on wheels
What are the features of drilling in different types of soil?
Drilling water wells with a homemade installation can occur in different ways, depending on the characteristics of the soil. The unit is a flat bailer if a hole is punched in quicksand or sand. This type of drilling rig is capable of freely destroying and extracting soil of loose texture. Mines in unstable rocks are created in accordance with a mandatory requirement: the shaft must be cased so that the walls of the shaft do not collapse. The projectile is not lifted higher than 0.5 m above the pipe. Otherwise, misalignment and jamming of the installation in the well are possible.
If the work takes place on gravel soil or a pebble layer, an I-beam bit is quite suitable. Hard soil is removed using a bailer equipped with a flat valve device.
If the soil is viscous and clayey, then the impact unit must have a specific design. In this embodiment, the chisel is equipped with cross-shaped parts. Large stones and boulders can interfere with the vertical movement of the installation. Then the work becomes impossible, it is transferred to another place. Very hard rocks can be crushed using a powerful chisel.
There are layers of rocky soil that crumble easily. To prevent a collapse, creating holes in the soil must be done carefully, while casing the walls at the same time.
Other models of drilling rigs
In general, the assembly process for most existing types of drilling rigs remains the same. The frame and other elements of the structure under consideration are prepared according to a similar scheme. Only the main working tool of the mechanism can change.
Read the information about making different types of installations, make a suitable working tool, and then attach it to the support frame and connect it to other required elements, using the recommendations from the instructions discussed above.
Drilling rig with "chuck"
Drilling rig with "chuck"
The main working element of such a unit is the cartridge (glass). You can make such a cartridge yourself from a thick-walled pipe with a diameter of 100-120 mm. The optimal length of the working tool is 100-200 cm. Otherwise, be guided by the situation. When choosing the dimensions of the support frame, you will have to take into account the dimensions of the chuck. Think over everything so that in the future it will be convenient for you to use the finished drilling rig.
The working tool should have as much weight as possible. Make triangular points from the bottom of the pipe section. Thanks to them, the soil will be loosened more intensively and quickly.
DIY drilling rig
If you wish, you can leave the bottom of the workpiece flat, but it will need to be sharpened.
Make several holes in the top of the glass to attach the rope.
Use a strong cable to secure the chuck to the support frame. Select the length of the cable so that in the future the cartridge can freely rise and fall down. In this case, be sure to take into account the planned depth of the source.
To increase the efficiency of excavation work, you can connect the assembled installation to an electric motor. In such a situation, the cable with the cartridge will be wound on the gearbox drum.
It is possible to ensure that the face is cleared of soil by including a bailer in the structure.
Using this installation is very simple: you first manually create a recess at the drilling site with a diameter greater than the diameter of the working cartridge, and then begin to alternately raise and lower the cartridge into the hole until the required depth is reached.
Simple screw installation
Homemade auger
The main working element of such a mechanism is the drill.
Drilling auger drawingDiagram of interturn auger ring
Make a drill from a metal pipe with a diameter of 100 mm. Make a screw thread on the top of the workpiece, and install an auger drill on the opposite side of the pipe. The optimal drill diameter for a homemade unit is about 200 mm. A couple of turns is enough.
Drill disk division diagram
Attach a pair of metal knives to the ends of the workpiece by welding. You must secure them in such a way that when the installation is placed vertically, the knives are positioned at a certain angle to the soil.
Auger drill
To make it most convenient to work with such an installation, connect a piece of metal pipe 1.5 m long to the tee. Fix it by welding.
The inside of the tee must be equipped with a screw thread. Screw the tee itself onto a piece of a collapsible one and a half meter rod.
It is most convenient for two people to use such an installation - each worker can handle a one and a half meter pipe.
Drilling is performed in the following order:
- the working tool goes deep into the ground;
- 3 turns are made with the drill;
- the loosened soil is removed and removed.
Repeat the cycle until you reach a depression of about a meter. Afterwards, the rod will have to be extended using an additional piece of metal pipe. A coupling is used to fasten pipes.
If you plan to construct a well deeper than 800 cm, fix the structure on a tripod. At the top of such a tower there must be a hole of sufficient size for the unhindered movement of the rod.
During the drilling process, the rod will need to be periodically increased. As the length of the tool increases, the weight of the structure will also increase significantly; it will become very difficult to operate it manually. To conveniently lift the mechanism, use a winch made of metal or durable wood.
Now you know in what order simple drilling rigs are assembled and how to use such units. The knowledge gained will help you save significantly on the services of third-party drillers.
Good luck!
Well indoors
Well head - correct installation
It happens that for convenience, a well is drilled indoors. Then a sand well, or the so-called “Abyssinian well,” is used. Such drilling is almost always done before building a house, because access to the house is needed for the drilling rig.
However, if the house is already standing, there is no problem with drilling indoors, since there is small drilling equipment used to build a well in a small space of 2 meters in height with an area of 3-4 square meters. m.
First, they drill with an auger to the watering horizon, the auger has a diameter of 50-80 mm. Then an iron pipe is inserted, consisting of pipe sections 1-3 meters long.
First, a cast tip in the form of a cone made of a metal hard alloy is fixed to the lower edge of the pipe, after which a filter pipe with a hole diameter of 0.8-1.0 cm is screwed on.
To prevent sand and clay particles from seeping through when water passes through the filter, it is wrapped with a galloon mesh. Pipe sections are sealed using couplings with special waterproofing.
After all these preparations, the pipe is clogged. Since the height of the ceiling does not allow making a pipe 8-10 meters long, the pipe is extended as it is driven into the ground. The casing is driven into the well using rods or headstocks.
If the casing string is clogged with headstocks, a special nozzle must be screwed onto the casing head to prevent the thread from being stripped. The main load when using this method falls on the casing shaft and pipe threads.
In this case, strict alignment must be observed, otherwise the thread may break and the wellbore will get stuck in the ground, and this risks having to pull out the pipes, which is almost impossible, or start drilling again in a new place.
Therefore, high-precision lathes are used to perform such threads.
If rods are used when drilling with small-sized rigs, they are built up. In this case, a rod is threaded into the pipe, and when struck, all loads fall on a metal tip on the bottom of the pipe.
This application of load leads to the fact that the soil moves apart under the impacts and the wellbore moves down. This method is advantageous in that the pipe threads are not subject to deformation.
When using a small-sized installation, an “Abyssinian well” takes no more than 3 days, and the depth can be 8-12 meters. The output of such a well is 1-3 m3 per hour, which is quite enough for a country house or cottage. Such a well can be operated for 15-25 years.
Water from the “Abyssinian well” has practically no chemical impurities, there are few hard salts in it, the presence of microorganisms is minimal, and filtration occurs with sand and soil. The quality of such water is even higher than that from an artesian well, so additional purification is used in rare cases.
A sand well can also be made indoors using a small installation, but this is very inconvenient, since clearing siltation is practically impossible due to the lack of equipment supply. Therefore, such wells do not last long - 5-8 years.
Drilling with small-sized rigs pays for itself very quickly; the cost of a well is quite low. There are also small-sized installations with which it is possible to drill inclined and horizontal wells in the ground.
Making a petal bailer
If desired, such a working tool can be made for a small-sized impact drilling rig. A petal bailer is made using approximately the following technology:
- they also cut off a piece of about 1 m long from a thick-walled pipe for the body;
- a piece approximately 15 cm long is cut from a pipe of smaller diameter;
- a circle is cut out of sheet steel, the diameter of which should be equal to the diameter of the insert cut out at the previous stage;
- the valve is welded onto spring hinges;
- grind off the lower part of the insert.
At the final stage, the structure made from a 15 cm piece is tightly inserted into the bailer body and secured with a bolt.
Making a petal impactor for a drilling rig is therefore easier than making a ball impactor. However, such designs are still considered less reliable. Ball bailers usually last much longer than petal bailers.
EQUIPMENT FOR LIFTING OPERATIONS
The hoisting equipment consists of a winch, a tackle system and a tackle rope. A winch is the main mechanism of a drilling rig, allowing heavy loads to be lifted and lowered using a wire rope wound around a drum. In addition, with its help, the driller, using reels, makes up or unscrews drill pipes and other connections.
The traveling system includes two blocks: a crown block and a traveling block. The crown block is a fixed block located at the top of the tower. The traveling block moves up and down the tower during make-up and unscrewing of pipes. Each block has a series of pulleys through which the traveling rope passes. One end of the tackle rope, coming out of the crown block, is attached under the substructure to a special fastening mechanism (dead end), the other is wound on the winch drum.
Using a rope several times longer than one string gives a gain in lifting capacity.
After several hoisting and hoisting operations, the tackle rope is pulled, that is, it is removed, cut off near Amy, and a new part is put into operation. This way, the same part of the rope is not left in the high voltage ranges.
A traveling rope is a powerful wire rope used when drilling and completing a well to lift or lower drilling equipment weighing several tens of tons.
Making a screw drill
Assembly diagram for a homemade drill.
In the factory version, the auger drill is a strip sharpened and bent into a spiral, welded to the pipe. It is made from high-strength tool steels. At home, you can make a simpler version of the tool. It is not difficult to make a drill with your own hands if you have welding and plumbing tools.
The basis is a round metal profile or a thick-walled pipe. A tip is welded to its end, which will serve as a guide during drilling. The tip can be made from a steel strip. To do this, it is heated and bent into a spiral. The lower end is sharpened to a cone. For reliable fastening to the pipe, a slot is made in it, into which the upper edge of the tip is inserted, after which the structure is tightly welded.
Screw drill drawing.
The next step is installing the knives. The cutting blades of the drill are shaped like a semicircle. They are made of steel with a thickness of at least 3 mm. A good solution would be to use halves of a circle with a diameter of 100-150 mm from a circular saw. The steel used in the circles is highly durable, and the teeth will help cut not only the soil, but also the roots of plants. The blades are welded at a distance of 20 cm from the tip of the drill at an angle of 15-20 degrees to the horizontal plane. Thus, the angle between them will be 30-40 degrees. Alternatively, two or more rows of blades can be installed on a well drill. Most often, blades of smaller diameter are installed below the main knives. This allows you to cut into the ground gradually, using less effort.
It is easy to make a rotary handle for a drill. It is enough to weld the holders to the pipe. The handle must be attached to the drill using a detachable connection. As the drill string goes deeper into the soil, it is extended with additional rods. The length of one rod during manual drilling is approximately 1.5 m. Most often, threaded connections are used to connect the rods to the drill and to each other. In some cases, cotter pins and clamps are used. The connections must be reliable, but at the same time easy to disassemble, since it is necessary to lift and dismantle the column to remove soil every 0.5 m of depth.
The auger-type manual drilling rig works well in sand, clay and small gravel.
Basic provisions and selection of equipment
Installation of a surface pump to give connection and operation rules
To begin with, it must be said that small installations for drilling wells have a strictly defined depth of use and are not intended for large-scale work. At the same time, professional or industrial equipment is very expensive, and the rental price can take years to pay off. That is why various technologies are emerging to solve such issues.
Before starting drilling, it is necessary to have as much information as possible about the occurrence of aquifers in the area
Drilling principle
- First of all, it should be noted that such additions or independent upgrades are used only at your own peril and risk. At the same time, most manufacturers of such equipment remove it from warranty service if processes not described in the instructions were used during operation.
- It should also be said that deep work involves a slightly modified technology, which is usually associated with the placement of the casing. While small-sized installations for drilling water wells usually do not touch this stage at all, since the main task is only to make holes.
One of the options for a factory drilling rig for small wells
- Taking into account such features, it should be said that small systems should be used only if you plan to make a depth of no more than 15 meters. At the same time, professional craftsmen recommend combining the drilling itself with the creation of an Abyssinian well, in which a needle well is used.
- Such drilling of water wells with small-sized installations makes it possible to gain access to formations that lie below the level that the equipment can create.
A type of homemade design for shallow drilling
Manufacturing
- Typically, drilling water wells with a small-sized portable installation is carried out in several stages. Moreover, each of them represents a separate technical process and requires the presence of certain tools or equipment.
- First you need to make a hole the full length of the main drill.
The simplest version of the unit before starting work
- If the design of the equipment requires the presence of additional extension elements, then they should be used immediately.
- At the next stage, he makes several additional adapters or extensions with his own hands. Some craftsmen usually immediately purchase such systems, while others try to avoid such actions, worrying about the life of the entire installation.
Some types of small-sized drilling rigs with an indication of their technical characteristics
- Drilling with additional elements should be done very carefully, going 20 cm deep into the soil. Otherwise, you can break the installation and even damage the well itself.
- Next, the installation instructions involve making a needle. It consists of a pipe on one side, with which a special attachment in the form of a sharpened peak is attached. Holes are also made in it for drawing water from the well.
The simplest design option indicating the main elements, which allows you to make the system yourself
- The pipe is inserted all the way into the resulting hole and then hammered until it reaches the aquifer. For ease of use, it is made of segments of the same length, which are connected by means of threads.
- As a result, the installed pipe will perform the functions of a casing and a water pipeline at the same time. Therefore, it is worth choosing a thick-walled material that can withstand heavy loads.
- Special attention should be paid to such an element as a drill. The fact is that there is an all-bore device designed for a specific operating mode, which can be called standard. However, quite often you have to deal with hard formations, and it is best to use specialized drills for them.
- It should be remembered that this installation part is classified as consumables and it is always necessary to have a certain supply so that the work does not stop.
Various options for making homemade drills adapted for a specific type of soil
Features of hydraulic drilling technology
Most drilling technologies use water as a flushing agent to remove rock and soil from the borehole cavity. In a hydraulic drilling system, water is used as one of the tools to destroy rock in the well cavity. Today, two hydraulic drilling schemes are used:
- Crushing the soil by the combined action of water pressure and the cutting bits of the drill rod. Due to the softening of the soil, cutting the bottom of a well with a cutting edge requires 10 times less force than with dry and semi-dry drilling;
- Washing scheme of hydraulic drilling. If the soil is relatively loose and contains a large amount of sand, then a well can be easily drilled by eroding the rock with high water pressure.
- Impact drilling using a bit and water pressure.
Important! Any high-pressure schemes require the use of a special gear unit mounted on the cut of the drill rod. The gearbox simultaneously ensures core rotation and water supply from the pump inside the rod
Hydrodrilling with rotary insertion
Even when clay or loam is highly saturated with water, it is very difficult to destroy the rock with water pressure alone, so for hydraulic drilling a drill bit on a rotating rod is used, as in the video:
The rod is rotated by an electric motor through a chain transmission. A lock on the top of the drill rig ensures that the new rod is installed and engaged with the main pipe without stopping.
The task of the crown is to destroy and crush the rock to a minimum size at which the flow of return water can carry the crushed mass outside the trunk. The rotary hydraulic drilling circuit exists with a direct or reverse water supply circuit. In the first case, water is pumped into the rod, cools the tool, washes the rock out from under the cutting bits and lifts the rock and soil through the annulus into the slurry pit.
In the second case, water is poured into the well through the annulus and discharged through the internal cavity of the rod. This method of hydraulic drilling is used in cases where it is necessary to obtain maximum quality of the well walls and avoid contamination of the water intake with clay solution. This, in turn, ensures maximum water yield from the well.
The combined use of water pressure and cutting tools makes it possible to drill wells in limestone, old clay, shale and formations with a high content of clastic fragments of soft sedimentary rocks. The maximum shaft depth, as a rule, does not exceed 50 m.
High pressure erosion of rock
For sand and sandy loam, hydraulic drilling of wells can be carried out according to a simplified scheme, in which the shaft of the mine is formed only by eroding the granular mass of the soil. In industrial conditions, a similar hydraulic drilling scheme with a working pressure of up to 300 atm. allows you to cut soft quartz and sedimentary deposits. At a pressure of 450 atm. Calcite, spar and granite are cut.
For home conditions, the operating pressure rarely exceeds several tens of atmospheres. It is almost impossible to carry out hydraulic drilling of a well to a depth of more than 20 m using the flushing method. The positive aspects of the flushing technology include the absence of a rotary machine and simplification of the work. Often, only a valve and a pump are used for hydraulic drilling by washout. The rod, through which water is supplied under high pressure, is installed on a three-support carriage and rotated manually using a gate.
Impact bits are also used to effectively destroy rock at the bottom of a well. In this case, sharpened chisels and bayonets made of hard alloys are mounted at the end of the drill rod. When applying gentle but frequent blows, while simultaneously rotating the rod around its axis, the sharp edge of the chisel splits small stones into small fragments, which are carried away by the flow of water. The method is quite effective for working on limestone layers, but is absolutely not suitable for viscous and mobile loams.
Types of drill for hydraulic drilling of wells
Drilling rigs may differ based on drilling technique. An impact drill operates through mechanical action using weights. The rotating structure is more complex in structure, but the work is done many times faster.
Types of drilling rigs:
- Shock-rope. The structure of the structure consists of a frame with a pyramidal base and a cable with a projectile.
- Auger. A rotating auger penetrates the ground, drilling a hole. Feature: the well is not flushed.
- Rotors. Hydraulic technology is followed.
- Rotary type manual device. A distinctive feature is the absence of a motor. All work is done by hand, which is a rather labor-intensive process. That is why the popularity of such equipment is quite low.
Screw installations are almost impossible to make yourself. This requires special skills and tools. But creating a DIY setup has many benefits. It is much cheaper, the equipment is compact in size. This can result in a high-quality design that is easy to work with.
§ Homemade winch and gear motor
When manufacturing a mini drilling rig, a “RA-1000” winch is used. You can take another one, but preferably one with a carrying capacity of at least 1 ton (or better yet, more). Some drillers install two winches, one electric and the other mechanical. In the case of a drill string wedge, it is very helpful.
To make the work easier, it is advisable to buy and connect two remote controls: one for reverse and engine speed, the other for the winch. This will save a lot of effort.
A gear motor for a homemade mini drilling rig will need 60-70 rpm, with a power of 2.2 kW. Weaker will not do. If you use a more powerful one, you will need a generator, since it will not be possible to connect to a voltage of 220 Volts. Recommended gear motor models for hydraulic drilling: 3MP 31.5/3MP 40/3MP 50.