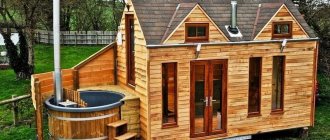
If you have seen handmade oak furniture at least a few times, then you understand how different it is, both in appearance and in durability, from modern options made from cheap substitutes. After all, solid wood products are different not only in their beautiful appearance, but also in their strength and durability. Natural wood has always been and will be a sign of good taste and sophistication; even solid pine furniture, if it is beautifully made, will look better than artificial materials.
Material selection
Every owner has unnecessary scraps of boards and plywood sheets on his farm. If they are not available, then lumber can be purchased at a specialized store or at the construction market. In addition, the summer cottage is full of improvised tools for creating crafts from wood with your own hands - saw cuts, roots, branches, branches.
There may even be a dried tree or stump. From all this you can come up with many unusual items. For the most part, the ideas are simple to implement. Even a beginner can implement them.
The main tools are a saw and a jigsaw. You may also need a hammer, nails or screws.
Expert advice
If it is planned to install spots in the slatted ceiling, then a hole is made in advance in the slats to the diameter of the lighting fixture. A wood router is used to drill the hole.
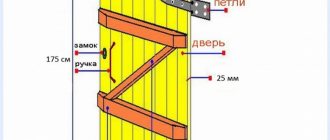
Be sure to lay electrical wires in plastic or metal cable ducts. The length of the stringer is selected according to the distance from one wall corner to another. This value should be 1 cm larger.
If you want to get a continuous one-piece coating, then choose slats with tongues and grooves. Decorative caps of different colors are available for sale. When choosing them, take into account the design of the room.
Types of crafts for the garden
If you have a child, you can turn your local area into a real fairy-tale corner by cutting out figures of heroes from Russian fairy tales.
In addition to people and animals, you can make a peasant cart, a train, and mushrooms. The best wood to implement this idea is birch.
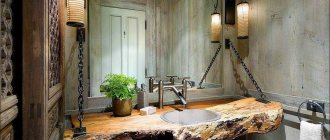
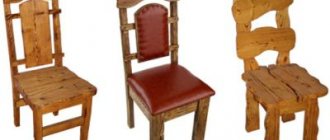
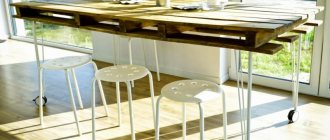
Garden furniture, for example, solid oak chairs or linden benches, is suitable for arranging a backyard. You can make several benches for flower pots.
It is appropriate to place small tree stumps with beautiful textile pillows throughout the area - you will get comfortable places to relax.
Another useful wooden craft for the garden and cottage is a bird feeder. There are many design options for it - from simple to complex.
You can make a wicker fence in the Provence style from branches and brushwood. It will become the highlight of your landscape. It can be used as a fence for a vegetable garden or front garden.
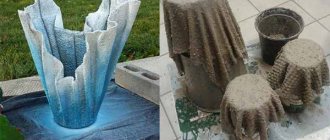
An old stump can easily be turned into a wonderful flower bed. As you can see in the photo of wooden crafts, such an element of landscape design looks very picturesque.
A mandatory attribute of a summer house - a swing - can also be cut out of wood. They also make decorative mills, wells, and bridges from it. Wooden carved gazebos and benches are considered decorations of the garden.
Wood is unique because it can be combined with other materials, be it stone, metal or glass. Such crafts look especially impressive.
Slotted thread
One of the most visually impressive is the slotted carving. It is great for interior and exterior decoration of houses. Decorating a piece of furniture, window frames or decorative cornices with it means attracting everyone’s attention and admiration to them. For many, this type of carving is associated specifically with Russian culture and applied art.
It is generally accepted that cutting through patterns on a large scale and developing this art began mainly with the advent of thin and wide wooden panels on an industrial scale. After all, before this, such blanks had to be cut out by hand with great difficulty.
Before cutting through the pattern, you need to make a design on the surface. You can come up with it yourself, or you can use a ready-made diagram from the Internet.
To make a slot, the board is drilled in several places from the inside out with a special drill or chisel. A jigsaw file is inserted into the resulting hole, which is used to make a slot according to the drawn diagram.
If the pattern element is small, then special files with small teeth are used for the same purpose. The remaining elements can be further decorated with patterns for decorative purposes.
After completing the drawing, the product is processed with sandpaper and a file.
In order to protect and make it more decorative, the wood can be additionally varnished.
The slotting technique is the type of carving that beginners in this business are advised to start with. Of course, complex ornate patterns won’t work out at first, but this is a great way to practice and make something truly beautiful!
If a novice master wants to learn the craft of wood carving, he should be patient and learn all the nuances. But only with the help of constant training and making products of varying degrees of complexity can you achieve impressive success!
Decorative wood products for home
Homemade wooden items add a natural feel to the interior. What kind of crafts are made from wood cuts - panels, stands, clocks, shelves, rugs, paintings. Even coffee tables
They make vases, candlesticks, fancy figurines, table lamps, sconces, boxes and entire wooden installations from wood.
Children's crafts from tree branches include making a frame for a photograph or painting.
Crafts made from wooden beads also look beautiful. They will become a bright accent in the living room or kitchen.
- Bathroom tiles. What is it like?
- Angorka. What it is?
- Flowers as gifts.
Home accessories are also made from the bark of pine, chestnut, oak, birch and other trees.
Crafts made from plywood
Spectacular products can also be made from plywood sheets. They usually play the role of original decor. It can be:
- funny figures of animals and birds;
- interesting flowerpots;
- fencing for flower beds;
- garden decorative elements.
Both men and women can work with this material - plywood is sawed without effort. Design and decoration depends entirely on your imagination.
Preparing to install slatted ceilings
You can assemble a conventional slatted ceiling structure yourself. More complex systems are best left to specialists.
Before installation, prepare the walls and ceiling - they must be smooth and clean. They also determine what will be between the rough ceiling and the slatted structure: cable ducts, ventilation ducts, pipes, fire-fighting devices. This determines what distance should be between the main ceiling and the slatted structure. It is also determined by the type of future lamps for slatted ceilings - built-in or suspended. For conventional pendant lighting fixtures, there is no need to make the inter-ceiling space too large, since it will only contain wires and fasteners. When using recessed lamps with incandescent lamps, the distance between the rough and slatted ceiling should be at least 13 centimeters, with halogen or LED lamps - at least 7 centimeters.
Benefits of wood
Wood, as a material for creativity, has the following advantages:
- Easy to create homemade products.
- Unique texture.
- Availability.
- Environmental Safety.
- Special energy.
- Relatively low cost.
- Practicality.
- Aesthetics.
In addition, wood has the ability to retain heat. So, wooden objects are pleasant to touch.
Dream Island - a place for a family holiday- Gas burners for heating metal: where to buy on the most favorable terms?
Gazelle. Why is she so popular?
Thus, we found out that the design of wooden crafts can be very different. To decorate a dacha, both deliberately rough products and finely crafted items are appropriate.
But it's better to choose one style and stick to it. It is also necessary to remember that the size of garden decor and its quantity must correspond to the area of the site.
Installation
The work process consists of several stages. Each of them is important to obtain a high-quality and beautiful ceiling.
Calculation of materials and preparation of tools
To accurately measure the closing area and subsequently calculate the amount of material required, you need to prepare a tape measure, a pencil and a sheet of graph paper. First, you should carefully measure the area of the surface to be treated by multiplying the length and width.
Important! If there are additional niches in the room, their areas are added to the result obtained.
The procedure for calculating the need for components for a suspended slatted ceiling is as follows:
- to determine the required number of corner profiles, the perimeter of the room should be divided by the length of one of them (plus two pieces for cutting);
- the number of hardware is determined based on their number per fastening step;
- the number of support rails is calculated according to the ceiling design (provided that they will be placed in increments of about one meter);
- the number of decorative strips is calculated taking into account their standard size (3 x 0.1 m).
Note! The calculated data obtained is the minimum of what may be required during installation.
When purchasing the entire volume of the required material, it must be adjusted upward by 10–15%.
Tools for installing a slatted ceiling will require:
- a regular electric drill or hammer drill;
- scissors for cutting metal blanks;
- building level, tape measure and hacksaw;
- pliers and a well-sharpened mounting knife.
To protect your eyes while working, it is recommended to use special assembly goggles.
Surface preparation
Preparing the ceiling surface comes down to cleaning it from plaster or old finishing material, which begins to crumble over time. In the case where slats with small gaps (windows) are supposed to be installed on it, the preparation of the base will have to be taken more seriously.
If necessary, detected defects in the rough ceiling are eliminated using plaster, onto which putty is then applied in an even layer. If desired, it is permissible to paint the prepared surfaces, which allows you to give them a more aesthetic appearance.
Frame installation
Before installing the frame, you will need to measure the distance to the ceiling and clearly determine the height of the suspension itself. For this purpose, a mark is made in the corner of the room, which will need to be guided by when installing and leveling the frame base (sheathing). Using the building level, the marked point is transferred to the remaining corners, and then they are all connected to each other.
Then take a wall corner with holes pre-drilled in it, the distance between which should be about 30–40 cm. The drilled workpiece is applied to the wall and securely attached to it with suitable-sized hardware.
At the next step, special stringers for the slatted ceiling are installed, the installation distance between which is set to no more than 80 cm.
Additional Information . Before installing the stringers, an indent of approximately twenty centimeters is made from the wall.
At the end of the installation operations, the stringers are installed in the previously prepared wall corners and fixed in them using hangers. Using these frame elements, it will be possible to adjust the level of the sheathing.
Fastening the slats
Immediately before installing the slats, it is necessary to place wiring on the rough ceiling to power the lighting elements provided for in the project. Individual wires are placed in plastic cable channels, which are pre-fixed to the ceiling surface.
In the process of preparing the slatted covering, holes are made in it using a special milling attachment to the size of the lighting fixture. Mounted wooden planks are fixed to the stringer clamps using the locks provided on them.