Atmospheric precipitation is the main enemy of buildings. Water flowing from the roof during precipitation melts, moistens the facade, breaks the sidewalk, and washes away the soil under the foundation. This can lead to subsidence of the building and the formation of cracks. In winter, water freezes in the pores of the building, and destruction accelerates. Let's look at how to make roof gutters with your own hands to protect the building from moisture, and what materials are used. Read the article and you will learn about the design of the system and installation features.
DIY roof gutters Source kakpostroit.su
Purpose and functions of drainpipes
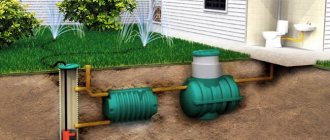
An external drain is a structure made of open gutters that collects water from the roof and discharges it into vertical drain pipes. In places where the system ends, liquid collection vessels are installed or storm drains are equipped.
Main functions of gutters:
- Protective . Drains water from the base and walls of the house.
- Cumulative . Stormwater can be collected in a container for irrigation.
- Decorative . A homemade beautiful drain will decorate a gazebo or cottage.
Industrial drains are made of galvanized steel and special plastic. Their cost is high. Plus elbows, corners, funnels, plugs, the price will increase several times. Finished products have one advantage - they are assembled like a construction set. Knowing how to install gutters if the roof is already covered with roofing can save a lot of money. Homemade drains are made from scrap materials, and their service life does not differ from ready-made structures.
On a note! If you approach the matter correctly, select the material and components, then a self-made drainage system can replace the main drainage system.
What function should the drain perform?
Regardless of what material the drain is made of, it must protect the foundation and base of the house from rain and melt water.
A drainage system is necessary for collecting and discharging rain and melt water
Waterlogged soil can cause premature deterioration of building masonry materials or subsidence of the foundation. Reducing the load-bearing characteristics of the foundation is a very big problem. It can only be noticed when cracks appear on the facade walls of the house. Restoring the strength of the foundation is very difficult and expensive; such work can only be performed by professionals. But they are not able to give a 100% guarantee that the measures taken will achieve the goal. All other functions of drainage (collection of rainwater into a container, decorative decoration of the facade of a building) are considered secondary and do not have any impact on the duration and safety of operation of the building.
Option for organizing drainage
Prices for gutters
Gutters
Materials used for homemade drains
To make a drainage system for a shed or a country cottage, you can use simple materials that you have on hand.
Drainage protects the building from the destructive effects of moisture Source diy.obi.ru
To make a drainage system you can use:
- galvanized steel;
- sewer pipes;
- PVC;
- tree;
- plastic bottles.
It is more convenient to make a tin drain using a bending machine. Cut galvanized steel sheets with allowance for seams. Bend the edges to join. Roll out the parts, make seams by hand, or use a seaming machine. Narrow the pipe at one end and install a riser.
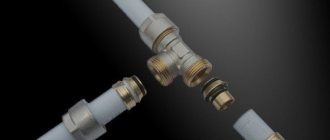
PVC pipes are easier to assemble. The joints are connected as in a sewer system. For the gutter, the whole part is divided into several identical parts. You can give the riser the desired configuration using shaped elements.
A plastic spillway is a budget and simplest option. Connect 1.5-2 liter bottles into a pipeline of the required length, first cutting off the bottom and neck. Seal with sealant. For the gutter, make trays, fasten them with wire or a stapler through the holes made with an awl.
Do-it-yourself drainage installation from scrap materials Source onduline.ru
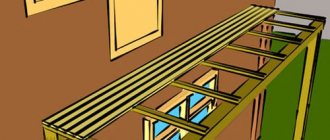
A wooden drain is mounted from boards that are attached at an angle of 90 degrees. They are connected with an overlap into the gutter so that water does not flow through the holes. The bottom is covered with construction film. Installed on brackets with a slope. The water drainage pipe can be made of PVC, tin corner, or wood. For wastewater, make a ditch at a distance of 150 cm from the wall and fill it with broken bricks and crushed stone.
Attention! It is necessary to give the gutter a slope of at least 2 mm per 100 mm and cover the joints, treat the wood with a special agent that prevents rotting. Such a drainage system will serve the home owner for a long time.
A homemade drain for a cottage is a good option used when installing storm drains. Gutters can turn out not just beautiful, but also original. Any imagination can be realized when creating a design for reliable protection of households from wastewater.
Rules for installing external and internal gutters
If you do not follow the rules for installing a drainage system, you can end up with flooded walls, foundations and basements. To avoid this, you need to follow the simplest instructions:
- The external gutter is installed with a slope of 1%.
- The outer chute should be interrupted no more than three times. If this rule cannot be fulfilled due to the complex geometry of the roof, it is necessary to install another drainpipe. But it is better to install it on the outer corners of the walls.
The main thing in a drainage system is the correct organization of the direction of water flow. It should not drain at the locations of the entrance doors and near the main paths, as in winter this will lead to the formation of a decent layer of ice, which can lead to serious injuries.
It is also important to ensure the required slope of the external gutters, which depends on the size of the slope. If the length of the roof slope is more than 12 meters, then the slope must be made in both directions and two drainage systems must be installed.
It often happens that the cornice is not located in a horizontal plane, and the slope of the gutter must be done taking this fact into account.
Compared to a flat roof, a pitched roof has another weak point - the so-called valley. This is the internal joint of the roof slopes, which is most susceptible to the pressure of water flow, which increases the likelihood of its penetration under the roof in this place. Therefore, it is necessary to pay special attention to drainage from valleys and install internal gutters there that will retain moisture, remove it outside, and therefore prevent water from getting under the roof. It is attached to the boardwalk (which should protrude 40 cm beyond the axis of the internal gutter) or sheathing. The process itself occurs in several stages:
- Two bars need to be nailed onto the sheathing or plank flooring in increments of 5–10 cm. There should be a small gap between the bars and the sheathing to ensure ventilation.
- Nail the sheathing, bring the ends of the wooden blocks to the axes of the gutter.
- Strengthen the main sheathing in the valley area by nailing a few more bars.
- Drive two wooden blocks between the sheathing in the place where there is free space.
The bend angle of the inner gutter must be greater than the bend angle of the valley - Bring the ends of the bars into the middle of the inner groove and clamp them.
- Bend the gutter so that the bend angle is slightly greater than the bend angle of the valley.
To secure the internal gutter it is necessary to install additional bars - Lay the gutter from the eaves overhang from top to bottom.
- Secure using metal staples.
Methods for attaching gutters
To attach gutters, you can use brackets that are combined with clamps.
Bracket mounting methods:
- Fastening to a front board is the simplest method, used when the roof is already laid. This type of bracket is used for plastic drainage. And to ensure strength, the brackets are equipped with power ribs.
- Fastening to rafters - this method is used for large areas of slopes to the roof deck with a rafter pitch of no more than 60 cm. In this case, brackets with an extension are used, with which the bracket is attached to the rafters.
- Wall mounting - in the absence of a frontal board and access to the rafters, the gutters are attached to the walls using crutches and studs.
If it is not possible to secure the brackets in a standard way, they are screwed to the wall - Fastening to the sheathing - when the rafter pitch exceeds 60 cm, the gutter is fastened using long brackets if the roof is made of metal tiles or ondulin. Or use combined brackets in the case of using bitumen tiles.
Drainage design for a private house
The drainage system consists of different functional elements, each of which serves its purpose.
Drainage design for a cottage or household Source krasivydom.info
To understand how to make a roof drain in a private house, you need to know what parts it consists of :
- A gutter is a semicircular pipe mounted along the roof of a building. It is used to collect wastewater and is installed at an angle to the drain funnels.
- Couplings - used to connect corner and long gutter parts.
- A funnel for receiving water is mounted on a gutter for discharging waste into the drain pipe. A grill is installed in the funnel to protect it from debris.
- The drain is installed vertically to the gutter and collects water coming from the funnel. It must reach the sewer system and end with a hole for the waste to exit.
- The elbow or outlet has a bend so that there is a small distance between the flowing water and the building.
- Clamps or brackets hold the east pipe and gutter in place.
Attention! Components are selected and calculated individually, taking into account the size of the roof and climate conditions.
Drainage planning and schemes
To understand the installation of a drainage system step by step, it is important to consider the following points when planning:
- Calculate the roof area, both total and in the section of each slope.
- Schematically depict the future installation, indicating the places where the funnels are fixed, the diameter of the gutters and the number of required elements.
- Craftsmen recommend purchasing all products from one manufacturer to eliminate discrepancies in part sizes.
- Select the system material wisely. Although aluminum and steel pipes are more expensive, they will last longer than plastic ones.
- When making calculations, take into account the standards of technical documentation, SNiP.
An important point is the location and design of the drain. Depends on the type of roof. The gable roof is equipped with two separate gutters. In a non-standard hipped roof, the perimeter becomes a solid contour of interconnected gutters.
The number of risers is determined by the length of the front part of the house. It is generally accepted that one riser is enough for every 12 m. For a larger figure, you will need to install two risers plus a compensating funnel. The last element is used, and when there are other buildings near the building or along the perimeter of the roof, it is planned to install a closed drainage system.
It is important to correctly calculate the number of long and short brackets in the form of hooks. If the roof will only be covered with material, then long hooks are fixed to the sheathing. Short ones can also be used after laying the roof, securing them to the front board.
When choosing a location for installing risers, you need to take into account the general appearance of the building so that the pipes do not spoil the aesthetics of the building. Therefore, drains are often installed in corners.
If the building frame is unusual or siding is used to finish the facade, it will be more difficult to choose the optimal location, since vertical pipes are placed next to the load-bearing supports.
Rules for installing a drainage system
Not only a professional can perform a high-quality drain installation. Understanding how to make a drain and following some recommendations, you can do the work yourself:
- The heavier the pipe, the closer the hooks should be located . Plugs, hooks and drain funnels are installed in advance, before installing the gutter. When arranging drainage for the roof of a house, it is better to use gutters made of copper; they are the most durable. The only drawback is the high cost. For a small country house you should not use expensive components.
Features of installing a house drainage system Source peredelka.tv
- The method of connecting the pipes depends on what the gutter is made of . For PVC products, cold welding is used.
- Steel gutters are cut with a metal cutting tool . A hacksaw is the most practical option.
- The gutter and additional parts are assembled on the ground before installation . The installation of drainage systems should be carried out by several people to help secure the structure to the roof.
On a note! When designing a drainage system for a building with your own hands, take into account the diameter of the pipes and gutters, the location of the water intake and drainage elements, and the amount of materials.
From metal profiles for plasterboard
The lightweight and durable metal profile is perfect for draining water. We find the required amount of material based on the perimeter of the roof of the house.
Profiles around the entire perimeter of the house can be attached to:
- brackets;
- wire;
- bars.
To protect against water pouring out of the gutters, it is cut into 2 parts, the end is left above the funnel and bent to make a semicircle barrier at the corner. The drain pipes and funnel will have to be made from other materials.
Drainage from plastic sewer pipes
You can make drainage with your own hands from different materials. The most popular option is plastic sewer pipes. This material has a number of advantages :
- relatively low cost;
- a large selection of adapters and pipes, various parts for fastening;
- the ability to cut pipes yourself;
- light weight, which facilitates transportation and installation;
- long service life.
The positive characteristics of plastic sewer pipes attract many owners of private houses and country cottages and dachas. The main condition is to properly design the drainage system.
Installation of a drainage system from sewer pipes Source fasad150.ru
See also: Catalog of companies that specialize in sewerage, water supply and drainage systems
When considering the question of how to make a roof drain with your own hands from plastic pipes, you should not forget about preliminary calculations. To determine the size of the gutter taking into account the expected rain flows, you need to calculate the effective parameters of the roof. If such calculations cause some difficulties, average values can be used. To do this, you need to prepare the following components of the drainage structure :
- PVC pipe 50 mm for the drainage system;
- cylindrical product 100-110 mm for gutters;
- adapters for connecting the listed parts - outlet diameter 50 mm, inlet diameter 110 mm.
For plastic sewer pipes, you will need to split them into several pieces of equal size. You can cut the product using a hand saw, electric jigsaw or grinder. The last option is preferable, but a number of features of the work must be taken into account.
On a note! When cutting a pipe with a grinder, the plastic will stick to the casing, you need to remove the protection. It is better to use a special mask. Or purchase a disc for working with PVC products. To connect tees and gutters, the pipes do not need to be opened completely: leave 150 mm at the edges.
Gutters for drainage structures
Depending on the throughput, different markings are produced. The marking shows the ratio of the diameter of the pipe to the gutter.
The following options are considered:
- 100/75;
- 125/90;
- 150/110.
Gutters are divided into:
- semicircular;
- rectangular;
- corner.
If the first two types are responsible for collecting water from the roof, then the corner gutter changes the direction of flow.
Fixation is carried out on the outer and inner corners of the roof.
Plastic gutters can be used to make both sharp and obtuse angles. To do this, you need to cut out a part and mount the halves at the required angle. The fasteners are cold welded.
The average gutter length is from 3 to 4 linear meters. Sold individually.
They are attached to the roof with brackets and hooks in increments of 60–90 cm, maintaining a slope of 1 cm every 3–4 meters. The fewer connections there are, the faster and cheaper the installation will be.
Drainage system made from plastic containers
The simplest and most budget-friendly option for making a roof drain with your own hands from scrap materials is straight-shaped plastic 1.5 liter bottles. It is easy to accumulate the required amount of material. You will also need brackets and wire.
Drainage from plastic containers can be installed quickly and is inexpensive Source yandex.net
For work you will need the following materials and tools:
- stapler for furniture and staples 10-10 mm;
- screwdriver or drill;
- construction and installation knife;
- wire;
- thin drill;
- plastic containers.
Detailed instructions on how to make drainage systems from plastic containers :
- Determine the length of the drainage system. For convenience, you can design a drain. The main part of the container is 15-20 cm. Such bottles are not suitable for structures longer than 5 meters.
- Clear containers of labels and stickers.
- Cut off the throat and bottom. For the gutter, cut the bottle into two parts.
- The gutter is mounted in plastic containers using a furniture stapler. The container is joined with an overlap of 150 mm and secured with 2-3 brackets. With a rotating system, the bottoms serve as plugs.
- The gutter is attached to the roof. Drill holes in the lid at a distance of 20 cm. Make holes in the gutter with an awl. Thread a wire through them to secure the drain to the roof.
- Drainage is also made from plastic containers. Cut off the throat of one, and make cylinders from the others. A container without a neck is an adapter in which a hole is made for attaching the gutter.
Ready drainage system from plastic containers Source legkovmeste.ru
Types of gutters: how to choose them for your project
It is important to choose the optimal dimensions so that the gutter and the dimensions of its pipe cope with their functions most effectively. The concept of choice is that elements that are too narrow will not cope with water flows, and elements that are too wide will cost much more. Therefore, it is worth considering the following factors:
- Precipitation amount for your area.
- The area and slope of the roof.
- Individual features of the house architecture.
Let's select the sizes
The diameter of modern grooves and pipes ranges from 60 to 216 mm. Most products comply with DIN EN standards; some manufacturers continue to produce products in accordance with GOST 7623-84.
Homeowners who prefer to make their own gutter should note that it should be slightly wider than the pipe. The height of the side should be at least 10-12 mm. The most common ratios of the elements of the groove/pipe system are as follows:
As an example, consider a practical example with a roof area of 60 m². A 100 mm groove and a pipe with a diameter of 80 mm are suitable here. For an area of 100 m² you will already need a 100 mm pipe and a 150 mm groove. The parameters are averaged; the individual characteristics of the building influence them directly. The length of the grooves is usually 2-3 meters.
Drainage system made of polyethylene and wood
The starting material for this design is a thin board, the length of which is equal to 2 perimeters of the roof overhang. Then you can proceed to the manufacture of the drainage system.
Instructions on how to make a gutter for a drain with your own hands from wood :
- Connect the boards in pairs at an angle of 90 degrees using nails. Make gutters that match the length of the walls of the building (connect the parts with an overlap).
- Make fasteners for installing the gutter using wire rod or boards. The best option is not wire - but a piece of lumber. For them, you will need to cut out the triangular grooves necessary to fix the gutter.
- Install brackets at the corners of the wall and secure with nails . Install narrow channels to drain drains from the roof of a private household, ensuring that their edges are overlapped.
- Adjust the gutter - tilt it and lay down a polyethylene film, securing it with nails, tape or buttons.
Arrangement of a wooden drainage system Source krysha-expert.ru
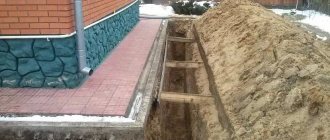
A wooden gutter is suitable for drainage. The length of the structure should be 250 cm. The purpose of installing a drainage system is to discharge wastewater into a drain or ditch 0.3 meters deep. Be sure to fill it with crushed stone or crushed brick.
Attention! When digging a ditch, an appropriate slope is made, due to which precipitation is diverted from the surface of the wall of a private household to a distance of at least 150 cm.
A drainage system for a wooden cottage will last a long time if you use a silicone sealant rather than polyethylene for reliable sealing. Before this, the wood is treated with a preservative.
Material design and calculation
The following are the main elements for installing gutters and their descriptions.
Brackets
The drainpipe is secured to the wall using brackets that are installed on the sheathing or to the eaves beam. The first type is considered obsolete and is installed before the start of roofing work. The second type is much more common and is easy to use. There are models with precise adjustment of the gutter position after installation on the board.
Gutters
They collect water from the roof and direct it to the drainpipes. They are installed along the entire length of the slopes with some slope. They have any shape, the possibility of self-production is allowed.
Gutter turns
Direct the water flow at an angle of 90° or 135°. The joints of these elements are subject to high loads; a powerful suspension is required.
Funnels
Connect gutters and downpipes. Funnels can be pass-through or plugged on the right or left. Pass-throughs are installed anywhere, while plugged ones are installed only at the edges of the gutter.
Pipe elbows
They change the direction of flow and use it to place a vertical pipe as close as possible to the walls of the structure.
Clamps
Fix drainpipes.
Drainpipes
Drain water from gutters. Standard length is 2 m.
To calculate the exact number of elements required to properly install the drain, you need to consider the following points:
- the minimum number of drainage gutters per slope should be equal to the length of the slope divided by the length of the gutter (standard - 2 meters) and rounded up. To calculate the total quantity, you need to add up the results for each slope;
- drainpipes are placed one per gutter, usually at the corners of the building. If the length of the slope is more than 12 m, another one is installed in the middle. Their size is determined by the height of the walls. The standard length of galvanized pipe is 2 m, plastic pipe can reach 3-4 m;
- Brackets for fastening gutters are placed every half a meter around the perimeter of the gutter. 2 brackets are installed on turns and funnels for greater structural rigidity;
- one funnel and pipe bend for each drainpipe;
- plugs along the edges of gutters;
- connecting element for each joint.
As an example, we will make a full calculation of materials.
For one slope 10 meters long with a wall height of 2.5 meters you will need:
- 5 gutters;
- 4 connecting elements;
- 1 funnel;
- 22 brackets (when using a corner element +1 for each);
- 2 plugs;
- 1 drainpipe;
- 1 pipe elbow;
- 1 drain;
- 2 pipe clamps.
For a four-slope, subject to the use of rotating elements:
- 20 gutters;
- 16 connections;
- 4 funnels;
- 4 rotating elements;
- 88 + 8 (at corners) = 96 brackets;
- no plugs required;
- 4 drainpipes;
- 4 knees;
- 4 plums;
- 8 clamps.
DIY gutter made of galvanized steel
Setting up a metal wastewater drainage system requires certain experience and knowledge. For the manufacture of drains, sheet roofing steel 0.5-0.7 mm is used. It cannot be less than 270 g per square meter.
To construct a drain you will need the following tools :
- marker for marking;
- scissors for working with metal;
- pliers;
- mallet and hammer.
Tin pipes are a simple part of the drain structure; making them yourself is very simple. To do this, you will need thin tin or galvanized steel sheets.
Practical and reliable drainage systems made of galvanized steel Source stroy-podskazka.ru
Methods for connecting drainage gutters to each other
There are 3 types:
- Glue. The area where the gutter is fastened with a coupling with a lock and a gasket is treated with adhesive-sealant. Recommended for use in areas that will not be exposed to direct sunlight.
- Glueless. Suitable for both metal and plastic elements. The connection is made using couplings with a durable gasket that does not require sealing.
- Soldering. Suitable for steel or copper gutters. Used by craftsmen. Not suitable for joining by beginners at home - high precision is required when processing edges.
You need to choose the connection option based on the recommendations of the manufacturer of the drainage elements. In the corners, it is recommended to use adapters with high-quality seals.
Installation of a do-it-yourself drainage system
When all the details of the drainage structure have already been prepared, proceed to assembling the drain. Installation of rainwater drainage systems can be carried out using different methods; the choice of method depends on the fasteners and the season when the installation work is carried out. It is advisable to do drains before covering the roof.
Do-it-yourself drainage system installation Source sip-roof.ru
The most successful and reliable option is installation on an external crossbar or rafter. This way you can protect the fasteners from rain using a cornice strip. If there is already a roof, use another method of arranging drainage.
Detailed instructions on how to make a drain from sewer pipes with your own hands and other materials :
- First, brackets are installed to support the gutters. They are mounted at a distance of 55-60 cm, and the level should decrease towards the release of precipitation.
- The holders are mounted so that the roof overhang extends to 1/3 of the semicircle. The other 2/3 will collect water draining from the roof.
- Brackets are mounted on the eaves strip at a slope. Install the holder located higher. Mount the bracket located at the very bottom (the slope is increased by 5 mm every meter). If you do not maintain the slope, the water will not drain well and leaks may form.
- The installed brackets are fastened with rope, and a line is drawn on the surface of the facade along the twine. Other supporting parts are mounted at the required distance, placing them along the line.
- Install the gutter and place a plug on the top edge. At the joints of the pipe and the gutter, make a hole for the funnel and install it.
Upon completion of the above work, they proceed to the installation of drains. Clamps are used for fastening to the façade surface. If there is a sewer pit on the site for precipitation, the pipe is led to it. When draining wastewater into the ground, the pipe is placed at a distance of 30-35 cm above the soil.
Drainage technologies
If we turn to existing technologies for constructing metal drainage systems, two options seem relevant for use:
- Based on round gutters and water pipes.
- Based on rectangular gutters and downpipes.
There is, of course, also another (exclusive) technique of execution, for example, based on wood, but this is rare and is not widely used.
The metal drainage system attracts not only its beautiful appearance. In terms of operational parameters, metal gutters occupy a leading position
Regardless of the technology for installing drains, the system is always calculated taking into account the roof area. Based on the calculated data, the throughput of gutters, funnels, and drainpipes is selected.
Based on the throughput parameters, the diameters, through holes, and overall dimensions of the shaped parts are determined:
- corner transitions;
- slip-on couplings;
- prefabricated funnels;
- bypass branches;
- connectors;
- drain pipes.
Under the condition of complete self-assembly, the master will have to make all the shaped parts of the working kit with his own hands. But if you don’t have the skills of a tinsmith and the desire to produce, you can simply buy the entire marked set of parts. Naturally, in this case, the complete independence of manufacturing the system already seems doubtful.
Useful tips and tricks
To prevent the drainage structure from clogging, nets are installed on the gutters. They do not interfere with the collection of precipitation, but protect the pipes from leaves.
Correct installation of drainage systems is the key to proper operation of the system Source sense-life.com
In ready-made drainage systems, such protection is included in the kit, but when making drains yourself, you need to do it yourself:
- you will need a metal mesh;
- Having cut it into strips slightly wider than the dimensions of the gutter, it is attached to the drainage elements using clamps.
The drainage system must be constantly cleaned of dirt and debris. Even a mesh will not provide reliable protection. Accumulated debris can make it difficult to remove precipitation, causing blockages to appear in the pipes. Water will begin to flow onto the facade of the building and wash away the foundation.
What is the price for factory gutters?
To fully understand the feasibility of making gutter elements yourself, it’s a good idea to familiarize yourself with the cost of factory-made analogues. We will not consider particularly expensive copper sets, but will focus on PVC products.
Gutters Döcke
The time-tested Standard system was developed by German engineers for low-rise housing construction. Cost of main components:
- Gutter 3 meters, diameter 120 mm - from 428 rubles.
- Pipe 3 meters, diameter 85 mm - from 512 rubles.
- Funnel - from 274 rubles.
A sheet of galvanized steel measuring 1250x2500 mm costs 850 rubles. From it you can make 3-4 gutters 2.5 meters long with your own hands.
Briefly about the main thing
Do-it-yourself roof gutters can replace a finished structure. The main thing is to follow the technology for installing the drainage system. The reliability and proper operation of drainage systems depends on the accuracy of measurements. A drain made according to all the rules will cope with the task and will last for a long time.
Different materials are used to make roof gutters: PVC, sewer pipes, galvanized steel, wood, plastic bottles. The process of installing the structure is similar in each case. Detailed instructions for installing drainage systems will help you complete the work without the involvement of a specialist.
How to secure vertical drainage elements
It is best to provide for the fastening of drain pipes at the stage of laying the walls. But even after completion of the work, no one forbids installing fasteners.
When performing installation, observe the following rules:
- Start installing drain elements from the bottom.
- Drill holes in the walls to install clamps.
- On the lowest clamp, install an elbow with a cut edge, and if the drain is carried out into a storm drain, then use a regular drain element.
- Fasten subsequent elements using a separate clamp in increments of no more than 1.8 m. If the length of the element exceeds 2 m, then it is necessary to install another clamp.
By following the installation rules, you can ensure the strength and tightness of the structure. In this case, the drainage will be reliable and will last a long time. Good luck to you in your construction activities.
Common installation mistakes
In the absence of experience, the following mistakes are most often made:
- Failure to comply with the slope of the gutters. The recommended rate is from 3 to 5 mm per 1 linear meter. If the indicator is higher, water simply will not get there; if it is lower, areas of stagnant water and debris will form, and unscheduled drainage cleaning will have to be carried out. To correct such a defect, you have to break part of the roof.
- Saving on the number of brackets. The consequence is that an overly flexible structure becomes less resistant to wind loads, with a high risk of damage and breakage. For drainage from plastic, fasteners are carried out in increments of 50 cm, from iron and other metal - every 60 cm.
- The couplings are not connected correctly. The consequence is that leaks occur in such areas. Do not neglect the use of rubber seals and you need to seal the joints with sealant. It is recommended to double fasten the brackets (on both sides).
Craftsmen do not recommend purchasing materials for drainage from different manufacturers, since the installation process may reveal inconsistencies between elements and lack of tightness of the structure.
Practical tips for installing metal roof drains
Korovin Sergey Dmitrievich
Master of Architecture, graduated from Samara State University of Architecture and Civil Engineering. 11 years of experience in design and construction.
A private house must be equipped with a drainage system that will drain melt and rainwater from the roof surface. This measure will protect the facade of the house from excessive moisture and destruction of the foundation. Most often, metal roof gutters are used for this, the installation of which can be done by yourself. To do everything correctly, you need to have some understanding of the materials, structure and methods of manufacturing water pipelines.
Roof mounting technology
Involves installing gutters on brackets:
- to the rafters;
- on the front board;
- to the edge of the roofing material;
- using additional brackets.
Let us examine in what cases it is advisable to use different types of installation.
To the rafters
Fixing the drainage to the rafters is carried out when the sheathing has already been covered with roofing material, but it is also allowed before laying corrugated sheets, slate and various soft flooring.
The fastening element is brackets with a long leg bent at a right angle.
When the roof is covered, you will have to tear off or unscrew the last row, if it is slate or metal tiles, in order to secure the drainage system to the last row of the sheathing, the rafters. When using soft tiles or ondulin, simply lift the last row to tighten the bracket.
This method is used if the cross-section of wooden rafters is from 180*50 mm.
When fastening, the roofing material must cover the gutters.
On the front board
The front board is mounted at the ends of the rafters. Width may vary.
Fastening is carried out with long brackets or hooks made of a guide metal profile and a bracket.
Special long planks with a groove are also produced. The plank is screwed to the board with self-tapping screws, and brackets fit into the grooves.
To the edge of the roof covering
In this way, the drainage system runs along the eaves of the roof. Used when a rigid material such as corrugated sheeting has been selected for the flooring.
To fasten the brackets (plastic or metal), you will need special clamps.
There are times when you cannot do without holes in the roof. Then it is recommended to put rubber gaskets under the metal clamps (if any). This way there will be less chance of damage to the roof.
Using an additional bracket
Installation is carried out when the roofing is completed. The risk of material damage is minimized. Also, additional brackets will be required if the main brackets for fastening the gutters are short.
Take a long bracket and simply bend it to the required length, fix it with a self-tapping screw to the wooden sheathing.
It is important to maintain the required distance from the center of the holder to the edge of the overhang. The recommended value is 30–40 mm. This will allow water from the roof to flow into the center of the gutter. Otherwise, water will overflow over the edges.
Some features of polymer systems
Compared to metal drainage structures, polymer systems are attractive due to their cost-effective installation and simplified assembly.
Meanwhile, plastic has the properties of changing structure under conditions of fluctuations in ambient temperature. Therefore, for anyone who decides to make a drain for the roof of a private house with their own hands, these properties of the material should be kept in mind and an installation technique that compensates for thermal expansion should be used.
Compensation for thermal expansion/contraction is achieved, for example, by incomplete insertion of the smooth ends of the pipes into the socket parts. Also, loose tightening of the rim of the fastening clamps releases the axial displacement of the parts as a result of thermal expansion.
It is advisable to limit the use of glue when installing drainpipes; use it only on one part of the connections. Installation of socket connections should be carried out in the socket position with the “up” direction.
The design of the mounting element, which provides compensation for thermal expansion. Used in the assembly of gutters. Similar design solutions are used on other parts
Almost all manufacturers of modern drainage systems have taken into account the properties of plastic and produce shaped parts (expansion elements) adapted to temperature changes. The body of such parts indicates the temperature scale according to which they are mounted in the system.
The influence of temperature may cause deformation of the plastic. Therefore, it is necessary to comply with installation standards and the distance between fasteners. Compliance with the rules is a guarantee of installing a high-quality roof drainage system.
In this material you can familiarize yourself with all the advantages and disadvantages of plastic and metal gutters.