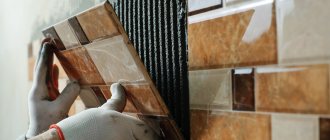
Today, country houses and cottages without balconies are rare. They not only decorate buildings, but also create comfortable living conditions. Wooden balconies are cheap, easy to make and can be combined with any wall materials.
Construction of a wooden balcony is considered a very responsible job. First of all, there is a danger of the unreliable structure collapsing. To prevent this, the work is carried out in stages and includes calculation and practical components.
You can build
The design and appearance of a new building largely depend on the appearance and decoration of the house, as well as on the material from which it is made. An important condition is the harmonious selection of the type of balcony in such a style that it does not stand out in design from the general image of the building.
Concrete balconies
The most common option is with a concrete floor. There are several features:
- The load-bearing elements of one of the sides are fixed in the wall of the house. Using electric welding, they are connected to pre-installed and carefully secured anchors. The reliability of the entire structure will depend on how massive the wall is. If the walls of the house, which will help distribute the weight and pressure of the new building, are not strong enough, it is necessary to attach additional supports.
- Dimensions in reach and depth should not exceed one meter.
- In brick buildings, concrete slabs are inserted into the load-bearing wall of the house along its entire length. They are welded to the lintel reinforcement, which is placed above the floor below.
- Console elements are laid into the masonry in houses with stone walls.
- The top level of the main support slab should ultimately be set 100-120mm below the final floor level.
- The floor of the structure being created must have a slope of 2% from the main building.
- The concrete slab should be waterproofed. To do this, a water-repellent coating is installed on the surface of the installed slab, on which a sand-cement screed is then poured.
- Parapets must be at least one meter. For this purpose, metal gratings are used, which consist of handrails and racks. The racks are attached by electric welding to the embedded elements of the slab, and the edges of the handrails are inserted into the load-bearing wall of the building.
- The balcony door threshold must be positioned 100 mm above the floor level.
Forming a balcony frame
This stage of construction is very important and requires great diligence and accuracy.
Wood is also used to construct the frame of a wooden balcony. Firstly, to maintain a unified architectural style, and secondly, wood is a valuable thermal insulation building material.
We begin the construction of a balcony in a private house by creating a frame.
It is best to think about the shape, size and purpose of the balcony in advance.
Balconies in wooden buildings differ in the materials of the enclosing structures. They can be internal or external.
Basic methods of building a balcony
For buildings built from logs or timber, the technology for constructing a balcony is similar. The only difference is the method of support. Supports can be made:
- beam-cantilever method;
- beam-supported.
Diagram of types of balconies according to the method of construction in a private house.
In the first option, cantilever beams (logs) or simply extensions are located on the lower rims of the logs and are elements of the continuation of internal or external load-bearing walls. Among other things, such beams additionally decorate the facade of the house.
The cantilever method involves another option, in which the supports for the balcony are elongated beams of the interfloor floor, protruding to the required length beyond the facade. But many experts believe that this method does not comply with building codes and requirements, since moisture may enter the support beams, which will eventually lead to rotting of the wooden elements.
With the beam-support method of construction, the balcony is located above the veranda or terrace and serves as a roof for them. This option is much more often used in the construction of country wooden cottages.
The internal balcony is built mainly according to the French type, when it is arranged as a full-height window frame. That is, this is a small fenced area located immediately outside the door.
Let's take a closer look at each method.
Console method
When using beam-cantilever technology, it is necessary, when preparing the project, to determine the location and height of the loggia in order to release beams in this place during construction. For greater reliability, the other end of the beam should be attached to the main wall of the house. The fastening must be rigid.
Construction of a balcony in a private house on consoles.
The beams are usually released at 1.5-2 m. The beams themselves can be made of rounded logs or profiled timber
It is important that the outlet beams form a monolithic structure with the wall. If the width of the balcony is greater, then additional support pillars are erected
At the same time, a special screw mechanism is placed in the pillars to reduce the height of the supporting element by the size of the building's settlement.
To further strengthen the console, wooden or metal slopes are installed. The latter, made using forging, can serve as an additional element of facade decor. To strengthen the fastening of beams resting on the walls, battens are used.
The consoles, which are the basis of the design of a classic rectangular loggia, are connected by one beam, then a rough flooring is made and a finishing floor is laid on top of it. The outer floor beams are securely attached to the horizontal frame posts of the wall, and the rest are attached to the battens.
The canopy over the loggia is made separately, or is a continuation of the roof of the cottage.
If the balcony is purely decorative and has a width of no more than 1 m, then in this case you can use wooden trusses as a support. They are attached to the wall with special brackets. But there is a significant drawback. Over time, the fastening loses its appearance under the influence of precipitation and dirty rust stains appear in the fastening areas.
Construction of a balcony on racks
Owners of country cottages most often prefer to build balconies on racks that rest on the base of the veranda or terrace. In this case, the base of the balcony serves as a roof for them.
This method is used when the balcony is large, or it is not possible to use a ceiling under the base of the loggia. Of course, this option will require more significant costs, but the size of the balcony and, accordingly, the terrace under it can be any. You can place a parking lot under the balcony.
Attaching a balcony to a private house using the beam-support method.
Support posts with this method can be wooden, metal or brick. They are usually located along the outer edge or on both sides of the loggia. The inner part of the racks rests on a beam, which is rigidly attached to the wall.
Support posts are installed in accordance with the following technologies:
- The logs are taken slightly smaller than required. Initially, bars are placed under them, and after the house shrinks, they are removed, thus leveling the loggia. But, nevertheless, there should be an outward slope of about 2% so that the water does not stagnate, but flows freely.
- The racks are installed on jacks and then tightened as necessary.
- The beams or logs are set strictly according to size, and when the building shrinks, they are simply sawed down.
Pros and cons of a balcony
The absence of a balcony in a private house may cause the entire structure to be perceived as an unfinished building. It decorates the façade and is an ideal place to spend time outdoors . But this is not an easy structure, the construction of which is subject to a certain number of requirements, and the most important among them are: ensuring the integrity and unity of the entire structure.
Among the positive aspects we can highlight:
- A balcony is a great opportunity to give your home a unique, inimitable look. Beautiful, individual and unusual designs will decorate any private home and give it a complete look.
- A balcony extension is an additional area that can be used as a place for relaxation, entertainment or even a work space. If the balcony is installed above the terrace, this will help to visually divide the house into two parts, which will visually increase the volume of the entire building.
- Balcony extension is an emergency exit during a fire.
- A balcony is not a cheap pleasure, but in some cases its installation can be profitable. Installing a balcony in a country house with a terrace or bay window will help save on the roof: its role will be played by the base of this structure. The balcony also acts as a roof over the entrance to the house, which becomes reliable protection from bad weather.
But, despite a fairly large number of positive aspects, there are also negative factors :
- The presence of a balcony is the cause of heat loss. Very often this happens due to the door installed on the balcony and the thermal bridges inherent in the cantilever structure. Exceptions in this case may include structures that have autonomous supports, but their installation requires significant financial costs and significant space.
- The construction of this structure is characterized by the complexity of developing design documentation and carrying out installation work. Before erecting such a facade structure, it is necessary to carry out a fairly large number of calculations related to determining the loads that it will experience, and the installation process itself requires certain knowledge and skills in this construction field.
- Installing a balcony requires considerable financial costs, so you need to be prepared for the fact that this pleasure will cost the home owner quite a lot.
- A question about the placement of a balcony that has not been fully thought through may result in the structure not being used for its intended purpose. This often happens in cases where the balcony faces the road or faces a neighbor's yard. That is why it is necessary, already at the project approval stage, to carefully plan the visibility of the structure with the features of the environment and construction sites present nearby.
Material
Durable and durable materials are used to make balconies. Most often it is concrete and wood.
Concrete balcony
This architectural structure has its own characteristics:
- load-bearing structures are recessed into the wall. The reliability of the structure depends on the thickness of the wall; if it is not very strong, then additional supports are used;
- the balcony overhang is at least 1 meter in length;
- if the house is brick, then the base slab is inserted into the wall along its entire length;
- the upper level of the slab is set 5-8 cm below the expected level of the floor covering;
- the concrete base must be thoroughly waterproofed;
- The height of balcony railings should not be less than 1 m.
Wooden balcony
Usually inferior to concrete in size and reliability, but superior in decorative terms. Externally, the balcony resembles a cozy wooden house or hut. Wood is a material that has many advantages. First of all, it is the atmosphere of comfort that natural wood creates, its smell and appearance. Wood goes well with different finishing materials.
Features of a wooden balcony:
- for the manufacture of load-bearing structures, beams with a cross section of 10*20 cm are used;
- the minimum depth of beams in a stone facade should not be less than 25 cm;
- the beams are fastened to the walls with bolts or metal angles;
- vertical posts (boards 4*10 cm) and longitudinal ones (5*10 cm) are attached to the console;
- flooring and handrails are installed;
- All elements made of wood and metal are treated with oil paint, gratings and handrails are coated with frost-resistant and water-resistant varnish.
The gaps between the lattice bars for any structure should not be wider than 10-12 cm.
Arrangement of the balcony base
These works require special care , since the reliability, attractiveness and longevity of the balcony structure largely depend on them.
Connecting the balcony frame to the wall
As a rule, the frame of a wooden balcony is made of wooden elements .
Firstly, wood has high thermal insulation qualities, and secondly, it goes well with various architectural styles.
Typically, the balcony frame is connected to the wall using bars fixed vertically to the wall at the ends of the balcony base. The height of the bars determines the size of the fence. The wall is most often covered with clapboard.
The lining made of pine and larch looks good and is durable . If the balcony frame is large, then round profile boards are installed (block house). This wall has a distinct log look.
Floor installation
The floor is mounted on the prepared sheathing . Forty-millimeter planed boards are chosen as the material. To prevent water from accumulating, they are laid with a gap of up to 2 mm.
For flooring on the balcony, terrace boards have proven themselves . They are durable, but at the same time easy to process. The corrugated surface of the boards is suitable for open balconies.
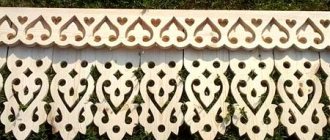
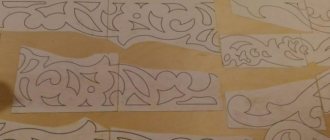
Fencing installation
A good fence not only has an attractive appearance that matches the architectural style of the building, but is also durable and reliable. Turned or carved balusters give a wooden balcony an attractive look.
Railings are made from different materials:
- Forged railings turn the balcony into a work of art. The number of possible ornament options is practically unlimited. Such fencing combines elegance with high strength.
- Wooden railings provide high safety and reliability. They are easy to manufacture and install. However, such railings have a short service life due to rotting under the influence of moisture.
There are certain rules that fencing for wooden balconies must comply with :
- the height of the railing is not less than 1.0 m;
- the distance between balusters is no more than 0.1 m;
- permissible horizontal load on the railing is not less than 100 kg/m;
- There should be no nicks or roughness on the surface of the railing.
Note! When choosing railings, you must first of all be guided by the safety of using the balcony.
Creating a canopy
Not every wooden balcony requires a canopy . It is equipped to create comfort and protect the balcony from the destructive effects of natural conditions.
It is easy to construct a canopy as an extension of the roof slope. In this case, it is enough to have longer rafters.
The simplest design is tying the top of the pillars to support the balcony base. After this, a sheathing is made on which the roofing covering is laid.
There are polycarbonate canopies mounted on the wall. Light materials that can withstand snow and wind loads are suitable for the canopy.
Processing of wooden elements
A mandatory requirement for all wooden balconies is protection from insects and weather conditions.
Protection will be effective if it is carried out comprehensively:
- applying primers;
- impregnation with antiseptics;
- coating with fade-resistant varnish.
Special requirements for processing cladding material on open balconies without canopies . Therefore, before installation work begins, the reverse side of the floorboards is coated with VISASOL antiseptic primer. It contains substances that prevent the formation of mold.
For wooden railings, an elastic, hard and weather-resistant varnish is selected . The best option is alkyd-urethane varnish. It is not afraid of mechanical influences, temperature fluctuations, or direct sunlight.
Note! Wooden fences must be treated with primer, impregnation and varnish from the same manufacturer. Only then will full compatibility of all coatings be guaranteed.
The outside of a wooden balcony must be coated with paint that matches the color of the house facade.
Waterproofing walls
The process of waterproofing the surface of the walls of a completed balcony can be done using the following methods:
- Painting. The most common, but expensive option. Protective agents are applied to the surface: varnishes with rubber additives, which must be renewed regularly.
- Pasting. Such materials can stick due to exposure to high temperatures or self-adhesive. The more common material is roofing felt. But the process of working with this material is labor-intensive.
- Powder. It includes a regular cement mixture to which liquid rubber, some types of plaster or tile adhesive are added. The disadvantage of this method is its low strength and resistance to mechanical damage.
- Water repellents. They are ready-made mixtures that have excellent water-repellent properties and provide protection from high humidity. The disadvantage is the rapid destruction from direct sunlight.
This method should only be used for hydraulic internal insulation.
What to give preference: roof or visor
The roof is not included in the list of mandatory components of a balcony, but it can significantly expand its functionality. Instead of a roof, a canopy can also be installed, which will also act as protection from bad weather and direct sunlight.
Roof requirements:
- The surface area of the roof should be slightly larger than the surface area of the load-bearing slab and balcony railing.
- The roof must be installed at an angle to prevent accumulation of snow mass.
On a note! The roof can be single-pitch or gable. The first option is the simplest and most budget-friendly, the second is ideal for corner balconies.
A special Marquise canopy will help give your balcony an unusual and stylish look . This metal structure is covered with a special fabric, which allows it not only to act as a protective element, but also to emphasize the individual style of the entire structure.
Dome-type visors are less popular . This is due to certain difficulties in its manufacture, but many owners of individual buildings prefer this method of decorating the facade structure.
The arched canopy looks stylish and elegant , which is practical and highly functional.
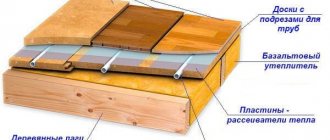
Making a subfloor
After building the foundation, it is recommended to start arranging the subfloor. We first cover the support with roofing felt in two layers.
The floor can be wooden or concrete. For example, in a frame veranda made of wooden beams, a wooden floor would be more appropriate. Concrete pouring will best fit into a brick extension.
Subfloor
We make a wooden subfloor like this:
- We fix the beam of the lower trim on the foundation. We use suitable fasteners, for example, anchors. To connect the beams directly, we first make samples at the places of their joints and additionally fasten them with galvanized nails;
- We attach wooden logs to the bottom trim. We keep the step at 50 cm - this way the floor will definitely not fall through. We use the connection option described above;
- fill the space between the joists with expanded clay;
- We make the flooring from unedged boards or plywood about 50 mm thick. We attach the flooring elements to the joists with galvanized nails or self-tapping screws.
We make a concrete screed like this:
- fill the base with a 10-centimeter layer of sand;
- pour a layer of expanded clay on top;
- lay the reinforcing mesh. For the floor of the veranda, a mesh of rods with a diameter of 6-8 mm with cells of 25x25 cm is sufficient;
- pour concrete.
The recommended thickness of the screed on the veranda is from 30-50 mm. For greater convenience and accuracy of pouring, we can pre-set beacon slats every 2-4 m.
Waterproofing of an open balcony
On an open balcony, the first priority is to install waterproofing of the floor, since this is the part that is most susceptible to the influence of atmospheric moisture.
Waterproofing for a balcony in a private house can be of various types. Most often, one of the main types is used, depending on the capabilities:
Which type of waterproofing to choose depends on the availability of finances, as well as on the design features of the balcony, and it is also important whether the house is at the construction stage or whether insulation is planned in a finished house.
- The simplest insulation can be arranged in the form of a metal sheet on which the balcony floor covering is mounted, with gaps for ventilation.
- If the balcony has already been erected, then you can make a simple concrete screed from a cement-sand mixture with the addition of liquid rubber. But here you need to take into account the type of floors and whether they can withstand such weight.
- An even simpler method of waterproofing can be laying insulating boards, which are mounted directly under the floor covering.
- The cheapest option would be to install roll waterproofing in the form of overlapping roofing felt sheets. A more budget-friendly option is coating insulation by applying bitumen mastic to the surface.
- If funds are available, it is better to use options such as applying liquid rubber or polymer self-leveling floors. But it is quite difficult to do such waterproofing in a private house with your own hands, so it is worth turning to professionals.
When installing waterproofing, the following algorithm is followed: Preparing the surface, laying a waterproofing layer, installing the floor covering, treating the floors with antiseptics. If the house was built a long time ago, then to install a high-quality insulating layer, the covering is removed and one of the selected layers is laid. If the open balcony is located above the bay window of the first floor, you can use the following coating pie:
- a layer of vapor barrier and roll insulation is laid on the ceiling;
- installation of a layer of insulation (penoplex);
- layer of coating waterproofing;
- floor covering.
It is also worth organizing a slight slope of the surface of the wooden balcony for natural water flow towards the edge of the balcony. The height difference is not significant within 40 millimeters, this will be sufficient and unnoticeable in everyday use.
Types of structures
Regardless of appearance and size, all balconies have mandatory structural elements. Among them:
- base plate, which bears the main load;
- fencing (parapet);
- additional elements (visor, wind screen).
The main structural element is a slab, which is made of reinforced concrete or wood. The first option is applicable only for buildings built from durable materials (stone, brick, reinforced concrete blocks). The wooden slab is lightweight, so it can be installed on the facade of any building.
Depending on the method of attaching the slab to the wall, balconies can be:
- with a cantilever beam clamped in the wall (the reinforced concrete slab is recessed into the wall during the construction stage, and the overhang of the structure cannot exceed 1 m);
- with a cantilever slab and support on beams (beams are recessed into the wall, on which a reinforced concrete or wooden slab is placed on top, while the width of the balcony can reach 1.2 m);
- with a slab supported on triangular brackets (this option is used when the balcony is attached to an existing building);
- with a slab on supports (an attached balcony rests on columns, walls, and beams standing near the facade).
The French balcony also belongs to the category of balconies, although, in fact, it is only a beautiful enclosure of a window opening.
Step-by-step instructions for installing wooden frames
Specialized companies usually accept orders for the production of expensive frames with three-chamber double-glazed windows along with installation. It is unrealistic to make such a design at home. Therefore, it is rational to consider the installation of simple glazing of balconies with wooden frames.
In terms of installation methods, installing sash with single or double glass differs little, but will save household financial resources (up to 20 - 30 percent of the cost of the window unit).
Tools and preparatory work
For installation operations you will need a small set of tools:
- plumbing tools (hammer, screwdriver, wrenches or socket bits);
- measuring instruments (tape measure, metal ruler, construction square, level, plumb line, laser plane builder);
- rubber mallet;
- carpentry tools (for finishing, sanding, varnishing, polishing windows);
- power tools (wrench, air chisel, screwdriver, electric drill, grinder);
- mounting guns for foam, driving dowels.
Balcony designs in a private house: a balcony over a porch or other extension
The design of any balcony includes mandatory elements.
This:
- Balcony slab;
- Fencing or parapet;
- Protective elements in the form of a visor and wind screens (not mandatory, but desirable elements).
Balcony slab is the main structural element, usually made of reinforced concrete or wood.
Due to the lightness of its structure, a wooden balcony can be mounted on a building made of almost any building material.
For private houses, the following main structural types of balconies are used, which differ in the method of attaching the balcony slab to the wall of the building:
- Balcony with a cantilever slab jammed into the wall. When making such a balcony, a reinforced concrete slab is embedded into the wall to a certain width, while the overhang of the slab (and, accordingly, the width of the balcony) cannot exceed 100 cm.
- Balcony with cantilever slab supported by beams. In this case, it is not the slab that is clamped into the wall of the building, but reinforced concrete beams, on top of which a balcony slab is laid, which can be made of either reinforced concrete or wood. Thanks to the beam support, the width of such a balcony can be up to 120 cm.
- Balcony with a slab supported by triangular brackets. This design can also be used in the case when the house has already been built and the owners decided to acquire a balcony during the operation of the building. In this case, a frame is driven into the wall of the building, on which a balcony slab is laid, which can be either wooden or reinforced concrete. Metal or wooden triangular brackets are used as supporting elements for the slab. This design allows the installation of balconies up to 150 cm wide.
- Balcony with a slab standing on supports. In this case, the balcony slab rests on columns, walls, etc. In this case, the width and shape of the balcony are limited only by the designer’s imagination and the cost of construction materials. An attached balcony can also be made on supports, when the supporting elements are not connected in any way to the structure of the house and are attached separately. Such a balcony can also be attached to an already finished house.
One of the options for a balcony on supports could be a balcony above the porch. With certain design features of the building, optimization of construction can be carried out. In the case where protruding structures are provided on the facade of the house (porch, terrace, garage, bay window, etc.) that require a roof, then this roof can be a balcony slab, and the construction of the balcony will be significantly reduced in cost.
Canopy or roof over the balcony: which is better?
The roof over the balcony is not a mandatory element of the balcony structure, but its presence makes the use of the balcony space much more comfortable, thanks to protection from precipitation; in addition, the presence of a canopy protects the slab itself and the protective fences from destruction under the influence of precipitation and time.
The roof should cover the width of the balcony slab with a small margin and have a slope to prevent the retention of snow and rain.
The nuances and dangers of installing wooden frames
When making boxes and window frames yourself, it is necessary to impregnate the wood with antiseptics. On the outside, all surfaces are varnished with acrylic varnishes with water-repellent properties. The inside of the box and binding can be varnished with oil-based furniture varnish and polished.
Countersunk holes are drilled for through bolt anchors. This method allows you to disguise a metal bolt with a wood plug, which is not visible when the sash is open. At the same time, the metal fastening is additionally protected from rust. Do not use wedges or bars filled with mounting foam to strengthen the frame structure. They are not strong enough to withstand strong gusts of wind.
If you plan to install a balcony extension, it is better to make its frame from a metal channel, the parts are fastened by welding or bolted connections.
Installation operations at height are dangerous. When working with the upper fastenings of wooden glazing of balconies and loggias, it is recommended to use stable, wide scaffolding. The normal methods of insurance when mounting at height would be a mounting belt or a chest strap with a three-meter end of a strong rope. The rope is secured to the metal parts of the fence or tied to the door of the balcony block. It is not recommended to install the structure alone; it is better to work with two or three people.
Screed, its manufacture and features
When talking about what to make a balcony floor from, you should take into account that making a screed yourself is not so difficult, and besides, it is a budget option. However, this simple method also has a downside:
- The screed significantly increases the height of the floor on the balcony (about 10-15 cm), which of course puts additional load on its base - that is, the slab. If the house is very old, the balcony may simply collapse.
- Concrete floors are considered the coldest. Of course, it can be insulated (for example, with polystyrene foam), but this will not help much; thermal insulation still leaves the floor cool.
If the above circumstances do not scare you, then you should study step-by-step instructions on how to make a floor on a balcony with your own hands.
Home comfort on the loggia directly depends on how well it is insulated
Do-it-yourself screed manufacturing technology
First, the floor is prepared for installation work. The first step is to carefully close all noticed cracks. They usually occur in those places where the wall is adjacent to the slab - the base.
Conventional polyurethane foam or acrylic sealant will help you with this preparatory stage. After all the cracks are sealed, you can begin arranging the floor.
Sealing cracks is an important step in the process of constructing and installing a floor on a balcony.
Waterproofing
Laying a waterproofing film is necessary so that when pouring the solution, excess moisture from your screed does not leak to the neighbors below.
To waterproof the floor on the balcony, you don’t have to make any special efforts. Just carefully lay a thick sheet of polyethylene in the form of a neat “trough”.
Important! The film should be laid overlapping, laying about twenty centimeters on the walls. After the work is completed, the edges of the polyethylene are carefully cut off. Waterproofing the balcony with plastic film
Waterproofing a balcony with polyethylene film
Reinforcement process
Basically, a steel mesh made of three-millimeter wire is used for this. The cells of the reinforcing mesh can be 50×50 or 100×100 millimeters.
The sequence of work is quite simple:
- All visible dirt and other debris are removed from the surface;
- The first row of mesh is carefully laid on the insulation and pressed tightly;
- The second row is placed overlapping 1-2 cells.
Reinforcement mesh increases the strength of the screed and significantly increases its service life
Lighthouses
In construction, beacons are special guides (landmarks), by moving along which you can level the applied coating to a perfectly flat and flawless surface. When making a balcony floor in the form of a screed, you can’t do without such little things.
Beacons are installed in one plane, which is determined in accordance with the height of the threshold in indoor block doors. Also, all beacons must be carefully aligned horizontally.
The top edge of the lighthouse should be at the same height as the subfloor surface
Important! To ensure that the beacons do not move during the screed leveling process, they must be firmly fixed. To secure them firmly, it is best to use building plaster or cement mortar. Installation of screed beacons using thick cement mortar
Installation of screed beacons using thick cement mortar
Filling the screed
After all this preliminary work has been done, you can prepare a solution of sand and cement (four parts cement and one part sand). The finished mixture is carefully poured between pre-installed beacons and carefully leveled using the rule.
To make the floor level, the rule must be applied slowly with little pressure, while simultaneously resting it on two beacons
After completing the concrete work, the screed is covered with a sheet of polyethylene to slow down the drying process. If you neglect this, it may crack during hardening.
It is also necessary to ensure that the thickness of the screed laid on foam plastic or other insulation is at least fifty millimeters. Otherwise, the base of the floor on the balcony will crack under the influence of gravity - for example, from the weight of furniture.
If all work on arranging the concrete screed is carried out according to the instructions, the floor surface should be perfectly flat
What is waterproofing and why is it needed?
Protecting building structures from moisture ingress is called waterproofing. This set of measures is used in the construction of any buildings from any materials. Protection against moisture in construction is used for:
- normal functioning of buildings;
- increasing the service life of the building.
These two points contain the whole secret of using waterproofing. Firstly, no home owner wants to live in dampness and surrounding mold. And secondly, a house, and especially a wooden one, will deteriorate very quickly under the influence of such an aggressive substance as water.
Wooden balcony in a frame house
Let's take a closer look at the technology of constructing a wooden balcony in a frame house with our own hands. The construction of the balcony itself consists of a main frame, a floor, a canopy and a protective fence. The support for a wooden balcony is provided by outrigger beams and support posts.
Let's consider options for constructing balconies in a frame house:
When building a balcony, floor beams are used for the base of the frame, which extend beyond the plane of the wall. Wooden beams with a cross section of 150 by 150 mm will be sufficient for a platform about two meters wide. The remote beams must be rigidly fixed in the wall, and they will form a single monolithic structure with it, which will not involve any repair work in the future, and will not need to control the shrinkage of the house. The ends of the beams are connected by a special crossbar, which will serve to construct the finished floor. The load-bearing capacity of the balcony can be increased by installing wooden struts in the form of a triangle, resting with one leg on the embedded parts in the wall.
When it is not possible to use all the elements and details of the floor as a base or remote platform, an independent structure of a wooden balcony on load-bearing posts is used. This structure will require additional financial expenses, but there are no restrictions on dimensions, and space will be created for a frame house with a terrace, utility room or car parking. In addition to wood, metal, sand-lime brick or reinforced concrete are used for supporting columns. The racks are placed on both sides of the balcony or under its outer edge, the inner part resting on a wooden beam fixed along the wall.
Balcony flooring
The columns of a wooden balcony are connected by a transverse beam laid on top of them, and placed slightly below the wall beam. The resulting slope of approximately 2° will ensure that all the water drains from the wall. Between the beams of the wooden frame, logs are installed in increments of 70 cm, which are fixed with special galvanized corners on the beam. The finishing coating is made from planed wooden boards (50 mm thick), screwing all parts and elements on the sides with hidden fasteners with a gap of 7 mm. The best material for the floor on a wooden balcony would be a decking board with a special corrugated surface, made from hardwood or wood-polymer composite.
Balcony fencing
The height of the railings on the balcony should not be less than 120 cm. The railings are assembled from carved or turned wooden blanks. Fence posts are attached to the load-bearing parts of the wooden frame using a tongue-and-groove connection, brackets and double-sided studs. On longer wooden balconies it is customary to install intermediate balusters.
Canopy device
The roof on a wooden balcony comes in two main types:
- The roof is shared with the house; to do this, simply lengthen the ridge line or extend the rafter legs.
- A canopy independent of the main roof, supported on a load-bearing wall through special supports or on pillars along the entire outer perimeter of a wooden balcony.
But the simplest and most effective solution is to use a lightweight structure covered with plastic, fabric or polycarbonate.
Wood protection
All wooden balcony elements and parts are usually coated with special paint mixtures and impregnations that are resistant to fading and fluctuations in external temperatures. High-quality and reliable wood processing is carried out by a whole complex of the following operations: priming, impregnation and painting.
Installing and assembling a frame balcony with your own hands requires a lot of physical effort and financial costs, depending on the final dimensions of the building, the complexity of the entire structure and the specifics of the building materials. But for the sake of comfort and coziness, it’s worth trying hard to make a more convenient place for your relaxation and work in the fresh air.
Preparing for work
Preparatory work, first of all, includes the creation of a project with calculations . If you correctly calculate the loads on the supporting structures, then the balcony is not in danger of collapsing.
The success of construction largely depends on the quality of the project. When preparing it, first of all, the location of the structure is determined . The classic option is the location above the entrance to the house. In this case, the porch columns will support the balcony base.
Experts recommend that at the stage of preparation for construction, it is simplified to calculate the load, taking into account the strength coefficient and weight of the following components :
- balcony designs;
- installed furniture;
- people going out onto the balcony.
There are other requirements for choosing the right extension design :
- for safety there must be a fence at least 105 cm high;
- the base of the balcony is mounted with a slope of up to two degrees, so that during precipitation the water flows out;
- The location of the balcony must correspond to its purpose. For decoration it is placed on the facade of the building, and for relaxation in quiet places;
- Additional equipment for the canopy will well protect the balcony from precipitation and extend its service life.
Construction of a cantilever balcony
Initially, the materials specified in the project are purchased and the tool is prepared. In addition, the project must include drawings with the dimensions of the parts. This will save materials and also simplify assembly.
Important! If an extension is being made to a house under construction, then the protruding floor beams are a good basis for the construction of a wooden balcony. In a built house, the best option would be to support it on pillars.
Before starting work, you must make sure that the location of the balcony door will not affect the strength of the load-bearing wall.
In a cantilever balcony, one of the options is used for mounting the base:
- pinching in the wall. Disadvantage: the width of the base is limited to one meter;
- support on cantilever beams. The dimensions of the base increase to one and a half meters.
Construction work is being carried out in stages:
- Markings according to the project are made on the wall;
- For the balcony beams, a wooden beam measuring 200 x 100 mm is prepared. It is pre-treated with antiseptic solutions;
- Holes are cut in the wall with a depth of at least 250 mm and a pitch of up to 1 meter. The ends of the beams, wrapped with waterproofing, are embedded in them;
- the ends of the beams are connected by a transverse beam, which is then used to secure the fence;
- to increase the load-bearing capacity of the balcony, wooden brackets are installed, which rest against the wall at an angle of 45 degrees. The brackets at the bottom of the beams are attached to the cross beam;
- sheathing for flooring from boards is laid on the cantilever beams; arrangement is being made.
Important! Be sure to treat the wooden surface with protective compounds!
Construction of an attached balcony
As in the previous version, work begins with the purchase of materials and preparation of tools. Unlike console structures, such structures are more complex to install and require more financial costs.
Stages of construction of an attached base:
- according to the project, markings are applied on the wall and in the places where the pillars are installed;
- for supports, pillars with a diameter of more than 140 mm are selected. They are treated with an antiseptic. The lower part of the pillars to the depth of installation in the ground is covered with bitumen;
- holes are dug or drilled. A sand cushion is placed at their bottom;
- the pillars are filled with concrete. For a closed balcony, the height of the pillars should be higher than the height of the ceiling;
- a wall support is attached under the door strictly horizontally along the entire length of the future balcony;
- at the level of the wall support, the pillars are tied with crossbars;
- the pillars are connected to the wall support with lathing, which is necessary for installing wooden flooring; arrangement is being made.
Features of waterproofing a loggia or closed balcony
Organizing floor waterproofing on a closed balcony or loggia is no different from the open version. But at the same time, special attention is paid to insulating the ceiling, and if necessary, the walls. In addition, you definitely need to take care of insulation if you plan to operate the house in the winter.
The best way to organize high-quality insulation may be to impregnate the ceiling with polyurethane mastic. This type of waterproofing is not cheap, but it pays off very well, especially in combination with roll types.
Waterproofing for a balcony in a country house looks like this:
- ceiling impregnated with liquid waterproofing;
- a layer of mineral wool insulation;
- steam-hydraulic barrier;
- layer of rolled insulation;
- sheathing;
- roofing material.
Options for installing waterproofing can be different, and an important factor will be what type of roofing material will be used. If you plan to install soft tiles, you will need a continuous sheathing and a layer of rolled waterproofing; when using sheet roofing, you can use the cake indicated above.
The walls of the loggia are less susceptible to precipitation, but also need protection from excessive moisture. The following types of waterproofing can be used:
- Painting is the protection of wall surfaces by applying paints and varnishes. They contain rubber additives that successfully provide insulation. The disadvantage of such waterproofing is the need for periodic updating.
- Pasting types of insulation are created by installing roll materials on the surface. Previously, roofing felt was used, but today there are more modern materials.
- Powder plasters are various types of plasters with the addition of waterproofing additives. Excellent protection of surfaces in combination with painting types.