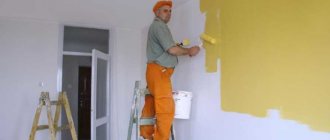
Decorative plaster is a type of finishing material for finishing the surface of walls, ceilings, wall niches, and window openings. This is an independent type of finishing. The first way it differs from a regular plaster mixture is the presence of polymers or other synthetic fillers in the composition. Such additives make it possible to make the coating strong, practically durable and give it an exclusive aesthetic appearance.
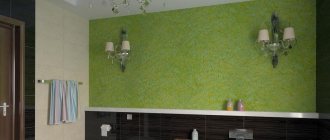
Partial decorative plaster combined with regular painting Source ps-khv.ru
The main advantages of decorative plasters:
- strength - long service life;
- moisture resistance – the walls can be easily washed, the finish is suitable for bathrooms;
- fire resistance - does not ignite;
- recoverability - simple correction of the damaged area;
- resistance to scratches - domestic cats will be indifferent to scratching a hard surface, preferring something softer (wallpaper, wood, felt panels);
- design possibilities - texture, richness of colors, natural contours, patterns, absence of seams, like wallpaper.
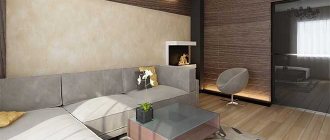
The refined top layer of finishing makes it possible to widely use it in projects developed according to designs of different styles. Universal decorative plaster in the interior will suit any spatial style and will serve as an ideal backdrop for filling the rooms with details. All thanks to the wide range of varieties and shades of mixtures. This is the second difference from ordinary plaster.
Basic aspects of application technology
In order for the plastered surface to look impressive, it is necessary to carry out the required set of works step by step, taking into account the features of the technological process. Let's consider the main stages:
- Selecting a pattern that is suitable for the walls of a particular room. A sample of the patterns should be at hand during work in order to promptly check it for correct reproduction on the work surface.
- Preparing the walls. The process involves removing old wallpaper or paintwork. After this, fine dust is swept away with a brush, and the walls themselves are primed with solutions that additionally protect against mold and insects.
- Applying the starting layer of plaster. The finished composition is applied to a primed work surface as a base for the finishing coating with a relief pattern.
- Primer treatment. After the starting plaster has dried, the walls are primed again to increase the adhesive characteristics of the surface.
- Application of relief plaster. The composition is applied after the walls are completely dry. Each drawing is specific in execution. If several layers are needed to reproduce the pattern, the next layer must be applied after the previous one has completely dried.
- Applying color. The relief pattern is covered with tone. After the paint has set, its excess is removed with a damp sponge from the protruding areas of the relief.
The entire cycle of planned work may take more than one day, but there is no need to rush. Making thoughtless adjustments to the technology of finishing work can cause a negative outcome.
Creating a textured coating
You need to know not only how to apply decorative plaster, but also how to make a textured surface from it . The application method will depend on the effect you want to achieve. With gypsum putty it is easy to imitate leather and finishing stone and create a relief pattern. Finishing mixtures are best suited, but you can mix them with starting mixtures in equal proportions. The solution is mixed strictly according to the manufacturer's instructions.
To create a base, a thin layer of putty is applied to the primed surface. The thickness of the coating will be no more than five millimeters. The work starts from the bottom, the mortar is spread in long strokes along the wall. Having applied the composition to two square meters, you need to immediately proceed to applying the relief, otherwise it will no longer be possible to remove anything from the set mixture.
The simplest working tool can be called a wad of rag, which is wrapped in plastic film. The created tool is applied to the wall, after which you need to make a rotational movement with your hand to tear the film off the composition. You will get a spiral curl. These prints can be arranged in any order. The wall will be covered with patterns reminiscent of peonies or roses. After treating the entire surface, you need to wait a day.
Then the wall is covered with a layer of water-based or acrylic paint and left for three hours. Next, polishing is done with a metal spatula to smooth out strongly protruding peaks. Some of the paint is also removed, exposing the base light layer. The result is a vibrant floral pattern.
You can make wavy patterns of lines with your own fingers. You can leave ring-shaped marks with a round plastic washcloth; use a sponge with large holes to form a surface that will resemble shagreen leather . Sometimes reliefs are applied with a regular roller, which is first wrapped with a thick cord - the effect of bamboo stems is obtained.
Special stamps and roller attachments are required to create imitation reptile skin. A snake scale or crocodile skin pattern needs to be painted over twice after drying to highlight the depth of the pattern. The layers of paint will differ slightly in tone, the top layer is applied extremely carefully: you only need to paint over the protruding parts of the “scales”. You can apply glitter or gilding with a soft sponge.
What tools will you need?
For plastering work you may need the following tools:
- sponge for a “bubbly” effect on the surface or color shading of the relief;
- a roller with a nozzle of a designed pattern, which will work on the principle of making an impression on a wet base;
- plastic film, rubber gloves or a brush, which will also be tools that give the walls a three-dimensional pattern;
- spatulas of different widths are the main tool for creating reliefs in most works;
- masking tape, adhesive tape to protect areas where plastering work is being carried out in the immediate vicinity.
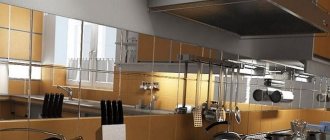
Photo: the pattern depends on the tools used to apply decorative plaster
Relief plaster, as a decorative element, requires limitless imagination when choosing a design, so you can choose almost any tool, even an ordinary teaspoon or tools from a manicure set.
How to delete?
Removing decorative plaster is difficult and the process takes a lot of time. So, let's look at the steps:
- The entire surface is wetted with hot water.
- Tap the wall with a hammer; parts that do not hold well will fall off on their own.
- Using a chisel and hammer, remove the remaining elements.
The procedure for removing decorative plaster is done from top to bottom. It is necessary to pry up the layers of coating and separate them from the base. In rare cases where the bond is too tight, a hammer drill may be needed.
You can “erase” the coating using a grinder with an abrasive disc. The plaster should be constantly moistened. After removing the decorative coating, go over the surface of the wall with a wire brush and then wash it.
Important! Only after all these procedures can you begin new decorative work.
Materials
To level the working base for applying relief, the following compositions are recommended:
- Based on gypsum. Gypsum solutions are applicable provided that the decorative layer is made of the same material.
- Cement based. It is not difficult to prepare such a solution with your own hands - take one part of cement to three parts of clean sand. But it is better to use ready-made compounds, due to their increased plasticity.
- Clay based. The starting layer with this composition is rarely performed, since many people prefer to use more modern mixtures. Despite this, it should be noted that clay is environmentally friendly and elastic.
Decorative design of walls involves the use of finishing compounds, which can be different. On the packaging, the manufacturer notes what type of terrain they are intended for. Mixtures can be homogeneous or multicomponent, for example, with stone chips. Relief plaster is available in ready-made or dry form for dilution to the desired consistency.
For priming working surfaces under plaster, many compositions are also produced in liquid or paste form. Under the starting layer, mixtures with antiseptic additives with a deep penetration effect are recommended. Paste-like primers are relevant for the finishing layer - with their help, a more favorable base for decorative design is formed.
Relief painting is done with water-based paints - emulsion and water-dispersion products. They are available in different colors, but you can get exclusive tones using additional colors that are added to white water-based paint.
The finished painted relief surfaces are coated with a varnish composition. The coating will keep the finish of wall surfaces in their original condition for a long time.
Photo: sanding the coating is an important step before applying decorative plaster
To perform finishing work efficiently, you need to familiarize yourself with the details of each process.
Mixture selection
For relief plastering of walls, compositions specially produced for this purpose are used. They are different, depending on the texture we want to make. They may also contain stone chips, which cannot be used for other designs.
Therefore, we need to select a mixture specifically for our design and idea.
It is packaged immediately in finished form, most often in plastic buckets, which makes it easier to store leftovers if there are any after work. Relief plaster is sold in all construction stores.
Preparing the walls
In order for the layer of plaster to lay effectively and reliably on the work surfaces, it is necessary to work with clean and dry surfaces. Therefore, before plastering, the walls must first be prepared taking into account the requirements listed below:
- Old coatings are carefully removed. Cleaned surfaces are additionally freed from dust.
- The prepared walls are covered with a layer of primer with deep penetration antiseptic fillers. The application of the solution is repeated several times for better adhesion to the plaster composition. The primer is applied in an even layer with a roller or wide brush in one approach over the entire working surface, avoiding multiple smudges.
- After the primer has dried, it is necessary to begin preparing the plaster composition, if we are talking about a dry mixture.
Applying the starting layer
Photo: applying leveling gypsum plaster to the walls
The starting or base layer of plaster is applied not only as a base for a relief coating, but also as a leveling composition.
- The product is mixed with an electric drill or a construction mixer. If a gypsum-based composition is chosen, it is not recommended to do too much of it at one time, since the structure of the mixture tends to set quickly.
- The finished starting plaster is applied to the walls in a layer of the required thickness with a trowel or spatula. The thickness and volume of material used depends on how smooth the walls were.
- Beacons are pre-installed on uneven working surfaces, which are used to level the walls.
- The solution is rubbed with a grater in a counterclockwise circular motion.
The walls are leveled to perfect condition. After this, a primer is applied to the set plaster.
Briefly about the main thing
- First of all, you need to choose the pattern that you want to put on the wall, remember it and think through every little detail so that it turns out exactly the way you intended it.
- The second very important stage is the preparation of the walls; everything needs to be done carefully. You need to remove old wallpaper, tiles, plaster, everything that is unstable on the wall.
- We sweep away all small elements (dust, dirt) with a brush or broom so that they do not interfere with applying the mixture.
You definitely need to prime the wall, this will help improve the adhesion of the mixture, which will give wear resistance and durability to your work.
- The relief mixture is applied only to the base layer, which also needs to be primed, since without it the wall most likely will not be level.
- It is best to use a ready-made mixture in jars or buckets; it is diluted in the required proportion, which means the quality will be better than a homemade mixture.
- The so-called stone plaster can be used; it contains many small stones, when rubbed, various intricate patterns are formed.
- It is advisable to apply varnish to the surface, especially if the plaster is made to look like stone or leather.
Applying relief plaster
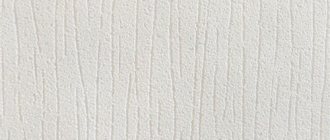
Photo: unique pattern of relief plaster
Photo: decorative plaster
Applying the intended relief layer is the most creative and exciting stage in the implementation of the planned finishing work. To do this, you can use different tools, as mentioned above. At the same time, it is important that the solution has the required consistency and structure - that is, it becomes homogeneous or heterogeneous if an emphasized relief of the finish is intended.
The application of relief plaster is carried out using several techniques, for example, short strokes, complex tapes, etc. The applied pattern can be left in its original state or smoothed out. After setting, the color will determine its relief, shadow and volume.
Photo: decorative plaster in the interior
Using ordinary plastic film, you can reproduce different volume effects. For example, with a film clenched into a fist or by applying it to a wet layer of plaster. The result of the work is a relief recessed into an even layer of decorative coating, visible in individual areas. The color will add dimension to the drawing.
Photo: pattern applied with plastic film
If you are using a coarse effect compound, you can create relatively straight vertical and horizontal lines by dragging a float through the soft consistency of the compound. Semicircles and circles are created using the same principle, and the color will put the effectiveness of the design in its place.
Photo: semicircles
Thanks to the roller, you can also create many interesting designs, and you can come up with exclusive textures yourself, without purchasing attachments. For example, using tape or rope wound around a roller. If you manage to select a roller with the right attachment, the work will go much faster.
Photo: applying decorative plaster with a roller
Relief plaster is applied to the prepared wall; just go over the wet material with a roller with a nozzle - the technology will give an impressive result. You can also use a comb spatula to apply intricate or geometrically regular shapes to the coating.
You can fantasize endlessly - a lot depends on the wishes and creativity of the owners.
Pros and cons of using
Everything can be learned by comparison: ordinary wallpaper provided the owners with a whole set of undeniable advantages, the main ones of which, perhaps, are the ease of application and versatility of use. What about the obvious advantages of textured plaster?
- resistance to any mechanical stress;
- excellent vapor permeability;
- maintaining performance at any temperature;
- high level of fire resistance;
- not afraid of ultraviolet rays;
- variety of surface relief;
- wide selection of color options;
- no toxic substances in the composition;
- good heat and sound insulation;
- basic installation and dismantling.
As you can see, textured plaster has more than enough advantages in terms of expressive wall design - in the photo you can only see how perfectly this or that texture fits into the interior. If you go from the other side and try to “dig out” the negative, the first thing that comes to mind is the relatively short service life
. Regarding other, more sustainable finishing materials. Otherwise, we have before us a case where even with the greatest desire to come up with a minus out of the blue, nothing happens.
Painting plastered walls
When working with decorative plaster, you can immediately select a material of a certain color, but in practice the technology for applying it becomes much more complicated, so only specialists with sufficient professional experience work with the finished product. For independent finishing work, it is recommended to purchase white plaster, after which it dries, you need to choose the coloring of the desired shade.
As dyes, ready-made paint of the required tone or one made independently by mixing white paint and color can be used. When introducing tinting materials into paint, you must remember that after drying the result will be half a tone or tone lighter.
To paint relief plaster, paint is poured into a tray specially provided for this purpose. A roller is dipped into it, taking the required amount and squeezing it along the upper ribbed surface of the tray, after which the material is applied to the walls. If work surfaces are painted with a brush, you can do without a tray by dipping it directly into a can of paint.
Photo: painting relief plaster
It is important to apply the first layer in one approach so that the tone is applied as evenly as possible. If you prepare the paint yourself using tints, you need to correctly calculate its volume so that there is enough material to paint all the walls with relief plaster.
After the entire area of the wall has been covered with the desired tone using a brush, sponge or roller, you must use one of the following painting technologies:
Photo: applying plaster with a sponge
- Without waiting for the paint to dry, they pass over the working surface with a dry or damp sponge, removing excess dye, thereby achieving the effect of a three-dimensional pattern.
- After applying the first layer of paint, you need to wait for it to dry completely, and then walk over the painted walls with fine-grained sandpaper, highlighting individual areas of the relief coating. Later, an additional light tone can be applied to them for a more impressive perception.
- The most labor-intensive method is considered to be painting relief plaster with small brushes. This option is great for painting specific figures of animals, plants, etc. on walls. Painting is usually done by artists or people who know how to draw a little.
- Two-color technology is used infrequently. In this case, on the work surface covered with the first layer of paint of the desired tone, a dye with a lighter or darker tone is applied with neat strokes. It remains on the protruding parts of the relief, creating a volumetric effect by highlighting them. Most often in this technology they resort to the use of bronze, gold or silver paint.
Whatever painting technology you choose, the final stage when decorating walls with relief plaster is coating them with varnish. The varnish is applied evenly with a sponge or brush, trying to avoid smudges. Careless application of varnish can ruin the entire job.
Surface repair
The surface preparation work does not end only with the removal of the old layer. It is important to ensure that the walls and ceiling are perfectly smooth. Experts call this condition “like an eggshell.”
To obtain such a surface, you first need to repair it. To do this, perform the following actions:
- Wet the required surface, including the edges.
- Plastering in several layers. Each one is dried.
- If it is necessary to treat cracks, they are first widened slightly to prevent cracking of the edges. After this, they are filled with gypsum mortar with a lime mixture. It is not recommended to use pure plaster, as it will stand out in a brighter color during the finishing process due to intense absorption of pigment.
After repairs, be sure to re-grout the surface. In this way, a homogeneous surface is achieved, avoiding differences between the repaired areas and those where such manipulation was not carried out.