One of the most important conditions for living in an apartment is a good heat supply, for which either a centralized heating system or autonomous equipment installed by residents is responsible. However, the efficiency of heating directly depends on the correct thermal insulation of the premises.
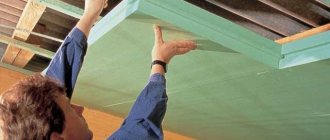
Let's look at how to insulate a wall in an apartment to increase the air temperature and at the same time reduce energy costs for heating. For this purpose, we provide two detailed instructions on thermal insulation with popular types of insulation, in which each step is illustrated with photographs.
Also in this material we will consider less popular methods that can be used to insulate walls from the inside.
What is the difference between internal and external insulation
Walls transmit up to 38% of heat, so it is very important to take care of insulating these surfaces in the summer, especially those that are cold. Often homeowners are interested in how to insulate a wall in an apartment from the inside if it is cold and whether it would be better to insulate it from the outside.
Experts in the field of construction and renovation of premises claim that walls with insulation, which is carried out from the street, have an increased ability to retain heat.
This does not reduce the internal area of the room, which is a definite advantage. Heat loss will be minimal, and the coating will reliably protect the walls from seasonal and daily temperature fluctuations.
It is not always possible to perform external wall insulation. For example, residents living above the 2nd floor cannot independently insulate their homes.
An excellent solution in this situation would be to carry out work indoors. When giving preference to this method, it is worth remembering the dew point, which is located in the space between the insulation and the inner wall. As a result, during the cold season, condensation will begin to accumulate in the room and dampness will appear.
Few owners decide to insulate a city apartment from the inside.
Video description
The advantages of stone wool are described in this video:
- Ecowool.
The basis of this insulation is made up of cellulose waste, treated with substances that prevent rotting and burning, damage by microorganisms and insects. Subject to the production technology, its composition does not contain toxic substances. Internal insulation of the walls of a house with ecowool is carried out by spraying using special equipment, and floors and ceilings can be covered manually with dry material.
- Warm plaster.
Plaster with perlite or vermiculite not only helps retain heat, but is also an excellent finishing material, which allows you to solve several problems at once: insulate, level and decorate walls. The material is non-flammable, non-toxic, and resistant to moisture, mold, and insects.
This category of insulation also includes liquid ceramic insulation - an acrylic-based material filled with small expanded clay granules.
A thin layer of liquid thermal insulation allows you to save the usable area of the room Source kraski-net.ru
General points of the technological process of arranging insulation from inside the room
Before you insulate your apartment, you need to familiarize yourself with the main points of the technological process.
Features of insulation from the inside
To prevent condensation from appearing on internally insulated walls, you can use one of the following methods:
- Performing insulation, during which builders use a heat insulator, the vapor permeability of which is lower than that of the facade material.
- Carrying out work using materials with minimal water absorption.
- Application of ventilated facade technologies.
The installation of insulation begins only after the surfaces have completely dried.
Additional Information
To ensure maximum heat retention inside the house, insulate a brick wall, experts recommend insulating not only the walls, but also parts such as the floor, attic and roof. At the construction stage, this is, of course, much easier to do, but even if the building has already been put into operation, a positive result can be achieved.
In the case of the floor, you can use the same material as for the walls, for example, polystyrene foam, extruded polystyrene foam. The main thing is to choose one that has high strength and density. A vapor barrier is usually laid on top of the multi-layer cake on the floor, after which you can pour the screed and lay the finishing floor covering.
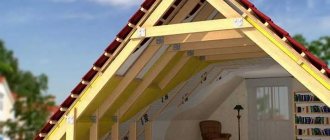
For those who don’t know, 40% of the heat is lost through the top of the house (the attic). The secret lies in the laws of physics, which are difficult to argue with. Warm air always rises because it is lighter, and cold air sinks. The principle of the technology is that ecowool or mineral / basalt .
On top, to make the attic space comfortable to walk on, a subfloor is made of rough wooden boards. It is especially important to equip high-quality ventilation of the space under the roof.
You will completely forget about
what is it like to be cold in the house if you lay thermal insulation material between the rafters along with Izospan . To keep it all firmly in place, a sheathing is constructed in 0.5 m increments.
Don't be intimidated by the large amount of work that needs to be done to protect your home from heat loss. If you understand all this, then it turns out that this is easy to do, especially for those who have tools and experience in performing construction work. The best guidelines in this matter are the standards established by SNiPs and the recommendations of experienced specialists.
How can you insulate a brick wall?
Types and features of insulation
Modern construction stores offer a wide range of thermal insulation materials. However, not every one of them is suitable for insulating walls in a house from the inside.
Below you can familiarize yourself with the features and types of heat insulators that can be used to insulate indoor walls.
When choosing a heat insulator, you should pay attention to:
- degree of heat conductivity;
- air permeability level;
- waterproofing properties;
- environmental safety;
- fire resistance;
- duration of operation.
When choosing insulation, it is necessary to take into account not only cost, but also sound and heat insulation
Minvata
Mineral wool is a popular type of insulation made from basalt fiber. Thermal insulation and air ventilation are good.
This type of heat insulator does not tolerate moisture well. When exposed to direct fire, no toxic substances are released.
During the installation of light and elastic mineral wool, special guides are used.
Expanded polystyrene
Expanded polystyrene is an insulation material that manufacturers make by foaming polystyrene under high pressure. The cost is affordable, installation is quite simple. Thermal insulation properties are good.
The material is considered environmentally friendly and safe. Long service life. However, with such insulation, it is worth considering that condensation will begin to accumulate on the walls, because the water permeability indicator is poor.
Most often, to insulate cold walls from the inside, extruded polystyrene foam Penoplex is used, which is characterized by good moisture resistance and light weight. Even a beginner can install a heat insulator.
Even a beginner in construction can work with expanded polystyrene
Keramoizol
Keramoizol is a liquid material that is sold in containers of various sizes. The insulation is durable, waterproof and vapor-tight.
During the installation process, several layers (from 3 to 6) of ceramic insulation are applied. The layers are laid perpendicular to each other.
High cost is the only drawback of this heat insulator.
Penoizol
Penoizol is a popular thermal insulation material that can be installed fairly quickly. The foam hardens quickly. There are no seams or joints.
This is a flammable material, which should definitely be taken into account when purchasing. The waterproofing properties are excellent.
Astratek
Asstratek is a suspension that can be applied to walls using a spray gun or mounted manually with a paint brush. Just a couple of cm of insulation layer is equivalent to 100 cm of mineral wool slab.
This option ensures the preservation of free space in the room. The surface is smooth and homogeneous. The master will need to carry out minimal processing to apply the cladding.
Astratek is not widely popular due to its high cost.
Expanded polystyrene is an excellent option for homeowners who want to cheaply insulate a cold wall
Briefly about the main thing
Internal wall insulation is carried out only in cases where it is not possible to do it outside or when external thermal insulation is not enough to maintain a comfortable temperature in the house. Not all materials are suitable for this. Thermal insulation for walls from the inside must be selected taking into account the basic requirements: to be safe for health, preferably non-flammable and durable, so that in a few years you will not have to make major repairs. These requirements are best met by basalt wool, ecowool, cork and warm plaster coatings.
What materials cannot be used for wall insulation
Construction experts are inclined to believe that walls cannot be insulated from the inside with foam plastic.
The caution is explained by the low vapor permeability of the material and poor resistance to fire.
It is quite flammable and capable of releasing toxic substances that are dangerous to human life.
In addition, it is worth noting that the release of harmful substances is possible even at room temperature. By insulating indoor walls with polystyrene foam, you can expect increased wall freezing and increased humidity in the room.
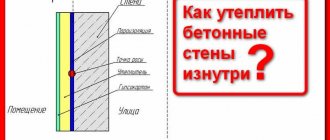
Dew point - physics of the phenomenon
Cold walls are not the only problem in old panel buildings. Wet surfaces are susceptible to the growth of fungus. The optimal solution to such problems is external thermal insulation, specified in the requirements of SNiP. And if it is impossible to insulate the building from the facade, internal work will need to be carried out. But in this case, some nuances appear.
Even if the cold structure was previously dry, after installing the insulator it may become damp, which is explained by a shift in the dew point.
This concept refers to the conditional boundary at which water vapor is cooled to the temperature of condensation. This phenomenon is aggravated in winter. If the house design is done correctly, then the dew point is located in the middle of the thickness of the facade material with a uniform structure.
Dew point is an important parameter that should be taken into account when carrying out thermal insulation.
With external insulation, the conditional value shifts to the area of decreasing density (towards the outer part of the wall).
If insulation is done from the inside, it ends up in the room and condensation accumulates in the insulator or on the main wall.
Proper preparation for do-it-yourself wall insulation
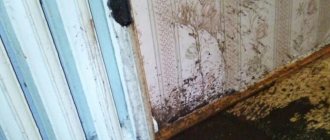
Before you begin installing the insulation, you should take care of preparing the walls. For this wizard:
- Remove wallpaper from surfaces. In order to facilitate this process, you need to moisten them with water and remove the paper layer from the walls with a spatula.
- Uneven surfaces are leveled using putty or drywall for this purpose. The latter is mounted on a metal frame.
- After cleaning the walls and drying the putty, they are treated with an antiseptic solution that protects the walls from the appearance of fungus and mold.
- Apply 2 layers of primer to the walls.
- It is important to take care of vapor barrier. To do this, you will need high quality polyethylene, which is fixed to the walls with a construction stapler/foil tape. The joints must be treated with adhesive tape. Compliance with these recommendations will allow you to achieve complete isolation.
Before you begin insulating walls in corner apartments and surfaces near windows, it is necessary to process the connection points with the ceiling and corners from the inside. In these areas, it is mandatory to apply a heat and vapor barrier, which can be masked using a false column/box.
When creating thermal insulation, the formation of cold bridges should be avoided
Main stages of installation
Do-it-yourself insulation of a private brick house from the inside begins with installing sheathing to match the size of the slab material. When insulating EPS or EPS, you can use wooden blocks or guides for drywall, installing them at a distance corresponding to the width of the insulation boards. For mineral wool, the distance between the sheathing elements is calculated by subtracting 1-2 cm from the width of the material for a more dense installation of the insulation. If PPS or EPS is chosen as thermal insulation, after installing them it is necessary to foam the cracks, if any. After installing the expanded polystyrene, you need to secure a layer of vapor barrier along the sheathing, gluing the seams with special tape.
Important! Ordinary tape, even double-sided tape, is not a substitute for vapor barrier tape .
When working with extruded polystyrene foam, a vapor barrier is not required. Mineral wool insulation also requires a layer of vapor barrier. The final finishing can be lining or imitation timber. Before installing the wooden planks, it is necessary to secure the counter-lattice for the ventilation gap. When finishing with plasterboard, a ventilation gap is not required.
Note! Penofol can be used as a vapor barrier.
Proper insulation of internal walls yourself
Below you can find the best methods and detailed instructions for properly insulating interior walls.
The step-by-step process of installation work will help even beginners cope with wall insulation with their own hands.
Insulation with mineral wool
Mineral wool has good thermal insulation properties, ease of installation and a long service life. That is why homeowners most often prefer this material.
- The first step is to secure the sheathing.
- Mineral wool sheets are laid between the sheathing boards in such a way as to avoid the formation of cracks.
- Mineral wool is fixed with dowels and nails.
- The material is laid in the direction from bottom to top. The outermost parts of the insulation are pressed down to ensure a tight fit.
When laying mineral wool, it is important to ensure that the panels are laid in an even layer and that there are no waves or creases.
The formation of cracks should be avoided. After the insulation is fixed, a vapor barrier layer can be laid on it.
Expanded polystyrene
The installation process is quite simple, but in order to achieve reliable thermal insulation in the house, you should take care to do the work correctly.
Step-by-step process of insulation with polystyrene foam
- In cases where the walls are made of round beams, experts advise trimming them.
- Panels of material are laid tightly between the lathing slats.
- The plates are secured with foam blades.
- Polyurethane foam is used to eliminate possible cracks.
- The vapor barrier is attached to the sheathing slats.
To insulate walls from the inside, you will need to purchase high-density mineral wool
Polyurethane foam
Polyurethane foam is ideal for insulating walls in both wooden and brick houses. Before you begin installation, you should take care to clean the surfaces from dust and old coating. Windows/doors/floor surfaces are covered with film.
Step by step process
- First of all, the sheathing is done (step 60 cm with 4x4 cm timber).
- Polyurethane foam is sprayed between the sheathing boards.
- The material is kept for about 12 hours until it is completely dry.
- Excess insulation is leveled without going beyond the level of the sheathing.
At the final stage, layers of the “pie” of the wall are laid.
Penofol
When using penofol, a small air gap must be provided to ensure free air circulation.
If you provide a gap on both sides, the master will be able to achieve an optimal result. 18-20 mm are considered acceptable values. In this case, the material is fixed to a wooden sheathing, and the latter is fixed to the base in order to achieve the required strength.
Insulation instructions
- Wooden planks, the thickness of which reaches 2 cm, are fixed to the surface of the walls. This must be done vertically. However, horizontal placement of the slats is also allowed. Depending on the width of the roll, the pitch is selected.
- The planks are attached to wooden surfaces using self-tapping screws. The planks are fixed to brick and concrete walls with dowels.
- Strips of the required length are cut from the rolled material, after which the strips are shot to the strips with staples.
- Each penofol sheet is mounted end-to-end. The material must be installed with the foil side inside the room.
- All joints are carefully taped with aluminum tape.
- The strips that provide the outer air layer of the required size are installed and secured to the sheathing.
The outside walls will need to be sheathed with suitable finishing material.
Wooden sheathing serves as guides
How to insulate a balcony in a panel house
You can apply putty directly over the foam.
We have already told you more than once how to insulate a balcony in a panel house. In principle, the technique is no different from insulating walls, only on the balcony the thermal insulation is also glued to the floor and ceiling. Let's better think about how to do this with minimal costs and as quickly as possible. How do you see an already insulated balcony? Is it really covered with clapboard or plastic? If yes, then:
- glue the foam to the wall with adhesive foam;
- lay a wooden sheathing on top - fasten it to the wall with dowels directly through the foam;
- Attach the plastic trim elements to the sheathing with a stapler.
The thickness of the foam should be at least 50 mm, and preferably 80 mm. You don’t need any Penofol - it’s money thrown away. There is no need to secure foam sheets with plastic dowels; they will not fall off 100% anyway. The gaps between the sheets are also filled with adhesive foam; the residues do not need to be removed, the finishing will still be there. If you think that it will be more profitable to buy universal construction adhesive, then you are mistaken - its price (relative to consumption) is equal to the price of adhesive foam, only you will also need plastic dowels. You will also have to drill a lot, and if the walls are thin, then nothing good will come of it.
Another option for insulating a balcony in a panel house is to paint it. You won’t hang pictures or shelves on the walls there. The first layer of putty is applied to the foam-glued foam, a fiberglass reinforcing mesh is embedded in it, then another layer of putty is applied. Then the surfaces are allowed to dry, primed and painted. In this case, foam plastic must be taken with a density of at least 25 kg/m3. This method is convenient, since you can always repaint the walls a different color.
Heat conservation without costs
There are always simple ways to help keep warm, while spending on them will be minimal or not at all:
- Try to clear the window facing south as much as possible so that the sun's rays penetrate it and heat the room;
- Windows are often covered with thermal protective film. It does not affect visibility, but helps keep the room warm;
- Block the flue of a stove or fireplace that is not currently in use. A third of the heat may escape through it;
- If additional heating sources are needed, install oil radiators or ceramic panels. They are safe and can quickly heat up a room.
Window
Up to 30% of the heat escapes through them. The most correct solution is to replace wooden window structures with plastic double-glazed windows. To do this, it is recommended to contact a specialized organization. Specialists will visit the site and accurately measure the size of the window. Then the team will deliver it and install it.
You need to know a few subtleties about window installation in order to check the work of the installers:
- The window frame itself and the glass unit must comply with the characteristics stated in the order. This is the thickness of the profile and the number of glasses.
Double-glazed windows with three or four glasses are suitable for an apartment.
- The problem area in windows is the joint between the frame and the wall. It is necessary to ensure that the installers thoroughly foam all the cracks. They must cover the seams with waterproofing tape on the outside and inside.
Entrance door
Not such a problem area as windows or walls, but insulation is also required. The most correct solution is to replace the old door leaf with a jamb with a new, insulated door structure. It is better to contact a specialized organization.
A company employee will come to the site, determine the strength of the partition where the door is planned to be installed, and take the dimensions of the doorway. Then a team of installers will deliver and install a new door.
You need to know all the intricacies of installing a door structure in order to control the work:
- If the wall is thin, then it needs to be insulated. Otherwise, the effect of the new door will be reduced.
- It is necessary to ensure that all joints between the door and the wall are carefully sealed with polyurethane foam.
- It is necessary to check the position of the door in two planes. If the canvas is skewed, then gaps will appear between the canvas and the jamb.