In my work, I sometimes have to use laminated chipboards to fill niches, make shelves and custom furniture. I prefer to buy ready-made furniture panels in stores. They are available in several standard sizes, have factory edges, and if you adjust the future product to these dimensions, then assembly is quick and without problems. But it’s not always possible to do without cutting, so you have to think about how to cut the chipboard so that the cut is even and smooth, and chips do not form on the decorative surface.
Source tildacdn.com
How to cut chipboard
Laminated chipboard can be sawed with a hand saw with a fine tooth, a jigsaw, or a circular saw.
The cut area is taped with masking tape and cut along the cut line with a sharp knife. The knife cuts through the laminate and the top grain of the wood underneath. Further, when passing the saw, the chipboard will not chip. Finishing the end under a C-shaped overlay edging when making furniture, this method is quite suitable. And under melamine self-adhesive tape it is better to use another method. Using a jigsaw or circular saw, we cut the chipboard with a margin of 2-3 mm. from the cutting line. I sawed along the guide with a jigsaw. You can use any smooth strip or rule as a guide. In my case, fiberglass lath is 150 mm wide. thickness 4 mm. As described above, chips formed on the chipboard. Next, we set the guide exactly along the cutting line and remove these 2-3 mm with a hand router and edge cutter. which we kept in reserve. The design of the edge cutter has a bearing on the shank equal to the diameter of the cutter itself. As a result, we get a perfectly smooth edge, to which you can easily glue self-adhesive melamine tape. Also, when cutting curved cuts, you cannot do without using a router. Using a jigsaw, we make a guide with the required radii and also go through the end with an edge cutter. The method of cutting chipboard without chipping is also suitable for cutting laminated plywood and MDF.
If you have at least once tried to cut chipboard at home, then you know for sure that this work is by no means easy and requires not only skill, but also the availability of a good tool. Laminated chipboard is especially difficult to process; when cutting it, many chips often form. That is why many craftsmen, faced with such a problem, come to the conclusion that it is better to cut chipboard when purchasing, especially since many trading organizations provide similar services and the price is quite reasonable.
Chipboard sawing is carried out using precise format-cutting machines, which will help obtain workpieces of a given size and shape.
In addition to cutting sheets, they will help you calculate and provide in the form of a visual video file several options for competent and economical cutting of sheet material (using special computer programs) and, if necessary, perform edging. However, if for some reason you prefer to do this work yourself, you will have to do some preparatory work before cutting the chipboard.
Figure cutting
It is even more difficult to obtain curved surfaces of a given configuration at home, and you will have to spend additional money on purchasing a router that will help you get rid of chips and nicks formed when you cut chipboard.
The price of a hand router can vary significantly, depending on the manufacturer, power, and the presence of additional functions. If you do not plan to produce furniture professionally, then it is advisable to purchase an inexpensive model.
To cut chipboard you need to follow these steps:
- Having marked the contours of the required part on a sheet of chipboard, we cut it out with a jigsaw, trying to cut just a couple of millimeters from the intended cutting line;
- we make templates of the design radius from fiberboard or plywood and carefully sand the ends with sandpaper;
- Having attached the template to the part to be finished, clamp it with clamps and process it with a hand-held copying cutter with a bearing, removing excess material exactly to the intended line.
READ Scaly juniper: description of varieties
In this case, it does not matter which cutter (with two or four knives is used). The only condition is that the knives must cover the entire thickness of the cut being processed. After processing, all that remains is to glue the edge onto the part.
What affects the quality of chipboard cutting?
In this case, we will be sawing chipboard; this is the most capricious material for sawing, because it has longitudinal and transverse layers, and a rather delicate and thin veneer. But on the other hand, it has a hard adhesive base, which will also interfere with us.
Saw blade. How to choose it?
When cutting chipboard, the saw blade must simultaneously cut cleanly and be durable, because the properties of the glue are very close to glass and dull the tool itself quite quickly. Therefore, in the process of cutting chipboard, you need to choose disks that are good enough to cut with them without loss of quality for a long time.
What is the difficulty of sawing with a circular saw with discs?
If we look at the cut of the workpiece, we will see that it is full of burrs, because “by hand” it is practically impossible to guide the saw straight through the cut.
On the saw blade there is a difference in height between the body of the saw itself and the sawing part - the tooth. Due to this distance, the disc has the ability to direct its position in the cut. Accordingly, as soon as it changes its geometry, the rear teeth begin to hit the chipboard workpiece and leave marks on it.
It is important to place the workpiece face down. Why?. The disk rotates from bottom to top, it cuts the pile of the workpiece upward onto the base
Thus, below, on the front side, we always have a clean surface. Problems begin to form at the top, where the teeth exit the workpiece. This is how explosions, chips, piles happen
The disk rotates from bottom to top; it cuts the pile of the workpiece upward onto the base. Thus, below, on the front side, we always have a clean surface. Problems begin to form at the top, where the teeth exit the workpiece. This is how explosions, chips, and piles happen.
How to minimize them, or avoid them altogether? There are several simple tricks and we will tell you about them now.
Types of files according to cutting edge geometry
If you look closely at jigsaw files, you will see that they all differ in the size of the tooth set and the geometry of the sawing edge. The more the teeth are set apart, the wider the cutting line will be, therefore the speed of work increases, however, at the cost of reducing the cutting properties. Not only the cleanliness of the cut depends on the routing method, but also what materials this equipment can be used for working with.
Milled with traditional wiring.
Peculiarities. In files with a traditional setting, the teeth are alternately bent in different directions, like in ordinary hand saws. This arrangement helps reduce the heating of the saw during operation, since the blade experiences virtually no friction in a fairly wide cut. It is virtually impossible to get a careful cut with such a file, but the speed of work will be the highest.
Purpose. The purpose of saw blades with milled teeth and traditional settings is to quickly cut hard and soft wood, as well as plastic and non-ferrous metals.
Milled with wavy layout.
Peculiarities. In equipment with such a layout, the teeth do not change direction alternately, as in the previous case, but in groups of several pieces. With all this, for each tooth the magnitude of the difference from the central axis is not the same as that of its closest neighbors - the working edge of the saw blade forms a wave.
Purpose. The purpose of saws with a wavy layout is to ensure clean cutting not only on wood, but also on chipboard or plywood, as well as working with non-ferrous metals and plastic.
Polished with traditional layout.
Peculiarities. The teeth of such blades are set apart and undergo a grinding process. The cutting line for such canvases is quite wide.
Purpose. Saw blades with ground teeth, set using the traditional method, are designed for fast, but relatively clean cutting of wood and its derivatives - chipboard, fiberboard, etc.
With conical grinding without routing.
Peculiarities. The blades of such saws do not have a tooth spread, but their segments are ground, which ensures a narrow cutting line and an even cut.
Purpose. Allows for careful cutting of wood
, laminate, polymer materials.
For wood and wood materials
At first the jigsaw was created to work only with wood. Modern tools have learned to saw
both metal and plastic, but their main purpose remains the cutting of wood and its derivatives. That is why most of the range of saw blades is designed to work specifically with these materials. “Wooden” files are divided into groups according to the type of work for which they are intended.
READ Why a Wood Hacksaw Saws Crookedly
Frisky cut.
When carrying out certain types of work with wood, it is often not accuracy that is important, but the speed of the process. Saw blades for quick cutting of wood can provide the highest productivity. They can be easily identified by the following relevant signs:
- long blade (from 60 mm),
- large teeth (straight up to 6 mm),
- large amount of separation (about 1 mm).
Unsullied cut.
Operations such as cutting furniture panels from chipboard or trimming parquet boards require smooth and careful cutting. When solving similar problems, where the quality of work comes to the fore, and not productivity, use blades for clean cutting that have:
- average tooth size (less than 3 mm),
- minor divorce.
Most files have teeth oriented towards the jigsaw. To ensure that the front side of the material after cutting chipboard or laminate comes out very neat, without chips or burrs, the workpiece is placed with the back side facing you/the tool. To cut from the “face”, you need to use a blade
with reverse tooth. True, it is more difficult to work like this than with ordinary ones - you have to overcome the force of pushing out the tool.
Figured cut.
It is virtually impossible to cut a curve with a small radius using an ordinary wide blade. For figured cutting, special files are used, which, due to their size, simply go through rounded areas:
- narrow blade
(no more than 4 mm), - small teeth (up to 2 mm),
- small length (up to 40 mm),
- beveled back side.
Tools and materials
If possible, it is best to cut chipboard with a hand router using homemade guides. This method is not very convenient when cutting large sheets, because when working with this tool you need a table. In addition, with this method it is necessary to change cutters frequently. But as a result, you will get cleanly processed, “trimmed” edges.
An electric jigsaw is the most popular tool for cutting chipboard.
Some craftsmen use a jigsaw in their work, however, in the absence of skill, it is difficult to make an even cut, and chips may form.
You can try installing a bimetallic blade with teeth pointed inward, designed for laminate, on a jigsaw. When cutting with a jigsaw, you should increase the speed, with a small feed, so that breaks do not form.
If such methods do not suit you, then to cut chipboard at home, we will prepare for work:
- a hacksaw with fine teeth (the one designed for metal work is best). In this case, the teeth must be set apart by 1/2 the thickness of the blade and be hardened;
- paper adhesive tape;
- file for roughing the cut line;
- sandpaper to finish the cut line.
Completing of the work
When the file has been selected, you still need to correctly saw the laminated board at home. Experts recommend sawing along a guide (a rail clamped in clamps will also work). If you use a new, unworn blade, you can cut chipboard as cleanly as you would with a circular saw. It is advisable to turn on the jigsaw at the lowest speed possible. This will significantly increase the resource of each file used.
The blades themselves are placed at right angles to the jigsaw sole. The easiest way to adjust the angle is with a square or protractor. Important: the straight line passing through the cutting edge of the tool must be parallel to the rigidly fixed part of the jigsaw. It is recommended to use special inserts that reduce the likelihood of splitting. But to make them work more efficiently, they usually cut the laminated layer on the side where the blade will come out.
To learn how to cut laminated chipboard with a jigsaw without chipping, see the following video.
Handy tools
You can cut chipboard with a jigsaw, but this will be a rough cut. The edges may turn out not straight, but sinusoidal, and in the worst case, the edge will not be perpendicular to the front surface.
When cutting, you must be prepared for the fact that the jigsaw file will begin to “walk” due to the bend. You need to cut with a margin of 4 mm, and then level the edge.
Cutting laminated chipboard at home using a jigsaw reduces the formation of chips. When cutting, you need to increase the speed and reduce the feed, setting the pumping to 0. Only sharp saw blades designed for special cutting of chipboard should be used. Only by following these rules can you achieve a good result. After cutting, the end that will be visible can be sanded down. Additionally, before cutting, as already mentioned, you need to cut a line along which the cut will take place. But we do not move the file along this line, but near it - then the chips will not touch the limits you need. In the end, all that remains is to finish the edges with sandpaper.
Indents from the contour can be up to 4 mm. Then these few millimeters are removed with a cylindrical cutter using a hand-held electric router with a bearing. The bearing is guided along a long level fixed to the back of the sheet.
To avoid problems with chipping, it is recommended to use (where possible) a flexible overhead U-profile. It covers chips well.
In addition, if the chips are in a non-working, low-visibility area, they can be disguised with a marker or felt-tip pen matched to their color.
The most undesirable way to cut chipboard is with a file (oddly enough, in old textbooks a lot of material is devoted to this method). You can use a plane, but preferably an electric one with carbide knives. But here we must take into account that dust from under the plane will scatter throughout the room.
And the most comfortable way is using a manual router along a guide. The end should be smooth and at 90 degrees, there will be no chips, and when the vacuum cleaner is turned on, there will be almost no dust.
https://youtube.com/watch?v=tG0elOFcRS8
Types and operational parameters
Like almost all construction equipment, circular saws are divided into professional and household. These two types differ in terms of service life and quality, and, as a consequence, in their cost.
For example, a professional tool is designed for long-term and intensive work, while the frequency of use of a household tool is often limited, since a circular saw can be used less often.
The second thing you need to pay attention to is the length of the intended cut of the board. The standard parameters of this criterion are 50-60 millimeters, which provides greater maneuverability of the saw.
But there are also exceptions. For example, to work with thin material, a tool with a disk of 30-40 millimeters is used, and, on the contrary, for thick boards, large saws in wood of 90-100 millimeters or more have been developed.
If you need a tool that combines different sizes of disks, then you can purchase a device with the possibility of permanent installation. It has the advantage of being lighter than devices with the same 100 millimeters.
The size of the hand saw blade also dictates its power – low, medium or high power. Professionals, in the case of household work, recommend giving preference to the second category, in which overheating and failure of sometimes quite expensive equipment are unlikely.
Types of files according to cutting edge geometry
If you look closely at jigsaw files, you will see that they all differ in the size of the tooth set and the geometry of the sawing edge. The more the teeth are set apart, the wider the cutting line will be, therefore the speed of work increases, however, at the cost of reducing the cutting properties. Not only the cleanliness of the cut depends on the routing method, but also what materials this equipment can be used for working with.
Milled with traditional wiring.
Peculiarities. In files with a traditional setting, the teeth are alternately bent in different directions, like in ordinary hand saws. This arrangement helps reduce the heating of the saw during operation, since the blade experiences virtually no friction in a fairly wide cut. It is virtually impossible to get a careful cut with such a file, but the speed of work will be the highest.
READ Chainsaw Seizes But Won't Start
Purpose. The purpose of saw blades with milled teeth and traditional settings is to quickly cut hard and soft wood
Milled with wavy layout.
Peculiarities. In equipment with such a layout, the teeth do not change direction alternately, as in the previous case, but in groups of several pieces. With all this, for each tooth the magnitude of the difference from the central axis is not the same as that of its closest neighbors - the working edge of the saw blade forms a wave.
Purpose. The purpose of saws with a wavy layout is to ensure clean cutting not only on wood, but also on chipboard or plywood, as well as working with non-ferrous metals and plastic.
Polished with traditional layout.
Peculiarities. The teeth of such blades are set apart and undergo a grinding process. The cutting line for such canvases is quite wide.
Purpose. Saw blades with ground teeth, set using the traditional method, are designed for fast, but relatively clean cutting of wood and its derivatives - chipboard, fiberboard, etc.
With conical grinding without routing.
Peculiarities. The blades of such saws do not have a tooth spread, but their segments are ground, which ensures a narrow cutting line and an even cut.
Purpose. Allows for careful cutting of wood, laminate, and polymer materials.
Ways to minimize chipping
An additional reason for the formation of chips may be misalignment of the saw teeth. Therefore, the first thing you need to do is purchase a tool with a straight cut (often Bosh files). However, it should be taken into account that during prolonged use, such files overheat and may even bend during the cutting process. Therefore, it is necessary to take breaks from work to cool the cutting tool.
However, just replacing the saw blade is not enough and in order to cut laminated chipboard (laminate) with a jigsaw without chipping, you need to make minor modifications to the power tool. Namely, make sure that when the saw moves against the inclination of the tooth, the material does not pull out. For this purpose it is enough to make a persistent platform. You can come to this conclusion by trying to cut two sheets of chipboard at the same time. So there will be practically no chips on the lower element.
In order to make a stop pad for a jigsaw, it is enough to cut out a rectangle from any dense material (for example, laminate) with dimensions identical to the dimensions of the sole of the power tool.
Then, along the larger center line, you should make a notch and secure the resulting equipment to the sole of the jigsaw using insulating tape or double-sided tape. All modifications are ready and finishing work can be carried out in compliance with certain recommendations.
Firstly, as mentioned above, you should use a jigsaw file with a straight cut.
Secondly, in order to better control the cutting process, it is justified to apply a marking line on both sides of the chipboard and check the accuracy of the processing from above and below.
And thirdly, take constant breaks from work to cool the cutting equipment.
Sometimes the solution to this issue can be simply cutting through the laminated layer of material using a mounting knife, and subsequent work with a jigsaw will no longer cause large defects in the form of chips. However, this work requires the performer to have some experience and accuracy.
Application of adhesive tapes
Adhesive tape (for example, ordinary tape) is used to protect the back side of the material. It is necessary to glue a tape to the cut line to protect the processed fabric from tearing off large elements. Masking tape cannot be called a very effective option for preserving material when cutting with a jigsaw, since its strength indicator is extremely low.
A fairly wide (each side of the cut material should be covered by at least fifteen centimeters) aluminum or fiberglass reinforced tape is best suited. In addition, the adhesive tape must be pressed with a dry cloth to eliminate the risk of wrinkles.
How to cut chipboard
Laminated chipboard can be sawed with a hand saw with a fine tooth, a jigsaw, or a circular saw. The cut area is taped with masking tape and cut along the cut line with a sharp knife. The knife cuts through the laminate and the top grain of the wood underneath. Further, when passing the saw, the chipboard will not chip. Finishing the end under a C-shaped overlay edging when making furniture, this method is quite suitable. And under melamine self-adhesive tape it is better to use another method.
Using a jigsaw or circular saw, we cut the chipboard with a margin of 2-3 mm. from the cutting line. I sawed along the guide with a jigsaw. You can use any smooth strip or rule as a guide. In my case, fiberglass lath is 150 mm wide. thickness 4 mm. As described above, chips formed on the chipboard. Next, we set the guide exactly along the cutting line and remove these 2-3 mm with a hand router and edge cutter. which we kept in reserve. The design of the edge cutter has a bearing on the shank equal to the diameter of the cutter itself. As a result, we get a perfectly smooth edge, to which you can easily glue self-adhesive melamine tape. Also, when cutting curved cuts, you cannot do without using a router. Using a jigsaw, we make a guide with the required radii and also go through the end with an edge cutter. The method of cutting chipboard without chipping is also suitable for cutting laminated plywood and MDF.
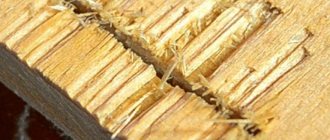
Everyone knows that laminated chipboard is our chipboard, which is covered with a paper-resin film. The lamination process takes place under special conditions: pressure 25-28 MPa, temperature 140-210 °C. The surface is durable, smooth, and beautiful. The laminated chipboard coating is very resistant to mechanical stress and thermal stress. Because of these qualities, laminated chipboard has become simply necessary for furniture production and for interior decoration.
Some craftsmen like to make furniture themselves. They purchase good quality laminated chipboards from manufacturers or in special construction stores. Since the color range of laminated chipboard is very rich, you can easily select the right material. The surface of laminated chipboard also has the most varied structure, since it can be smooth, imitate wood of different species or stone.
In order to make special furniture or a unique interior with your own hands, it is not enough just to buy laminated chipboard and draw it into details. The laminated chipboard coating is very thin, its structure is fragile. If you cut laminated chipboard roughly and incorrectly, the cut will turn out ugly, torn, and cavities will form on the edges. To be able to cut laminated chipboard correctly and not get chips and cracks, you need to know some little “tricks” of the job.
Metabo saw blade markings - Bosch correspondence table
Metabo coding on jigsaw files is also not informative. Therefore, the manufacturer makes an additional reference to the Bosch labeling standard on the packaging.
Metabo jigsaw blade marking table:
| Metabo marking | For materials | Material | Interchangeable Bosch part number |
| 623675000 | Hardwoods, softwoods, particle boards, blockboards, fibreboards. For fast cutting. | HCS | T234X |
| 623686000 | For laminate, kitchen panels 3 - 30 mm, coated slabs. For a clean cut. You need to turn off the pendulum stroke. | BiM | T101BRF |
| 623695000 | For laminate, hardwood, softwood, coated boards, plywood. For cutting along curves. For a clean cut. | BiM | T101AOF |
| 623933000 | Hardwood, softwood, nailed wood, 5 - 50mm coated panels. For fast cutting. | BiM | T144DF |
| 623948000 | For laminate, hard and soft wood, coated boards, plastics 2 - 30 mm. For a clean cut. | BiM | T101AIF |
| 623975000 | Hard and soft woods, laminate, coated boards, plastics 3-30 mm. For a clean cut. | BiM | T101BF |
| 623977000 | Hard and soft wood, chipboard, laminated wood 5 - 80 mm, glass fiber reinforced polymers 5 - 30 mm. For fast cutting. | BiM | T301CLF |
| 623998000 | Cuts without chips on both sides. For fast cutting of soft wood. You need to turn off the pendulum stroke. | HCS | T308B |
| 623999000 | Cuts without chips on both sides. For fast cutting of hard wood. You need to turn off the pendulum stroke. | BiM | T308BF |
| 623976000, 623980000 | For fast cutting of hard and soft wood. | BiM | T144DF |
| 623679000, 623694000 | Hard and soft wood, chipboard, fiberboard. For precise angled cuts. | HCS | T344DP, T144DP |
| 623834000, 623835000 | Excellent, chip-free cuts on both sides. For fast cutting of soft wood. For precise angled cuts. You need to turn off the pendulum stroke. | HCS | T308BP, T1044DP |
| 623608000, 623650000 | Hard and soft wood, chipboard, wood boards, fibreboard, coated panels 3 - 30 mm. For a clean cut. You need to turn off the pendulum stroke. | HCS | T 101 BR |
| 623609000, 623635000, 623704000, 623962000 | Hard and soft wood, chipboard, wood boards 10 - 45 mm, fiberboard 10 - 45 mm. For a clean cut. | HCS | T101D |
| 623624000, 623651000 | Soft wood, plywood, plastics 1.5 - 5 mm. For clean cuts and curved cuts. | HCS | T101AO |
| 623634000, 623691000, 623703000, 623961000 | Hard and soft woods, chipboards, wood panels, fibreboards, plastics 3 - 30 mm. For a clean cut. | HCS | T101B |
| 623654000 | Wood, chipboard, wood boards 4 - 60 mm, fiberboard 4 - 60 mm. For a clean cut. | HCS | T301CD |
| 623603000 | Wood, chipboard, wood panels, fibreboard, timber. | HCS | T744D |
| 623607000, 623649000 | Wood, chipboard, wood panels, fiberboard. Especially for curve cutting. | HCS | T244D |
| 623633000, 623690000, 623712000, 623964000 | Wood, chipboard, wood panels, fiberboard. For fast cutting. | HCS | T144D |
| 623678000 | Wood, chipboard, wood boards 2 - 15 mm, fiberboard. For fast cutting. | HCS | T344D |
| 623605000, 623646000 | Wood, chipboard, wood panels, fibreboard, plastics. For cutting along curves. | HCS | T119BO |
| 623631000 | Wood, chipboard, wood panels, fibreboard, plastics. | HCS | T119B |
| 623606000, 623632000 | Wood, plastics 4 - 50 mm. For fast and rough cuts. | HCS | T111C |
| 623621000, 623677000 | Wood, wood with nails, metal, non-ferrous metals, plastics | BiM | T345XF |
| 623949000 | Wood, wood with nails, non-ferrous metals, plastics | BiM | T111HF |
| 623620000, 623676000 | Steel sheets 1.5 - 10 mm, non-ferrous metals up to 30 mm. | BiM | T123XF |
| 623970000 | Steel sheets 1.5 - 4 mm. For cutting along curves. | BiM | T118EOF |
| 623971000 | Steel sheets 1 - 3 mm, non-ferrous metals. | BiM | T118AF |
| 623973000 | Steel sheets 2.5 - 6 mm, non-ferrous metals. | BiM | T118BF |
| 623978000 | Steel sheets 1 - 3 mm, laminated materials 2 - 65 mm, non-ferrous metals, plexiglass. | BiM | T318AF |
| 623979000 | Steel sheets 2.5 - 6 mm, laminated materials 2 - 65 mm, non-ferrous metals, plexiglass. | BiM | T318BF |
| 623604000 | Steel sheets 2.5 - 6 mm, multilayer materials 2 - 120 mm, non-ferrous metals, plexiglass. | BiM | T718BF |
| 623618000, 623638000 | Steel sheets 2.5 - 6 mm, non-ferrous metals. | H.S.S. | T118B |
| 623623000, 623629000 | Steel sheets 1 - 3 mm, non-ferrous metals, multilayer materials. | H.S.S. | T318A |
| 623636000 | Steel sheets 0.5 - 1.5 mm, non-ferrous metals. | H.S.S. | T118G |
| 623637000, 623692000, 623965000 | Steel sheets 1 - 3 mm, non-ferrous metals. | H.S.S. | T118A |
| 623647000 | Steel sheets 1 - 3 mm, non-ferrous metals. For cutting along curves. | H.S.S. | T218A |
| 623697000 | Steel sheets 2.5 - 6 mm, non-ferrous metals. | H.S.S. | T318B |
| 623687000 | Fiberglass reinforced polymers, Corian 4 - 60 mm. | Carbide toothed strips | T301CHM |
| 623640000 | Plexiglas, polycarbonate 2 - 20 mm, non-ferrous metals 2 - 10 mm. | H.S.S. | T101A |
| 623657000, 623658000 | Ceramics, glass, glass fiber reinforced polymers, cast iron. | Carbide coating | T130Riff, T150Riff |
| 623652000, 623688000 | Drywall, cement fiber boards 5 - 50 mm, glass fiber reinforced polymers 5 - 20 mm. | Welded carbide teeth | T141HM, T341HM |
| 623662000, 623663000 | Stainless steel sheets (Inox), non-ferrous metals. | Hard metals | T118AHM, T118EHM |
| 623622000, 623639000 | Aluminum 3 - 15 mm, non-ferrous metals 4 - 20 mm, plastics. For fast cutting. | H.S.S. | T127D |
| 623648000 | Aluminum 3 - 15 mm, non-ferrous metals 4 - 20 mm, plastics. For cutting along curves. | H.S.S. | T227D |
| 623974000 | Aluminum 3 - 15 mm, non-ferrous metals 4 - 20 mm, plastics. For fast cutting. | BiM | T127DF |
| 623641000, 623684000 | Expanded polystyrene, cardboard, leather, rubber, carpet up to 50 mm. | HCS | T113A, T313AW |
As a conclusion, it should be noted that the marking of jigsaw files is important information that allows you to accurately select the optimal equipment for a specific type of activity (cutting metal, wood, clean and rough cuts, and other options).
Rules for sawing laminated chipboards
To cut laminated chipboard at home, use a hand saw with fine teeth, a circular saw or an electric jigsaw. To complete the job without any problems, you need to do the following:
- Secure the adhesive tape tightly exactly along the cut line. The tape will prevent the saw teeth from damaging the coating film.
- Use a sharp knife to cut through the coating and the layer underneath along the cutting line. In this case, the saw will only cut the inner layer of chipboard and touch the coating only tangentially.
- The hand saw, when working with it, should be placed at an angle (very sharp) to the surface of the slab.
- When cutting with a power tool, you need to use a minimum feed.
- When the part is cut out, you need to cut the edge of the coating at an angle of 45° with a sharp knife.
- The cut is polished using a fine file, the cut is processed towards the center from the edges.
The edge of the sawn laminated chipboard should be covered with a special overlay to prevent any chips or cracks on it in the future. To protect the cut, you can use self-adhesive melamine tape, or a C-shaped edge, or a T-shaped edge.
It is extremely rare that when carrying out repairs using chipboards, it is possible to do without cutting the material. Unfortunately, owners often cannot cut chipboard so smoothly that there are no chips or other damage. But with a competent approach to carrying out such an event, it is still possible to get quite a good result. To do this, you need to perform the following steps.
Euro-sawing – flawless connection of tabletops without seams
The guarantee of long service life of a kitchen work surface is the reliable connection of its parts. It is possible to connect the tabletop at a right 90 degree angle or in a straight line, if the kitchen footage allows for placement along one wall. There are three main methods of merging, but you should always adhere to one result - the surface should give the impression of a single whole:
- joint to joint without euro-saw;
- using a T-shaped metal profile;
- joint using a euro saw.
You will have to familiarize yourself with all the methods, not only with the euro saw. After this, you can decide how to connect the countertops to each other and make a choice among these options.
Professional and household circular saws
Circular saws allow you to make cuts with maximum angular accuracy and a smooth edge. But when working with some materials, guides may be required. By the way, only professional tools are equipped with guide bars. There are models in which the guides are integrated into the design of the saws themselves.
Circular saws for professionals are equipped with a powerful motor that allows the blade with teeth to rotate at high speed.
An important characteristic of such saws is considered to be the depth of cut. Depending on it, saws are divided into small, medium, large and professional
For domestic use, it is recommended to choose small and medium-sized circular saws with a maximum cutting depth of up to 55 mm. Only large saws should be used for production purposes. Their cutting depth can reach 70 mm. In addition, large saws allow you to cut through both thin and thick materials. Woodworking industry enterprises usually use professional saws with a cutting depth of up to 140 mm.
Trimming sawing method
This method also involves using a circular saw, but a plunge-cut saw is more suitable. You will need a double ruler: it is fixed to the workpiece with clamps. The principle of operation is the same as that of a format-cutting machine: two cuts are made along the same line.
This is what the ruler-bus is used for. It is installed along the marking line, the laminate is lightly cut without disturbing its texture. Then the material is sawed along the marked trace.
By the way! Thanks to the cut on the laminate, no chips will form during the second deep cut.
The cut area can be sealed with an edge.
Using this method, you can cut the tabletop into one or more parts. Minimal chips are possible, but they can be easily removed by regular sanding or hidden with a decorative overlay.
Round cuts can also be masked.
Disadvantage: This method can only make straight cuts.
Cutting pipe at an angle of 45 and 90 degrees
If you need to cut a pipe at an angle of 45 degrees, which is often required when laying water and heating pipes. Often steel and cast iron pipes that have a cylindrical shape are used. In installation work, rectangular or profile pipes are used. However, you should cut the pipe correctly with a grinder so that you can easily connect it later. Therefore, you should carefully mark the pipe.
Some craftsmen try to mark the cutting area using a tape measure, but we warn you that the result will most likely be negative. And for a positive result, consider the following recommendation from professionals.
Take a sheet of paper or cardboard, preferably A4, fold it diagonally and wrap it around the pipe where you plan to make an even cut. The edges of the paper must be absolutely aligned with each other. And the side of the paper that is closer to the end of the pipe was perpendicular to the axis. Then mark a cutting line in a circle.
If you need to cut exactly at an angle of 90 degrees, then solve the problem quickly using paper or masking tape. Wrap it around the pipe so that the ends match. Make an even mark and saw off.
How to cut a profile pipe evenly?
Craftsmen advise using a square when cutting a profile pipe. To do this, apply the square to the sides one by one, and turn and apply marks with smooth movements. After the steps, secure the pipe and cut. Prepare yourself a template that will be useful in the future and will save time. It is better to carry out the action with a grinder, so the cut will be smoother.
How to cut a cast iron pipe?
When working with cast iron pipe, keep in mind that it is a fragile material. Therefore, we will find a way to cut such metal without damage.
Before starting work, make notes for the cut, as you would when working with steel pipes. Place a wooden beam for support. Run a grinder around the circumference of the pipe, making small cuts. Then take the chisels, insert them into the groove and hit them hard with a hammer. Please note that Bakelite-based cutting discs are used to cut cast iron pipes.
If you don’t have a grinder at hand to cut a cast-iron sewer pipe or other purposes, use a hacksaw, chisels or special pipe cutters.
How to cut a gas pipe?
Cutting a gas pipe is a dangerous action, so it is best to leave it to professionals. But if you are confident in your abilities, then use a grinder, welding, hacksaw, or gas welding to cut metal.
Trimming instructions:
- Before work, turn off the gas supply riser. Then release the rest of the gas from the pipe. To do this, light the gas in the burners and wait for it to go out.
- After these steps, cut. Using a welding method, the metal base burns when exposed to high temperature. The result is fast and effective. But remember that cutting or rooting gas pipes again requires experience.
Methods for cutting large diameter pipes
For cutting large diameter pipes, such as sewer pipes, there are a number of reliable tools available. Next, let's look at some of them in detail:
The grinder is an inexpensive and accessible option, but it is considered not the safest when working with such materials. If you decide to use this method, be careful and use protective equipment. A roller machine (pipe cutter) is a tool adapted for such manipulations. The device is attached and material removal begins. The clamping force is adjusted using mechanical devices
It is important to note that machine models differ in shape, so before use, consider the size relationship with the pipe. Gas cutting is the most popular option for cutting larger diameter pipes and sheet metal. The cut occurs due to the action of a high intensity flame, the metal melts and leaves the cut area with a gas flow
This method is convenient and effective.
How to cut a pipe lengthwise correctly?
A quick way to cut a pipe lengthwise using a grinder:
Pay main attention to the markings. For this case, use painting thread, which is widely used when marking walls. Before starting work, secure the pipe and, using small movements, carefully saw the pipe. It’s better not to rush, but delicately and slowly process the parts of the pipe, so that the cutting disc does not jump off the marking lines. Remember safety precautions... How to cut thin-walled pipes?
How to cut thin-walled pipes?
Thin-walled pipes are made of non-ferrous metals: aluminum, copper.
Reworking the jigsaw sole
When setting up a jigsaw, you first need to check the perpendicularity of the sole, since sometimes the clamp is not firmly fixed. Specialists often modify the sole of the tool, that is, they reduce the gap between the leg and the pressure pad. This eliminates "breaking" of the crust in the layers of material on top.
Read also: Three-pin button with backlight connection diagram
When using pads, it is important for every novice craftsman to remember that they should not scratch the surface of the part. In this case, they need to be replaced every five meters of cutting. Zero clearance can be achieved by attaching the cover plate to the jigsaw support leg.
The lining has only one narrow slot that fits tightly to the cutting element. Therefore, even a weak feed of the teeth can cut off small chips, and not turn out the chips of the top layer. The highest quality pads, which are guaranteed to last you a long time, are usually made from:
- sheet plastic;
- metal material;
- fiberglass.
Rules for the safe operation of an electric circular saw
When purchasing this power tool, you should also pay attention to safety criteria. Absolutely all conscientious manufacturers of such equipment “swaddle” the cutting disc with a protective casing, which can protect fingers, parts of gloves or other materials from getting under the cutting device, preserving the health of its owner
The casing always covers the upper part of the disk, facing the face of the person working with the circular saw, and the lower part is “exposed” only during direct cutting.
The first quality of protection can also protect the face, body and other parts of a person’s face from chips.
Another safety measure is to protect the device from accidental activation. Only after pressing the start button and disabling this option will the saw begin to work.
You should not be afraid of a circular saw jamming, since almost all modern manufacturers have provided a similar possibility in their equipment, when the cutting disk stops rotating, but the engine does not turn off, after which the saw can be removed from the problem area of the cut and start working again.
How to cut laminated chipboard with a jigsaw without chipping
Such work should be done delicately, as there is a high probability of deformation of the material. For cutting, fillers such as sand are used. Actions can be carried out using a grinder or a special machine.
To summarize, we emphasize
that cutting metal pipes is a complex process, but every willing master can improve it. Using the advice of professionals, you can easily cope with cutting pipes of various sizes and materials. Also, do not forget to process the edges of the pipes after cutting with a file or sandpaper. And the most important thing to remember when starting such actions is safety precautions. When starting work, wear a special suit (casing), mask or closed-type glasses. Your hands should also be reliably protected from sparks, so use thick gloves.
Ensuring a clean cut
In almost all cases of material processing, the chip size can be reduced to half a mm. Such minor defects are not visible; they can be removed by chamfering with sandpaper or covering up the chips with a correction pencil. You can also sand the end with sandpaper or cut through the top layer of the surface with a utility knife.
To begin, make 2 cuts half a mm deep on both sides of the part, indicating the thickness. It is necessary to mark two grooves on the sides of the cut, which can be done using an oblique shoemaker or segment knife (for uncoated wood material or chipboard), or using a sharp drill and a pobedite cutter (for laminate).
What not to cut chipboard
If the volume of work is large enough and the quality requirements are low, some craftsmen advise sawing chipboard at home using a grinder (angle grinder, commonly called an “grinder”). In doing so, they use a disk designed for working with wood. To make cutting easier, a guide bar is secured along the cutting line using clamps. Cutting chipboard using a grinder can sometimes be seen in the video.
The easiest way to mark is to draw straight lines along the sides of the slab using stretched threads, a square, a ruler and (or) a measuring tape. If there are a large number of parts to be cut, it is difficult to choose the optimal sheet cutting scheme that can reduce losses due to the remaining scraps. To outline smooth curves, you need to use patterns that allow you to reproduce numerous fragments of the same type.
Special programs help improve the quality of cutting, in which the dimensions of products are specified, calculations are made and a diagram of the optimal arrangement of cutting lines is displayed. Such programs include “Cutting 2”, “Master 2” and others.
An example of using the software is shown in the video:
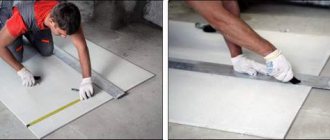
When cutting material with your own hands, you need to pay special attention to the straightness of the corners and maintaining straight lines. Marking large sheets should be done on the floor, working in pairs
Drawing dimensions by one person is fraught with distortion of parameters caused by the displacement of measuring instruments during work.
Cutting programs
You can make a cutting map for laminated chipboard from a sheet using special programs on a computer. Among the most famous of them: “Astra Opening”
In the program file is an order, which may contain several products that have their own set of parts, the parameters for which are specified by the user. Based on information about cutting the edge of the slab, type of cutting, cut width, through cuts, etc., the program will generate a cutting map. Then a specification, sketch and other technological documentation will be automatically generated. The program includes reference information about materials, operations, edges and parts.
"Master-2"
Suitable for those who are constantly engaged in cutting chipboard. This program:
- supports multi-user mode;
- systematizes and sorts information;
- sorts orders into archived, planned and active;
- saves information about materials, etc.;
- takes into account the remaining material.
In the editor you can see which part is laid correctly and which is not, and the remainder, both significant and not so significant. The user can change the settings for ease of use.