How to make a homemade earth drill (pit drill, earth drill)
When building a house and landscaping a site, it is often necessary to make round holes in the ground. They are needed when constructing a fence - for installing poles, when building gazebos, installing arches and other light utility structures. The same holes, but with a larger diameter and depth, are required when constructing a pile foundation. These holes are made with a motorized or hand drill. There are plenty of them in stores, but many people prefer homemade ones: they are often more productive and reliable than factory-made products. In addition, you can make a drill with your own hands of any design, and there are many of them.
Preliminary calculations
Before you start drilling holes for pillars, you need to make preliminary calculations.
To install any pole you need a hole. Its diameter is slightly larger than the size of the structural element itself. The pit must strictly correspond to the parameter of the pillar. For this purpose, preliminary calculations are made. They are often quite simple. If the hole is made too spacious, it will lead to loosening of the soil. This is unacceptable for a columnar base. The foundation will be shaky and not rigid. It is very important to calculate the distance between the pillars. Simple formulas are used for this
Everything here is actually extremely simple. The weight of the structure directly affects the number of pillars. The heavier it is, the greater their number should be. Holes for pillars need to be drilled to a certain depth. This is done using various devices, which will be discussed below. Moreover, the depth directly depends on what type of soil is present in a given region. The more buoyant it is, the deeper you need to dig. This is a simple pattern that allows you to create a high-quality foundation.
Designs and Applications
There are three main designs of earth drills:
An example of a homemade earthen garden auger
The auger drill is distinguished by spirally wound several turns of the spiral
Folding blade - features of the TISE pile drill
Garden earth drills that are easier to make. Depending on the type of soil on which drilling is carried out, their design is slightly modified. This is the beauty of homemade drills - they can be “sharpened” to specific conditions and it’s not just about the size - the blades can be made removable, bolted on, but also about the design features. Yes, ordinary drills in the store are inexpensive, but they are “universal”. They work well on “light” soils.” On loams, clays, marl, etc. they are ineffective.
Driller's Reminder
Creative inventors can mount a motorized or electric drill on a trolley. If the tool is often used on the farm, this will be convenient.
Before making your own power tool, calculate the possible costs (gearbox, drill, auger, knives).
Compare with the cost of a new auger. If the difference in favor of a homemade product is significant, it makes sense to make efforts to make it.
It is not for nothing that the gearbox is considered the most important element of a motor drill. The number of output revolutions must meet the requirements for operating comfort.
A high RPM will keep the driller on his toes and the auger will continue to rotate even after the unit is turned off. Is it dangerous.
On the other hand, low speeds lead to a longer time period required to complete a certain task. Your arms and back will get tired.
A correctly selected gearbox is the key to your “friendship” with the motor drill.
From the following article you can find out interesting technical characteristics of the KB-403 tower crane.
At the following address https://spez-tech.com/tehnika/selhoz/pochvoobrabatyivayushhaya/kakoy-luchshe-priobresti-mini-kultivator-dlya-dachi.html an article has been prepared for you that will allow you to decide on the choice of a manual cultivator for your dacha.
Do not put pressure on the tool while drilling. It can be difficult to control, especially when the auger hits a rock. Be prepared for this and keep your distance.
Failure to comply with safety precautions has the same consequences, regardless of whether you are working with a factory-made or home-made tool.
Before work, stretch your hands - you will be more resistant to the vagaries of a motor drill.
If you have old chainsaws, hand drills, drills, or grinders lying around in your attic, don’t rush to get rid of them.
These tools will help you make a new expensive device that will open up wide possibilities for you.
The information obtained by watching the video can be applied in practice - when creating a motor drill with your own hands:
If you find an error, please select a piece of text and press Ctrl+Enter.
Making a garden drill
A garden auger is the simplest but most effective design. It consists of:
The post drill can be equipped with a prefabricated rod
This is a basic design, and there are many modifications to it. But let's first talk about what an earth drill can be made from.
Materials
As already mentioned, the rod is most often made from a round or square pipe. Diameter - from 3/4′ to 1.5′, profiled pipe can be taken from 20*20 mm to 35*35 mm.
Blade knives can be made from:
Earth drill with blades made from a saw blade for an angle grinder
The spear-drill is made from different materials - there are many different designs. They just make a sharpened rod. Then you need a piece of large diameter rod. The second option is to make something like a drill from the steel strip. And yet - a combination of these two.
And finally - about the pen. It is more convenient if it is made of a round pipe. Its diameter can be selected according to the circumference of the palms. The main requirement is that you should be comfortable.
Knives and fastening method
First of all, you need to decide whether you are making a drill with your own hands with removable or stationary blades. If the blades are removable, weld shelves made of thick steel at one end of the rod. The shelves are made at an angle - so that the planes of the knives are separated at an angle of 25-30°.
After the shelves are welded, two or three holes are made in them for fasteners. Then the same holes will need to be made in the blades, and installed on bolts of substantial diameter.
One rod can have several sets of cutting blades - for holes of different diameters
You will have to cut holes in the center of the disks themselves so that they fit more tightly to the rod, but this operation is also required for the monolithic version - with welded blades.
Sheet steel
If you are going to make the blades from sheet steel, cut out a template from paper and use it to create a circle of steel. Drill a hole in the center - you will need to insert and weld a rod into it. Circle or square - depending on the chosen rod. The hole dimensions are slightly larger than the dimensions of the rod.
Next, you need to decide what kind of blades you will make - from two halves of a circle (as in the photo above) or in the form of an open circle with offset edges - one turn of a spiral (in the photo below).
Manual drill with one turn
The edges should also be separated by 25-30 degrees. In this case, drilling efficiency will be maximum. If you work on dense soils (clay, loams with a predominance of clay), the blades may collapse under load. To avoid this, stops are added from a corner or a thick strip of steel.
Strengthening a hand drill for drilling wells in dense soils
The blades bend due to the fact that unhardened steel is used, but it is almost impossible to find it in the sheet, and even if it is possible, it is unlikely to be bent.
From a saw blade
If you have an old saw blade of a suitable diameter, you have found an almost ideal option. They use hardened steel, which is elastic and durable. But such a disk cannot be bent, so it is sawed in half and these halves are placed at the required angle.
The disc is sawn in half
Let's start drilling
If we talk about step-by-step instructions for drilling a water well with your own hands from A to Z, it looks like this:
- A pit is dug one and a half meters long and the same width. Depth - from 100 to 200 cm. This is necessary to prevent the collapse of the upper layers of soil. The walls are lined with plywood sheets in the manner of formwork. The bottom is covered with boards. A wooden shield is mounted on top of the pit, on which you can safely walk without fear that the walls of the pit will collapse.
- Technological holes are made in the bottom and coating to carry out the work. A drill rod attached to the drilling rig is threaded through them.
- The drill is driven by a special motor with a gearbox or manually. If we are talking about a puncture, a support is installed on the pin, which is struck with a sledgehammer.
- If the technology involves parallel installation of casing pipes, work is also carried out through technological holes in wooden panels.
- The soil removed from the well is selected manually. If it is sludge, you need to install a mud pump that will pump it directly out of the casing.
- After drilling is completed and the casing is installed, you need to install the electrical equipment and start the pump, which should run until the water from the well becomes absolutely clean.
After all stages are completed, a caisson is installed instead of the enclosing box. The head, pumping and filtration equipment are installed, and the pipeline is connected. The system is being tested. The equipment depends on the type of well.
Abyssinian
The upper water layers are suitable for irrigation, but are not used for domestic use. This is all due to pollution that penetrates the soil with floods. Such a well has a depth of less than 10 meters. Water must go through a multi-stage filtration system. Only in this case does the liquid turn from technical to drinking.
A hand pump can be used as pumping equipment. The use of any type of electrical equipment (submersible, surface) is allowed. The pumping station does not have to have a lot of power, and this makes the well the most inexpensive. It is advisable to install a storage tank into which a daily supply of water is pumped.
Well on sand
At a depth of 10-40 meters there are layers in which water undergoes natural filtration. Passing through the sand, it is cleared of some impurities. It does not contain large inclusions, clay or a number of chemical compounds. This water can be used for domestic purposes and for irrigating agricultural crops, but additional filtration is required to make it suitable for food use.
The best option for electrical equipment is a pump. Surface pumping stations are also used. If the depth is more than 10 meters, it is possible to use an ejector, which will increase the pump's performance by accelerating the flow of produced water in the pipeline.
Artesian
These are wells with absolutely pure water, enriched by nature in the limestone plates of the soil cut. The depth can vary from 100 to 350 meters depending on the location of the site, the geological features of the soil and the terrain. Water does not require filtration. The threat comes from contaminants that can enter the casing from the outside. The minerals contained in the solution are beneficial for humans.
It is necessary to install a submersible pump for the well. This can be a centrifugal or vibration type device. The latter is preferable, since it breaks less often and has better performance. The main thing is that the pump has a coarse pump that prevents solid particles from entering the working chamber.
Auger drill
Due to the large number of turns, an auger auger creates significant resistance, that is, it is much more difficult to work with it than with a garden auger. But augers are used mainly in the presence of a mechanized drive - when making a drill for deep wells - for water, for installing underground probes for a heat pump, etc.
This is what an auger drill looks like
To make a homemade auger drill, you will need several metal disks. The number of disks is equal to the number of turns. The disks are cut identically, a hole is cut in them in the center for the rod, as well as an identical sector - so that they can be welded.
A sector is marked in the rings and cut out
The discs are welded on one side, then, slightly stretching the resulting accordion, the seam is welded on the other side. Rings are welded on the outer disks. The welded discs are placed on the rod, the lower edge is welded.
It turns out to be such a big spring
Next you will need a winch. The blank for the auger is secured, the winch hook clings to the ring and is stretched to the required length, after which the auger is boiled.
Chainsaw motor drill
When faced with a similar question for the first time, you may be surprised that a chainsaw is used not only for sawing wood. This is just one area of application.
A chainsaw can make an elegant gas cutter, a winch, a drill, a boat motor, a debarker, a device for cutting logs into boards, etc.
Functionality is ensured by the design features of the chainsaw:
- unpretentious and reliable engine;
- sealed supply of the fuel mixture, leakage of which is only possible if the chainsaw is turned over;
- The main thing is a power take-off system that is understandable to everyone. The output shaft of the chainsaw allows you to attach any attachment.
The chainsaw engine is designed for long-term and intensive use, so you don’t have to worry about breakdowns or poor performance of the task.
Theoretically, it is possible to make a similar power tool from a trimmer, lawn mower or grinder.
In practice, this is quite difficult due to the unusual design of the gearbox. Problems may arise due to insufficient power take-off or incorrect rotation of the drill auger.
Drill for TISE piles
Do-it-yourself drill for TISE piles - one of the options
The photo below shows the second version of a homemade drill for TISE piles. The design is more complex, but also more effective. The plow blade is made from a piece of spring, sharpened and welded to a folding structure with bolted joints.
More complex design
The dredger is made from an old propane tank. The collection of soil occurs from below, which is why the receiver is made with a rounded bottom. It has two holes, their edges are sharpened.
Motor drill from trimmer
Another promising option is to create a motor drill from a trimmer with your own hands, which will allow you to save a lot. Lawn mowers like these are ubiquitous. This allows you to find all the components needed for your future device without any problems.
Among them we should mention:
- engine from trimmer;
- Boer;
- connecting elements.
It is important to take into account that the operation of all types of drills will be much more convenient if a stand for a motor drill is involved in the process. You can make it yourself only if you have a welding machine.
Progress
Since the technical parameters of the trimmer engine are weaker than those of a chainsaw, a motorized ice drill from a trimmer can be used exclusively for soft ground. However, its rotation speed is also excessively high, which requires the use of a reduction gear.
It is quite simple to create such a device using drawings:
- Make an auger, securing the drill and pipe used for connection.
- Equip the engine with a gear reduction device.
- Connect the auger and motor.
In the process of selecting materials for the manufacture of the auger, it is strongly recommended to use durable types of steel, since in the process of soil processing stones and other objects that can damage the working element are often encountered. If you provide for the possibility of removing the drill from the motor of the device, you will get an attachment for the trimmer.
Blueprints
A self-made drill is good because its design is “tailored” to its owner. During the manufacturing process, everyone makes their own changes, then many more refine the product. But it can be difficult to do without basic drawings. This engraving contains several drawings with the sizes of various drills. As you understand, the dimensions are arbitrary; they can and should be changed, adjusting them to the size of the required wells.
Shovel drill
There is no point in making a serious structure for planting plants. In this case, you can make a garden drill from a shovel. Choose a high-quality shovel made of good steel, apply markings as shown in the drawing. According to the markings, you will need to cut out two small fragments and saw the lower part in the middle to a depth of 30 cm (pictured).
Next, the edges are bent one forward, the other back, and the petals formed in the lower part are folded towards them. The resulting seams are boiled outside and inside.
Drill for soft soils
If the ground is soft, the conventional design does not work very well. For such cases, there is a special drill with an extended cutting part. It is a kind of glass with slits on the sides. The cuts are equipped with cutting edges. They are best made from well-hardened steel.
Drill for soft soils
This drawing shows an interesting handle design - it can be rearranged as the length of the rod increases.
Basic drawings of auger and garden auger
Both of these units work well, but the garden one has to be taken out often, and the auger one is harder to rotate. Choose according to your own preferences.
Auger and garden auger for soil of different densities
Detailed projection drawing of an auger drill
Garden auger drawing
Motor drill from trimmer
Another promising option is to create a motor drill from a trimmer with your own hands, which will allow you to save a lot. Lawn mowers like these are ubiquitous. This allows you to find all the components needed for your future device without any problems.
Among them we should mention:
- engine from trimmer;
- Boer;
- connecting elements.
It is important to take into account that the operation of all types of drills will be much more convenient if a stand for a motor drill is involved in the process. You can make it yourself only if you have a welding machine.
Progress
Since the technical parameters of the trimmer engine are weaker than those of a chainsaw, a motorized ice drill from a trimmer can be used exclusively for soft ground. However, its rotation speed is also excessively high, which requires the use of a reduction gear.
It is quite simple to create such a device using drawings:
- Make an auger, securing the drill and pipe used for connection.
- Equip the engine with a gear reduction device.
- Connect the auger and motor.
In the process of selecting materials for the manufacture of the auger, it is strongly recommended to use durable types of steel, since in the process of soil processing stones and other objects that can damage the working element are often encountered. If you provide for the possibility of removing the drill from the motor of the device, you will get an attachment for the trimmer.
What it is?
An electric drill is a tool that automatically operates on alternating current, which is used to solve such a problem as creating earthen pits of various types and purposes.
The device consists of a rod, handles and a drive. It is equipped with an electric motor, which is its distinctive feature. Special blades on thrust bearings are attached to the rod (the so-called rod part of the frame), which collects and lifts the earth when the unit is buried in the ground during the development of the hole.
Electric drill for excavation work: advantages of modern devices
Builder 4th category
You have to use a variety of equipment in your garden. To plant trees or build a fence, the owner will need an electric excavation drill. This device is simple in design and has high performance. You just need to choose the right device, and the work will take less physical effort and time.
Purpose
When using an electric drill, you can perform many types of work without voltage, due to the fact that the device can be used immediately after it has been turned on, and it is also characterized by high productivity.
During operation, there are low mechanical costs, which is a plus: the efficiency is seventy percent.
It is difficult to work manually with highly dense soil, especially if it contains elements that prevent drilling (stones or other rocks, roots), and the use of the unit greatly facilitates soil development.
An electric drill will come in handy in dachas and gardening . They can be used to loosen the soil and make holes of the required depth for planting various crops, be it ornamental shrubs or young trees. Therefore, the use of the unit in the summer is very common, especially among land owners. An earth drill can be attached to a drill or screwdriver and used for any purpose, cultivating the soil.
An electric hole drill is used when installing fences and you need to make holes in the ground for a fence. Similarly, when laying the foundation of any structure, it becomes necessary to drill the soil for piles. Sometimes it becomes necessary to drill through ice, in which again a power tool comes to the rescue. Convenience is due to the fact that you can use different blades.
But in order to successfully use the tool, you need to decide what characteristics it will require for successful operation for its intended purpose. Thus, the diameter and type of blades and the length of the rod differ. For various types of excavation work, units of suitable power are selected accordingly.
Removable blades of drilling machines can be helical, auger or disk.
In the case when it is necessary to obtain a hole with smooth edges that would not crumble, an attachment is used, which is a pipe with a spiral of blades around it - this is an auger. It can be used to drill tunnels in the ground, it is used for water wells, and is also suitable for making holes for pillars.
During serious work, double-spiral augers are the most useful; with their help, it is easier to lift dense soil than single-spiral augers.
The auger must be selected according to the type of soil you will be dealing with. For example, for ground that is frozen and covered with ice, the store always has a separate type of durable attachment.
Auger blades are very popular because they are the most practical and versatile. A garden drill is capable of making depressions in the ground up to a meter, so you can make holes for the base of light structures: swings, benches. This hand-held electric soil drill is suitable for summer residents and can be used even in rocky soil.
The disk type is represented by an attachment in the form of blades attached to a rod, located at an angle to each other. May be useful for the garden.
The length of the rod is selected based on the user’s height and the required depth of the hole. Working at an angle with an electric drill is not always convenient and, moreover, unsafe, so the length of the rod is an important characteristic. For downhole drilling, it would be optimal to choose a rod of 1.5-2 m.
Units with an electric motor operate from the electrical network. A cordless drill is very convenient because it can drill even without being connected to an outlet. If you plan to work for a long time, it is better to use an extension cord, because the battery may be discharged.
Ways to improve the tool
When drilling holes, the master may encounter a large number of plant rhizomes that lie tightly in the soil. The sharp edges of the blades will make working with the drill much easier. For ease of use, you can cut several teeth on the sloping area of the blade or round off its cutting area.
You can improve the design and make removable cutters for the drill. Thanks to them, it will be possible to drill holes of any diameter. In addition to the manufacture of spare parts, it is necessary to provide for their attachment to the collar. The easiest way is to connect them with two iron plates, which are secured by welding.
In the mounting plates, as well as in the blades, you need to drill two holes for the sides. The cutters are fastened with M6 bolts. To ensure that the bolts do not interfere with work, they must be screwed in with the threads facing up.
There is another way to improve your homemade pole drill. You can increase the efficiency of the lower end of the knob. To do this, you need to cut out a narrow metal plate (10x2 cm) and grind it into a cone shape using a grinder, making a kind of point.
There is no need to make cuts in the collar; turned metal plates are inserted into its end, fixed by welding and flattened. The result should be a peak.
There is another method for making a pike. A metal plate is cut to a length of about 17 cm and a screw is made from it, similar to a corkscrew. Further, the algorithm of actions is the same as in the described first option.
A suitable drill can act as an auger, which can easily handle wood as well as metal. Such a tool will penetrate the ground much easier and will drill a hole to the required depth without any problems.
Builders who work on dense deep layers of soil will need one piece of advice. Between the pick and the cutter you need to weld a small flat cutter. Thanks to this design, it will be possible to loosen the earth and center it when drilling. For such a part you will need 2 metal plates 3x8 cm. This trick will significantly speed up working with the tool.
Milling cutters can also be made from grinder discs, which are designed for working with stone. The circles need to be cut along the radius and the hole in the center should be expanded according to the diameter of the knob. Bending the disk with the sides apart gives the appearance of a corkscrew or auger. All that remains is to weld the part in the manner described above.
The cutter is very easy to make from a circular saw blade. The teeth of this model can easily cope with plant rhizomes and hard soil.
The master can choose how to modernize his drill independently. It is worth saying that making a drill for poles with your own hands is not a complicated process at all and requires minimal physical and financial costs from the master. The entire manufacturing process takes two hours at most.
Finally, there is one important piece of advice: before the drilling process, it is best to loosen the soil with a shovel, then the device will fit into it more easily and the work will go much faster. The recommendations given will certainly help the master make a functional and effective tool that will serve him for decades and become a very good assistant.
Popular brands
Today, electric drills allow you to perform many jobs. Without these tools, the efficiency of solving many problems would be significantly reduced. Thanks to the fact that suppliers now offer equipment that meets consumer needs, labor productivity has increased significantly and less and less human effort is spent.
Drill manufacturers compete for dominance in the market and try to improve new models of equipment. The brands in greatest demand are:
STIHL is the first domestic company to produce a variety of technical equipment at attractive prices. The models presented by this brand receive a lot of positive reviews. Buyers note the decent quality of the products. As for electric drills, STIHL guarantees a long service life of the unit.
There is a large selection of drill models designed for work of various formats.
Equipment for any, even the most specific taste, is sold by the following brand - EFCO , which specializes primarily in garden equipment. It is not surprising that this Italian brand is so famous on the Russian market: official representative offices sell its products in many countries. The drills from this company are very durable and are used for tasks of various sizes, from making an ice hole for fishing to responsible professional work.
Self-production
Many craftsmen ask the question: how to make a motor drill so that it is not inferior to industrial designs? If you have some skills and the necessary tools, creating a drill hole is quite feasible. Before manufacturing equipment, you need to take into account the criteria that a good motor drill must meet:
- If you plan to make a compact, lightweight model, the power can be 3 hp. If you need a more powerful motor drill, you should choose an engine up to 6 hp.
- The larger the engine displacement, the more productive the unit. Considering the type of soil, you should choose one or another engine size.
- You should also take into account the diameter of the screw and the possibility of replacing it if necessary.
In order to build a tool, certain skills are simply necessary. If there are none, you should enlist the help of a locksmith.
Gearbox
Selecting a gearbox for a homemade drill is an important stage in the process of assembling this tool, since this element is one of the main components of the mechanism. According to the type of output speed, gearboxes are divided into step-up and step-down gearboxes. To be able to regulate the speed, the second type is chosen for the motor drill.
The direction of rotation of the gearbox must be reversible in order to easily unscrew the tool from the hole when it gets jammed in hard ground. The gearbox device includes several elements:
- Output and worm shaft
- Two gears (bevel type)
- Bearings
- Frame.
The gearbox must have holes for filling lubricants.
Auger
If you need a standard-diameter auger, you can purchase it at the store. To make it yourself, you will need a metal pipe core, a screw blade and a tip. Hard soil types will require a strong steel core to prevent deformation. To make the blade you will need hard alloy steel. The tip is also made of carbide metal. Its shape should contain grooves, and the second end should be a shank on which the gearbox or coupling will be placed.
Racks for motor drills
When doing a large amount of work, a motor drill is very inconvenient to hold in your hands. In this case, you can make a special frame to hang the equipment you have made. Experienced craftsmen implement different types of racks:
- Lifting mechanism: uses a chain drive, which is installed inside the central pillar. The mechanism can be raised and lowered using an electric motor or mechanically using a handle.
- Moving the frame on wheels: two wheels are attached to the lower support to change the position by simply tilting.
The material for making the racks must be durable: usually a profile pipe, a section of channel and metal corners are used.
Nuances of choice
When the question arises of choosing the appropriate electric drill for the soil, it is important to determine the conditions in which the unit will be used. Based on the type of land that prevails at the work site, it is decided what power of the device is optimal. Serious large-scale work is carried out using a device slightly larger in size than a household electric drill.
The parameters of the device determine its cost and scope of operation. Thus, a low-power electric drill (about 1.5 kW) will be a good option for solving simple tasks such as making single holes for seedlings in a summer cottage. If the product is to be used in a large construction project, which may require pile drilling or other deep holes in the ground, then you will need a drill with a power of at least 2 kW.
The equipment of the unit also plays an equally important role and is worth paying attention to when choosing. For example, for household work, the diameter of the nozzle can be no more than 15 or 20 mm.
The diameter of the nozzles depends on the massiveness of the structures drilling the soil. The attachment that comes with the electric drill can be replaced with new ones as needed.
To take advantage of all the advantages that an electric drill has over other drilling machines, do not purchase a unit if you doubt the integrity of the supplier. Then you will be able to appreciate the bonuses that come from using an electric drill. Namely, efficiency in energy consumption, noiselessness and harmlessness to the environment, because during operation no toxic exhaust gases are released into the atmosphere.
2. Malfunction: The engine does not start.
Cause: There is no switching in the ignition circuit.
Solution. Checking the ignition circuit. Try to carefully inspect the wire going from the magneto (ignition coil) to ground. Carefully inspect the engine stop button. The ignition is turned off by connecting this wire to ground (engine body). Jamming occurs frequently. This button is broken. To check, disconnect the wires going from the button to the engine and try to start it.
If a spark does not appear, try to inspect the high-voltage wire running from the ignition coil to the spark plug. Check the position of the contact in the spark plug cap. It should not be displaced.
In places of breakdown, specks usually form. First, wipe the wire and spark plug cap with a dry cloth. The breakdown of a high-voltage wire is clearly visible in the dark. The magneto ignition coil cannot be repaired, only replaced.
How to do it yourself?
If you have a hole drill with an electric motor, then there is no longer any need to strain yourself when digging the ground with a shovel. The tool now does everything itself, with it you can make holes for various purposes, you can bring water to the site, lay the foundation of a house and design a garden by planting trees.
Instead of buying, as an option, electric drills are made with your own hands from scrap materials. Designing a high-quality unit is a feasible task for everyone. A homemade drill is not inferior to the one you purchased ready-made.
Moreover, the inventor is given freedom to make his own changes: modifications provide the device with additional functions and make operation easier.
Such useful modifications are: increasing the number of tiers of blades; adding a box in which soil is collected, etc.
You can create just such a unit that would be ideal for drilling. The type of nozzle and the size of the blades, power, dimensions of the equipment, engine characteristics based on the soil properties are determined independently.
To get a new, reliable electric drill, you need to assemble parts such as the cutting part, the rod, handles and the motor. The blades can be circular disks, and to create an auger yourself, you can look for a suitable model - ready-made drawings are used to create working attachments based on a template. The electric motor is made from a hammer drill, and a powerful motor is also obtained from the starter and gearbox of the drill.
With your own hands, using an electric cultivator, it is easy to create an effective machine for cultivating the land, including plowing it and removing roots from it, which a drill can do well. What do you need to start designing?
Tools and materials
One of the simplest options for a homemade drill is a drill unit. The tool is ideal for using it to develop your own powerful techniques.
It is designed for long-term use and makes it possible to use different types of drill attachments. But the same lawn mower is not as simple as it seems at first glance, and if you make an electric drill out of it, difficulties may arise due to the gearbox.
So, before you start, you will need the following materials:
You can start working.
Budget electric drill.
As they say, laziness is the engine of progress. He began experiments on drilling through thick ice back in 2014. And it seems that I found the optimal solution to this, in the form of an attachment - a gearbox for a chainsaw, but something didn’t catch on; of course, it’s convenient for them to drive assholes, but that’s not what we go fishing for. https://www.youtube.com/watch?v=5mIlvYdKwvA And then just last season the original battery on the Dingasik “died” (it’s a winter “goat”, like a snowmobile), I stuck an adult 55 A/h battery in it .
Well, I think, since the stars have aligned, it’s time to switch the drill to electric traction. I bought a Toyota electric power steering at Drome for 2.5 rubles.
, a 22mm aluminum tube in Leroy, a rubberized cable with a cross section of 2.5mm, a 40 Amp car relay, a 30 A fuse, bicycle handles, crocodile clips on the terminals, and other little things.
First of all, I unscrewed all the unnecessary parts from the amplifier that could not be removed in a civilized way - I sawed them off with a grinder, only two wires should be left (thick power ones), the rest “in the furnace”. The button cannot be connected directly, they are usually designed for 2-5 amperes, and the motor “eats” 15-17, in general, sooner or later it will burn out. It is also advisable to install a fuse in the power branch; no one is insured against a short circuit, otherwise at least the battery will remain intact.
The button I have is not quite correct, it is a two-position on-off button, it is better to set it to “single-contact” like on a doorbell, pressed - there is power, released - no power, it’s safer.
Well, of course, it is advisable to solder all contacts. There is a lot of information on the Internet about how to connect a relay; I won’t describe it. I screwed the handle into the standard holes of the amplifier. I put spacers inside the tube on the bolts, without them, when tightening the nut, the handle flattens and it bursts.
The diameter of the output shaft was adjusted to the dimensions of the adapter.
The weight turned out to be 5 kg. Rotation can be provided either left or right, it all depends on how the terminals are connected to the battery. The rotation speed is about 140 rpm, which makes it quite comfortable to make holes in the ice.
I’ll also tell you a case of how NOT to do it. I started assembling the drill at the end of last season, screwed on the handle, installed the auger, threw the wires directly without buttons and relays and ran to the tests. The first hole was good, the second was a total “song”, and on the third the auger got caught on the lower edge of the ice..... In general, while I reached it and threw off the terminals, the handle broke off on the ice. It’s good that the drill itself didn’t drown. So don't repeat other people's mistakes. I wish you all a good bite and big catches in the coming season.
Price issue
Today you can find quite a few varieties of hand drills, which will differ in their appearance, shape, length, diameter of possible drilling, design features and other nuances.
Typically, such a tool can drill holes in the soil up to 2 meters deep with diameters up to 30 cm.
The simplest, cheapest drills usually do not stand out in anything special, have a simple shape, consist only of metal, which is painted in a certain color, often red and green.
The weight of the motor drill and the manufacturer are one of the criteria when choosing. The system that dampens vibration also plays an important role.
More expensive branded products can be supplemented with various elements that increase comfort during work. For example, the handles can be rubberized, the design can be dismounted, and the ability to extend the base of the drill can be added for drilling deeper holes.
On average, the price of the simplest drill is around two thousand Russian rubles. If you go deeper, a hand drill with a possible drilling diameter of twenty centimeters will cost two thousand one hundred rubles, and with a diameter of fifteen centimeters, two thousand. The price will also be affected by the maximum possible drilling depth.
We choose a motor drill so that it has protection against accidental starting. When you get stuck, reverse motion is an excellent help.
If we consider expensive branded models, then their cost can start from four thousand rubles and grow upward. If you have a collapsible design with the ability to increase the drilling depth, then the extension cord must be purchased separately; its cost will start from a thousand rubles.
Operating rules
When using equipment such as an electric drill, it is important to follow proper storage and safety guidelines during use. Following simple recommendations will extend the life of the tool, avoid premature failure, and also prevent injury.
- Metal parts of the device may be subject to the destructive effects of corrosion processes. Therefore, to protect the blades and rod from rust, they are coated with a special anti-corrosion coating or metal paint.
- To ensure easy drilling, the sharpness of the blade is periodically checked and sharpened if necessary.
- The cause of unexpected failure of the device may be working with an unsuitable blade for a given type of soil. Therefore, before drilling, the soil is first examined, and it would be better to slightly loosen the top layer.
- The electric drill lifts the earth up and can break if you work without interruption and shutdown to remove accumulated earth from the auger. Periodically stop drilling and remove excess soil. This will help avoid bending and breakage.
- Be careful not to get injured.
- After completion of work, it is important to clear away any adhering soil and check the condition of the equipment.
Characteristic
Hand-held drilling equipment has gained considerable popularity. But using it “in its pure form” is very difficult and time-consuming. A stand for a motor drill can significantly simplify many jobs. This structure is made from a pair of metal pipes. A carriage is attached to the fixed part, which moves the drilling element.
To make the carriage move, a chain is attached to it. And this chain, accordingly, is connected to a shaft equipped with a sprocket. When working, rotate the handle up and down. Thus, the gas drill stand allows you to pull up and lower the main drilling part. At the same time, which is important, the reliability and stability of manipulations is ensured, and not just the unloading of the operator’s muscles.
Adjustment of the design is required. After all, the soil can be different, and there simply cannot be a single standard for excavation.
Moving along the surface of the earth will be greatly simplified if you equip the device with wheels.
Field tests: checking the functionality of a manual hole drill
After the welds had cooled, it was possible to test the hand-made tool. Despite the fact that I was not entirely sure of its performance, the hole drill performed well. The only drawback is the need to periodically pull it out of the well along with the earth that has accumulated on top. Otherwise, no complaints.
First drilling. Surprisingly, it goes into the ground like clockwork
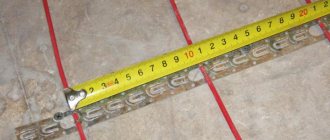
Having made 4 turns around the axis, I pulled out the hole drill along with the earth that had collected on top of the cutting planes. During this time, the hole drill was drilled to a depth of about 7-10 cm, which is quite good. It turns out that a well one meter deep will take about 10 minutes. Of course, provided that the soil is not too rocky.
Depth of the drilled hole after four full revolutions