Hello readers of my blog! Today we will talk about how to properly lay a warm electric floor with your own hands. It would seem that the matter is not tricky, but when you are faced with this problem, you have to think about how to do it correctly, what preparation to do, what materials to choose. Thus, I decided that this article would be useful to someone, and I am devoting my efforts to this subject. In it I will answer a number of questions that will arise immediately before How to properly install a heated electric floor with your own hands, and some even after that. This topic is quite broad, because before work, thorough preparation is necessary, but how to do this? And this is a separate topic. You can learn about all this in great detail in the article below.
What is a heated floor
How to lay a heated floor, or rather, how to properly lay a heated floor with your own hands so that it serves me as long as possible? I studied this issue from A to Z.
In this article I will tell you in detail about what an electric cable underfloor heating is and how to lay a cable underfloor heating with your own hands.
It's no secret that the most common type of underfloor heating is electric.
Where is it used? Everywhere.
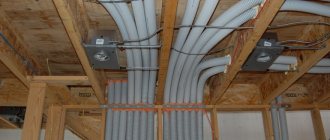
Electric heated floors are easy to install and therefore can be found not only in apartments, private houses, but also in garages! There is no need to install any pipes, break down walls and needlessly irritate your neighbors. Laying a heated electric cable floor is not a difficult and not at all noisy task. And now you will see this.
What is cable electric underfloor heating?
Since a heated floor is called electric, it is absolutely clear that it is heated using electricity.
Or rather, an electric cable, which, heating itself, warms the floor. There are two types of such cables: resistive cable and self-regulating cable. What is their difference?
The first type of cable (resistive) heats itself due to the electricity that flows through it and heats the surrounding space, that is, the floor. The cable can be single-core or double-core.
Single-core is when there is only one wire running throughout the entire cable - the core. It is covered with braid and insulated. A two-core cable, accordingly, consists of two identical insulated conductors.
IMPORTANT! During installation, the single-core cable must begin and end in the same place. That is, it must be closed. This rule does not apply to a two-core cable.
IMPORTANT! Single-core and two-core resistive cables have two disadvantages - they emit an electromagnetic field (however, two-core cables are weaker). Heavy furniture cannot be placed on a resistive cable heated floor; the cable may overheat. The same can happen if the technology for laying resistive heated floors is broken.
The second type of cable (self-regulating) is much more complex and free of previous disadvantages. Accordingly, the cost of such a cable is much higher.
So, you have figured out the types of cable heated floors. Now I’ll tell you how to determine how much cable to buy?
What you need
It is very important to plan your budget correctly so as not to save not only on the heating elements themselves, but also on all building materials. High-quality waterproofing is especially important; in some cases it is a decisive factor.
To lay the floor you will need the following materials:
- the flooring system itself (heating elements and reinforcing mesh included);
- connecting wires;
- fastenings;
- temperature controller;
- temperature sensor;
- RCD protection system (residual current device);
- cement with sand;
- copper cable for grounding.
It is also necessary to purchase the flooring in advance in order to determine its thickness, texture and other aesthetic characteristics.
Material selection
The heating cable can have various designs.
Main types of cables:
- Self-regulating. The element is a polymer matrix. When overheating occurs in the fault zone, the current flow is reduced to prevent breakdown. The remaining areas are operating normally. Thanks to this property, a cable of this type has durability and high reliability, but is characterized by high cost.
- Resistant. Consists of one or two wires that have very high resistance. Passing through them, the current is converted into thermal energy. The heating core is protected by a layer of insulation and a metal braid responsible for grounding. However, if one section of the core fails, the entire system breaks down irreversibly.
Installation of the heating branch cable is carried out in a layer of cement fill, which will additionally redistribute heat and perform the function of insulation from cold from external sources.
How much cable to buy for electric floor heating
First of all, you need to measure the floor area on which you want to lay the cable heated floor. Install underfloor heating cable electric (unlike, for example, water) only on those areas of the floor surface where there is no furniture (cabinets, sofas, beds), plumbing fixtures or large household appliances (stove, washing machine, refrigerator).
The cable underneath may overheat. And why heat the surface under the furniture and waste electricity, and therefore money, on it? And this only reduces the warranty period of the floor.
Have you measured the area? Remember this number.
Better yet, write it down (for example, the floor area in my room is 9 m2). Now multiply it by the power of the heating system, which is per 1 m2 of room.
Now you have received the system power that you need to heat the entire area of the selected room (I multiply my 9 m2 by 150 W = 1350 W). With this number, feel free to go to the store, where a smart salesperson will help you choose a cable with the required parameters. Warm floors in the form of cables are most often sold in ready-made pieces of a certain size.
Necessarily! Ask the seller for the length of the selected cable.
This is where the fun begins in laying a warm electric floor with your own hands. This is the calculation of the so-called “step”. Pitch is the distance between cable turns.
It is measured in centimeters. We calculate how many centimeters should be left between the cables when laying it. To do this, multiply the area on which you decided to lay a heated floor by 100 and divide the result by the length of the cable (in my room: 9 square meters x 100 / cable length = step).
All! Now you know where to start laying a heated electric cable floor with your own hands.
IMPORTANT! Correctly calculate the required power of the future heated floor to avoid overheating of the cable.
And now the most important and responsible event - laying a heated floor with your own hands or installing it (as you wish).
Power calculation
To determine the power, you need to know the characteristics of all wiring and heating devices. Key indicators: length and power factor.
There is a special formula: P1 = P2 * S * K.
K – safety factor equal to 1.3...1.6. P1 is the power of the purchased cable, and P2 is the required heating power of one square meter of room.
However, classical norms are most often used. So, in a living room the power does not exceed 150-180 Watts, and on balconies and loggias - 180-230 Watts per square meter. It is not recommended to increase the power without a good reason, so as not to overload the system and not lead to wasted heat, which will be generated in excess.
Also, the power varies depending on the purpose: is it primary heating or additional heating. For example, if such a structure is the main source, the element should cover 70% of the floor surface. If the heating is additional, fill only the center of the room or areas not occupied by heavy furniture and household appliances.
For non-standard premises and in other cases requiring accurate calculations, special calculators were created. Let's take a closer look at them.
Calculator
A calculator for calculating the length and cable laying diagram can be found freely available on the Internet. The most important indicator is the cable pitch (the width of the stripes between adjacent wires in a loop). To calculate all parameters, you need to indicate the basic initial data.
We will need:
- total area of wire laying areas;
- specific power of the cable indicated in the passport;
- functional purpose of the floor (main or additional source, whether there are other heated rooms nearby).
The calculated value will help you make the right choice when purchasing a cable and calculating the insulation thickness. Knowing the length, you can calculate the step, which is on average ten centimeters.
Do-it-yourself installation of heated electric cable floors
What should you do first when laying any electric heated floor with your own hands? Select a thermostat and a location for its installation.
A thermostat is a device that controls a heated floor: it maintains the set temperature and regulates heating on and off. Choose a thermostat based on the power of your heated floor.
After you have chosen the thermostat and the place where you will install it, proceed directly to installing the thermostat and laying the heated floor, having first leveled the floor surface with a cement screed.
Apply damper tape around the perimeter of the room. Lay thermal insulation at least 2 cm thick. It is needed so that the cable heats only your floor, and not someone’s ceiling below or basement.
There are two main ways of laying heated floors - parallel and spiral. The names speak for themselves.
It is more convenient to install cable heated floors using the second method. You will need: mounting tape, cement screed, the cable itself.
The floor is ready. It is smooth and insulated.
Now lay and secure the mounting tape to the prepared floor surface. And mark the cable laying step on it. Remember you calculated it earlier?
IMPORTANT! The cable must not cross itself!
All that remains is to install the temperature sensor. In the prepared groove on the floor and on the wall (from the heated floor cable to the thermostat) we place a cable with a temperature sensor at the end.
Tip 1: To ensure that the temperature sensor serves you faithfully longer, protect it with a plastic corrugated pipe. A plastic corrugated pipe is a special hollow tube into which the temperature sensor wire is placed and the end is closed, for example, with insulating tape, so that nothing unnecessary gets inside the tube. Place the cable with the temperature sensor in a corrugated tube along the floor between the turns of the cable.
Tip 2: After laying the electrical cable for the heated floor, check its functionality.
That is, you take a special tester and measure the resistance of the laid cable. The data obtained should not differ from those indicated in the technical passport by more than ten percent. If you don't have a tester, just connect the cable to electricity and at least check whether it heats up or not.
Everything is fine? Now you have come to the finish line. All that remains is to fill everything with cement screed.
The thickness of the cement screed should be from 3 to 5 cm. Leave the screed to dry. After it has dried (28 days are recommended), you can begin connecting the cable heated floor to electricity.
Connect the temperature sensor, floor cable wires, and electrical wires to the back of the thermostat.
Tip 3: If you are not sure that you can connect the heated floor to the thermostat yourself, ask a professional to do it (for example, a neighbor - an electrician).
At this point, the installation of underfloor heating cable electric is completed. On top of a cement screed with an installed electric cable heated floor, you can lay floor coverings such as tiles, laminate, carpet, cork flooring, and so on.
Installation of electric heated floor
Cable heating systems can be installed in any premises, both residential, office or industrial buildings. Proper laying and installation of electric heated floors will ensure reliable and safe operation for many years. Installation of an electric heated floor begins with the preparatory work.
Preparatory work is carried out for one single purpose - calculating the required amount of materials and elements. The main task before laying an electric heated floor is to calculate the power of the heating cable.
Installation of a core floor
How to make a warm floor under tiles? It's simple. DIY installation!
Technology of laying rod-based heated floors with laying of cable mats. First, a layout is made for the placement of the canvas, and the amount of material required is calculated.
Rod floors are sold as a kit, but sometimes it is necessary to purchase additional components. The required power is calculated by analogy with the cable mats that we discussed above.
Laying a core floor consists of several stages:
- Preparatory work - determining the location for the temperature sensor, cleaning and leveling the base, placing the foil backing - these works are carried out in the same way as when installing any electric floor. If the floor is planned to be screeded, then the perimeter is covered with damper tape.
- Installation of rods - the rod roll unwinds on the surface, the distance between adjacent strips should be 50 - 70 mm. The length of one strip should not exceed 25 m. The strips are fixed to the substrate with tape.
- Connection - a thermostat is installed in the prepared area, to which the floor wires are connected. The sensor, placed in the corrugation, is placed in the groove of the substrate and connected to the regulator, which in turn is connected to the power source. A prerequisite is to conduct a test test of the system before the next stage of work.
- Pouring the screed - this can be concrete mortar, dry adhesive mixtures, or dry screed, layer thickness 20 - 30 cm.
- Installation of the finishing coating - only after the screed has completely dried is the finishing material applied. When laying tiles, no screed is required; the mats are filled with tile adhesive.
It is permissible to lay a core heated floor on an old coating. The installation principle is the same as when installing a thermomat.
Preparatory work before installation
Before we start work, let's sketch out a small action plan:
At the initial stage of installation, it is necessary to decide on the location where the thermostat will be installed. The thermostat is installed on the wall, like a regular switch, in the most convenient place at a height of at least 30 cm from the floor.
A hole is drilled in the location marked on the wall to install the thermostat. Perpendicular to the floor, from the installation location of the thermostat, a groove is made in the wall for laying the power wire and the floor temperature sensor wire in plastic tubes or corrugation.
First of all, the surface is cleaned of dust and debris; it should initially be smooth, without holes or drops. If necessary, the surface is leveled with a screed; the thickness of the screed should be at least 3 cm; if the layer is thinner, the screed will crack. The optimal thickness of the screed is 3-7 cm.
Before pouring the screed, it is necessary to treat the floor with a primer, this will improve the contact of the surface with the cement-sand screed. After the primer has dried, you need to mark the places where installing a heated floor is not required (stationary furniture); the distances from the walls to the heating cable are also taken into account (at least 5 cm).
To heat a room more economically, it is necessary to reduce heat losses. To do this, a layer of thermal insulation is laid between the concrete base of the floor and the heating cable. The thermal insulation layer will make it possible to reduce heat loss by up to 30%.
VERTICAL - along the perimeter of all walls at the base of the floor. For this purpose, thermal insulation in the form of a special damper tape or ordinary polystyrene sheets 15-20 cm wide and about 1 cm thick is suitable. Insulation laid in this way will reduce heat loss through the outer walls of the room;
HORIZONTALLY - sheets of heat-insulating material with a thickness of at least 2 cm are laid on the concrete base of the floor, close to the vertical insulation.
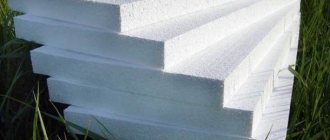
Thermal insulation material must be mechanically strong and resistant to thermal influences. You can use material from such compositions as polystyrene foam, polypropylene foam, cork agglomerate, fibrous-mineral boards, etc.
If an electric heated floor is installed in rooms with high humidity, a waterproofing layer is laid on top of the thermal insulation. This will prevent moisture from penetrating into the subfloor. This is especially true in apartments, so that in the future there are no problems with neighbors downstairs.
Film floor installation
Infrared heated floor - Installation, laying and connection of film flooring.
As mentioned above, installing a warm electric film floor is simple. But you need to start, as when installing any heated floor, with the film location diagram (do not lay it under furniture). The film is placed at a distance of at least 10 cm from the furniture.
Then the power of the floor is determined. When laying laminate as a finishing coating, the power should not exceed 150 W, if there are tiles - up to 200 W. Afterwards, the quantity of the product is calculated - with film this is easy, it should cover the entire required surface, a maximum length of 8 meters.
The process of constructing an electric heated film floor is similar to cable systems, the only difference is in the arrangement of the heating element.
Preparatory work
You should start by preparing the area for the thermostat. It is installed in an accessible place on the wall. A recess is made for it, in which the junction box is placed.
Then the subfloor is prepared - leveled and cleaned.
A polyethylene film is laid down - it is necessary for protection from moisture. Foil insulation (no more than 5 cm thick) is laid on top of it, with the metallized side up, this will help avoid heat loss. The sheets are glued together with tape.
The location of the film is marked on the insulation, and a recess is made for the sensor. The temperature sensor should be placed under the second section of the infrared floor - this will allow more accurate reception of information about surface heating.
Film editing
Floor strips are laid according to the prepared diagram. To reduce the length of the wire, the film is placed with its end sides to the wall where the thermostat will be, the distance from the wall is 15 cm, the copper contacts should be located down.
Laying the sheets overlapping is not allowed; they must be positioned end to end. If necessary, the film can be cut, but only along specially designed lines; the maximum length is 8 meters. The product is fixed with tape to the heat-insulating material.
Connecting the system
The film is connected to the power supply using terminals. To do this, the insulation is removed from the edge of the wire, it is inserted into a clamp, one contact of which is inserted inside the film, and the second is installed on a copper busbar. All contacts are fixed with pliers and insulated with bitumen tape; the places where the film is cut must also be insulated.
After this, a temperature sensor is installed, it is attached to the bitumen insulation to the black silicon strip at the bottom of the film, and the wire is pulled to the thermostat along a recess in the substrate.
The thermostat is installed. The sex cables from the sensor are connected to it. Then the power supply wire is connected. To check the functionality of the system, you need to turn it on at full power for a few minutes.
Laying the finishing coating
Before laying the finishing product, the structure is covered with thick polyethylene - this will protect it from moisture.
Laminate flooring can be laid directly on plastic film. If you are going to lay carpet or linoleum, then sheets of plywood are placed on top of the waterproofing.
How to properly install tiles on a warm film floor - this can be done in two ways:
- A painting mesh is placed on the polyethylene to improve adhesion. A thin layer (1 cm) of self-leveling compound or screed is poured.
- The waterproofing is sheathed with GVL, the sheets are fixed with self-tapping screws. It is important not to damage the film. The tiles are mounted using underfloor heating adhesive.
Electric film floors can be installed on old flooring.
To do this, it is cleaned, a heat-reflecting product is placed on top, on which the film is laid.
Preliminary cement-sand screed and fixing the mounting tape
Before laying the heating cable, a cement-sand screed is poured onto the thermally insulated surface. The screed layer will help prevent overheating of the heating cable, and will also create a solid base for laying the heating cable.
If for some reason it is not possible to organize a preliminary screed, you can lay the cable on a metal mesh laid out on top of the thermal insulation (with a fine mesh of 1-2.5 cm). The mesh, in this case, together with the heating cable laid on top of it, is filled with the finishing screed in one step. Due to the metal mesh, the screed is strong and monolithic.
After the cement-sand screed has sufficiently hardened, the floor is covered with special foil-coated thermal insulation (installation foil). The entire surface of the floor is covered with foil, it is laid with a reserve at the joints, and the edges are glued with foil tape so that they do not wrap during the installation of the cable.
Such a heat-leveling screen in the form of foil will promote uniform heat distribution over the entire surface of the heated floor.
To securely fix the heating cable, use mounting tape. Lay the mounting tape on the floor surface every 50 cm and secure it with ordinary nails or self-tapping screws.
To fix the cable on the mounting tape, special brackets are provided, located at equal intervals from each other along its entire length (usually 25 mm). Using these brackets, it is easy to maintain the required cable laying spacing.
Methods for installing heated electric floors
Laying methods depend on the type of elements and purpose of the room.
Main options:
- Mounting into a screed layer. Suitable for living rooms, bathrooms, kitchens and loggias. Cable elements, waterproofing, and insulation are used. The final touch is decorative flooring.
- On top of the screed under the tile. A very economical method, but suitable only for residential apartments, when the room on the floor below is fully heated.
- Directly under the floor covering. Film options are used; they are placed directly on the screed. In some cases, waterproofing is done.
It must be borne in mind that floor screed is required in any case if you want beautiful, smooth and durable floors.
Installation of heating sections
First, you need to return to the previously drawn up plan for laying the heating cable, carefully study such details as the order and step of installation.
Before unwinding the cable, you need to check its resistance.
The value of the measured resistance is recorded in the warranty card. It must match the one indicated on the cable sleeve label. Acceptable discrepancy ± 10%.
The cold end of the two-core heating cable is inserted into the corrugation and installed in the initially prepared groove. The coupling and the beginning of the cable are fixed to the floor to the mounting tape and cable laying begins from this place.
Moreover, the coupling must be located on the floor in such a way that it is completely filled with concrete screed.
During the installation process, you need to ensure that the cable lines do not touch or cross, and also strictly observe a constant laying step throughout the entire heating area. In places where cable bending is required, the bending radius should not be less than 5 cm.
The end coupling of a two-core heating cable is fixed on the mounting tape with the same condition as the connecting one - it must be completely covered with a concrete screed. If a single-core heating cable is used to install a cable heating system, then when drawing up the installation diagram, you need to take into account that both ends of the cable will be connected to the thermostat.
Features of calculating the required materials
After choosing the type of heated floors, you should calculate the required materials.
For example, if a cable system is selected, you should decide on the total length of the cable to be laid.
To do this, you need to take into account several factors:
- The cable should not be located under the furniture, therefore, when determining the parameters of the room, the area allocated for it should not be taken into account;
- The cable should not come close to the walls. The minimum distance from the cable to the walls should be 5 cm;
- The most common installation method is “snake”. With this installation, the cable stretches across the entire width or length of the room, not reaching the wall, is wrapped and laid to the opposite wall, where it is wrapped again. In this way, the entire floor area allocated for the system is covered. In this case, the distance between parallel parts of the cable must be at least 8 cm.
Calculating the number of thermomats or infrared film is much simpler; for example, a thermomat section is 50 cm wide and the length can reach 30 m. Therefore, calculating the amount of required materials will not be very difficult.
The infrared film has the same width, but its length cannot exceed 8 m.
You can use the formula.
Installing and securing the temperature sensor and thermostat.
When the cable is laid completely over the entire surface, you need to install a temperature sensor. It is mounted in a corrugated tube and installed together with the supply end of the heating cable in one groove. A plug is placed at the end of the tube where the thermostat will be located to prevent solution from getting into it.
The tube with the sensor is laid on the floor, between the heating cable lines without crossing them.
In order for the temperature sensor to function normally, it and the tube are fixed in the middle of the cable lines on the mounting tape. The floor temperature sensor with a tube must be located along a cable at least 50-100 cm in length.
The thermostat is installed and connected after three wires have been connected to the junction box: the floor temperature sensor wire, the heating cable power wire and the 220 V mains wire. It is prohibited to place the thermostat in rooms with high humidity. It is not safe!
At this stage, the installation of the electric heated floor is completed. You can start pouring the heating cable system with cement-sand screed.
Filling with screed
Decorative floor screed is the final stage. The screed is poured from a mixture of sand and cement, the height of this layer is from five to nine centimeters. The entire mass should be distributed evenly, without the slightest irregularities or voids. To do this, initially the screed is made more liquid and pliable by adding a plasticizer, and then, when the level is established, the resulting mass is thoroughly dried. Only after complete drying can you begin to apply the decorative finish.
Finish coating
The best coating option for installation over heated floors is absolutely non-combustible materials. For example, ceramic tiles, granite, brickwork. Also, such rigid materials interact perfectly with the screed, which ensures reliability and high strength of the entire coating. Once warmed up, such layers will be able to maintain the required temperature regime longer.
All finishes must be installed using standard technology for the specific material. You can install laminate, parquet and even linoleum or carpet. It is possible to choose any option depending on the budget and interior design solution. Before purchasing, make sure that the parquet material and linoleum are intended for installation on heated floors. To do this, consult with an experienced sales consultant.
Installation of cement-sand screed or self-leveling floor.
Before you fill the cable heating system with screed, you need to make sure that it is working. To do this, the heated floor is turned on briefly. A diagram of the installation of warm flooring with the placement of connecting and end couplings must be sketched, or better yet, photographed and included in the warranty card.
It is better to prepare a screed for electric heating from mixtures specially designed for this purpose. It is necessary to pour the liquid cement-sand mixture over the floor surface evenly and carefully, without damaging the cable insulation.
It is necessary to ensure that no air pockets arise during the screed pouring process, as they impair the heat transfer of the heating cable.
The thickness of the screed should be approximately 3-5 cm. The time for complete drying of the screed is indicated by the manufacturer of the mixture (approximately 28 days).
After the screed has hardened along the walls, it is necessary to cut off the protruding parts of the insulation (if any). Then you can begin laying the flooring (ceramic tiles, etc.).
If during its service life the temperature sensor fails, it can be easily replaced by pulling it out of the corrugation through the thermostat box. That is why the temperature sensor must be mounted in the tube. Electric heated floor
Warm floors with electric and water heating are becoming increasingly popular.
The latter often serve as the main heating system for private houses, and electric floors are widely used for additional heating of rooms. This factor, as well as a number of other reasons, made electric heating more popular.
We propose to consider the design, principle of operation, as well as the possibility of independently installing electric heated floors.
Which system to choose
Underfloor heating systems are divided into water and electric. Both types are in demand, and it is impossible to say unequivocally which one is better. To make a choice, you should familiarize yourself with their characteristics and compare the pros and cons.
Water floor
The main condition for installing water floors is the possibility of direct connection to the central heating system or the installation of a separate boiler room. In apartment buildings, such floors can only be used if they were originally included in the project. In standard city apartments, their installation is prohibited, since the water pressure in the system is designed exclusively for radiator heating.
Water heated floor
For the installation of heated floors, metal-plastic or polymer heat-resistant pipes are used, thanks to which the system functions uninterruptedly for 40-50 years, subject to proper installation and connection. This type of heating is low temperature and is most often used as auxiliary heating. At the same time, it can also act as the main source of heat, especially for small rooms.
Pipes for water heated floors
The structure of a polyethylene pipe
Table of characteristics of polypropylene pipes
The system consists of a distribution unit, which includes a manifold, pump and mixing unit, and a heating circuit. The optimal area for heating with one circuit is considered to be 10-15 m2, so for large rooms a system with several circuits and the ability to separately turn off each of them is designed.
Manifold diagram for a warm water floor
Advantages of a water floor:
- long service life;
- low energy consumption;
- safety;
- There are no restrictions on the placement of furniture.
Minuses:
- complexity of design and installation;
- large thickness of the structure and, as a result, high load on the base;
- in case of leakage, a major overhaul of the floor and a complete replacement of the circuit is required.
Electric floor
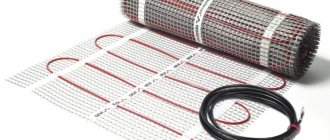
Electric underfloor heating systems are equipped with various types of heating elements, and depending on this they are divided into cable, film and thermomats.
| Floor type | Characteristics |
Cable | The most common type, characterized by the simplicity of the device. Mounted in a screed or a layer of tile adhesive, it is convenient when laying in a small area. The cable is supplied completely ready for installation, so it cannot be shortened or extended. To avoid overheating, furniture should not be placed above it after installation. |
| Film | It consists of thin strips of heat-resistant polyester with heating elements sealed inside. This device provides very fast and uniform heating. Film floors are assembled from separate parts at the installation site and laid directly under the floor covering. They cannot be installed in screed and tile adhesive, since the alkaline environment destroys the film |
Thermomat | A type of cable system. Available in thin rolls of fiberglass with an attached cable. When installing on difficult surfaces, it is permissible to trim the fiberglass to make it more convenient to unfold part of the section. The use of electrical mats greatly simplifies the installation of the system |
Prices for heated floors Caleo
warm floor caleo
Types and design, as well as features of heating elements
A single-core wire or a two-core cable is most often used as an electric floor heating element.
The first option is notable for its low cost, but the increased background EMR imposes restrictions on its use in residential premises. The heating cable has two cores, one of which plays the role of a regular conductor, and the second - a heating element. This design can significantly reduce electromagnetic radiation, but increases the cost of the product.
More detailed information about the above heating elements can be found on the pages of our website.
Installation can be greatly simplified if you use a heating mat. This design is nothing more than an ordinary thermal cable laid with a certain step width on a reinforcing mesh.
As a rule, the width of the mats is about 0.45-0.5 m, and the length can vary from 0.5 to 12.0 m (accordingly, the maximum heating area for one segment is limited). There is no standard for mat sizes, so they may vary slightly from one manufacturer to another. The electromat, like the thermal cable, is a solid structure, the footage of which cannot be changed arbitrarily.
Rod structures are considered a subtype of electric mats. They use special carbon rods with the addition of copper and silver as heating elements. Heating elements are connected in parallel with a certain step.
The main advantage of this design is self-regulation. That is, if the temperature on any rod has increased due to poor heat transfer (for example, furniture has been placed), then the heat release is reduced. Thanks to this property, you can lay the mat over the entire area of the room.
Infrared film. This heating element became widely available relatively recently, literally at the beginning of the century.
The term “infrared” used in the name is a marketing ploy aimed at distinguishing this product from a number of other heating elements.
As you know from a school physics course, infrared emitters are also called thermal, therefore, any heating device can be classified in this category. The design of the film infrared heating element for a heated floor is shown in the figure below.
Project development
The HTP design stage begins with deciding whether the system will be the only source of heat or whether radiators will be additionally installed in the premises. If installation of batteries is not intended, all circuits are connected directly to the boiler, without installing a distribution unit. With this scheme, the temperature on the boiler is set to 45 degrees, and the coolant flows directly into the pipes.
When combining floor pipes and radiators, installation of a mixing unit is mandatory. For the batteries to work, the coolant must be heated to 70 degrees, and for a heated floor this is too high a temperature. In the mixing unit, the coolant will cool before being supplied to the pipes.
Before installation begins, a detailed design for the placement of collector units and mixers is drawn up. Craftsmen recommend placing them in the center of the entire system so that the length of the pipes in all rooms is the same. This will help you make precise adjustments.
The next design stage is sketching a pipe laying diagram. There are 2 options:
- For small rooms (less than 10 sq/m) - parallel laying in a “snake” pattern in increments of 20 – 30 cm.
- In large areas (from 15 sq/m) - in a spiral. This method is more labor-intensive, but ensures uniform heating of the pipes over the entire area. Snake installation in large rooms can lead to broken pipes due to excessive bending and uneven heating in different corners of the room.
Spiral laying option
For rooms from 10 to 15 square meters, both installation schemes are suitable. The pitch between the pipes can be increased to 35 cm if additional radiators are to be installed.
If the room is large, divide it into several circuits. They must be the same size, the difference is allowed within 15 meters. If there is good thermal insulation, the standard step is 15 cm.
Standard formula for determining contour size:
- The heated area in squares is divided by the laying step in meters.
- The size of the curls and the distance to the collector are added to the result.
Expert opinion
Grebnev Vadim Savelievich
Heating system installer
When preparing the calculation and pipe laying diagram, hydraulic resistance is taken into account. It depends on the number of turns: the more there are, the higher the resistance. Please note that each circuit connected to the collector must have the same resistance.
How to choose a manifold and pipes
More often, users choose inexpensive collector models. But if there is no need to save money, then it is better to buy a model with servos and mixing units. Such devices allow you to automatically regulate the degree of heating of the water entering the pipes
A mandatory attribute of the manifold is an air vent valve and a drain valve for emergency situations. For the device to work normally, you can configure all valves once according to the required parameters.
To install the collector you will also need a cabinet. The best option is to use ready-made cabinets that are assembled and tested in the factory.
In this case, you only need to select the required number of collector groups, the power of the circulation pump and the mixing unit, if necessary. The cabinet is mounted in the wall and the heating circuit from the common riser and the circulation circuits of the heated floor are connected to it.
The standard option is to install the cabinet in the wall
The only drawback of using a ready-made manifold cabinet is its relatively high price, but when it comes to increased reliability and safety, it makes no sense to save.
For a rough estimate of the required number of pipes, you can proceed from the calculation of 5 linear meters of pipe per 1 square meter of floor. Polymer pipes made of cross-linked polyethylene are optimal in terms of price and quality ratio. They are lightweight, easy to install and have a service life of at least 50 years. Metal ones last longer, but they are more expensive and more difficult to install.
Preparing the base
The area for laying pipes must be perfectly level, with a height difference at the location of one circuit of no more than 6 mm. A concrete screed is used as the base. A layer of insulation is laid on it.
Extruded polystyrene foam is often used for the base.
Experts advise using extruded polystyrene foam - the degree of thermal conductivity is low and mechanical strength is high. This material is not exposed to moisture and does not absorb it. This type of gasket is produced in slabs measuring 50 by 1000 mm or 600 by 1250 mm, and with a thickness of 20, 30, 50, 80 and 100 mm. The product is equipped with snap grooves, this will allow for a strong connection.
Expert opinion
Grebnev Vadim Savelievich
Heating system installer
Expanded polystyrene sheets with a foil layer should not be used. There is no significant benefit from it, since the reflective property does not work in an opaque environment. In addition, the cement mixture is alkaline, it will very quickly corrode the foil.
Profile polystyrene mats are highly plastic, equipped with special bosses, and pipes are laid between them. Also, the bosses serve as a retainer for the heating elements. In them, the contour is attached in increments of 50 mm. The use of mats greatly simplifies the installation process, but they are more expensive than polystyrene foam insulation. The thickness of the slabs is from 1 to 3 mm, and the sizes are 500 by 1000 or 600 by 1200 mm.
If there is a heated room under the floor, a layer 3-5 mm thick is sufficient. If the room below is cold, the layer is increased to at least 20 mm. If this is the first floor and there is soil below the floor, the insulation layer should be 70-80 mm.
Along the perimeter of the room, the walls are taped with damper tape. It serves to compensate for the thermal expansion of the screed. If expansion is not taken into account, the screed may crack or swell. The height of the tape usually does not exceed 10 cm. It must be glued to the wall. After filling the screed, the excess is cut off.
After laying the thermal insulation, draw the contours of the pipes on the surface. This will facilitate the installation process and help identify design errors in advance.
Pipe installation
The most suitable base for laying pipes is a special mounting mesh made of metal or plastic with 100 mm cells. It is spread on thermal insulation, pipes are pulled from above, along pre-designated contours, and secured with wire or plastic clamps.
The advantage of using mesh is additional reinforcement of the base for laying pipes. The disadvantages include the complication of the installation process. But the end result eliminates this drawback.
Pipes can also be laid on polystyrene mats. They are specially designed for water heated floors. The mats are a kind of mats with protrusions on the front side in which pipes are fixed. Economically, this is a more expensive method, but installation on mats is much easier and faster. In addition, polystyrene serves as additional insulation.
During installation, try not to step on the pipes or drop heavy objects on them. Even microscopic damage can cause leakage when pressure is applied. Cut the pipe only after it is completely on the floor and back to the manifold. Don't skimp on stretching the material. Savings will lead to leaks in the future.
Expert opinion
Grebnev Vadim Savelievich
Heating system installer
If you choose snake installation, place the beginning of the pipe at the coldest wall or at a window. This will help avoid uneven heating. When laying in a spiral, this condition does not need to be observed. In any case, heating will be uniform.
Connection
The most common way to connect a water heated floor is a distribution unit. Its goal is to increase pressure, implement temperature regulation and uniformly supply coolant to several circuits. There are different devices - with manual or automatic adjustment.
Connecting the system involves connecting both ends of the pipe to the manifold distribution with clamp fittings. Using a collector, the heated floor is connected to the main heating system or to a specially equipped boiler.
When choosing a heating boiler, it is important to take into account its power; it should equal the power of all areas of the floor with a small margin. The boilers have an inlet and outlet for water, which are equipped with shut-off valves.
Also, to circulate the coolant, it is necessary to install a pump. Most often it is included with the boiler. But if you plan to heat a large area, you will need to install an additional pump.
After connecting the pipes, you can fill the system with coolant. The manifold responsible for supplying the coolant is equipped with a ball valve; water is connected to it. And a pressure testing pump is connected to one of the outputs connected to the heated floor circuit.
The system filling process is as follows:
- Close all channels except one. Open all air vents at the same time.
- Supply water. Using the drain hose, monitor the degree of cleanliness and air exit from the system.
- When all the air is out and the water comes out completely clean, close the drain valve.
- After this, shut off the filled system. If there are several circuits, perform the actions for each one.
- After flushing and filling all circuits, close the tap.
Expert opinion
Grebnev Vadim Savelievich
Heating system installer
Upon completion of the procedure, there should be no air in the pipes, and the water should flow perfectly clean.
Hydraulic tests
Concrete can be poured only after a test run of the system. Fill the pipes with coolant at high pressure and maximum temperature. Make sure all pipes are filled and heated evenly.
The next stage is crimping. To carry this out you will need a special pump.
Procedure:
- Bring the pressure to 5 bar and wait until it drops to 3 bar.
- Then bring it up to 5 bar again. Repeat the cycle 4 – 5 times. At the same time, inspect the circuits for leaks.
- At a pressure of 2 bar, leave the system running for 12 hours. If the pressure does not drop, proceed with the finishing tests:
- Set the maximum temperature and turn on the circulation pumps to achieve maximum pressure. If the system has radiators, set the mixing unit regulators to the operating marks.
- Wait for the entire system to warm up completely, including batteries (if any).
- Make sure that all circuits and radiators are heated evenly.
- Leave the heating running for a day. If the condition does not change, you can turn off the boiler and begin concreting the pipes.
When pressure rises in the pipes, they try to straighten out. If their fixation is not secure, then unpleasant surprises will arise during testing. After filling the pipes with concrete, there is no need to worry about this.
Bay screed
Pipes that have cooled to 25 degrees can be concreted. Use a special mixture to prepare the solution. It has the best thermal conductivity coefficient and will ensure uniform heating. The thickness of the concrete layer for living rooms is 20 mm, in utility rooms - 40 mm.
There are special requirements for screed mortar. The surface will be subject to mechanical and temperature stress, which can lead to deformation. Therefore, plasticizers and fiber are added to the cement-sand mixture.
Plasticizers will give the solution elasticity and increase mobility. This is important for free penetration of concrete between the pipes. Fiber will increase the strength of the base and, in addition, will prevent the formation of cracks in the screed. Polypropylene and basalt fibers are intended for warm water floors. The standard fiber rate per square meter is 500 grams.
The solution is mixed mechanically. Before pouring pipes, the surface is cleaned of dust. The concrete screed must be poured in one step, without interruptions in work. 4 hours after concreting, cover the floor with film to ensure that the solution strengthens evenly and prevents premature evaporation of moisture.
Expert opinion
Grebnev Vadim Savelievich
Heating system installer
Do not turn on the heating and do not lay the finishing coating until the concrete has completely hardened. This will take at least 28 days.
Finish coating
It is recommended to use porcelain stoneware or tiles as a finishing material for a water heated floor. Laminate, linoleum or carpet are acceptable only if there is a corresponding marking on the packaging.
Typical technologies for laying electric heated floors
Before presenting several installation schemes, it is necessary to explain what affects the design. These factors include:
It should be taken into account that the minimum thickness of the thermal coating is selected based on strength criteria. At the same time, the installation technology does not allow unreasonably increasing the thickness of the screed, since this affects the inertia (time) of heating (the floor takes a long time to heat up). Accordingly, the sensor of such a system may not have time to respond to changes in daily temperature.
On the other hand, a 60-100 mm coating in such a situation can accumulate heat. With this option, you can make a reserve of heat, including heated floors at night, when a preferential tariff is in effect.
Installation errors and their consequences
Strict adherence to the recommendations of specialists when installing heated floors yourself is an important condition for the successful functioning of the system.
Most often, beginners make the following mistakes:
The height difference between the beginning and end of the pipe. If it exceeds half the diameter of the pipes, air pockets will form inside. As a result, the circulation of the coolant will be difficult and the quality of heating will decrease. To prevent this from happening, it is important to place the pipes strictly parallel to the floor.- Connection of pipes within one circuit. There is no point in installing a circuit of 2 pipe sections and filling it with concrete. This may cause leakage. Each circuit must consist of a whole piece of pipe. Connections should only be made to the collector group.
- Neglect of hydraulic testing. A test run of the system at maximum pressure must be carried out before pouring concrete into the pipes. Otherwise, it will be almost impossible to find a leak, if one occurs.
- Pouring screed onto empty pipes. The concrete pushes through the pipe material and the circulation of the coolant will subsequently be difficult.
- Premature heating start. Heating the pipes until the concrete gains strength will lead to cracking of the screed.
Instructions for laying an electric floor on an old subfloor
If you make fasteners on concrete, then the heat loss as a percentage will be about 30-35%.
Provided that the axis of the thermal cable is located at a distance of 10.0 mm from the base, and the pitch is 70.0-75.0 mm. In this case, you should opt for a cable with a rating of 10.0 watts per meter. The cable is attached to the base using mounting tape (you must first lay insulation on the base).
An even layer of tile adhesive is applied on top. When it dries, you can lay tiles without a screed or other covering in compliance with the technology of its installation, for example, pre-lay a bed under the laminate before installing it.
Laying in grooves
If conditions do not allow raising the floor to the required level, it is possible to wall up the thermal cable in grooves. It should be noted that this technology is unacceptable for shell rock, foam concrete or other material with low thermal conductivity.
This method is not acceptable for insulating load-bearing floors, since it violates their strength. As a rule, it is used to warm up open areas.
The technical characteristics of the thermal cable in such cases are selected based on the depth of the groove. If they are no more than 10.0 mm, then you can use a low-power heating element for a warm floor. When the depth exceeds 20.0 mm, the power consumption can be increased to 17.0-18.0 watts per meter.
Correct installation of the intermediate screed
This method can significantly reduce heat loss. Below is a table of heat loss.
Based on the table above, it can be stated that the maximum thickness of the screed may not exceed 20.0 mm. If the base is located above an unheated area (for example, a balcony, loggia, etc.), it is advisable to increase the heat-insulating layer to 40.0-50.0 mm.
The best solution is to reinforce the intermediate screed with polypropylene fiber. The further procedure is the same as for point 1 (installation on the old base).
Application of thermal insulation
Electric floor heating elements are mounted on an insulated surface (gypsum fiber board, polystyrene or PVC boards, etc.).
It is desirable that the insulator have a foil surface. It should be located in the border zone, between the cement base and the self-leveling screed.
It should be noted that this installation option is not durable and reliable, but, nevertheless, its popularity is quite high, since it is easy to install.
Brief description step by step
Let's look at the step-by-step process of laying the floor.
Main stages:
- preparation of the base;
- laying out elements;
- sensor installation;
- system connection;
- filling with screed.
Let's look at each step in detail to know all the details of such an important but simple process.
Application of mounting grid
The most correct way to install a wired floor heating element is in this way. In this case, you need to secure the cable to the mesh with plastic clamps, as shown below.
After the term installation is completed, the assembled structure is slightly raised above the base (you need to place it on some support of the appropriate size), after which the pouring is done. As a result, we get a thin layer of reinforced concrete, inside of which there is heating wiring.
This method of termo installation allows you to create an economical and reliable heated floor with minimal inertia of heating temperature.
Connection
The heating element with a wire and sensors are connected to the thermostat according to the diagram specified in the instructions. Then it is necessary to connect the entire system to a residual current circuit breaker, the leakage current value is maximum 30 mA.
The check is carried out in various ways depending on the element:
- Cable and mats - the resistance of wires and elements is measured and compared with the passport characteristics (usually about 10%).
- You can simply touch the IR film. If it is warm, it means everything was connected correctly.
When installing a heated floor in a bathroom or bathhouse, you should connect the braid of the heating wire and the grounding wire. The use of grounding minimizes the risk of electric shock in the event of a malfunction.
Observe safety precautions: it is strictly forbidden to apply tension to the floor structure with screed or glue that is not completely dry!
Dry screed technology
This option is no less reliable than described above. It is called dry because during the manufacturing process it does not need to be filled with concrete-sand mortar. Below we provide brief step-by-step instructions for installing and installing an electric floor in a house or apartment yourself:
Concluding the topic of laying electric flooring, it is necessary to refute the false statement that it is impossible to use it in a wooden house (or made of timber). Below is an example diagram for such an installation.
Laying infrared thermal film.
Concluding the section on laying electric floors, it makes sense to describe in detail this process for film coating due to its popularity. The materials we will need are:
When everything is ready, we proceed to installation, provided that the horizontal floor is level, the algorithm of actions will be as follows:
At this point the process is considered complete. Please note that this version of an electric heated floor makes it possible to repair it (replace heating elements). To do this, simply remove the coating.
What are the consequences of incorrect installation?
Installation errors or improper operation can lead to multiple problems. However, there is no need to worry - they do not pose a danger to human health and life. But it’s still a pity to spend money, so it’s better to start installing heated floors with your own hands when you have the proper level of skill and experience.
The most common negative consequences:
- incorrect thermal conditions (for example, overheating under massive furniture);
- failure of the entire system due to breakdown of the sensor, wires or other elements,
- insulation failure leading to overheating of wires;
- “leakage” of heat due to improper thermal insulation;
- curvature of laminate and other finishing coating.
To avoid such troubles, you should follow all the rules when installing a heated floor.
Areas of application of electric flooring
Due to its specificity, heated floors are used in conjunction with centralized heating in houses and apartments. Here are a few examples of its effective use:
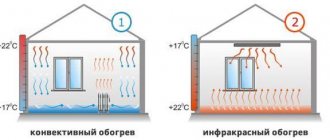
Heating of kitchens and rooms. This type of space heating helps normalize humidity and temperature. Uniform heating of the floor surface does not allow convection currents to arise, and the electronic thermostat automatically maintains the set parameters.
Use in damp areas. If you connect the system correctly (via an RCD or differential circuit breaker), and also ensure reliable grounding of the electric floor and install waterproofing, then you can take a shower without a tray or rubber mat.
Balconies and loggias. Even on a glazed balcony or loggia you can get a cold in the winter; the situation can be corrected by equipping them with electric floors. This is smarter than making a heating battery there.
Where can it be mounted?
Warm floors can be used almost everywhere. The electric version is installed in private houses, apartments, loggias, bathhouses and even garages. The water type takes up a lot of space, so it is not applicable in small apartments with low ceilings, but in large houses it is superior in ease of use to its electric counterpart.
A floor with heating elements can be used as the only or additional source of maintaining room temperature. However, it should be remembered that such a heating system is not a cheap pleasure. Be prepared for your electricity bills to skyrocket.
Advantages and features of heated floors
If we compare this technology with its water counterpart, for example, XL - PIPE, then the first thing that catches your eye is the price level.
Water systems are significantly more expensive than their electric counterparts. This is due to the fact that it is necessary to install expensive equipment, a liquid thermostat for system control, a boiler or boiler, etc., for all this you will have to pay a lot of money.
It is also worth mentioning about setting the parameters of thermostats in water systems; you won’t be able to use the remote control for this; you will need the help of a specialist. The electrical concept makes it possible to configure the controller yourself. The thermite user manual describes in detail how to do this.
On the remote control you can set the warm-up time, set the maximum temperature, check the serviceability of the main components, etc.
Peculiarities.
There is an opinion that electric floors are harmful due to the high level of EMR. This is not entirely true; a good European manufacturer will never put on the market a product that does not meet accepted standards. Actually, this is the answer to the question of which manufacturing companies are better.
The system is practically beyond repair, you can check the serviceability, search for a break, but the design of the cable heater is such that its repair is not expected.
On the other hand, the technology is designed to operate the system for 15-20 years. This is the period that assumes that new repairs will be carried out. Consequently, if the system barely heats or the heat spreads in places, dismantling is carried out to the base (tiles and adhesive coating are removed), after which a new installation of the heated floor is made.
It should be noted that this feature is also typical for water systems.
Please note that in some options for dry electric heated floors, it is possible to dismantle the coating, and therefore repair (to be precise, replace) the heating element.
Actually, the only serious drawback of heated floors is high energy consumption. Operating a water system is much cheaper.
Well, now it's time to finish the article. All the material I wanted to share has been reviewed. I hope it will be useful to you, and you will use it if you need to lay a warm electric floor with your own hands. Improve your own practical skills and gain new knowledge, as they say: “It’s never too late to learn!” That's all, thank you for your attention, successful and easy repair!
Surface preparation and features of base insulation
It is best to remove the entire old floor along with the screed down to the base to increase overall reliability. All material is completely cleaned, any elements are dismantled.
Then a layer of waterproofing is laid with a margin so that it extends onto the wall by about 10-12 centimeters. The perimeter is marked with a special tape; this damper tape helps regulate the processes of thermal expansion of the floor surface. Excess tape and waterproofing can always be trimmed.
The floors are also thermally insulated to prevent heat from escaping down the floors or into the ground. To do this, choose insulation depending on the desired result, budget, purpose of the room and the characteristics of the heating system itself.
Basic recommendations:
- If the floor serves as an additional source of heat, you can get by with foamed polyethylene with a foil coating - penofol.
- If the floors below are heated, use polystyrene foam with a thickness of 20-55 millimeters, or similar insulation.
- If there is a lot of unheated space around, and the risks of energy loss are high, it makes sense to insulate the floor with a layer of 10 centimeters of polystyrene foam or mineral wool.
A reinforced mesh is placed on top of the insulation, most often sold as a complex with heating parts of the floors.