13931 0 5
Icer October 20, 2016Specialization: master in the construction of plasterboard structures, finishing work and laying floor coverings. Installation of door and window units, finishing of facades, installation of electrical, plumbing and heating - I can give detailed advice on all types of work.
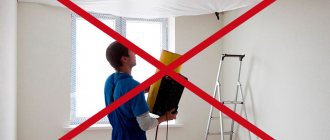
If you think that filing a ceiling is a difficult and tedious process, then I will tell you how to cope with it easily and quickly. Yes, you can do without several assistants who hold the sheet at arm's length while you screw it. You can hire a teenager or any other person as an assistant, and he is needed in order to hold the material and provide support at certain moments; the rest of the time you can work on your own and do an excellent job with the installation.
A simple device makes it possible to do the job even alone
Stretch ceiling in a wooden house: pros and cons
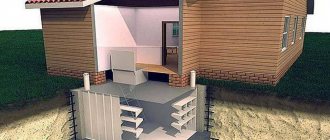
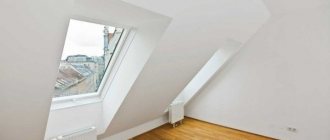
One of the innovations of our era is suspended ceilings. They are also used in wooden houses. In new buildings, they wait until the foundation has completely settled before installing them. Sometimes this takes several years. There are no other similar restrictions for the design, and you will learn about the basic installation rules right now.
Alignment of walls
Photo: wall preparation
Vertical surfaces are given special attention. The presence of irregularities will lead to poor fit of the fastening profile. Before assembling the structure, the walls must be leveled. The work is carried out in the following sequence:
- Clean the wall of old finishing materials. Remove paint, plaster, tiles, etc. The result should be a clean concrete surface or masonry.
- Inspect the concrete for damage. Identified cracks are repaired using a repair compound. To fill the recesses more densely, they are first jointed. Use a hammer drill or an angle grinder with a disc for concrete.
- Plaster beacons are installed. They are necessary for proper alignment of the walls.
- Gypsum plaster is applied. The rule is to level the mass according to pre-installed beacons.
Further execution of the work depends on what finishing materials will be used. You can prepare the walls for the installation of suspended ceilings by gluing wallpaper, painting, gluing tiles, etc.
Advantages and disadvantages
Compared to a regular ceiling in a log house, suspended structures allow you to expand the list of styles that can be used for its design.
The smooth surface not only serves as decoration, but also performs some functions:
- protects against sudden roof leaks;
- hides flaws in the main floors;
- provides sound insulation.
Due to the increased humidity, mold, mildew, and condensation cannot appear on the coating, as on a regular ceiling. However, it is worth considering that such a misfortune can occur between the ceiling and the structure, because the film does not allow air to pass through.
Other advantages also include:
- ease of installation - takes several hours;
- ease of care of the canvas;
- durability - from 10 to 25 years, subject to operating rules.
However, if the house is not heated regularly, the PVC sheet will begin to deform. Sharp shavings and splinters falling from the ceilings can severely damage the canvas: cut, create holes, after which no repairs to the film will help. .
These problems can be avoided by living in the house permanently. Then, before installation, the surface of the wooden ceiling is treated in advance with protective compounds, and the type of canvas is selected with properties corresponding to the microclimate of a particular room.
Reviews of suspended ceilings are mostly positive.
The procedure for fixing a fiberboard sheet
First you need to fix the sheet according to the guide rails. To do this, the sheet must be lifted, pressed against the guide profiles and secured with several fasteners along the edges of the sheet. Important detail: this is a preliminary fixation. Therefore, do not use staples for this. Secure the sheets with long nails or thin screws that will protrude from the fiberboard. That is, do not completely hammer them in so that you can then pull them out painlessly. The sheet secured in this way is checked with a rope that is pulled across the entire room. If the sheet is unevenly attached, then it is relatively easy to pull out the nails and straighten it.
Now we move on to fixing the aligned sheet. To finally nail the sheet to the ceiling, you need to start from one edge in increments of 15 cm. In this way, we gradually go through the entire sheet, and there will be no bulges on the material.
Features of preparation
In a private house, you need to pay attention to the materials used to decorate the wooden walls. If they are covered with plasterboard or clapboard, then fastening the frame under the film will be easily installed.
A rounded beam, on the contrary, will complicate the work of the master.
Some people insulate the top floor. This reduces temperature changes, which can negatively affect the condition of the canvas: it can sag in the heat or crack in severe frosts. If there are leaks, the roof is repaired.
It is necessary to check how the wiring is installed. Overheating of the cable or wires in the immediate vicinity of the fabric can deform it or cause a fire.
Depending on the height of the ceiling, the type of construction is chosen. It doesn’t make much difference which profile will be used, but the plastic one is more elastic: it can adapt to the curves of the wooden wall cladding.
If the house is completely new, they wait two years until the foundation settles.
Floor arrangement
The production of flooring is often accompanied by a large amount of dust, which can settle on the PVC film. In this regard, rough work is carried out at the initial stage.
The surface is inspected for damage. Particular attention is paid to the junction of the floor and the walls. Existing cracks are filled with cement-sand mortar. If necessary, pour a concrete screed.
At this stage, hydro and sound insulation is installed. It is possible to install underfloor heating systems or lay insulating materials. The final step is finishing the flooring.
Selecting a canvas
The modern stretch ceiling market offers three types of coating: glossy, matte and satin. Gloss can visually enlarge the space and make the room taller, thanks to its reflective properties. Matte surface is a universal solution for all types of rooms. Satin is closer in appearance to the previous one, but more refined and looks very stylish.
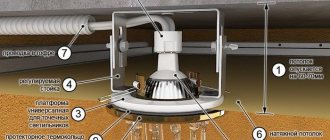
Stretch ceilings can be equipped with lighting sources.
It is worth taking into account that the use of spots will increase the distance between the film and the rough ceiling from 3 to 12 cm, depending on the type of devices, wiring and type of canvas.
Film width is an important characteristic. For large rooms it is better to use fabric sheets; they have a standard width of 5 m. But PVC and its derivatives have different values - from 1.2 to 4 m. However, the problem is easily solved. In the case of a prefabricated covering, the edges are simply joined: if processed correctly, the seams are barely noticeable.
Types of rack structures
Wooden slatted ceilings are modular types of structures that are installed in public institutions and in residential apartments, houses, and cottages. By type, rack structures are divided into two types: open and closed.
Open type ceilings
The main design difference lies in the method of installing the slats. In open structures, a gap is left between the elements during installation. It can be closed with special insert strips (plugs) or left free. The gaps are made of small width, five times smaller than the main strips, the plugs are made in various colors and textures. It depends on the chosen design, design and dimensions of the room. In low rooms, it is recommended to install caps so that the ceilings are not visible through the cracks. And in spacious and high halls, the free space will provide ventilation if the supply and exhaust diffusers are hidden behind the sheathing.
Open finish
Interstitial plugs decorate ceilings and add aesthetics. Sometimes they are made of a different material or a different color, with a mirror surface or a relief texture. The assortment is large, and its cost depends on the design of the ceiling. Open type ceilings are installed in large structures, commercial, entertainment or public institutions. On high floors, gaps between the slats are not noticeable.
Closed structures
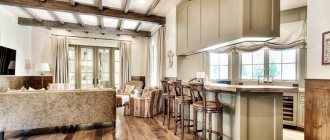
When installing closed structures, the slats are mounted at the joint, forming a continuous plane and look like a continuous surface with no gaps between the slats. Closed structures are installed with low ceilings, and if it is necessary to install ventilation between the ceilings, it is recommended to use perforated slats. The elements can be the same from lining or from different-sized and multi-colored panels, which will create a structure that decorates an expensive interior, as in the photo below.
Combined
Recently, offers of combined structures have appeared on the suspended ceiling market, where wood is used as one of the materials. It looks interesting, creates a fresh, not boring interior, the combination of different materials makes the room original and unforgettable. This design consists of slats that differ in material, height and width. By choosing the texture of materials, you can create spectacular compositions. The photo shows a combined finish:
Combined slatted design
Temperature
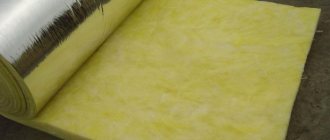
It is worth paying special attention to the composition of the canvas. The operating temperature for PVC sheets ranges from +5 to +50°C. Fabric ceilings are more expensive, but they also have a greater margin of safety. They retain their appearance and properties both at −50 and +40°C.
The presence of a stove in the room as a whole does not affect the change in the characteristics of the paintings. It is only necessary to take precautions directly near the pipe to ensure optimal temperature conditions.
PVC film stretch ceilings of any type are installed using special equipment - a heat gun. The preservation of the quality and appearance of the canvas depends on the correct temperature. The process does not take much time. Before the main assembly, the room is heated to +40°C, and the materials are stored in another room.
Tension occurs when the vinyl film is heated to +70°C, so you need to be extremely careful. It is better for this work to be carried out by a craftsman who has experience in installation in wooden houses. Ceilings made of fabric do not require heating.
Floor protection
In the process of fixing the canvas, installers need to reach the floor slab. Metal stepladders are often used. The legs of the stairs scratch the flooring. In this regard, they protect it from damage. The work is carried out in the following sequence:
- Remove furniture and interior items. Massive structures are moved to the center.
- In the freed space, cardboard or thick polyethylene is laid out on the floor.
- Glue the backing with tape. This prevents the cardboard from moving when moving the ladder.
Thus, they protect floor materials from various types of mechanical damage. In some cases, thick non-slip fabric is used instead of cardboard.
Ceiling shape
The design of ceilings provides a wide variety of designs: simple, classic, complex, futuristic.
The interior design is usually chosen by the owner, according to his taste and imagination. But you can seek help from a specialist who will advise the best design solutions.
In wooden houses, due to the plasticity of materials, suspended ceiling designs are possible:
- Single-level canvas covering the entire area of the room.
- Stretch ceiling divided by beams.
- Multi-level configurations, divided into small sections and zones.
- Caisson.
- Arched tension structures.
- "Starry Sky".
- With built-in stained glass windows.
- Complex shapes.
How to putty fiberboard before painting
One slab for the ceiling is not enough, so you can’t do without puttying the joints. The process is simple: the seams are filled with putty, and reinforced tape is applied on top.
It is advisable to use alkyd putty - for elastic, springy fiberboard sheets it is suitable for its plasticity.
If there are few joints, you can use acrylic-silicone sealant.
The seams between the sheets can be puttied or covered with strips, including decorative ones.
You can embed inserts from another suitable material into the fiberboard ceiling.
Before finishing, carvings can be made on the fiberboard ceiling panels
Assembly
The room is measured and the material is secured using a profile. Then they connect to the base corner and beams, after which they move to the opposite corner, continuing the fastening. The frame is installed and fixed in a baguette. The fabric is slowly stretched, fixing the corners.
If the house is made of timber
Wood is by no means a simple material. In houses built from timber, suspended ceilings are practically not installed. This is a very difficult job that requires the skills and dexterity of the one who takes on this matter. In this case, you should pay attention to the following recommendations:
It is necessary to install a ventilation duct, since false ceilings do not allow the wood to breathe. It is for this reason that mold forms and fungi appear.
The film is stretched using a heat gun, but fire should be avoided.
Boards and joists are treated several weeks in advance with special impregnations that will reduce the risk of fire.
Before starting work, the ceiling is leveled and treated. The baguette is cut at a certain angle. Then the joints are glued. To facilitate installation, you can make a backing from boards. Wood is easy to drill and holds screws well. There is no need to waste time securing dowels.
Fastening the timber with a baguette in the middle is not used, since the next fastener will be located at the junction of the logs, which is unacceptable. When marking is applied a little further, the width of the marking line will become slightly less than the middle. This type of work will require a good craftsman with the necessary experience, skill and ability.
Preparatory work with floors
Once you've completed the lower part of the room, start preparing the upper part. The base ceiling can be in almost perfect condition or, conversely, be in a deplorable, neglected state. Let's consider step by step how to properly prepare a base ceiling for a future suspended ceiling if its condition raises questions?
The floor slab is cleaned of a layer of old paint, whitewash or a layer of plaster. Pay special attention to areas where the paint has peeled off and blistered. At the same time, inspect the joints and seams in the ceilings. If there are significant defects, eliminate them by covering them with putty. Seal large defects, cavities and cracks with cement mortar or plaster. If possible, use a mounting paint mesh to strengthen the solution.
Having eliminated the defects, proceed to priming the base ceiling. The surface must be primed in any case. This will allow you to avoid the future appearance of fungus and mold in the upper part of the room.
Upon completion of the elimination of large defects, the entire ceiling surface can be puttied, giving it a uniform appearance. At this stage, you should take care of the air ducts and ventilation systems. All hoods must be located below the expected level of the future ceiling. Why? The thing is that during the operation of the room, the movement of air through the ventilation ducts can lead to retraction or swelling of the stretched fabric.
Why is it important to prepare a rough ceiling?
The question of how to prepare a ceiling for a suspended ceiling is not one of the popular search queries. Therefore, if you are interested in him, it means you are attentive to details. And, as you know, the devil lies in them.
At first glance, it seems that the tension fabric will cover all the unevenness running along the communication ceiling. What to cook there? However, in about 40% of cases there is something to cook. Find out if you are one of them. And if you want to learn even more, subscribe to the channel. I, as the current manager of a ceiling company, tell you a lot that is difficult to find on the Internet. And as a former journalist, I convert it all into understandable language.
So, incorrect or incomplete preparation of the ceiling for suspended ceilings is fraught with:
1. Inflating a new ceiling.
2. Fluctuation of the tension structure.
3. By pulling the film up, that is, by bringing it closer to the rough ceiling.
4. Falling of elements from the rough onto the suspended ceiling. They put pressure on the film, causing it to sag and can be visible through the tension fabric.
5. Damage to the film long before the warranty period expires.
6. Inaccurate line of connection of the stretch ceiling to the walls.
Now, about the reasons for these phenomena. There are four of them:
- Leakage of the rough ceiling, leading to the penetration of air masses from outside through it. The stretch film, unless ventilation grilles are inserted into it, is impermeable to air. Therefore, changes in pressure under the canvas cause it to inflate, suction, or flutter.
- The presence of poorly secured elements on the rough ceiling. This could be: old plaster, tiles from a previously installed suspended ceiling, old ceiling plinth, hanging wires. Insulation in frame-type ceilings can also be poorly secured. The insulation in them, according to SNiP 31-105, must be covered with polyethylene or polypropylene film. But SNiP is not always observed. When particles of insulation, etc., fall on the suspended ceiling, they put pressure on it and become visible.
- Strong heating of the rough ceiling. This happens over some furnaces and heating boilers. Stretch ceiling film is sensitive to temperatures above 60 degrees. Critical heating leads to deformation of the tension structure.
- The presence of rounded corners between walls and ceiling. These can be found in Soviet-built houses. The builders covered the corners with plaster in order to maintain 90 degrees and prevent freezing at the seams between the ceiling and wall slabs. But it’s not possible to reliably and accurately attach the profile to a suspended ceiling on loose curves.
Do-it-yourself fiberboard arch
One of the positive properties of fiberboard - the ability to bend, coupled with an even more excellent quality - the ability to hold its shape, allows this material to be actively used for the construction of arches.
The main conditions for a quality design:
- Accurate measurements of all details.
- Drawing up a drawing.
- Availability of good tools that will allow you to accurately cut out the necessary elements.
- Possibility of having an assistant during installation.
You can bend fiberboard with an arc so that it does not burst or have cracks if you first apply a thick layer of PVA glue to the surface. Once absorbed, it will give the fiberboard the necessary elasticity.
The entire frame should be cut out and assembled, for example, the legs (the base of the arch, its lower part) need to be on the floor. Then insert all the elements into the prepared opening.
It should go like this:
- cut the aluminum profile and bend it exactly to the shape of the fiberboard arc;
- make a frame from the profile around the entire opening;
- use a screwdriver to attach the fiberboard arch elements.
If the arch is being made as a rough material and it is intended to be further covered, painted, for example, then all joints must be glued together with reinforced mesh or construction tape. Now the finished arch can be decorated.
When the fiberboard is laminated, you need to cut out the parts very carefully and install them no less carefully. Otherwise, all the irregularities will be noticeable.
Fiberboard arches can decorate a space and hide the imperfections of a doorway. Moreover, such a design will cost minimal money, and it can be completed in record time.
Preparing the ceiling for a suspended ceiling
Preparing the ceiling for a suspended ceiling corresponds to the causes of possible problems. If:
1. The rough ceiling is not airtight; it is covered with film in the case of a frame structure. In the case of a tiled ceiling, the cracks and holes in it are coated with sealant.
2. There are poorly fixed elements on the rough ceiling; they are either dismantled or securely fixed. Hanging wires, for example, cannot be removed, because they supply electricity to the home. Even pipes sometimes run along the rough ceiling. Don't remove them. The main thing here is reliable fixation. But falling tiles from an old suspended ceiling or fragments of plinth are easier to dismantle.
3. There is a curve between the walls and the rough ceiling; it can be knocked down if the height of the room is fundamentally maintained. The suspended ceiling profile must be attached to a straight surface that can support fasteners. Therefore, the tension structure is lowered below the curvature. As a rule, this is about 25 cm. If you knock down the plaster scattered in the corners, the stretch ceiling will drop by only 5-7 cm.
4. There is strong heating of the ceiling above the stove; a plasterboard box is mounted there. It blocks the transfer of heat to the film, ensuring a long service life of the stretch ceiling, preserving its aesthetics and, importantly, environmental friendliness. When critically heated, the film not only deforms, but also partially decomposes into volatile substances harmful to health.
Stretch ceiling installers can make a box at the customer’s request. The rest of the work is not within their competence. Then, who should you entrust with the preparation before installing a stretch ceiling?
Conclusion
This technology can be used not only for fiberboard, but also for chipboard, plywood, oriented strand boards, plasterboard and other sheet materials. This method makes the work not only easier, but also safer, the main thing is to install the support securely.
Did you like the article? Subscribe to our Yandex.Zen channel
October 20, 2016
Ceiling installation, Ceiling finishing, Ceilings, Wooden ceilings, Ceiling structures
If you want to express gratitude, add a clarification or objection, or ask the author something, add a comment or say thank you!
Installation technology
To install wooden slats on the ceiling, it is recommended to adhere to the design technology. In this case, the finish will be distinguished by quality and durability.
Preparation of materials and tools
To perform this type of construction, you will need the following materials and tools:
- slats;
- means for moisture resistance and fire resistance of the material;
- antiseptic solutions;
- hammer drill and screwdriver;
- tape measure, ruler, marker and pencil for measurements and markings;
- dowels and screws;
- stringers for a suspended ceiling made of wooden planks;
- lamps and wires to devices;
- wall corners for suspended ceilings.
Preparing the construction base
Before installing the slatted elements, the construction base is prepared. To do this, remove the old finish from the surface. If you are installing an open type structure, then perform the following manipulations:
- dismantle the old finish;
- the building base is dusted, degreased and treated with an antiseptic;
- the surface is primed in two layers, after applying the product, take a break to allow the composition to harden;
- plaster is applied to the ceiling to level the building base;
- take a break to allow the material to harden;
- the surface is puttied, and after the product has hardened, a paint and varnish product is used to decorate the base.
In this case, it is enough to remove the old finish and dust the surface, as well as treat it with an antiseptic to protect against mold and mildew.
After preparing the construction base, wires are installed and other communications are organized.
Frame installation
Even a novice craftsman who does the construction with his own hands can install the frame. The main thing is to adhere to the installation technique:
- Before installing the frame, determine the height of the suspended ceiling. To do this, take into account the presence of spotlights and the height of surface differences. If you plan to install such devices, then the height of the structure is made such that the size of the structure is 1 cm larger than the spot.
- A mark is made in the corner at a distance from the ceiling equal to the height of the suspended structure. Using an industrial level, the mark is transferred to the remaining corners. Next, the dots are connected. If the marking is done correctly, the lines will converge at one point.
- In the wall corner for the suspended ceiling, two holes are made at a distance of 30-40 cm from each other. After this, the tool is placed on the base in the place where the part will be attached and markings are made for the holes. Using a drill, drill holes. Dowels are inserted into them, an angle is applied and the part is installed using self-tapping screws.
- Stringers are installed at a distance of 20 cm from the wall. The distance between the elements is 80 cm. The stringers are attached to the ceiling using hangers.
Installation of planks
Before installing wooden slats on the frame, the material is coated with several compounds. Products are treated with agents to increase moisture resistance and fire resistance. It is also recommended to apply an antiseptic solution to the slats to protect against the formation of mold and mildew. This will improve the performance of the product and increase the service life of the suspended ceiling.
After each treatment, take a break to allow the material to dry. After applying the products, the wooden slats are painted. The color depends on the interior of the room. They make both the same color palette and contrasting colors. Various paints and varnishes are used to paint slats. It is recommended to decorate the material before installation, since it is easier to do it on the floor or other surface rather than on the ceiling.
If spot lighting is planned, then before installing the slats, holes are made in the material for the devices. For other devices this manipulation is not performed.
Photo
Unedged board
Slat ceiling
Board covered with stain
Coffered MDF
Raw board
Slat pattern
Installation of boards at the end
Large beams
Wooden hanging
Did this article help you?
Lathing scheme
First you need to draw up a diagram that will show the places where the profiles pass, and also the points of their attachment. The drawing is drawn up with a simple pencil on a regular sheet of paper.
The dimensions, of course, should be scaled down.
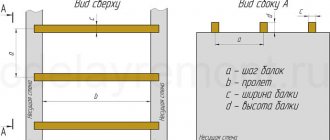
The diagram should include:
- Places for attaching guide profiles (starting strips running along the perimeter), marked in increments of 30-40 cm (the scale, of course, needs to be reduced on the sheet);
- Ceiling profiles and their cross members - in increments of 60 cm;
- Passage points for intra-frame lighting fixtures, wires and other communications.
To do this you need:
- Measure the length from edge to edge of all (namely all, not one or two) walls. You cannot measure a wall and then simply multiply its length by 4, since the level may not be the same, errors in calculations will subsequently lead to curvature of the frame;
- Measure the height of all corners, as well as from the floor to the central part of the ceiling;
- From the lowest angle, you should then measure the distance between the base and the suspended ceiling to determine the accuracy of the choice of communication devices or ceiling design. At this stage of measurements, it is also recommended to measure the location of not only the lamps, but also the junction boxes.