A concrete countertop is a great opportunity to create a beautiful, functional, durable and original work area in the kitchen according to an individual design. Such designs are becoming more and more popular every day due to their environmental friendliness, relatively low cost, and the ability to do everything yourself and realize the most unusual idea.
To create a countertop, you just need to create or adjust a drawing downloaded from the Internet, prepare tools and materials for mixing concrete and creating formwork. Then everything depends on the correct adherence to technology and imagination.
Features of concrete that make it ideal for kitchen structures:
- With a small thickness, it does not crack due to sufficient viscosity.
- Does not place very high loads on supports.
- Absorbs heat to a minimum.
- Fits perfectly into any interior due to the possibility of creating a variety of decor.
- It lends itself well to various processing - grinding, polishing.
- The thickness of the slab is up to 40 millimeters and the structure is reliable and durable enough to withstand the loads placed on it and last a very long time.
To ensure all of the above properties, when mixing a solution for pouring a concrete countertop, take at least M400 grade cement, washed quartz sand, and also add a variety of plasticizers, broken glass, marble chips, various dyes, etc. White Portland cement M500 is usually used as a white grout for tile joints.
Often, concrete countertops are decorated with pieces of marble or polished onyx - they are placed on the bottom of a mold, which is then filled with a cement-sand mixture. The thinner the mosaic elements are, the stronger the monolith will be.
As for performance characteristics in the kitchen, a concrete countertop without protection is afraid of dirt and acid. To eliminate these problems, the structure, after pouring and hardening, is coated with special polymer substances, a thin layer of which (glossy or matte) is completely invisible to the eye, but can close the pores and make the concrete invulnerable to any problems.
Requirements for a kitchen countertop
What qualities should a worktop in the kitchen have? First of all, of course, it must be kept absolutely clean. This means that this surface must be resistant to household detergents and disinfectants. Secondly, it should be easy to clean and have a smooth surface without grooves, cracks or crevices where dirt can get in. Thirdly, the countertop in the kitchen, where a wide variety of dishes are prepared, must be durable and reliable. We decided that a concrete surface would be most suitable so that the countertop in the kitchen would satisfy all the requirements placed on it.
What to cut
When choosing how to cut artificial stone, it is worth remembering the above types. You can use a fine-tooth saw or hacksaw to cut acrylic or plaster. It is worth remembering that gypsum generates a lot of dust when sawed with a grinder. In addition, this tabletop is fragile. You can simply break it by first making a depression in the right place - at the risk.
For cutting porcelain stoneware and agglomerate use:
- Grinder and diamond-coated discs;
- Electric tile cutter;
- Circular saw.
You can also use a hacksaw with a diamond or pobedite blade, but electric tools are more convenient and faster to use.
What do you need to prepare for work?
In order to make a high-quality and stylish concrete countertop in our kitchen with our own hands in the work area, we decided to use a material unusual for this purpose - finishing putty for the floor. It is usually used for filling floors in high-traffic areas, as well as in industrial or utility rooms, where there is a high probability of various chemicals getting on the floor.
To keep baseboards always clean: a trick with fabric softener
Fragments of ancient parchment were discovered in a cave south of Jerusalem
Add to the Lenten menu: delicious potato zrazy with mushrooms
We also needed:
- Sander;
- sandpaper with varying degrees of grain;
- various trowels;
- drywall knives;
- container for diluting putty;
- water-based liquid sealant for concrete surfaces;
- masking tape;
- water;
- paint brush;
- paint roller.
Sequence of actions for self-production
It is relatively easy to create a concrete countertop with your own hands. The main thing is to measure and design everything correctly, and then follow the technology. First of all, you need to create the correct drawing in accordance with the measurements, then prepare everything you need.
What materials will be needed for the solution: cement grade M400 and higher, washed quartz sand, crushed stone, water, plasticizer, various decorative elements (granite or marble chips, pieces of glass, parts for creating mosaics, etc.).
Required materials: steel wire with a cross-section of 3 millimeters and self-tapping screws for the reinforcement frame, moisture-resistant plywood 12 millimeters thick and boards with a cross-section of 50x30 millimeters (you can also additionally prepare wooden blocks of 50x50 millimeters) for installing the formwork, a plastic pipe 50 millimeters long and 35 millimeters in diameter for the hole under the mixer.
Tools that may be needed for work:
- For working with concrete
– usually a shovel, spatula, trowel, concrete mixer or construction mixer, bucket.
- For installation of formwork
– screwdriver, saw.
- For reinforcement frame
– pliers.
- Additionally
– ruler, pencil, building level, tape measure for measurements.
Drawing
Before making a concrete countertop, you need to carefully design everything and make a drawing. The sketch can be created before or after preparation. The most important thing is the correct measurements of the space where you plan to install the countertop. If you plan to make an angle in the kitchen set, you need to make it equal to 90 degrees - this will make it easier to carry out all further work.
Using a tape measure, you need to measure the boundaries of the place where the tabletop will be installed; if the configuration of the work area is curved with a transition to the adjacent wall, it is better to divide the element into several parts and make a tabletop for each separately.
The formwork can be installed alone, but divided into several zones. The boundaries of each section must be transverse and coincide as closely as possible with the walls of the pedestals; only in this case will it be possible to eliminate the possibility of cracks spreading.
Basis: reinforcement and formwork
To make formwork for concrete, you need to install a sheet of moisture-resistant plywood on a horizontal, flat surface, and carefully and accurately transfer the dimensions from the drawing onto it using a ruler and pencil. At the edges of the lines, boards of 50x30 millimeters are mounted on edge - they create the height of the tabletop.
Usually the height is exactly this - 50 millimeters: if it is less, the strength decreases, if it is more, the weight of the product increases significantly (which can be as heavy as a marble table) and in this case you will need to think about special supports.
The concrete solution creates quite a significant pressure on the walls of the formwork, so it is advisable to fasten them well. This can be done in two ways - by installing metal corners or using 50x50 millimeter bars for fastening, which are attached to the corners of the structure (in addition, you can install 2-3 bars evenly along the length of the board, if it is long).
When creating formwork, it is important to pay attention to sinks for washing - there are overhead sinks, there are built-in sinks. The design of the invoices assumes the presence of a horizontal side around the perimeter.
How to design a countertop with a sink:
- Invoices
– the sink needs to be turned over, placed on a plywood sheet, and circled along the side. Then they measure the width of the side (it can be 3 centimeters, for example) - and put an identical shape inside.
- Built-in
- the outline is drawn along the edge, making boundaries from 50x50 millimeter bars attached with self-tapping screws to the plywood. Boards of 50x30 millimeters are usually installed outside the lines, but in the case of a sink, the bars are attached precisely inside.
Do not forget that built-in sinks require a seating chamfer, which is quite difficult to make. The easiest way to avoid these problems is to choose an overhead sink model for a concrete countertop. Next, a pipe is glued to the location where the mixer is installed.
The reinforcing frame is made of steel wire in the form of a mesh with a cell size of 25x25 millimeters. The frame should be 25 millimeters away from the edges of the formwork structure and the plywood sheet. To create it, you first need to cut pieces of steel wire. The formwork is covered with plastic film, carefully placing the edges on the boards.
The frame itself can be made outside the formwork and then installed or assembled directly into the structure. To do this, you need to screw self-tapping screws around the perimeter of the formwork in increments of 25 millimeters, align the height of the head with a level and a ruler, screw the wire to the screws, and fasten with knitting wire at the intersections.
All joints between parts of the formwork must be treated with sealant, filling the cracks and gaps. If you want to make a kitchen countertop with your own hands with rounded edges, instead of joining two 50x30 mm boards, install a pipe in the corners. And the corner space, limited by two adjacent boards and a pipe, is filled with sealant.
Concreting
Concreting can be done in several ways: the usual method involves simply pouring it, while the layer-by-layer method creates a structure by pouring the solution twice. The formwork is covered with polyethylene film, the filling and frame are done, and the decoration is done on top.
If the first method is used, then classic concrete is prepared (the composition includes 1 part cement, 2 parts washed quartz sand, 4 parts filler in the form of marble chips or another, 0.5 parts water). First, mix water and cement until milk appears, then add the remaining components in portions. Mix thoroughly.
To decorate the front side in an original way, you can line the bottom of the formwork with various objects, decor, broken glass, beads, copper wire, etc. The decor must be secured with glue so that the parts do not move when pouring. The glue can be any kind, the main thing is that it holds it together.
When performing layer-by-layer pouring, different solutions are prepared. The front (first) layer is filled with a mixture of fine sand without adding large fillers (crushed stone, gravel). Add a little less water than in the recipe so that there are no pores. But it is better to purchase a ready-made dry mixture for the front layer, which is made according to the instructions indicated on the package. Mixing is usually done at low speed. The solution is poured to half or a third of the height of the formwork structure.
The solution must be compacted with a spatula, filling all voids and removing air. You don't have to wait for it to dry. Next, lay the reinforcing mesh and wait half an hour. Then plain concrete is poured and the formwork is covered with film. You can remove it after a day and lay concrete on top with a wet cloth. After 2 days, the formwork is dismantled.
Decorating with varnish or paint
When thinking about how to coat a concrete countertop, many choose paints and varnishes. But before that, the monolith needs to be properly processed. If there is no decorative layer, the front side of the tabletop is sanded - it is better not to take a grinder for this purpose, but to choose an angle grinder. It is more comfortable and safer to work with it. The entire process will require several laps.
First, the slab is ground with a coarse-grained wheel, then with a fine-grained one. It is advisable to polish with a felt wheel. If the tabletop needs to be trimmed in some places, this is done using a grinder and appropriate diamond wheels.
If there are small depressions on the slab, they are removed using a special acrylic-based sealing mixture. After the mixture dries, the monolith can be further sanded.
After sanding and polishing, the countertop needs to be primed and painted. To do this, you can choose different compositions, but you need to choose non-toxic ones that are suitable specifically for concrete and can withstand the effects of various adverse factors (high humidity, temperature changes, abrasion, etc.).
Features of materials
Since we were going to set up a work area in the kitchen, it was important for us to consider the safety of materials in contact with food. This concerned both the material for pouring and the sealant, which was supposed to hide all possible seams and cracks that arise at the junction of various elements of the working surface, as well as protect the concrete coating itself. Please note that when purchasing, be sure to review the certificates of safety and compliance of materials with sanitary standards. Also, always use cutting boards when working with food on a concrete countertop.
Grinding
To do this, the future tabletop should lie flat, face up. We start working with the sanding machine until all the irregularities are eliminated. Since the tools and materials for grinding can be very diverse, decide for yourself. Optimal for home use is an electric or pneumatic angle grinder and a set of diamond discs.
If, however, there are deep unevenness and large voids on the surface of the tabletop, then you should cover them with an acrylic-based sealant and allow the product to dry.
Then you should grind several more times until the voids are completely eliminated, pre-treating the countertop with filler. In the end, the product should be smooth, without dimples or scratches.
The table will look good only if the surface is perfectly polished.
However, if you do not have the opportunity to polish the surface, then you can prime and varnish it. Any acrylic based primer and varnish are suitable for concrete. It is better to apply with a roller, evenly and slowly, giving the layers time to dry.
That's all the tricks. Don’t forget, using the technology described in the article, you can make a tabletop from concrete not only for a table, but also for a kitchen set. Rest assured, you will get a very beautiful and exclusive item.
Preparatory stage of work
During the kitchen renovation, we did not change the existing furniture in the work area. We just decided to update it to match the updated interior. The first thing my husband did was take out the old sink. The small area where the sink slopes are located also had to be finished with concrete in order for the result of the work to be of high quality. The old work surface was made of plastic. Therefore, the first thing was to degrease it by thoroughly washing it with a special detergent. Then the plastic was treated with coarse sandpaper, because concrete will stick to a rough surface much better than to a smooth and slippery one.
Like the end of the world: Beijing was covered by a dense sandstorm (photos from users)
We choose beautiful tiles and make a countertop for the kitchen: it turns out impressive
Counting calories in your diet and more: reasons for feeling unwell in the morning
After the entire working surface was sanded, we washed it again, removing the dust that had settled after sanding. The surface was then dried with paper towels.
Final project
Although every care was taken to create a neat, beautiful fill, it was quite nerve-wracking when it came time to unscrew the metal square. But the mixture went on so well that it looked perfect. For an even better result, we ran sandpaper along the edges of the tabletop and were happy with the result.
After opening the car wash, we made sure that everything was fine in this area too.
Preventing unnecessary work
Once the worktop was sanded, cleaned and dried, we applied masking tape around the perimeter to protect the overlying wall and the tiles on it from being cleaned once the job was completed. After all, concrete applied to the tiles could stain them, and then there would be more work. But this simple method of protecting the surface from unnecessary dirt turned out to be very effective - after applying a layer of putty, the tape should simply be removed along with the dirt that had fallen on it.
Installation of reinforcing frame
Concrete, of course, is a strong material, but quite fragile. During operation, the tabletop can withstand quite large mechanical loads, so the presence of a metal frame will have a positive effect on the strength characteristics of the product.
When making it, it is important to adhere to certain rules: the size of future cells should be on average 25 mm, while the same distance should be maintained on all sides of the structure.
The reinforcing frame can be manufactured separately, and then fixed in the formwork or immediately assembled in place. But before this stage, it is necessary to lay down the plastic film carefully and evenly, without forming folds on the surface.
Next, maintaining a distance of 25 mm around the perimeter of the formwork, screws or nails are fixed to which the metal frame is attached.
In order to create a beautiful edge, you can use a pipe, which must be installed in the corner formed by the plywood and timber, and the free space that should not be filled is filled with sealant or silicone.
Dilution of the mixture
A special feature of the finishing material we have chosen—finish concrete coating—is its ability to quickly harden. This should definitely be taken into account when diluting the mixture - it needs to be prepared in small portions, otherwise a lot of material will simply be spoiled and thrown away. You should not be afraid that you will cover the surface in small areas - a wide trowel will help you level all the layers.
An unexpected discovery by scientists has revealed the cause of drought in Europe
Like in 2018: Russians were warned about a possible fuel crisis
Anticipation is important. Why do people ignore their inner voice?
Some features of the work
The corners and joints of the horizontal surface of the table top and vertical walls need to be worked out with movements in different directions. The mixture is first applied with upward pulling movements, and then it should be distributed by moving the trowel horizontally to the left and right. This will make the coating smoother and more uniform.
Try to initially make the concrete layer even, without depressions or bulges due to excess or lack of mass. This will avoid wasting time, material and effort for its subsequent alignment. Since the concrete layer is thin - literally a few millimeters - this is not difficult to do if you take maximum care in your work.
Facts about lard that are better to know (especially for those who still doubt the benefits)
How to make a play tent for children in the room. You will need a couple of boards and fabric
Not a marriage, but a fake: Julia Tall’s first husband told the whole truth about their union
About the pros and cons of marble
If we are talking about natural stone, then you need to understand that the cost of such a countertop will be very high, especially if you are planning to make a large countertop.
Perhaps this is the main disadvantage of marble. Now let's find out the benefits of marble:
- Great appearance. I want to spend hours admiring the beauty of this stone. It is impossible to select several identical countertops; each is unique. There are no absolutely identical stones in nature.
- Wide choice of colors. You can choose your favorite shade of marble.
- If you install lighting fixtures correctly, soft light can highlight the natural beauty and texture of the stone to give it expressiveness.
- Marble is a natural material and therefore is not capable of causing allergic reactions.
- During the hot season, a marble countertop can keep you cool.
- Marble is a hard material and will last a very long time. Of course, if you care for the stone correctly.
What are the disadvantages of marble countertops:
High price. Even if you order a small countertop, the cost of marble products still remains consistently high. Sensitivity to temperature changes. Since marble is a natural material, temperature changes should under no circumstances be allowed, namely, it is forbidden to place a hot pan that has just been removed from the stove on a cold surface. Spots and even cracks may appear on the surface. Marble is a porous material and therefore reacts almost instantly to any liquid. If you spill coffee, tea, wine or juice on a beige marble countertop, dark stains will remain on the surface. If you don’t wipe the stain right away, it will be difficult to get rid of the stains. Immediately soak the liquid with a paper or cloth towel, and then wipe the surface dry with a clean cloth. Sometimes, if the liquid is too caustic (red wine, freshly squeezed juices (cherry, orange, carrots, beets)), then special chemicals will help save the surface from the appearance of unpleasant stains
You just need to use them very carefully. No acids! It is very easy to spoil a countertop made of white marble and other light shades. Even a slice of lemon or a drop of lemon juice can cause yellow spots to appear.
Vinegar, citric acid and lemon juice are the main enemies of marble countertops.
What to do if you really want to install a countertop made of natural stone in the kitchen, because marble reacts very sensitively to chemicals and acids. There is always a way out; you need to purchase a special protective agent for marble with the addition of natural ingredients. If you have ever treated a marble countertop with a protective agent, do not forget that from time to time you need to reapply the protection. And this does not 100% exempt you from careful handling of cast marble countertops. Therefore, it is better to decorate part of the kitchen interior with natural stone, but it is better to equip the workplace (where food is prepared) with more modern materials that are resistant to various liquids.
If this is your first time treating a marble surface, you should first test the product on a small, inconspicuous area of marble, and then treat the entire area of the countertop. By the way, if protective fluids do not cope with their tasks, there is only one way out - grinding and polishing the stone.
Look how beautiful the black marble countertop looks in the photo:
And also a tabletop made of green marble:
Layer-by-layer coating
In order for the concrete countertop to last as long as possible, it had to be made not too thin. We had to apply three thin layers of the mixture to get the desired result. Each layer was thoroughly dried and then moistened with water. If you decide to repeat our experiment, then use a damp sponge, so you will not only wet the surface before applying the next layer, but also remove dust and dirt that has fallen onto the dry surface.
After the last layer of concrete had dried on the countertop to be renewed, my husband spent a lot of time sanding the surface to make it as level as possible. He then used a vacuum cleaner to remove any fine dust from its surface. This is a mandatory stage of work, since the sealant coating will be transparent, with a slight matte sheen. Under such a coating, everything, even minor dirt, will be visible. By the way, if you want to somehow decorate the concrete countertop, then this should be done at this stage of work.
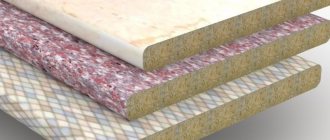
Kinds
The choice of composite countertops is not limited to size, shape and design. There are several options for composite materials.
Porcelain tiles
The thickness and dimensions of products are selected based on customer preferences. This material is purchased for the working kitchen area by those who value strength and durability. Porcelain tiles serve their owners for decades without any problems.
A tabletop made of thick sheets is installed based on practicality. It can be used for cutting meat and other operations for preparing food for cooking. The selection of material depends on the cost, and this, in turn, depends on the color of the product.
Porcelain stoneware countertops may vary in texture.
They are:
matte (untreated);
The undeniable advantages of porcelain stoneware include:
- the possibility of laying it on different bases: metal, wood, plastic, concrete;
- the material can be removed from visible defects (chips, scratches and other flaws) during the polishing or grinding process with a special tool;
- differs in heat resistance;
- moisture resistant and durable;
- does not contain harmful additives;
- heavy-duty – can serve as a cutting board;
- does not emit toxic substances;
- is not a favorable environment for the growth of bacteria;
- functional and multi-colored.
The disadvantages of porcelain stoneware can be described in several points.
- Finishing large-scale surfaces will be an expensive and time-consuming process. The joints between the plates will have to be sanded periodically.
- Caring for your countertop requires regular effort. If the surface is not wiped twice a day, porcelain tiles lose their shine.
- The material is not resistant to acidic cleaning agents. Needs treatment with a special polish.
- Installation requires professional help.
Agglomerate and acrylic stone
These are the most popular materials for the production of countertops. Both are composite and consist of a certain filler and some binding components. The cost is reflected in the thickness, color scheme of the composite, the size of the countertop and the complexity of the manufacturing process.
The positive characteristics of the material are described below.
- The color range is varied. Among quartz models, you can choose a base color and match it with inclusions of natural stone.
- The agglomerate is non-toxic and safe - it consists of 90% natural materials.
- Products of this type will not appear chipped or cracked. If a heavy, hot frying pan falls onto the countertop, the maximum damage will be a barely noticeable scratch.
- Solid quartz countertops made from agglomerate are flexible. Installation is allowed both on a complex frame structure and on legs, even with a large tabletop area.
- Moisture resistance. Resistance to acids, the formation of mold in the structure, the penetration of fungus and fat into it.
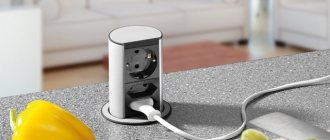
- It is possible to install a sink or hob.
- Has no expiration date. Can be used for more than one generation in a row.
Minuses.
- Seams. The large mass of tabletops does not allow them to be manufactured in a large, solid area. With a surface size of 1.5 m or more, two segments are glued together. The joints are filled with sealant and treated with pigments to match the composite.
- To cut durable agglomerate, you need special discs and other tools designed for processing marble.
- Difficulty in transportation. The slab is transported strictly vertically.
Finish coating
The concrete countertop looks stylish. But she needs protection. We chose a water-based sealer to match the concrete—based on acrylic resins with a satin finish. In order to apply it efficiently, we diluted it to the consistency of skim milk. The sealant is applied using a short-haired paint roller. This work took us a lot of time, since the liquid splashes quite a lot when rolling, and we had to work slowly so as not to stain everything around with the sealant. What is quite problematic in this work is to apply the required amount of liquid sealant in the corners of the worktop - it accumulates there. I had to finish all the joints with a narrow spatula, dispersing the liquid sealant over the surface so that it could then be dispersed with a roller. My husband treated the slopes on the walls with sealant using a brush, since it was very inconvenient to work with a roller.
Once the sealant was thoroughly applied to the entire countertop, we removed the protective masking tape from the wall surface. Where concrete did get onto the tiles, my husband had to remove it with a utility knife, carefully scraping it off the surface. Fortunately, there were only two such defects - the masking tape did its job perfectly.
Everyone liked our concrete countertop in the kitchen - it is practical, stylish and serves as a decoration for the kitchen, despite its seemingly boring color.
Found a violation? Report content
The purpose of graffiti in the interior
The main purpose of graffiti in the rooms of a house or apartment is not to pay tribute to fashion, but to express your feelings and show them to loved ones. Drawings on the walls make the home bright and give joy to all the people living in it. Decorating walls with graffiti allows you to expand the space of one room to infinity. Three-dimensional drawings can carry you far forward, into the depths of their stories.
Graffiti in the interior becomes the owner's calling card. It reflects his vision of life, art, desires, shows strength of character or hints at his weaknesses. Everyone draws on the wall something that reflects his thoughts, capabilities and even emotional experiences. A unique interior is more of a bonus than a goal. Before you paint graffiti on a wall, it's worth taking a few lessons from an artist who specializes in this form of art. He will not teach you what exactly needs to be painted, but will only tell you how to work with paint correctly and what materials are best to paint.