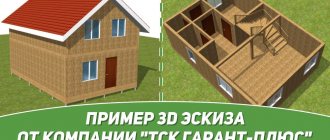
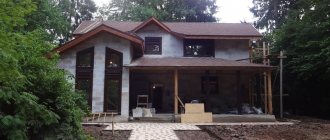
Owners of suburban areas regularly have to resolve issues of selecting materials for building a cottage. Often this material becomes SIP, but the second question arises - how to equip the roof?
SIP panels minimize labor costs and are an alternative to classic materials. They are formed in three layers, have the necessary structural rigidity, and do not require additional insulation. The outer layers are metal, the inner layers are high-tech insulation.
How to form a reliable SIP roof?
Content
- Construction of a flat roof made of SIP panels
- Construction of a pitched roof made of SIP panels
- Choosing a roof from SIP panels
- Selection of fastening Without purlins
- With intermediate runs
- With rafter system
- Required Tools
Roof insulation and vapor barrier
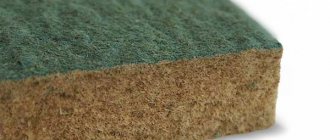
The design of SIP panels includes two OSB sheets with a layer of insulation laid between them. Thus, the insulation appears on the roof along with the installation of the panels. The exceptionally low thermal conductivity of SIP panels is an excellent protection for warm air inside the house from contact with cold outside air. And the high degree of air permeability of the insulation does not prevent heated air from leaking out, allowing you to save on the vapor barrier device.
Do you dream of your own home, a holiday home or for permanent residence? There is nothing easier than doing this at TechnoSip.
Look at our catalog of projects, the prices will pleasantly surprise you.
up to 100 sq. m. from 100-200 sq. m. from 200-250 sq. m
Construction of a flat roof made of SIP panels
Rigidity and load-bearing capacity are indicators sufficient to resist snow and standard operating loads. The filler does not compress, the metal shell is very rigid, the mechanics of perception of external influences are identical to elements made of reinforced concrete. This makes strength calculations simple and quick, without the use of complex formulas.
There are two methods to form a flat roof from a composite:
- First. The panels, enclosed in a shell of chipboard with filler (mineral wool, stone wool), are laid on a frame that provides structural rigidity. Waterproofing, spacer sheathing, and roofing are formed on top. The technology is complex, you will need the help of specialists, but you can use materials that are not of very high quality. Arrangement will require small expenses.
- The second is the use of SIP in a metal shell, special roofing iron, treated with zinc and polymers for beauty and protection against rust. In fact, the outer layer is a profiled sheet. Their length is large; one element can cover a 6-meter span. If such a structure is used, the quality of the protective and decorative treatment, the reliability of the locks connecting the profile elements, and the stability of the sealing composition become a significant factor.
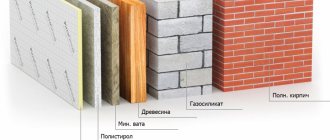
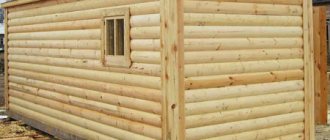
Textured solutions for facades
A panel with a surface made using the “washed” concrete technique.
Panel facades are subject to any type of finishing; most often they are plastered or tiled to look like stone or brick. At the same time, finishing work is quite labor-intensive and will require additional time. However, developing the idea of prefabricated concrete houses, manufacturers are offering ready-made wall design options.
The point is that they can be given a decorative appearance during the manufacturing process of the panels. One of the original solutions is to create a textured surface using the “washed” concrete technique. Thanks to special additives, the outer layer of concrete (3–5 mm) does not harden on the products, and subsequently it is simply washed off with a stream of water under pressure, exposing the granite filler. Thus, the facades acquire a spectacular “stone” texture that does not imply any finishing.
Scratched concrete also looks interesting
The surface that has just begun to harden is treated with hard brushes, covering it with a pattern of thin grooves.
Another decoration technique is to mold various textures onto panels.
This is done using matrices that give the walls the relief of stone or brickwork, timber, plank cladding, etc. In a similar way, any geometric pattern or, for example, a monogram of the owner of the house can be printed on the facades. The panels are delivered to the assembly site already painted in the color chosen by the customer.
Concrete walls are not subject to cracking, so facades with textured decor applied to them will forever retain their original appearance
Construction of a pitched roof made of SIP panels
The type of roof is determined by the design of the house. Pitched options:
- Single-pitch. Easy to install, any roofing material can be used. They are mainly used in auxiliary buildings. The attic cannot be equipped. The slope is determined by the configuration of the rafter system. Precipitation flow is unidirectional.
- Gable. Most often found on cottages. Two slopes, between them a triangular area, pediments. High resistance to different types of precipitation.
- Attic. They are erected quickly and are characterized by a broken slope line. The pediments are made in the shape of pentagons. The attic will be spacious, but an additional layer of insulation will be required.
- Hip. Feature – 4 slopes, a pair in the shape of a trapezoid, the same number of triangles. The slopes are inclined at an angle of 45 degrees, drains are required to remove precipitation. During the arrangement, a complex rafter system is used, which only craftsmen can prepare.
- Tent. Hip roofs, which are equipped with 4 or more slopes in the shape of triangles, the tops of which converge into a point. Installation costs are high, the reason is the complexity of the rafter system.
- Multi-pincer. The most complex in design, adapted to the respective buildings. We recommend entrusting installation to specialists.
- Dome. The peculiarity is the curvature of the structural elements. They can cover the entire building or its individual elements. The roof covering is formed by flexible, soft materials.
Architectural possibilities
Companies offering insulated reinforced concrete panels on the private housing construction market have a serious production base with appropriate equipment, which gives them the opportunity to work on individual projects.
A panel cottage today is not a standard box, but a modern house in which a variety of architectural and planning solutions can be implemented. Thus, the technology makes it possible to create cantilever projections, bay windows, risalits, a second light, a free layout without internal load-bearing walls, windows and openings of any size and shape in the building - arched, round, corner, with complex geometry. Of course, there are certain restrictions, but they relate mainly to the classic attic (instead, a mezzanine with a height of 1.9 m is possible) and radius structures, which are difficult to implement even when built from piece materials.
You can reduce the cost of building a house by choosing a ready-made project from the manufacturer’s catalog and simply adapting it to your needs and preferences
Choosing a roof from SIP panels
The main materials are as follows:
- Metal tiles. An affordable and therefore in-demand solution. If you follow the installation technology, you can achieve maximum service life. Plus - the ability to choose among a huge number of shades, coatings, textures. The guaranteed operational period is a quarter of a century, but it can be increased to 75 years if you pay careful attention to installation. It is possible to cut sheets and implement any projects, regardless of complexity.
- Flexible tiles based on bitumen. It lasts a long time, the choice of shades and configurations is varied. It is important that on the day of installation the weather is good, warm, without rain. In winter, installation is not possible. If you need to move into the house in winter, the roof goes into conservation.
- Composite tiles. Expensive material, but the price is 100% justified by the quality. The roof is formed by several layers: steel sheet, protective coating, basalt chips, acrylate (increasing protection from external influences). Visually, the material looks like ceramic tiles; under the polymers, the metal is protected from rust. Operation period – 70 years.
- Natural, cement-sand tiles. The most expensive material for forming roofing. It looks beautiful, is resistant to precipitation and mechanical stress, and does not require special care.
You can also consider budget technologies, coatings made of ondulin, profiled sheets, polycarbonate with a honeycomb structure. Soft flat roofs are available in many versions, different in color, and are easy to install and maintain.
Project "Aurora"
This house seems to have been specially created for a quality and carefree holiday and is an excellent option for a country or country cottage.
The area of the house is 44.6 m2 with sides of 5.66×5.66 meters, which makes it possible to build it even on the most modest plot of land.
- In front of the entrance to the house there is a small porch with a canopy;
- Just inside the front door is a hallway with stairs leading to the second floor;
- From the hallway you can access a small bathroom with a window or a rest room with two large windows, where, if necessary, it is quite possible to equip a small kitchen;
- The door from the relaxation room leads to the shower room, from which you can access your own sauna. To enjoy this type of holiday, you don’t even need to leave the cottage;
- The roof of the house is gable, so the second floor is represented by an attic-type room, which occupies the entire area;
- On the second floor you can arrange either one large bedroom or divide it into several smaller bedrooms. But it is worth considering that in this case the window opening will be present in only one of them;
- But, probably, given the concept of the first floor, most will prefer to organize a spacious billiard room in the attic.
Mounting selection:
Before installation, you need to evaluate the configuration of the house and understand how to fix the panels. There are three methods:
No runs
The elements of the rafter system are the Mauerlat, beams for forming the ridge and joining. This option is good for small houses, if the distance from the ridge to the Mauerlat does not exceed 4 meters. If the indicator is higher, then you cannot do without intermediate runs.
With intermediate runs
This method makes it possible to increase the rigidity of the roof and adapt it to heavy loads. The upper edge of the beams, even ridge beams, is beveled at an angle corresponding to the slope of the roof. Solution for large cottages, attic floors.
With rafter system
SIP panels are lightweight, so you don’t have to lay the rafters over the entire length or width of the roof. You can focus on the size of the working area, or use the option based on intermediate runs. You don’t need a lot of beams, increased strength is not required, and material consumption will significantly affect the price.
Price
The final estimate depends on the area and length of the span of the structure, the thickness of the sandwich, the characteristics of the insulation and external layers. The minimum cost for purchasing good quality panels is 1,750 rubles/m2 , installation work when laying them on a turnkey basis using special equipment costs 400 or more rubles/m2.
The cost of installation of additional elements is negotiable, with a minimum of 250 rubles/rm. If the area exceeds a certain value (from several thousand m2), installation prices may be reduced.
Conditions for planning the construction of a roof
When arranging, the following is taken into account:
- Slope.
- Load created by snow.
- Wind pressure.
- Probable directions of air flows.
Atmospheric loads must be considered taking into account the region of residence and probable deviations from average climatic norms. From this data you can determine what roof slope is required.
Required Tools
The installation of the roof involves the following work:
- Configuring the panels, giving them a shape that ensures a tight fit.
- Transportation to the installation site.
- Sealing gaps.
- Preparation of technological holes.
- Installation of mechanical fasteners.
The following tool is required:
- Hacksaw. An alternative is electric scissors or a circular saw.
- Vacuum or mechanical type gripper.
- Screwdriver, drill with a set of attachments.
- Mallet made of polymer material.
- Hand tool for measurements.
- Mounting gun.
Load calculation
When the slopes and dimensions of the slopes are known, you can understand the wind and snow loads that will affect the roof.
- The snow load is determined by multiplying the standard mass of snow precipitation by an indicator that takes into account the roof slope. This indicator is equal to one if the angle is not more than 25 degrees, 0.7 - from 25 to 60 and 0 if more than 60. You can determine the area in which the construction site is located by evaluating the climate map prepared by the meteorological service.
- Determination of wind load. Strong winds can cause serious damage: from tearing off individual roof segments to overturning the entire structure. The reason for such destruction is the separation of wind flows horizontally and vertically, the formation of force applied along different vectors. Wind load can be determined by multiplying the following indicators:
- Ripple factor.
- An aerodynamic indicator determined by the geometry of an object.
- The standard value of wind pressure determined for the area.
You can understand in which wind region a building is located by looking at the wind map of the country.
After calculations, it is possible to determine the positions of intermediate runs that help maximize the load-bearing capacity of SIP panels.
What weather can you work in?
SIP is characterized by a minimum weight, but a large windage, due to which installation is unacceptable if the wind speed exceeds 9 meters per second. Negative temperatures are not a hindrance, however, when sealing joints with sealant, temperatures below +4 degrees are unacceptable.
If it is raining, the fog has thickened, the surfaces have become slippery, you cannot lay the roof, this is a safety requirement.
Project "Successful"
The name of the project fully corresponds to its layout, which is simple, but at the same time very competent and functional.
The building itself is two-story and occupies an area of 72 m2. The appearance of the building is very attractive and does not fall into the “standard” category.
- The entrance to the house is equipped with a small porch with a canopy; in fact, there is a small canopy around the perimeter of the entire building. This technique makes the house more comfortable to perceive;
- According to the standard, upon entering the house, we find ourselves in a small vestibule isolated by a door;
- From the vestibule you can go to a small bathroom with a small window or to the hall;
- From the hall there is access to a staircase leading to the second floor, in technical. room and living room;
- By the way, the utility room allows you to fit all communications, as it has an area of almost 5 square meters;
- The living room is also quite spacious and has an area of 13.5 m2. Please note that the layout does not provide for a partition between the living room and kitchen, but at the same time leaves the opportunity for future owners to install a door if necessary. The partial presence of partitions also makes the kitchen more private;
- Going up to the second floor we find ourselves in another small hall from which 4 doors lead to another bathroom and three separate bedrooms;
- Thanks to this layout, a family of 4 people can comfortably live in the house;
- Each of the rest rooms has a different, but at the same time sufficient area.
Roof installation: stages of construction
The sequence of erecting a roof from SIP panels is as follows:
- If the dimensions and configuration do not meet the requirements, the panel will have to be cut. It is laid on a flat surface, to prevent damage, it is better to first cover the surface with felt or other soft material. Chips are removed as they form. For positioning accuracy, the element is held by a gripper. The location where the grip is installed is cleared of packaging film.
- Raising SIP to the roof. If there are no special mechanisms, it is permissible to feed along slipways - boards leaning diagonally against the wall.
- It is better to remove the film from the bottom plane right before installation.
- Once the panel is placed on the beams, holes can be formed into it. They are needed to accurately install the screws without resistance. The screw material is stainless steel, adapted to atmospheric loads. When screwing in fasteners, you must strictly maintain a right angle. Washers and washers made of artificial rubber are placed under the caps in advance. This will provide a tight seal and prevent excessive pressure on the material. Too much force when tightening is not required, it can damage the base and lead to premature wear of the polymer gasket, due to which it will no longer be elastic and the seal will be compromised.
- If the slope is more than 15 degrees, a stop is placed under the panel, in the overhang area. This part prevents it from slipping.
- Using the technology described, the following panel is installed. The connection with the previous element is locking. The class of such a connection is different: in some places a seam seam is used, but more often on the top sheet of one of the panels there is a wave edge slightly raised above the main plane, which is placed in the recess of the next panel. You can create a reliable seam connection using a special tool.
- The joints must be sealed to prevent leaks. To do this, you can use silicone-based sealant or special adhesive tape. Tapes are also used at the junctions with the wall.
- If the length of the panels is shorter than that of the slope, when laying it is necessary to maintain a vertical overlap, starting from the bottom part. The amount of overlap between the 1st and 2nd rows is determined by the slope; if the slope is less than 10 degrees, 30 centimeters is enough, more - 20.
- To get a protrusion of the top layer that is large enough to overlap, you need to trim the insulation on some panels.
- When the installation of all panels is completed, complete removal of the protective film is permissible. This must be done immediately (if you hold it under the sun, it will stick tightly to the base, the material will look ugly). Walking on the panels is acceptable, but with extreme caution. It is better to step on the areas of contact with the purlins; shoes should be soft enough; hard soles are unacceptable.
- The final stage is decorating the ridge unit. The voids between the end parts of the panels are filled with insulating material. If the insulation is foamed polymer, it is necessary to fill it with polyurethane foam, if it is mineral wool, then the gaps are filled with a similar material. After filling, a plastic overlay is placed on top, secured with self-tapping screws, and covered with a steel ridge strip. After the installation of the panels is completed, you can install auxiliary elements, drains for drainage of sediments, and others. When working with SIPs, you cannot place them on the side where the element for the “lock” connection is located. It may be damaged by the weight of the panel.
House assembly
Concrete cottages, as a rule, are placed on a slab foundation or on a deep foundation. Manufacturers of three-layer reinforced concrete panels offer the construction of a slab 300 mm high, insulated over the entire area with a 100 mm layer of EPS (basic version). The house kit is delivered to the site by panel trucks with a carrying capacity of up to 20 tons. For example, to transport material for the construction of a two-story house, up to 10 trips may be needed. To unload and install the panels, a truck crane (25–120 tons) is required, which must be provided with access and a flat, free area of sufficient size for all manipulations. Note that transportation and operation of heavy equipment constitute a very significant expense item in the construction budget.
The walls of one floor can be installed in a day or two. First, the installed panels are fixed with supports, and then the elements are connected layer by layer to each other. Reinforcing bars are inserted into the loops embedded in the load-bearing (inner) layer of concrete and the connecting point is monolithic, creating a single prefabricated monolithic enclosing structure. In the thermal insulation circuit, the interpanel seams are filled with mineral wool or foamed, and in the outer layer of concrete they are laid with a rope of polyethylene foam and sealed with sealant. Thus, blowing or freezing of walls through the joints of panels is excluded.
The interpanel seams on the facades are only 20–25 mm thick, and if you paint them in the color of the walls, they will be almost invisible
Joining unit of two external and one internal wall panels (top view)
Connecting units in ceilings and load-bearing partitions, including corner ones, are concreted in the plane of the panels. All internal surfaces are smooth (height differences are no more than 3–5 mm) and ready for finishing; there is no need to plaster the base using reinforcing mesh, as is done in brick or block houses.
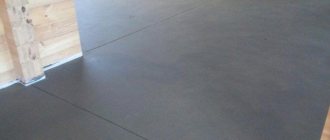
The roof can be either pitched over wooden beams or flat. The structure, based on 220 mm thick hollow core slabs with 200 mm EPS insulation, a prefabricated screed made of asbestos cement sheets (ACL) and a reinforced concrete parapet 600 mm high, is optimally “adapted” to panel technology. In addition, the flat roof fully meets modern trends in private architecture, aimed at laconic lines and simplicity of forms.
Operation and maintenance of roofs made of SIP panels
The rules must be followed:
- Check for scratches every 12 months. If they are found, the protective coating must be promptly restored.
- In the first days of winter, all debris, fallen leaves, and branches are removed from the roof. The load on the roof should be reduced, do not climb on it again, and do not wear shoes with hard soles. It is better not to use metal tools; metal can damage the coating; alternatives are shovels made of plastic, wood, or brushes.
- Do not remove dirt chemically or use acids or alkalis. Usually everything can be washed off with water, but if that doesn’t work, you can prepare a soap solution. The main thing is to rinse it thoroughly after cleaning.
- The last resort is cleaning with white spirit. This is a fairly strong solvent, so you need to use it carefully, in small dosages. It is recommended to rub the surface with a cloth moistened with solvent no more than 40 times. If dirt remains after such cleaning, you need to pause for at least 30 minutes before the next treatment.
- Drains must be clean. If they are clogged with leaves, the water will not drain and ice plugs will form in winter. The ice is hard and dense, deformations and even through damage and cracks are possible.
- When removing snow, tools made of plastic or wood are also used. In order not to damage the roof, you don’t have to clean it down to the base, but leave a small layer, about 5 centimeters thick.
Project "Economy"
From the name it is clear that this house is one of the most affordable construction options - the approximate cost is 815,000 rubles. However, for a young family of two people, this is a more than suitable option.
The building is one-story and occupies an area of 53 m2.
in the price:
- construction of a pile-screw foundation;
- all exit and unloading work;
- construction of walls and ceilings;
- metal roofing;
- metal entrance door;
- glazing with energy-saving double-glazed windows from Rehau.
The layout of the house can be called compact and very thoughtful. Despite the small square footage, all rooms are of sufficient size, correct in shape, and most importantly, the rest rooms are impenetrable.
- A smart solution is a furnace room isolated from the living area, which can only be accessed from the street;
- Immediately behind the front door there is a convenient vestibule, through which we find ourselves in a small hall. There is a door between the hall and the vestibule, which allows you to isolate the penetration of cold air into the house when the doors are opened;
- From the hall, 4 doors lead to a sufficiently large bathroom with a window, a fairly spacious kitchen, which also has a window and two rooms;
- The living room is a regular square, with an area of just over 15 m2. This allows you to fit all the necessary furniture and leave enough free space to move;
- The bedroom area is almost 10.5 m2, which also allows you to install all the necessary furniture;
- It is impossible not to note the successful location of the interior doors, which in all cases are located almost in the corner and take up a minimum of usable space.
Roof repair from SIP panels
If the inspection shows that scratches have appeared on the surface, the damaged areas are treated with a special paint that matches the composition of the polymer layer. As a rule, such paints are offered by the manufacturers of SIP panels themselves. Repair algorithm:
- If the damage is deep, metal is touched, pockets of rust have formed, they must be removed.
- The area to be restored is cleaned of contaminants; the use of white spirit is acceptable.
- Restorative paint is applied. For surface scratches, one layer is enough, but if the scratch has reached the metal, two layers, with preliminary priming.
Before carrying out repairs, you need to understand whether moisture ingress is the result of a leak or condensation. “Fogging” of the panel is possible if the insulation layer is too thin and does not correspond to the climate of the area. In such a situation, you will have to additionally insulate the structure.
In order not to encounter problems and to experience 100% of the benefits of a house made from SIP panels, you should entrust the installation to a professional construction team. You also need to carefully approach the selection of a manufacturer of building elements; using low-quality material, an attempt to save money will definitely backfire.
Video description
See the video for options for interior and exterior finishing:
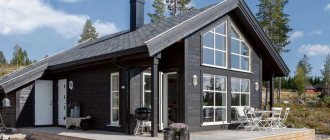
External finishing of SIP houses with painted plywood is relevant in the European style, when the surface of the material is painted with light paint and decorated with wooden blocks of a contrasting dark color. To insulate the facade, you can use glass wool or stone wool.
Plywood of various thicknesses Source pinterest.com
See also: Catalog of companies that specialize in finishing and facade materials.
Project "Vesta"
A wonderful house project for a family of 4 people with a carport covers an area of 99 square meters.
The house has a very modest, but at the same time
noble facade design and configuration.
- The entrance to the building is made in the form of a small porch with a canopy protruding beyond the roof;
- Behind the door there is a small vestibule, from which you can go to the bathroom, and then into an L-shaped corridor;
- From the corridor there is a door to a separate bathroom with a window and three separate bedrooms, the average area of which is 10 square meters;
- The corridor is combined with a spacious kitchen-living room with an area of almost 28 square meters;
- In the part of the room where the food preparation area would be located, there is a door leading to a small pantry;
- From the living room you can exit onto a covered porch under a canopy;
- The area of the carport is 23 square meters.
The article was written for the site.
Tags: house, Design, construction
Project Oreo
Despite the airy name, this house has a very solid appearance and leaves no doubt about its reliability.
The total area of the building is 96.1 sq.m. of which 84.9 square meters are residential, and 11.2 square meters are given over to cozy terraces.
- A notable feature of this project is the presence of a snowmobile garage. For residents of the Far North, this vehicle is very relevant. The garage has an entrance not only from the street, but also from the interior of the house. Thus, you can comfortably go straight to the living room;
- The entrance to the house is a terrace with a low porch;
- Immediately behind the front door there is a vestibule, from which you can go directly into the hallway-living room;
- Another entrance to the living room leads directly from the terrace;
- Another highlight of the house is the presence of large double-glazed windows in the living room, which makes it very bright and gives a feeling of spaciousness;
- From the living room a small staircase leads to the second floor;
- Let's go back to the hallway. In addition to access to the garage, there is an entrance to the bathroom and a separate shower room. And from the shower you can go to the private sauna;
- On the second floor, in front of the stairs, there is a T-shaped hall with a window;
- From it, doors lead to three separate bedrooms, the minimum area of which is 7.4 square meters, and the maximum area is 11.4 square meters;
- For the convenience of all family members, there is another bathroom with a window on the second floor;
- The house is designed to accommodate a family of 2-4 people and it can be argued that for the comfort of each person this house has everything necessary.
Project "Luxembourg"
This project is a functional two-story house with a total area of 96 m2. Its notable feature is the front façade, which is made almost symmetrically and has a comfortable terrace in front of the front door.
- From the spacious terrace you can go not only into the house itself. There is a separate door leading to the technical room. This room, in turn, is completely isolated from the living area;
- Behind the front door there is a vestibule, the configuration of which allows you to fit a small built-in wardrobe;
- From the vestibule the door leads to the hall-staircase, which also provides space for installing a wardrobe;
- From the hall there is an entrance to a fairly spacious bathroom, bedroom and kitchen-living room;
- The bedroom has sufficient area to accommodate a double bed and a wardrobe;
- The kitchen-living room is a rectangle with a large window opening on the central wall. There is no partition between the cooking area and the dining area;
- On the second floor there are two separate bedrooms, almost identical in size, with large windows;
- There is also another bathroom with everything necessary and a window opening;
- Despite the fact that in each room you can easily find a place for a closet, the layout provides for a separate dressing room, with an area of slightly more than 4 square meters with a small window; The house is designed to accommodate a family of 4 people.