In this article I will tell you what a shower drain and shower tray are, and also share my experience in choosing and installing them. If this is your first time on my website, I’ll introduce myself: my name is Evgeniy.
I am an installer of heating, water supply and sewerage systems. I work mainly in private homes; you can get to know me in more detail on the “about the author” page.
A shower drain or tray is a device for collecting water from the floor surface and then discharging it into the sewer. They are called showers because they are often used in showers made using construction methods.
This is when the drain hole is in the floor, the grate is installed flush with the tiles, and the water goes into it when you bathe in the shower.
What is the difference between a ladder and a tray?
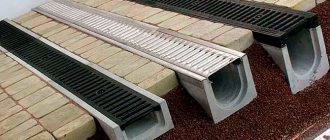
In simple terms, a shower drain differs from a tray in size and appearance. A drainage device with a square or round grate is called a drain. A shower tray is a drainage channel with a rectangular grille.
Since the trays have a larger grid area, they also have a larger area for collecting water from the floor. Many people think that if the shower tray is larger than the drain, then the water will flow into it faster. However, this is not quite true. I'll explain why a little later.
Recommendations for selection
When choosing a special element of plumbing communications intended for drainage of wastewater into the sewer system, you must first of all pay attention to such a very important parameter as throughput indicators, indicating the amount of water that the drain can consistently discharge per unit of time. As a rule, the standard calculation of the required throughput is based on the following data:
- with a diameter of the upper shower head of 300 mm, the average water supply per hour varies between 30-90 l;
- using a cascade shower requires water consumption in the range of 1500-1800 liters per hour.
When choosing throughput, it is advisable to take into account a small margin of 5-10%, which will prevent emergency situations and flooding.
If you need to perform independent installation and have no experience in plumbing work, it is not advisable to purchase round models. It will be quite problematic to perform a perfectly smooth and beautiful installation of the floor covering when installing such a ladder with your own hands.
Corner round drain
Which is better: shower drain or tray?
When customers ask me: Zhenya, I want to install a shower drain in the floor, tell me if I should install a tray or a drain? I usually answer them like this: If your shower is built using a construction method or a shower cabin without a tray, then it is best to install a tray.
It costs more, but it also looks beautiful. If you have a shower with a tray, then I recommend installing a drain in the bathroom. It will come in handy if the flexible line bursts and water starts gushing out of it.
When purchasing and selecting a tray or ladder, be sure to ensure that it has a dry seal. Now I will explain what it is and why it is needed.
Materials
Drains are made of steel or special plastic. Less commonly, models are made from sanitary cast iron. Plastic models are cheaper than steel and cast iron, so they are most widespread. They are easy to clean and are not afraid of corrosion. Plastic sewer drains are simple, easy to maintain and can withstand heavy loads. They are durable and resistant to aggressive environments.
Steel ladders are recommended for installation in premises that are subject to increased requirements. These drains are made entirely of high-strength stainless steel.
Cast iron drains have increased wear resistance and throughput. They are used in the most difficult conditions. Cast iron drains can be installed not only in shower stalls, but also in toilets, swimming pools, and laboratory rooms.
Shower drains can have the following shape:
- round;
- rectangular;
- square;
- triangular;
- oval;
- extended tray.
The most popular are rectangular and square models. They are easiest to fit into the lining of the floor covering used in the shower stall.
Technical device
The design of the drain resembles a glass, in the lower part of which a pipe is welded, which is connected to the sewerage system. The tray, as you may have guessed from the name, has a design reminiscent of a rectangular container. And also at the bottom there is an exit for connection to the sewer pipe.
There are 2 types of outputs: vertical and horizontal. Ladders and trays with a vertical outlet are installed in cases where sewerage pipes run on the back side of the ceiling. With a horizontal (side) exit they are placed where the sewer pipe runs along the same side of the ceiling.
I'll give you an example so you don't get confused. I need to install a drain or tray in a bathroom on the first floor of a private house. If I install a device with a horizontal outlet, I will have to pour a large layer of screed, which should hide the sewer pipe.
Or you can drill a hole in the ceiling and install a drainage gutter with a vertical outlet. And run the sewer pipes along the ceiling of the basement.
In this case, the screed layer on the first floor will need to be poured much less. This is savings. And saving means earning money.
What is a water seal
Each device that is connected to the sewer is equipped with a water seal by default. Sometimes it is also called a wet shutter. Have you seen water standing in the toilet or in the siphon under the sink? This is a water seal.
It is needed to prevent odors from the sewer from penetrating into the room. As long as there is water in the water seal, it will not allow odors to pass through. But as soon as the water evaporates, the room will immediately begin to smell like sewage.
If water takes a long time to evaporate from the toilet or siphon, then water will evaporate from the drain or tray quite quickly. Especially if there is a warm floor nearby. While people bathe in the shower every day, the water seal will trap gases from the sewer.
But as soon as you go on vacation or stop using the shower, the water from the water seal will evaporate and the room will smell. To get rid of this problem, they came up with a dry shutter.
What is a dry shutter
A special valve is built into the design of the drainage device, which opens under water pressure, closes when there is no pressure and does not allow odors to pass through. Valves can be either reed valves or ball valves.
The second ones, it seems to me, work better. The water level dropped, the ball sank under its weight and closed the sewer hole. If water enters the gutter, the balls float.
But reed valves, in my opinion, work worse. After a while, the elastic band becomes “oaky” and stops fitting tightly. If the reed valve is plastic, it may begin to jam in the hinges after a few years.
I note that removing and washing the valve takes 10-15 minutes. So this is more of a quibble on my part than a compelling argument in favor of dry ball valves.
Which is better: a water seal or a dry seal?
I always recommend purchasing a tray or drain with a dry seal. It costs a little more, but protects against sewer smell much better. I am a supporter of the valve with balls, although if the valve blades are made of plastic, then they will work for a long time and without problems.
What tools will you need?
The set of tools that will be required for the work depends on the installation method and the selected materials:
- A mandatory tool is a level. It is necessary to control the slope of the floor plane. You can use a regular building level or a high-precision laser device.
- To apply the markings you will need a pencil and a tape measure.
- You will need to purchase the ladder itself and plastic pipes of the appropriate diameter in advance (usually 50 mm).
- If you are going to install a podium, you will need blocks for the sides, a metal profile, and gypsum board sheets.
- You will definitely need waterproofing material. It can be rolled or in the form of mastic.
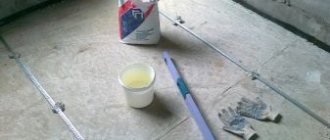
- If you are going to fill the screed, you will need a dry construction mixture, a container for preparing the solution, a mixer attachment, usually a spatula, and a grater.
- For insulation of screeds, extruded polystyrene foam is purchased. You will also need a damper tape, which is installed around the perimeter of the room before pouring the screed. To fix it to the wall, use masking tape.
- To install the front covering you will need: ceramic floor tiles, glue, PVC crosses, grout, tile cutting devices.
- Silicone waterproof sealant.
ceramic tiles for bathroom
Tools for work The set of tools required for work depends on the installation method
Types of drains and trays
Conventionally, they can be divided into 3 types:
Spot
This is a small drainage device with a round or square grid. They are most often called ladders.
Linear
This is a sewer gutter with a rectangular cross-section grate. Sometimes manufacturers, instead of the usual decorative grille, make a tray cover onto which tiles can be glued. Then the tray is almost invisible, and the water goes into the cracks. Therefore, such drainage gutters are called slotted.
Wall-mounted
There are trays that are mounted into walls. Then the water you are bathing under goes into the corner of the wall or into the wall. Therefore, this drainage gutter is often called a wall gutter.
A shower with an inconspicuous tray looks more beautiful, but you will have to pay extra for beauty. Wall drainage gutters are often more expensive than point or linear devices.
Sometimes for wall trays you need to install a separate installation.
What to look for when choosing
When choosing a shower tray or drain, I recommend setting a budget. You can buy a tray for 5,000 rubles, or you can buy it for 80,000 rubles.
However, in terms of characteristics they will be approximately the same. Below I will write my rating of ladders and chutes based on my experience working with them.
If you don’t want to stand ankle-deep in water while taking a shower, then you need to determine the water flow rate from the shower in the bathroom. I had a situation where I installed a tray for water drainage for a man.
And then he installed a rain shower, and the water did not have time to go into the drain hole in the floor. To replace the drain, the tiles would have to be broken, but the customer did not want that.
Even at the stage of installing the sewer system, I told him several times to decide on the shower system so that I could calculate the drainage system. And he waved it off and said that later he and his wife would buy a drain and a shower. So I bought it. Well, at least he had no complaints against me, he understands that he himself is to blame.
We are currently building a lot of frame houses. But they don’t sell ladders for framers. There is a wide variety of them abroad, but no one brings them to us. I don't know what this is connected with. Therefore, ladders and trays designed for installation in the screed have to be built into frame floors.
Stainless steel or plastic
I often meet customers who are sure that a stainless steel shower drain or tray is the best. I have the opposite opinion. I believe that the body of the ladder or tray should be made of plastic.
Stainless steel is steel that contains chromium. It is the layer of chromium oxide CrO that makes steel stainless. When people bathe in the shower, they use household chemicals (shampoos, shower gels, etc.).
Who knows how and how long it will take for these substances to damage the chrome coating? That's right, no one knows this. And as soon as the chromium oxide layer is damaged, the stainless steel will immediately begin to rust.
But this does not threaten the plastic body of the tray or ladder. I met customers who said that plastic is fragile, but you definitely can’t break stainless steel. I don’t know how to argue with such people; in my life I have never seen a drainage channel body break after installation.
If a tray or ladder is built into concrete, then it is practically one piece with it. You can probably break the body with a hammer, but with your foot, even jumping on it, it’s unlikely.
If the body of the drainage device is built into the frame ceiling, then it is also unlikely to be broken. Provided that the ladder or tray is installed correctly and according to the instructions.
Floor with drain: work order
Although the designs of drains are different, all floor-mounted models are installed according to the same principle - the sequence of work is the same.
It is much more pleasant to stand on a warm floor in the shower, which is why a floor with a drain is most often made with a layer of thermal insulation. The best thermal insulation material for this is high-density extruded polystyrene foam. It does not absorb water, does not rot, has excellent thermal insulation characteristics, and can withstand loads normally (it will withstand the weight of the screed and tiles without problems).
You can make a floor with a drain in the shower with your own hands
It is more convenient to work with a level (laser level) that has a plane builder function. It will make the work much easier.
Preparatory work
The first step is to remove a branch from the sewer riser where the water will flow. The sewer pipe is laid with the required slope (2 cm by 1 meter), the socket is placed at the intended location of the drain connection. After the sewer outlet is installed, take a drain and make preliminary markings - you need to mark the height of the screed on the walls of the shower stall:
- We install the level so that it marks the axis of the drained sewer pipe.
- We position the drain so that its axis is approximately 1.5 cm higher than the axis of the sewer pipe (see photo).
The axis of the drain should be slightly higher than the axis of the sewer pipe - After this, we raise the leveling beam to the installation height of the ladder grating (taking into account the fact that another grate will be installed - add its thickness).
- Since normal water flow requires a slope. It is made 1-2 cm per meter long. From the existing ladder grating line upward, set aside the required distance.
Mark the line for laying the screed on the walls - Based on the mark found, we set the leveling beam. This will be the level of screed that must be maintained along the walls. You can draw this line with a pencil or marker.
Now you can measure the height to which you will need to raise the floor in the shower stall. It largely depends on the parameters of the ladder (its height). Based on the obtained figure, it will be necessary to plan the layers of screed and their thickness.
Determining the thickness of screed layers
Usually it is assumed that polystyrene foam 5 cm thick is placed in the screed. The minimum thickness of the screed is 3 cm (more is possible, less is not). This is in the center near the drain; towards the edges it becomes thicker (the required slope is created). From the existing screed height line, we put the resulting figure down (add the thickness of the polystyrene foam and the screed). It will be necessary to bring the rough screed to this level.
From the existing height of the screed we set down the thickness of the insulation and DSP
To reduce the load, the rough screed is made of lightweight concrete. It can be foam concrete or expanded clay concrete. Wet work can be minimized. To do this, you can lay foam blocks at the missing height and fasten them with reinforcing mesh. You can pour a 3 cm layer of DSP on top.
When installing such a base, a damper tape is needed along the walls. Since in the presence of polystyrene foam or any other insulation, the floor may sag a little, it must be made incoherent with the walls. This is why you need a damper tape. It is placed around the perimeter of the base. In height it should be 1-2 cm above all layers.
You can use a special damper tape, or thin foam plastic (1 cm thick or less). Even corrugated cardboard will do. The remaining tape is then cut flush with the screed. She did her job - we got a floating slab.
The poured screed must stand for at least a week - the concrete must gain at least 50% strength. After this, you can continue working.
Waterproofing
To prevent the drain floor from leaking, the shower stall needs good waterproofing. It is better to make it multi-layered. One of the layers can be done at this stage.
Coating waterproofing is usually used. This could be bitumen mastic or special waterproofing for swimming pools. It is applied with a brush in several layers, extending onto the walls at least 30 cm. These mastics form an elastic, waterproof film on the surface without seams or joints. This type of waterproofing is highly reliable.
Particular attention should be paid to the processing of corners. They can even be glued with a strip of rolled waterproofing (such as Gidroizol, etc.). Apply the first layer of coating waterproofing to the walls, then glue the joint between the wall and the floor with roll waterproofing (set on the same compound), and apply another layer on top.
Multi-layer waterproofing is more reliable
For those who like to do everything with a margin of safety, the first layer of waterproofing can be laid even under the first corrective screed. All rules remain the same as described above.
Instead of coating waterproofing, you can use roll waterproofing. But you will still have to lay it on bitumen mastic, lubricating it well and pressing the seams. The approach to the walls is approximately the same - about 30 cm. If the width of one roll is not enough, the panels are laid with an overlap of 15 cm, they are well coated with mastic.
Choosing a place to install a drain ladder
To ensure that the tiles on the floor of the shower stall look at least normal, it is better to position the drain grate symmetrically relative to the tiles. Therefore, first, dry, lay out the tiles on the floor (taking into account the seams). When laying out, remember to step back a little from the walls - by the thickness of the tiles and glue.
It is not at all necessary to make the drain in the center - it can easily be moved to any wall. In this case, the far wall from the entrance was chosen to reduce the possibility of water spilling out of the booth
Next, we choose the position of the ladder so that everything looks good and, at the same time, it is necessary to make a minimum of trimmings. Not only do they take up time, they also spoil the view.
Installation of drain and insulation
The next stage is installing the drain and laying thermal insulation. A drain is placed at the selected location, it is connected by a pipe to the sewer outlet (during installation, do not forget about the slope). After this, insulation boards are laid. It is cut so that the installed ladder can be covered. A damper tape is also required around the perimeter. This time it is better to make it also from polystyrene foam, but taking a thickness less than -2-3 cm is enough. At this level, polystyrene foam will still prevent heat loss into the walls.
Gangway installation
The joints of polystyrene foam are glued with tape (so that moisture does not leak out of the concrete). If there are large gaps, they can be tightly packed with scraps and then sealed.
Filling the screed
A reinforcing metal mesh is placed on the laid insulation. A ready-made mesh of steel wire with a diameter of 3 mm and a pitch of 10 cm is sufficient. It is cut to size and laid on polystyrene foam. Next, they begin to install beacons.
The floor with the drain must be sloping towards the drain. To do this, you need to set up beacon strips. You can use standard beacons (from a hardware store) or wooden planks. They are installed so that their surface sets the required slope.
When the preparatory work is completed, the ladder bowl is oriented along the walls. This can be done using a square. At the same time, you need to align the measurements as you determined during fitting.
Fill the floor with a drain and an installed drain with ordinary cement-sand mortar (for 1 part of cement of a grade not lower than M400), 3-4 parts of coarse sand. To give the coating water-repellent properties, you can add appropriate additives.
The poured solution is left to “ripen”. This usually takes 28 days. In this case, you need to take care of the screed: maintain stable humidity, avoid low temperatures (optimally around +20°C), and avoid exposure to direct sunlight. The easiest way is to cover the piece with matting (an old bag) and/or film. For the first 4-5 days, the surface must be moistened daily. It is more convenient to do this on matting - there are no traces of drops left. After 28 days, you can complete the finishing - laying the tiles.
Installation nuances
When I install a sewer system in a private house, I always make sewer outlets below the ceiling and always install covers.
If the sewer outlet is below the ceiling and there is a case, then bringing the sewer system to the required height at the end of the repair is as easy as shelling pears.
When there is no case, you will have to break the tie to install the ladder. And the sewer pipe will most likely have to be replaced, since during construction workers step on the sockets of sewer pipes and break them.
Is it possible to install a drain in an apartment?
I have had orders where people wanted to choose a floor shower drain under tiles, but did not know whether it could be installed in an apartment building.
The drain in the apartment is simply installed, but be prepared for the level of the screed to rise. Again, I repeat that a ladder or tray with a side exit is suitable for an apartment.
Where should the ladder be in a private house?
The boiler room of a private house must have a drain in any case. I know several people who refused to install it and then regretted it.
Watch the video where we explained why every boiler room should have a drain.
All equipment containing water is collected in the boiler room.
This is an indirect heating boiler , buffer, boiler, collectors, pumps, etc. Every home has some of this. Sooner or later this equipment must be serviced or repaired.
To do this you need to drain the water. If there is no ladder, you will have to run around with rags and basins to remove spilled water from the floor. And if you have an indirectly heated boiler or a ton-sized buffer tank, then you have to bother with hoses to somehow drain the water.
And so the drain valve was opened and all the water drained into the drain. The boiler room must have a drain to the floor anyway.
Installation of tray and ladder
I will say a banal and obvious thing: whoever will install the drainage device must read the instructions for it. Usually everything is written there in clear and accessible language, what, how and in what sequence needs to be done.
Video of step-by-step installation of MIANO shower tray
Most importantly, do not forget to waterproof and maintain the slopes of the sewer pipes.
Watch the video to see 7 mistakes made when installing sewer systems.
But if you still have questions, write them in the comments. Perhaps then I will edit this article and write step-by-step instructions for installing a drain and shower tray with pictures or make a video.
Changing the floor height to install a drain
The height of the shower drain starts at 6 cm. In addition, the device must be tilted when installing it to ensure effective water removal. Therefore, in some cases it is necessary to raise the floor to a certain height. The top point will be the plane of the device's drain grate. When choosing a new floor height, take into account the height of the drain, which is selected taking into account the area of the shower room and the intensity of its use.
In addition to the height of the ladder, the thickness of the rough and finishing screed, insulation, and waterproofing material is taken into account
Changing the height of the bathroom floor is done in different ways. The choice depends on the material and condition of the ceiling.
Choosing a screed
The easiest way to make a floor with a slope is to use a screed. However, this option is not suitable for weakened floors, since the “wet” screed has a lot of weight (approximately 15 kg per 1 m2 at a height of 1 cm). Therefore, it cannot be used in old houses.
Forming a slope for a “wet” screed
It should also be taken into account that when installing a “wet” screed, it will take time for it to “mature”. Another disadvantage: installing a traditional screed is a “dirty” process.
Traditional “wet” screed in the bathroom
Extruded polystyrene foam will help lighten the cement-sand screed - these are slabs that, unlike foam, retain their shape under the weight of the screed and have heat, sound and waterproofing properties. The result will be an insulated floor. The height of such a screed is at least 3 cm. This floor design is used when installing a “warm floor” system. For an apartment, it is better to choose an electric heated floor - it is faster to install and if we are talking about a small area, then you don’t have to worry about a high electricity bill.
"Warm floor" in the shower
To install a screed on a weak foundation, you can use lightweight concrete (polystyrene concrete and other varieties). This will also make it possible to resolve the issue of insulating the structure without the use of additional materials due to the thermal insulation qualities of the composition. It makes sense to use this composition to create a rough screed - the weight of the floor cake will be reduced and its insulation will be ensured. Together with the main screed and other layers of the structure, the required height for installing the ladder will be 120 mm.
Wooden structure
Installing a wooden podium will reduce the load on the floor. The main thing is to properly treat the wood with moisture-proofing compounds and choose a species that is resistant to a humid microclimate.
When installing logs, choose their arrangement – “envelope”. In the center, determine the place for the drain hole. To fix the lags in the screed, holes are drilled for the studs in increments of 300 mm. Logs are attached to the studs taking into account the slope. If necessary, the tree can be cut down towards the drain. Moisture-resistant plywood 1.2 cm thick, a sheet of moisture-resistant plasterboard, a waterproofing layer and cladding (tiles) are attached to the joists on top.
Scheme of laying logs in the shower
Another option for forming a slope on a wooden or concrete floor involves adjusting the thickness of the tile adhesive. This method is recommended for small rooms and showers. The advantage of this method is its light weight, but the disadvantage is that it is labor intensive.
Note! The only technical characteristic of the ladder is its throughput. It should ensure timely removal of water; liquid should not accumulate and “stand” in the pan.
Special equipment will allow you to lay tiles with high quality
Rating
My rating contains water drainage devices only from those manufacturers whose products I have ever installed. Based on my experience, I can say that European manufacturers all make good products; when purchasing, you need to look at the price and equipment.
And so they are more or less all the same. I do not recommend purchasing cheap Chinese and Turkish trays and ladders. Replacing a drain costs 10-20 times more than the cost of the product + installation. I think it is better to initially buy a higher quality product.
My rating of point drains
Shower drain Tim BAD011002
This product has 2 advantages:
- Low cost, about 500 rubles;
- Small height - 67 mm.
Among the disadvantages: the ladder must initially be set exactly at the height of the finishing floor covering. No dry shutter. Of the 4 drains purchased by the customer, 3 leaked at the welding site. Maybe it was a defective batch, but I installed these ladders only once and didn’t risk it again.
Bath drain, shower drain TECE S110
Several times we had to install such ladders. When purchasing, you need to look at the package. The set may not include legs and a dry siphon. I can’t say anything bad about this ladder, but, in my opinion, the price is a bit high.
Drain drain AlcaPlast
The Czech manufacturer AlcaPlast produces many products for draining water. Among everything I've put on, this is a solid average. On the one hand, the plastic is flimsy, on the other hand, there have never been any problems with these ladders and trays.
Point shower drain Aco
These products are of high quality with an increased throughput of up to 120 liters per minute. Suitable for any rain shower. The cost is also high. I installed them several times, but they were strong and reliable, but expensive.
Viega Advantix shower drain
I like these ladders most of all due to the price-quality ratio. That's why I installed them most in my life. I don’t know the exact number, but I definitely supplied a couple of hundred pieces. There are no problems with them. Dry shutter included. The plastic is strong.
My rating of shower trays
Drainage channel AlcaPLAST Simple
Pros: good quality plastic. Waterproofing tape included. Combined siphon, when water evaporates, no odor will appear in the room.
Disadvantages: I didn’t like how the legs were adjusted. Low flow rate: 28 liters per minute. I wouldn't install one like this for a rain shower.
Gutter trays ACO (Ako)
They are made in Germany from high quality stainless steel. This is a premium brand, so they are relatively expensive, but there are several budget models. I only installed this once. I can't say anything bad.
Drainage channel TECE TECElinus
They also make it in Germany and the price is also high: trays from 15 thousand rubles and a grill will cost another 5 thousand. I can't say anything bad, but it seems to me that the price is too high.
Shower tray Viega Advantix
Made in Germany. Drainage channels were made of stainless steel or plastic + stainless steel. Good quality. I have never had any problems with the products of this brand, I recommend it for purchase . But the price tag is also not cheap and starts from 15 thousand rubles.
MIANO gutter trays
Over the last year I have been recommending them to all my customers. Made in the Czech Republic. The plastic is strong. There are cases in charcoal black, which looks cool. Everyone usually has gray plastic.
Drainage channel complete with water seal and dry seal. High flow rate: suitable for rain showers.
Convenient adjustment of legs during installation. They can be twisted directly through the body with a screwdriver. This speeds up installation of the tray significantly.
Waterproofing included. At the same time, the price tag is average. In my understanding, these gutters are ideal in terms of price-quality ratio.
I buy MIANO shower trays in the Akvamosaika online store ; these products are not sold in offline stores in my city.
Structural characteristics and purpose
The shower drain belongs to the category of complex plumbing devices, and is fixed directly to the pipeline through a special floor hole. This design includes:
- funnel-shaped water inlet or housing;
- siphon, responsible for creating an effective hydraulic seal;
- a flange through which the waterproofing membrane part is sealed;
- a grate that prevents clogging and failure of the sewer system;
- outlet coupling part connected to the drain part of the sewer system.
Drain drain assembly diagram
During operation of the drain ladder, the entire device must be securely fixed, and the removable part is represented only by a lattice cover. Most shower drain devices are installed in the floor, but some models are built directly into the wall.
Decorative drain gratings
Despite their apparent simplicity, drainage structures have a wide range of functionality:
- transport the water flow to the sewer riser;
- provide optimal tightness of the joint with the floor;
- carry out primary filtration of wastewater and prevent sewer clogging.
The built-in hydraulic seal prevents all unpleasant sewer odors from entering the room.
Conclusion
In this article I shared my experience and opinion, which is very subjective. I have ordinary customers, so I rarely supply premium products.
I always try to balance price=quality.
You can safely choose products from a popular and well-known European brand and it will work for you for quite a long time.
Don't go for the cheap stuff. When you make a shower drain in the floor and water leaks somewhere under the tiles, dampness and fungus will appear. This will be quite expensive to fix. As I already wrote above, replacing a tray or drain costs several tens of times more than the cost of the product and the work to install it.
I wrote my reviews about ladders and trays and talked about the nuances. If you found the article useful, please like it and ask your questions in the comments.