Greetings, my dear readers.
Sorry I haven't written for so long. A whole bunch of problems have accumulated, both at home and at work, not only did I sit without the Internet for two weeks - death, melancholy.
Today I will tell you the secret of the ancient diggers and teach you how to dig a hole correctly - in case it comes in handy for someone! It doesn’t matter whether you’re digging or digging, it doesn’t matter what you’re digging for - you’re digging a shambo, a drain hole for waste products, a sewer, you’re digging a hole for a garage or a toilet - the main thing is that you must understand that after reading this article you will become a digging Jedi, only damn, instead of a laser pointer you will have a shovel! So, let's get started my tireless hands!
We made the markings, again I will repeat to you that it doesn’t matter why you are digging, even just for the sake of it. What a romance - he took a shovel and went. As my grandfather said, and his grandfather told him - dig deeper, throw further, rest while you fly!
So, my one-assed, two-bunched creatures - let's look at all the options through the prism of a shovel!
At what horizon should we dig a well?
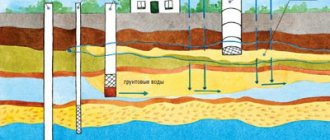
Aquifers can occur at several levels. The topmost one is usually located close to the surface of the earth. This layer is called perchal water. It may be contaminated by agricultural chemicals, fecal bacteria from sewage, etc.
Verkhodka is not suitable for feeding a well, unless the water is planned to be used exclusively for technical purposes or for watering garden plants. It should also be taken into account that during seasonal changes the amount of water can significantly decrease or increase.
Wells are dug into the groundwater horizon. This aquifer lies below the perched water. The water in it is often free-flowing, so its level in the well is the same as in the aquifer. During the construction of hydraulic structures, groundwater is cut off from the perched water layers to protect it from pollution.
An aesthetically designed well will not only provide the site with water, but will also decorate the local area
Artesian waters lie below groundwater. Wells are not dug to this horizon, and the construction of wells is very expensive. In addition, you have to obtain a permit to use water resources.
Artesian waters are pressure waters, so the water level in the well is higher than in the horizon, and even gushing is possible.
Different zones of the same aquifer may vary. They have different chemical compositions, temperatures, and differ in degree of purity. Therefore, it is imperative to have your water analyzed, even if there are wells nearby dug to the same level and the water in them is good
Open method steps
For the quality of the result, it is important that after completion of digging the mine does not stand idle without a well for more than 3-4 days. In the open air, the soil on the walls begins to dry out, and they may collapse. It is highly advisable to involve three people: they will be able to take turns (two working, one resting), and quickly complete the work.
To dig a well in a country house using open technology, the following steps are performed sequentially:
- After marking the diameter of the future shaft (with a margin of 10 cm), they dig the shaft to the depth of the aquifer.
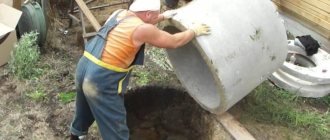
- Using a winch, install the first ring. Be sure to check whether it stands vertically: a minimal distortion of the base will affect the quality of the entire structure.
- The next ones are installed on top of the first ring. Each joint is laid with sealing material; it is better if it is hemp or jute rope impregnated with fiber rubber. Such waterproofing requires additional protection, so the seams are covered with cement mortar.
- Water is scooped (or pumped out) from the bottom, the well is left to fill for a day, then the water is removed and left again.
Installing the ring in the shaft Source ytimg.com
Finding a place for a water source
When building a well, it is important to correctly determine the depth of the horizon of clean drinking water, calculate and purchase the required number of concrete rings, equipment for arranging the hydraulic structure itself and the water distribution system. It is also important to choose the right place and time to dig a well.
Choosing the right location for a well depends on several factors:
- Geological exploration data . There are many ways to search for water in an area, but nothing more reliable than geological studies of the area has yet been invented.
- Information about nearby sources. It would be a good idea to ask your closest neighbors how deep their wells are built and what the quality of the water is.
- Suitability of water for drinking. It is imperative to submit a water sample for chemical and microbiological analysis to the nearest sanitary station. Experts will determine the concentration of chemicals and the presence of pathogenic bacteria.
- Soil type. The complexity of digging wells, the need to use special equipment, etc. depend on this. Ultimately, all this affects the cost of the finished well. It is most difficult to build a well on rocky soils.
- Terrain. The greatest difficulties arise when building a well on a hillside. The ideal option is a flat area.
- Distance from sources of pollution . Wells are dug at a considerable distance from cesspools, septic tanks, compost heaps, and barns. It is undesirable to place them in lowlands where rain and melt water flows, as well as water mixed with agricultural fertilizers.
- Degree of distance from home. The closer the water source is to the house, the more convenient it is.
In this case, the excavation should be placed so that it does not interfere with travel or block access to outbuildings or utility rooms.
The optimal distances are shown in the diagram below.
When constructing water supply and sewerage, you should focus on SNiP 2.04.03-85. This is necessary to prevent contamination of drinking water sources, erosion of building foundations, and disruption of systems.
Types of septic tanks
The simplest septic tank is a cleaning structure consisting of a single container - it processes wastewater using microorganisms. However, this option can be used provided that no more than two people live in the house. Read also: “How to make a drainage hole correctly in a private house.”
A two-chamber septic tank has a more complex design. The waste liquid first flows into the first container, where large waste settles. Then the bacteria begin to process the contents. The first chamber is connected to another container via a drain pipe. Thus, a fine-grained, purer liquid enters the second part of the septic tank. There the wastewater finally settles.
The second tank has a similar device as the first part of the treatment plant. In it, bacteria continue to process wastewater. Both chambers are cleaned approximately 1-2 times throughout the year. The output from the septic tank is water that is quite suitable for use for technical purposes, for example, for irrigation. It can also be dumped into a nearby body of water.
Features of wells of different designs
There are two types of structures – shaft and tubular. The first option is much more widespread, because Construction of such a well is usually cheaper and more convenient to use. The shaft structure is universal, and water can be raised using buckets, hand and electric pumps.
Another advantage of the shaft structure over the tubular one is the ease of construction. You can find out how to dig a mine well with your own hands by reading specialized literature and articles.
If desired, everyone can take their advice and dig and arrange a quality water source on their own.
A column, or tube well, is a shallow well, the walls of which are lined with a pipe, and the water is raised using a manual or electric pump
A tube well is built if the aquifer is located shallow, and the owner can use drilling equipment. The advantage of a tubular structure is faster construction. Due to their small diameter, tubular structures are less polluted. They can be built next to residential and commercial buildings.
Both types of wells have their own advantages and disadvantages. When choosing a suitable design, you should take into account all the nuances. Since it is easier to build a mine well without the use of special equipment, in the future we will consider the issues of digging just such a source.
Video description
About fastening well rings with staples in the following video:
- Crowbar, pickaxe. They will be needed if you come across a layer of dense or rocky rock.
- A bucket and a cable for lifting soil, a wheelbarrow for removing it.
- Rope ladder for descending into the mine, lantern, tape measure.
- Winch or well gate, slings for installing rings (for the open method). Mechanization can also be used to lift soil to the surface.
- Vertical control tool. The easiest way to check the vertical is with a plumb line with a cord; you can use a construction spirit level (level).
- Drainage pump for pumping out water entering the mine.
- Tool for sealing seams.
- To attach the brackets you will need a hammer drill and bolts.
Digging a mine requires compliance with safety regulations: it is recommended to work with a partner: one performer is underground, the other is insuring from above. Safety precautions also require the use of a helmet and a safety belt with a cable.
Preparing the ring for descent Source kanaliza.ru
The best time to start construction
When is the best time to dig a well? If you start work in the spring, after floods, you can make a mistake with the depth of the mine. Groundwater is rising, and until its level drops, it is not advisable to dig. Otherwise, there may be a need to deepen the structure, because There will not be enough water in summer and winter.
The autumn rainy season is also not the most favorable time for building a well. But in the summer heat or winter it is quite possible to start work. During these periods, the water drains away. If you can build a working well, it is guaranteed to maintain productivity in other seasons.
Winter construction is complicated due to soil freezing, but in summer or early autumn nothing prevents excavation work from starting. However, there is one exception. If the well is built on quicksand, it is better to dig it in winter.
The first frost is not an obstacle to building a well. You can start work even if the first snow has fallen. The main thing is that the soil does not freeze too much
What you need for work: materials and tools
Before digging a well by hand, you need to prepare the following materials:
- Reinforced concrete rings of suitable diameter (usually 1 m). As for the height, it is better to choose the minimum: this will not affect the quality of the structure, and it will be more convenient for you to move and install them. Rings of small height have a disadvantage: there will be more seams, which means it will take more time to seal them.
- Materials for the bottom filter: gravel (fine and coarse fractions), sand.
- Fastening material for joints of rings: thrust staples (three staples for each joint), cement mortar for sealing seams.
- Materials for waterproofing.
You will need the following tool:
- Shovels with a shortened handle: bayonet for digging, scoop for excavating soil.
Tools for excavation work Source termopaneli59.ru
Construction and arrangement of a mine well
Most often, shaft wells are built from ready-made concrete rings. This is the most convenient option. The design is strong, reliable and can last for several decades. It is better to carry out work on the construction of a well by two or three people.
Lifting mechanisms will be required. You need to install a tripod with a winch or winch. With its help, buckets with dug up soil are lifted up and concrete rings are lowered into the hole. You will also need strong ropes, cables or chains.
First of all, you need to calculate the desired diameter of the well. The optimal option is 1 m. For this design, standard rings are used. It is better to choose products of small height. This will make it easier to install them one on top of the other. At the same time, you will have to spend more time sealing the seams, because... there will be more of them.
Penetrating materials are often used to waterproof drinking wells. The compositions of the Penetron system are very popular.
How to make the walls and bottom of the structure?
To arrange the walls and bottom of the structure, you need to follow the following instructions, which are not complicated:
- Dig a hole 0.5–1 m deep. A shallower or greater depth will be inconvenient for work.
- Install the first ring. The ideal option is installation on a cutting shoe.
- Dig the bottom of the hole, removing soil evenly over the entire area of the shaft.
- When the ring is deepened, install the next one and fasten it.
- Continue working until you reach the aquifer. This usually takes several days.
- The signal that you have reached the aquifer is the water at the bottom of the shaft. It's dirty and muddy. To clean it, you will need to pump out the water and install a bottom filter.
- When the shaft is ready, remove water and dirt with buckets or a pump, go deeper another 10-15 cm, and level the bottom.
- The bottom of the well should be covered with a 25-centimeter layer of sand. It is best to choose river, coarse-grained. The next layer is fine crushed stone. Its thickness should be at least 15-20 cm. The last layer is large crushed stone. The thickness is the same.
Crushed stone should be disinfected with a weak lime solution before laying. It is not always convenient to place the bottom filter directly on the bottom of the pit. It happens that the soil is too liquefied due to too much water. In this case, first lay a boardwalk with gaps, on top of which a bottom filter is poured.
When the structure is ready, the water is pumped out. After this, you need to wait until it fills up and pump it out again. This procedure is repeated several times until the water is cleared. Now you can take a sample for laboratory analysis.
We also recommend that you read the article about the causes of cloudy water in a well and how to eliminate it.
In addition to the usual bulk materials, you can use zeolite or shungite to construct a bottom filter. This is an expensive pleasure, but the water in the well will always be clean and fresh
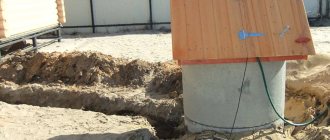
External waterproofing – clay castle
As external protection against water, the so-called clay castle. It is necessary to cut off the perched water and prevent rain and melt water from entering the well. The clay castle can hardly be called an impeccable structure. It can contribute to deformation of the well structure, because changes in volume.
To achieve good external waterproofing, roll materials are often laid, the surfaces are treated with liquid glass, and then a clay castle is made. This results in double protection from moisture. This leads to higher construction costs, but helps maintain water quality.
For the castle, choose clay with a small sand content - up to 15%. It is frozen out by leaving it outside during the winter. Then the material is mixed with lime (4 parts clay and 1 part lime), thoroughly mixed until a homogeneous plastic mass is achieved.
The “correct” clay does not crack if you make a lump out of it, does not spread, and holds its shape perfectly. It is placed in a trench dug around the well. The width of the trench must be at least 0.5 m, and the depth - 1 m. The walls of the trench are reinforced with formwork.
The clay castle is laid in layers of 15-20 cm. Each layer is well compacted. When the clay castle is ready, it is covered with geotextiles, and concrete or paving slabs are laid on top. External finishing is necessary so that the clay does not become limp during rains and does not turn into a dirty mess.
A clay castle is the cheapest way to protect a well externally. Often the material can be obtained for free or for a nominal sum.
Arrangement of the well head
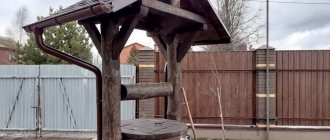
The above-ground part of the structure should rise by 0.7-1 m. The easiest way to arrange it is to install an additional concrete ring. The junction of the underground and above-ground parts is well sealed.
The concrete ring does not look very aesthetically pleasing. Therefore, to improve the appearance of the head, they are often trimmed with wood or stone, and houses are built that completely or partially cover the above-ground part of the structure.
Image gallery
Photo from
Mounting brackets in the well shaft
A pipeline is laid between the house and the well
Rubble stone well head
Airlift for lifting water from a well
Be sure to install a lid and canopy over the well. This is necessary to protect the water from rain, snow, debris, and insects. The tighter the lid closes, the better. Otherwise, the water can quickly become polluted and rot, becoming dangerous to human health. Also, to avoid interruptions in water supply during the cold season, the well must be insulated for the winter.
A canopy is often made in the form of a gable roof made of boards, clapboards, sheet metal or tiles. There is huge scope for imagination here. The upper part of the well can be decorated so that the structure turns into a spectacular landscape decoration.
Even if water from the well will be supplied to the house by pumps, it is advisable to install a mechanical device to raise it. This will help provide your home with water in the event of prolonged power outages.
Classic options are crane and collar. The first type of construction will look perfect on a site decorated in a “rustic” style. The collar is universal. It can be built from ordinary logs and decorated in any way you like.
A suitable piece of log can be used as a gate. It is installed on vertical posts and secured
Mine digging technologies
A shaft well is built without the use of a drilling rig. Not so long ago, stone, brick or wood were used to strengthen the walls of the shaft; today it is more convenient to do this with the help of reinforced concrete rings. There are two ways to dig a well yourself - open and closed.
The open burial method is considered the most suitable for soil with a dense structure that is not prone to crumbling. First, they dig a shaft to the depth of the aquifer; if necessary, strengthen the walls. The diameter is planned to be 10 cm larger than the outer diameter of the concrete ring. Reinforced concrete rings are installed, joints are sealed, and a bottom filter is installed.
The technology of the closed method (another name is “in the ring”) is chosen if the site has sandy soils, and the risk of collapsing the walls of the shaft makes the work more labor-intensive and dangerous. The closed method requires more effort, but is much safer.
The essence of the method is that a shallow hole is first dug. The depth of the hole depends on the quality of the soil; usually, this is a range of 0.5-1 m. Then the first ring is installed (the diameter of the shaft is made equal to the diameter of the installed reinforced concrete product).
Clarification of the size of the future mine Source wrc-info.ru
After installing the ring, they begin to sequentially remove soil from under it; The ring begins to fall under its own weight. When the first ring is hidden underground, a second one is placed on it, secured, and the soil continues to be selected; they do the same with the rest. It is important to monitor the vertical arrangement of the rings: if the vertical is broken, the movement will stop.
How to make filter shields with your own hands
Wood
You will need about one cube of board. The tree must be chosen carefully:
- Aspen is the best material. It does not rot, even if it is constantly in water. In addition, aspen itself does not absorb moisture. But when it passes through the tree, it is disinfected.
- Oak is a very durable material. You practically won't have to change it. Such a bottom shield will last 15–20 years. But there is also a significant drawback of such wood - the water becomes sweetish.
- Larch allows water to pass through quite well, even if the gaps between the boards are small. However, it also rots very well and absorbs water. You will have to change it every two years.
Other types of wood, such as birch or spruce, are not suitable for making a shield.
- It is necessary to knock the boards together so that you get a square - larger than the outer diameter of the well ring.
- Leave a space of 20–30 mm between the boards. This is necessary for a stable passage of water.
- Then we cut a circle slightly smaller than the inner diameter of the well trunk, about 2–3 cm. It is advisable to wrap the finished product in geotextile.
- Now you can lower it into the well. This is done vertically to the very bottom, and only at the bottom is it unfolded and laid flat. To prevent it from floating, large stones are placed on top and only then filter layers.
Metal
Only stainless steel or galvanized reinforcement or mesh should be used. You can take a galvanized pipe with a diameter of 15 mm and assemble a grate from it, laying it on top of each other and tying or bolting it together.
Leave the grid cell 2 by 2 cm. You can also use a multi-level grid layer. And they also drop to the bottom. The iron shield need not be loaded with stones. However, it must be secured so that it does not sag. To do this, several holes are drilled in the wall of the ring at the level of the filter and reinforcement or long bolts are inserted into them, to which the shield is subsequently attached.
Simple Projects
Below are general algorithms for constructing the simplest structures of well houses.
Over-well house made of wood
A superstructure wooden house is the easiest to make. The configuration of this design looks like this:
- The base frame is made of timber 100x100 mm.
- The left and right triangular panels are the sidewalls (similar to the roof gables). The panels are made on a frame from 25 or 32 mm edged boards, and a 100x50 mm beam is nailed perpendicular to the base as a strength element. In the upper part of each beam and shield, a hole is drilled into which a metal bushing for the gate is installed (in a modern version, the bushing can be with a bearing). For ease of installation, the sidewall on the handle side can be made of two parts - the lower (larger) in the form of a trapezoid and the upper in the form of a closing triangle.
- A quadrangular rear roof slope with a longitudinal arrangement of boards from the ridge to the bottom and two cross members (they also serve as stiffening elements).
- Quadrangular front roof slope. It differs from the back one by the presence of a door (or opening if the house is semi-closed).
- A gate made of rounded logs with a handle on one side and an axial rod on the other.
- A block for the upper connection of the slopes (can be triangular or semicircular).
Note. The specific dimensions depend on the size of the well neck and its elevation above the ground.
Assembly can be carried out on site or on the ground. But in both cases you need an assistant. The sequence of work looks like this:
- Install the base frame and level it horizontally. When installed in place, it is fixed to the top ring or well crown.
- Place one of the sidewalls on the frame, level it vertically, and nail it.
- The second side panel is mounted in the same way.
- Install the gate into the bushing holes in the sidewalls.
- Check the perpendicularity of the sidewalls to the base and nail the tie bar on top.
- The rear slope is nailed to the frame, sidewalls and connection.
- The front slope is nailed to the frame, sides and connection. Hang doors if necessary, and mount shelves for buckets inside.