Wood, being an environmentally friendly material, not only effectively retains heat, but also gives the air in the room a special aroma.
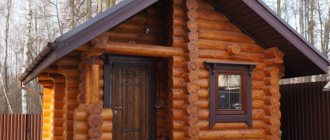
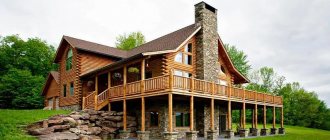
DIY sauna log house
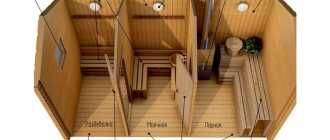
Log bathhouse 4x6 m
To build a wooden bathhouse, you must first prepare the timber.
Method #2. Complete replacement of the lower crowns
A complete replacement of the crowns can be performed not only in the manner described above (with the gradual removal of all parts of the damaged log).
The new crown will be more durable if it is made from whole logs rather than from pieces. To do this, the walls of the log house are raised using jacks, the damaged lower crowns are removed, and new logs are installed in their place. This method involves displacing the entire structure of the sauna log house, and therefore requires preparation.
Preparatory work before raising the frame
- Window glass and frames, door frames are removed so that they do not crack during the lifting of the frame.
- All heavy furniture is removed from the bathhouse; ideally, the log house should remain empty.
- If the floor joists are embedded in the lower crown, then they are dismantled. In structures where the logs are laid above the lower crown, the floor can be left untouched.
- The chimney is separated from the ceilings and roof. Otherwise, in the process of raising the log house, they may be damaged by the heavy chimney pipe.
- Those crowns of the log house that will not change are secured and fixed. To do this, at a distance of 50 cm from the corners of the log house, on each wall, boards (bars) 40 mm thick are nailed vertically. The lower edges of the boards should end at the level of the end of the logs of the crown that is not subject to replacement (second from the bottom). The upper edges are fixed on the logs of the uppermost crown. The boards are nailed both on the external and internal walls (across the entire log house - 16 boards, 4 on each wall). From below and from above, each board is secured with through dowels. Such fixation is necessary so that the walls of the log house do not move when they are lifted on jacks.
Once all the preparatory work is completed, the walls can be raised and the repair of the lower crown can begin.
Progress of work on replacing the lower crown of the log house
If the log house stands on a strip foundation, proceed as follows:
- A log frame consists of two logs (top and bottom) connected in a corner joint. The first step is to determine which logs in the crown being replaced are the top ones. Jacks will be installed underneath them. Here, retreating 0.7 - 1 m from the corner of the house, an opening 40 cm wide is knocked out in the foundation. Opposite the opening, a part of the lower crown log is cut out. The overall height of the resulting niche should allow a jack to be installed there.
- Two such niches are cut out on two opposite walls, at equal distances from the corners.
- Install jacks, from 2 to 4 pieces. The available quantity will allow you to either lift the entire frame at once, or each wall one at a time. Less distortion can be achieved if you lift all the walls at the same time - by installing 4 jacks under two opposite walls (2 pieces on each).
- Using jacks resting on the upper logs of the crown bandaging, the frame is raised by 7 - 10 cm.
- The lower logs of the dressing are released and removed. Temporary supports (logs, concrete blocks, bricks, boards, etc.) are installed under the opened lower logs of the second crown.
- The jacks are lowered. The upper logs of the crown being repaired are also lowered along with them. They are also removed. Instead, new logs are installed and immediately pressed with jacks.
- Temporary supports under the lower logs of the second crown are removed. New logs are laid on the foundation (the lower ones are tied).
- The jacks are lowered slowly and synchronously, placing the upper logs of the dressing on the lower ones. The gaps between the new logs and the second crown are sealed with tow, moss or jute (caulking is performed).
This completes the replacement of the lower crown.
If the log house is on a columnar foundation, replacement is easier:
- Jacks are installed between the foundation columns on which the upper logs of the lower crown frame rest. 2 pcs. on the wall. In this case, the jack must be installed on a solid base, for example, on a board made of boards (dimensions about 50x50 cm). The head of the jack rod should rest on the log through the metal plate.
- The jacks are lifted. Next, perform the same steps to replace the lower crown as in the presence of a strip foundation. That is, the difference in replacing the crowns of log houses with strip and column foundations is only in the method of installing the jacks. To do this, the strip foundation must be partially destroyed. There is no need to destroy the columnar foundation. It is “intermittent” in design, so there is enough space between the posts to install jacks.
See the diagrams below for more details.
Cost calculation
How much does it cost to build a bathhouse? Before starting construction, it is necessary to calculate the estimate. This is required to make it easier to calculate upcoming expenses. To do this, you need to make a list of works:
- Creation of a planning bath project. In this matter, you cannot do without the services of an architect. He will independently make and prepare all drawings in accordance with the client’s conditions. A typical bathhouse design 6 m by 6 m will cost 8,000 rubles.
- Foundation. The cost of the necessary materials will depend on the point of purchase.
- Walls and roof. To do this you will need to buy a roofing covering.
- Communications. These include conducting electricity and water. This is one of the most important work during construction.
- Furnace installation.
- Carrying out finishing work.
In addition, funds will be needed to heat the bath and insulate it.
Of course, preparing an estimate and the cost of construction will not show the exact costs, since the prices of the materials used vary.
Undoubtedly, self-construction will cost much less than professional construction (specialized companies require at least $20,000 for the construction of a bathhouse).
Features of repair of some structures
Repair of bath walls
If the condition of the building is quite satisfactory, then it is worth considering carrying out repair work. First of all, the walls are repaired. If the bathhouse quickly loses heat, then most likely there are cracks or cracks. Even if no through holes are found, the walls need to be insulated. You can use mineral wool for this.
New window installed
Then you should take care of the windows and doors. In old baths they are most often made of wood. If the building has served for several decades, then the windows and doors may become deformed, then they will have to be restored and insulated. It is best to remove old structures and replace them with plastic products. Such windows and doors will last much longer.
Interior decoration is no less important. Very often it is she who fails in the first place. There is a lot of moisture inside the bathhouse, and the wooden finishing of the walls, ceilings and floors (which is what is mainly used in bathhouses) begins to rot and warp.
Replacement of insulation and wall covering
In an old bathhouse, it is better to remove all the old interior lining. Then it is necessary to install the thermal insulation layer. Basalt wool is best suited as insulation. It does not burn and is not afraid of moisture. Then a layer of foil material is laid.
Particular care must be taken when covering walls. If work is carried out in a steam room, then it is advisable to use hardwood paneling. Many experts recommend sheathing with alder material. To decorate the walls in the washing area and rest area, you can use softwood lining.
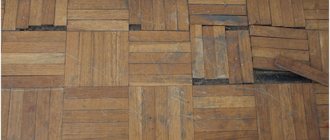
Bathroom floor repair
More often than others, the floor in a bathhouse has to be repaired; it is the floor that is exposed to water more than other elements. Floors can also be insulated. You can choose penoplex as insulation for a steam room; polystyrene is suitable for other rooms. The floors are then covered with moisture-resistant hardwood boards.
Gangway installation
When repairing flooring, pay special attention to the sewage system. Even if it worked properly, when opening the floor, it is better to clean it or even completely replace it
One of the options can be seen in the video.
Repairing the ceiling in the steam room
The ceiling also needs to be insulated and covered with a layer of foil material. For cladding, you can use coniferous boards.
Wall treatment
Since almost all the interior decoration of the bathhouse is made of wood, it needs to be protected. For this purpose, special antiseptic impregnations are used. They need to process all wooden elements, not only the outside, but also the inside. This will prevent premature rotting of the wood.
Furnace repair
A very important part of the bathhouse is the stove. If it fails, it is better to replace it with a new one
It is worth paying attention to some points:
- Firstly, the power of the stove. It should be enough to create the optimal temperature.
- Secondly, the firebox design. Today, designs are often produced that can be heated from the dressing room. Such stoves are more convenient.
- And, of course, we must not forget about fire safety.
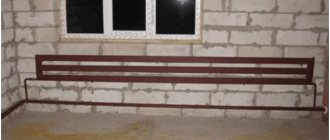
Protected wiring in the bathhouse
When carrying out repair work, do not forget about the lighting system. It is better to immediately replace old wiring, sockets and switches with new ones
In this case, special attention should be paid to safety. Water and electricity are bad neighbors
Therefore, all wiring and electrical appliances must have the necessary degree of protection.
Finishing work. Conducting communications
Step-by-step construction of a bathhouse with your own hands also includes finishing work. These include finishing internal and external walls, if necessary, finishing the floor. The final stage of work includes communications. It conducts electricity and water.
Much attention should be paid to the installation of the stove, because it requires compliance with a large number of fire safety standards and requirements.
At this point, the construction of a bathhouse with your own hands can be considered complete.
ANTISEPTIC AND BLEACHING OF WOOD
Today, antiseptics and wood bleaches are available with different compositions and effects. There are light antiseptics for wood with slight darkening. There are antiseptics with deep (up to 20 mm) penetration. In our case, the depth of the lesion in some places reached 40-50 mm. We selected several strong antiseptics and conducted trial tests on our wood. Having determined a suitable composition, we began chemical treatment. For better penetration, paint brushes were used.
After two treatments, much of the blackness had disappeared, but the surface of the cedar logs had acquired a grayish-pale tint. After the antiseptic had dried (2-3 days in good weather), the logs were sanded with fine-grained sandpaper.
The logs looked noticeably refreshed, but the blackness in the cracks and in some local areas still remained. For preservation (protection from rain and sun) until the next stage (final painting), the frame was covered with paint in one layer.
Old log house What to do with him? Reconstruction or demolition?
Thanks to the new trim, we straightened out all the sides and corners of the house. The sunken logs and distortions disappeared. The old log house was treated with antiseptics. We installed additional communications into the house. Due to the lathing on which the house block was mounted, the walls were strengthened, placing the house, as it were, in a frame. The updated façade has sparkled with new colors, and the owners of the house can still live for a long time in such a home without investing in new construction.
And it seems like there is a house, “No breaking, no building,” but finances still may not allow it. Is the game worth the candle?
The photo below shows our customer's house.
Is he thinking about reconstructing or demolishing?
old log house of our customer old log house of our customer
Here the question arises in this way. If the existing quadrature is enough for you and you have no desire to increase the height of the log house or add an attic floor, then you will not have to strengthen the foundation or definitely change the lower crowns, but it will be enough to make cosmetic repairs inside and out.
Quick installation and a presentable appearance for the facade can be achieved by covering it with wooden siding
Using our work as an example, we show how beautifully and adequately you can transform an old log house.
Customers contacted us with possible options for updating the log house. At the beginning, the option of resurfacing and repainting the log house was discussed. And having considered the option of finishing the facade with a new block house and painting it on site in the desired color, it turned out to be about the same. But! There are many more benefits.
The block house allowed us to keep the appearance option - a house made of logs.
Coniferous wood (pine with Christmas tree Kirov Forest). We chose the largest profile diameter. This makes him look more massive.
pine siding pine siding finishing with wood siding finishing with wood siding
We left the work of caulking the log house. And for example, the price for such a service starts from 80 rubles per linear meter. We cleaned and refinished all the trim around the windows with white paint. We also installed new trim and decorated the corners of the house.
The new façade provided additional insulation for the house
Thanks to the new trim, we straightened out all the sides and corners of the house. The sunken logs and distortions disappeared. The old log house was treated with antiseptics. We installed additional communications into the house. Due to the lathing on which the house block was mounted, the walls were strengthened, placing the house, as it were, in a frame. The updated façade has sparkled with new colors, and the owners of the house can still live for a long time in such a home without investing in new construction.
Water supply
An old bathhouse, which has been on the site for a long time and is not used, is unlikely to have a water supply. To steam and wash comfortably, you need to correct this misunderstanding.
The bathhouse can be connected to any water source, from a well to a central water supply system. The main thing is to lay the pipeline correctly. Pipes should be installed in the ground no higher than the soil freezing level. In the underground area they must be carefully insulated. If the steam room is not heated in winter, care should be taken to install a device that allows water to be drained from the system. Otherwise, the pipeline will defrost.
If the water comes from a well or well located on the site, then this problem can be solved quite simply. All that is needed is to install the pipeline with a slope towards the water source. We should not forget about the tap for draining water from the heat exchange and heating system.
Preparation for restoration
Before starting work on restoring the premises, you should carefully inspect it and check the condition of all systems and parts. The most important part of preparation is the foundation inspection. If cracks or other serious damage are found on its surface, reconstruction of the bathhouse does not make sense. In this case, it is easier to build a new building; you can also consider the option of moving it to another base.
Interior of the bathhouse Source arma.ks.ua
We repair the roof
The main load on the roof of the bathhouse is created from inside the room. Constant evaporation of steam penetrating into the attic leads to the deposition of moisture on the supporting structure of the roof. Repairing a bathhouse roof involves strengthening or replacing damaged areas in the rafter system and roofing material.
When the slate roof of a bathhouse cracks, the cracks are sealed with a special solution consisting of parts: 1/3 cement, 1/3 asbestos, 1 PVA glue, 1 water. Before applying the mixture, which is applied in several layers 2 mm thick, the slate must be cleaned and covered with primer.
To repair rusted areas of a metal roof, tow is used, previously immersed in hot bitumen. It is inserted into the hole, which is then filled with mastic. For serious defects, patches are used: roofing material is placed on the damaged area, previously treated with bitumen, and coated with mastic. If the soft roof of a bathhouse is damaged, the rotten fragment is removed, a new one is installed, and sealant is applied to the joints.
Stage 9. Roof
Construction of a roof on males with layered rafters
Rafter system
As soon as the tree shrinks, you can begin building the roof. If you do this earlier, the roof will simply collapse.
Step 1. Place wooden beams on the wall framing (we have already talked about this).
Step 2. Fix the beams and attach the rafter legs to them in 1 m increments. In the ridge part, cut the rafters at the appropriate angle for the connection.
Step 3. Nail a solid board deck to the rafters (if you plan to use rolled roofing material) or make a sheathing (if you use slate, tiles, etc.).
Step 4. Install the roofing according to the instructions for the specific material.
Step 5. Cover the ridge with galvanized sheet steel to protect it from aggressive environmental influences.
Step 6. Cover the roof gables with siding or clapboard.
How to sew up a pediment
After this, proceed to further planned work - pouring a concrete screed or building a wooden floor (in the second case, the logs are cut into the logs of the second crown and fixed), install insulation, carry out interior finishing and arrangement of the steam room according to your project.
An example of a log house with a shingle roof
An example of a log house with a shingle roof
Cornice filing
Roof overhang trim
Tree protection
I started treating the wood with a protective coating from the ceilings. The ceiling in the steam room was treated with linseed oil. The ceiling in the washing room and dressing room was covered with a scuba tank with Eurotex-sauna wax. Then the walls, door and window openings are the same, the steam room is linseed oil, the dressing room and washing room are Aqualak, only in three layers. At the last stage, the floor, as I already said, had to be sanded in places. The floor was treated with Eurotex-sauna, also three times in all rooms.
The baseboards and corners were treated separately, the “spare parts” from the steam room were treated with linseed oil, the rest with scuba diving. Eurotex dries quickly, the next layer must be applied half an hour after the previous one.
Video description
This video shows how to prepare sites for installing jacks in an existing strip foundation:
But much more often, lifting mechanisms rest on the ground under the walls. To create a solid foundation, some preparatory work is performed.
- Drainage of groundwater using drainage ditches around the perimeter of the building - this is sometimes necessary in wetlands and clayey soils supersaturated with water.
- Marking reference points, in place of which holes are dug to remove the loose top layer of soil.
On a note! The minimum number of such points is 4 - two under each long wall with a distance from the corners of no more than half a meter. If the walls are long or made of joined logs, additional intermediate support platforms are installed.
- Compacting the bottom of the pits and constructing a platform on it from thick scraps of boards, flat stones, metal plates or other durable material.
- Sawing out areas of rotted crowns to ensure support for intact logs.
Inspection of the structure
The purpose of the event is to identify faults, determine a method for correcting them and compile a list of necessary materials and work.
The audit is performed as follows:
- inspection of external walls - the condition of the insulating material, the presence or absence of cracks, crevices, gaps, rot, the integrity of corners and other wall structures is checked;
- inspection of the base - checking for the presence or absence of flaws;
- inspection of the roof and ceiling - the general condition of heat, water and thermal insulation materials is checked, as well as the presence or absence of defects;
- inspection of the stove and chimney - the presence or absence of certain damage or burnout is checked, as well as the condition of the lining, if any;
- inspection of doors and windows - checking the presence or absence of distortions, cracks, chips, gaps, cracks, as well as tightness;
- inspection of the floor - the general condition of the insulating materials is checked, the presence or absence of fungus, termites, cracks, crevices and other defects, as well as the “health” of the finish, if any;
- inspection of internal walls - the presence or absence of cracks, cracks, chips, gaps and other defects is checked, as well as the condition of the facing material, if any;
- inspection of interior items;
- inspection of water supply and drainage systems;
- inspection of electrical wiring.
After assessing the condition of all elements of the structure, an estimate is drawn up, materials are purchased, and repairs are made.
How to make the interior decoration of a bathhouse step by step instructions
If the bathhouse box is built from a log house, it is necessary to withstand the time required for the building to shrink. Before carrying out interior work, it is necessary to caulk the logs inside and out. Similar requirements are imposed on timber buildings; insulation and finishing are carried out on a fully established structure, otherwise deformations are possible.
Requirements for finishing materials
The choice of material is determined by the operational characteristics of the premises
Given the high humidity and temperature fluctuations, pay attention to characteristics such as:
- Environmental cleanliness;
- Biological resistance;
- Easy to care for;
- Long service life;
- Resistance to high humidity and temperature.
An important factor when doing the work yourself is the ease of installation of the selected materials.
Bath finishing technology
Buildings made of cobblestones and logs do not have ideal geometry, so the first stage of work consists of installing a frame made of bars on the walls and ceiling. Purchase chamber-drying material, because... it is more stable to humidity fluctuations. A dry block does not “lead”, which has a positive effect on the quality of the finish.
Fix the bars vertically, maintaining a level relative to the horizontal and vertical axis. The distance between the frame posts must correspond to the width of the insulation. The standard size of mineral or basalt wool is 60 cm, therefore, the distance between the posts should not exceed 58-59 cm.
Install the insulation sheets against each other, pressing them from above to minimize their shrinkage. Having insulated the walls, continue installing mineral or basalt wool on the ceiling. Avoid voids between sheets. Any gap in the insulation will become a cold bridge.
When arranging the floor along joists, it is allowed to lay roll or fill insulation. After installing the insulation, it is necessary to secure the vapor barrier.
Why is vapor barrier needed?
Warm indoor air is saturated with water vapor. When meeting cold floors, moisture from the air settles on them. The resulting condensation leads to dampening of the material. Wet insulation loses its thermal insulation properties, and a damp structure will rot in literally 2-3 years. The main requirement for the installation of vapor barrier films is continuity. When connecting the canvases, it is necessary to overlap at least 10 cm, and all joints must be glued with professional tape such as Tyvek or 3M. In the steam room, aluminum foil is used as a vapor barrier, which, in addition to retaining moisture, serves to reflect heat. The high energy efficiency of the steam room contributes to rapid heating, slow cooling of the room, and, as a result, energy savings.
Important! After attaching the vapor barrier, before finishing, it is necessary to create a ventilation gap of at least 2 cm. The absence of a ventilation gap leads to the lining getting wet, which negatively affects its appearance and service life
The lack of a ventilation gap leads to the lining getting wet, which negatively affects its appearance and service life.
Working with wooden paneling
To install the lining you will need:
- Roulette;
- Building level;
- Pencil;
- Hacksaw, jigsaw or parquet;
- Hammer and mallet;
- Nails.
Start installing the dies from the corner. If the lining is positioned vertically, align the first board vertically. Nail it in the corner; later they will be covered with decorative trim. Secure subsequent dies with clamps. Hidden fasteners are more aesthetically pleasing and safer. Periodically check your work with a level.
Advantages of lime lining
Linden is used for finishing steam rooms based on its consumer properties:
- Ease of processing;
- Easy to care for;
- Lack of resinity;
- Resistant to high humidity and temperature;
- Environmentally friendly.
The only drawback is the high cost compared to coniferous and aspen lining.
Finishing the bath with ceramic tiles
Ceramic tiles and porcelain tiles are highly durable, resistant to moisture and temperature. It is optimal to use tiles when arranging the floor covering in a washroom if the base of the floor is a concrete floor. The use of tiles on the walls of private baths is impractical due to the high cost and complexity of installation on wooden walls.
Finishing work
After finishing the interior of the bathhouse with clapboard, it is necessary to close the joints of the corners, window and door openings with decorative elements. To treat wood, use compounds intended for coating wood in a bathhouse.
How to build a sauna stove
For all sauna stoves there is a single condition, the fulfillment of which is mandatory - lengthening the combustion channel so that the door is located in the dressing room (firewood is placed in it in that room).
The oven door must be in the dressing room
You can install a metal stove by purchasing it ready-made, or build a brick one yourself (it is much better due to its slower heating and long-term heat transfer). The most difficult thing will be to correctly remove the chimney through a wooden roof, insulating it with special metal sheets and vermiculite.
When installing a stove, the most difficult thing is the chimney outlet
Stones must be selected as carefully as possible. They must have the following qualities:
- heat resistance (does not collapse due to temperature changes);
- heat capacity (gives off heat for a long time);
- environmental friendliness (does not emit harmful substances when heated);
- homogeneity and the same coefficient of thermal expansion (foreign inclusions with a different thermal expansion can explode when heated);
- round shape (it improves the circulation of hot air).
The stones should be:
- up to 13 cm for the first layer on the grill;
- up to 9 for the intermediate layer;
- up to 6 for the top layer.
Bath stones should be round in shape
If the heater is made correctly, then unforgettable moments of steam await you.
Russian traditional steam room with heater can be supplemented with dry herbs for aroma
Repair of main bath structures
Bathhouse foundation repair
Preparing the bath for moving. To do this, it is necessary to free its internal space as much as possible from furniture, appliances, interior items and even the stove. To raise a small wooden bathhouse, you will need several jacks and beams to fix the building in its new position. This process occurs gradually and slowly to avoid disturbing the geometric proportions of the walls. Otherwise, returning them to their original position will be problematic. The bathhouse is raised in parts using jacks: first, one corner is raised to a small height, then the opposite corner is moved the same distance. All new positions of the structure are fixed by placing timber. The steps are repeated until the bath is raised to the desired height. After completion of this stage of work, the area under the building is cleared for the construction of a new foundation. Then the formwork is installed and the reinforcement cages are made. After this, the concrete mixture is poured into the formwork. To save it, stones can be placed in the formwork. After the concrete has hardened, the new foundation must be covered with coating and roll waterproofing made from bituminous materials. After three weeks, the bathhouse can be lowered onto the concrete foundation that has gained strength, having first removed the formwork
Like lifting the bathhouse, its transportation to a new place is done alternately from side to side - carefully and slowly.
Bathroom floor repair
Advice! To determine the beginning of the wood deterioration process, you need to hit the floorboards with a hammer. A muffled sound of impact indicates the beginning of the destruction of the boards. To determine the condition of the joists, you need to hit the nails that attach the flooring to them. A dull sound is given by rotten wood.
Repair of bath walls
- Old materials are removed from the walls, and blocks are placed on the log walls to obtain a flat surface. They are located on logs in a vertical position.
- Then a vapor barrier membrane is secured to the beams using a stapler.
- Between the cells of the sheathing, a slab insulation made of basalt wool is laid.
- The insulation is covered on the outside with a waterproofing film and external cladding.
Repair of the roof over the bathhouse
Slate. Cracks in slate sheets are sealed with a mixture of cement, fluffed asbestos and PVA glue. The ratio of cement and asbestos is 1:3, PVA glue diluted with water 1:1 is introduced into their dry mixture until it reaches the consistency of sour cream. After cleaning the surface, it is primed with a solution of PVA glue, and then the cracks are coated with the prepared mastic. It is applied layer by layer until the coating thickness is 2 mm. Each layer must dry.
Metal roofing. Metal roof holes are sealed with tow, dipped in hot bitumen and covered with a top layer of bitumen mastic. More significant damage can be repaired with patches. The metal around the defective area is treated with hot bitumen. Then a couple of layers of roofing material are laid on top, which are lubricated with mastic.
Soft roof
When repairing a soft roof, carefully remove the damaged fragment. Clean the surface and remove nails
Then they smear the new tile with glue and install it, sliding it under the bottom of the top sheet. Then it is secured with roofing nails, and the joints are coated with sealant.
Lifting rules
When lifting a building, you should know the weight and dimensions of the structure. Of course, you can use one jack, but the procedure will then take a very long time. But 2 or 4 jacks will seriously speed up the process. Do not forget that the walls must be securely fixed when the jacks are removed.
The lifting procedure is performed in several stages:
- Devices should be placed at support points. Support areas should be prepared in advance.
- Next, a rise of about 3-4 centimeters is performed. First you need to raise one wall, then put strong and reliable supports under the wall.
- Supports made of boards, logs or other reliable, strong material should be installed between the devices at an angle.
- Now we need to move the jacks. The load of the wall is transferred to pre-prepared supports. In the meantime, the devices need to be moved to the opposite wall. All previous steps are completed.
- Once the supports are installed, the devices can be removed. Next, the walls are raised to the required height. You can raise two walls or all four in this way.
Making a log house from logs using the “bowl” method
There are three types of making such a log house - Russian, Norwegian and Canadian. A peculiarity of the Russian method of cutting a log house is that the groove, which is located in the top of the crown of the log frame, exactly repeats the contour of the previous crown. The Norwegian and Canadian method involves cutting out a cone, and the bowl that goes in the crown above is also shaped like a cone. The Russian method of making a log frame is the most aesthetically pleasing, and Canadian and Norwegian technology guarantees a higher strength of joints.
Using the Russian construction method is the best option when constructing a bathhouse from rounded timber, where a milling cutter is used to select grooves, and the diameter of the log is always the same. In such conditions, there is no need for additional clamping of the corner using a cone.
However, if the timber is cut manually, and it is not possible to ensure the same diameter of the logs, it is better to use Canadian or Norwegian construction technology. In this case, it is not possible to ensure a perfectly even frame, but the bathhouse will be strong, reliable and durable.
The cost of construction using the “bowl” method is higher than the “paw” method. This is due to the fact that this method will require a larger number of logs.
Approval of the project by administrative authorities
This is a key step. Without approval of the project before the start of construction, an already built bathhouse can be demolished due to any complaints from neighbors, and you will lose the labor and money invested. The project should include the following items:
- A plan (floor plan, even if you have only one), created according to all the rules of drawing with specifications, sections and explication.
- Approximate estimate for materials.
- Planned type of foundation with drawing.
- Consent of the closest neighbors for construction.
The bathhouse design must be agreed upon with the necessary authorities
Inspection of the structure
The purpose of the event is to identify faults, determine a method for correcting them and compile a list of necessary materials and work.
The audit is performed as follows:
- inspection of external walls - the condition of the insulating material, the presence or absence of cracks, crevices, gaps, rot, the integrity of corners and other wall structures is checked;
- inspection of the base - checking for the presence or absence of flaws;
- inspection of the roof and ceiling - the general condition of heat, water and thermal insulation materials is checked, as well as the presence or absence of defects;
- inspection of the stove and chimney - the presence or absence of certain damage or burnout is checked, as well as the condition of the lining, if any;
- inspection of doors and windows - checking the presence or absence of distortions, cracks, chips, gaps, cracks, as well as tightness;
- inspection of the floor - the general condition of the insulating materials is checked, the presence or absence of fungus, termites, cracks, crevices and other defects, as well as the “health” of the finish, if any;
- inspection of internal walls - the presence or absence of cracks, cracks, chips, gaps and other defects is checked, as well as the condition of the facing material, if any;
- inspection of interior items;
- inspection of water supply and drainage systems;
- inspection of electrical wiring.
Windows, doors and trim
As a rule, window frames and doors installed in bathhouses are made of wood. With constant interaction with water, it is deformed, resulting in the formation of cracks. The solution to the problem is to completely replace the window frames and doors.
The final stage of bathhouse renovation is interior decoration. The process of improving the bathhouse premises is left to their owners. When shaping the interior, you can use any building materials. The main thing is not to place flammable things in the immediate vicinity of the boiler or stove. Preference should be given to wood. Its use is more consistent with the design style of Russian baths.
Repairing and modernizing an old bathhouse is a labor-intensive, but not very expensive process. It is affordable for any average owner of a country plot.
Modernizing a bathhouse may involve a number of other measures, for example, you can add a veranda on which garden furniture will fit perfectly, but such tasks are not a priority. It is possible to operate a bathhouse without a veranda or even a dressing room, but it is not recommended to do this if the floors are rotten or the roof is leaking.
For repairs, high-quality natural materials should be used. When synthetics interact with water and high temperatures, various chemical elements can be released and negatively affect health. As mentioned above, the ideal solution is wood, a completely safe material with an attractive appearance.
Selection of jacks
To lift the bathhouse without causing any harm to it, you should use special, powerful jacks. In any case, it is important to prepare thoroughly, and only then proceed with the procedure.
It is worth understanding that not all jacks can be used for such work. It is worth refusing to use frame and rack jacks, because they cannot guarantee sufficient reliability. But screw and hydraulic jacks will be an excellent help in lifting the building. It is worth noting that a hydraulic tool can be used even if you need to lift a house with a large area.
When choosing equipment, you need to carefully check its load capacity and rod length. These characteristics can be found on the body. It is very important to choose a device with a margin of approximately 30-40% of the load you need. To find out the required lifting capacity of the jack, you need to calculate the weight of the building with the roof, trim and fixed equipment. You should multiply this result by 1.4, and then divide by the number of jacks that you are going to use during the work.
Typically, a standard bathhouse, having one floor and dimensions of 4x5 meters, will weigh no more than 5-6 tons.
The length of the rod allows you to determine the amount by which the frame can be raised.
Jacks should be load tested before using them to lift a structure. Use the devices to lift a load that weighs a lot and leave it in that state for a while. Check the working rod - it should not give any arbitrary upset.
As for the number of jacks that you will need to lift the building, this will depend on the complexity and scale of the work to be done. If the structure is light or only one part of it needs to be lifted, then only one jack with sufficient power will be sufficient. In other situations, you will need to use at least 2 devices for each wall.
- If only one jack is used during work, then it should be gradually moved around the perimeter. After slightly lifting the wall and installing a stand under this location, the device should be moved. When the lower part reaches the required level, the procedure is considered complete;
- If two jacks are used during work, this allows the wall to be lifted much more evenly, maintaining the integrity of the corner joints;
- If four jacks are used during work, this minimizes the risk of deformation of the structure.
The greatest difficulty is lifting the building onto the base if the box is large, as well as the longitudinal joining of the beams. The fact is that the joint points are the weakest points. This is where deformation can occur. If the logs are long, they may sag and bend when you lift the bathhouse. In this case, the problem can be solved with the help of additional jacks.