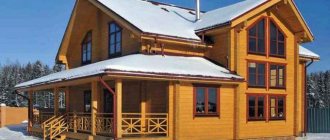
Low-rise country houses have occupied a serious niche in the construction market today. Various materials are used, such as brick, various types of blocks, but wood remains one of the most popular. In order for the house to be comfortable at any time of the year, it must be properly insulated. One of these materials is polystyrene foam, which is distinguished by its practicality and reliability. Insulating a wooden house with polystyrene will be the key to effective thermal insulation of the building. This will significantly reduce heating costs.
Types of expanded polystyrene
The material is a gas-filled polymer. Thanks to the technology, the insulation contains a low percentage of water, and the main part consists of foamed polystyrene with additives. It is this structure that gives it high performance, capable of retaining heat and sound.
Internal structure of polystyrene foam
Depending on the manufacturing method, polystyrene foam can be of several types. Its price, density and feasibility of use in a particular area depend on this.
*
- Pressless - consists of granules that are repeatedly dried and foamed. It is characterized by fragility and a high level of moisture absorption.
- Pressed - has a low heat transfer coefficient. Due to additional pressing, the granules and structure are closed. Additional work during production increases the cost of pressed polystyrene foam.
- Autoclave - production involves the use of an autoclave, so this type of material is rarely found on the building materials market. Using autoclaved polystyrene foam to insulate a wooden house is impractical.
- Extrusion – polymer material for household use (film, packaging, containers). Not intended as insulation.
- Extruded is an ideal option for insulating a wooden house. It is non-pressed polystyrene foam, but the production technology uses an extruder. The pores of the insulation are as closed as possible and are small in size. These indicators create high thermal insulation properties. Extruded polystyrene foam is the most common and affordable type of insulation on the building materials market.
Disadvantages of polystyrene foam
Polystyrene foam is far from an ideal material; it also has its own disadvantages, which you need to know about in order to draw your own conclusion whether or not to buy such material for floor insulation. The main ones are the following.
- Low strength indicators. The material is easy to damage or break. But at the same time it is easy to cut.
- The material is afraid of the effects of varnish or paint - it is destroyed because of them.
- This is not a breathable coating, although it is full of air in itself.
- If there are mice or rats in the house, they can greatly damage this type of insulation. Therefore, it is best to cover foam blocks with plaster.
- This is not an environmentally friendly material, and if it is set on fire, it releases a huge amount of toxic fumes into the air. But the foam itself is absolutely safe for humans.
- You still need to create a frame for foam plastic, but in the case of this material it can not be made as powerful as when using the same mineral wool.
The use of polystyrene foam for floor insulation has its disadvantages
Features of insulating a wooden house with polystyrene
Expanded polystyrene is a lightweight, durable sheet of varying thickness. Thanks to its integral microstructure, it is resistant to mechanical stress and external natural factors.
Appearance of polystyrene foam
*
There are two ways to install insulation depending on the mounting location:
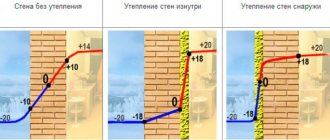
- Internal insulation - involves installing expanded polystyrene on the internal parts of the walls of the house. This method has many disadvantages, one of which is that the material does not absorb moisture and does not allow water vapor to pass through itself. Thus, the heat in the house will not pass to the wooden walls from the inside, and the counter flow of air and cold will act from the outside through the wall. In this case, the dew point will shift inside the house, which will lead to condensation between the wall and the insulation, and ultimately to rotting of the wood. This phenomenon causes the formation of mold, mildew and insects.
Insulation of a wooden house from the inside
- External insulation is the so-called ventilated facade. The advantage of this method is the use of waterproofing and the ability of the insulation to be ventilated. External installations are more expensive than insulation inside the house.
Insulation of a wooden house from the outside
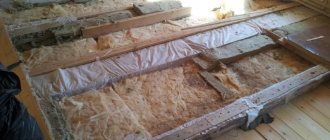
Insulation of a wooden floor with polystyrene in a house is carried out between the wooden floor joists. This allows you to prevent the entry of cold air from the ground, as well as stabilize the temperature on the floors, preventing warm air from below from rising through the ceiling and oversaturating the floor of the heated upper floor. Insulation of floors is also effective if the rooms above are not used during the cold season and are not heated.
Insulation of a wooden floor with polystyrene
Principles of installation work
Regardless of the choice of type of thermal insulation, it is necessary to follow the sequence of work performed for proper insulation. If we consider the structure from bottom to top, it will look like this:
- waterproofing layer;
- thermal insulation layer;
- vapor barrier layer;
- design for floor installation;
- floor.
Compliance with this order of work guarantees the maintenance of normal temperature conditions in the room and protection of the structure from freezing and rotting.
The easiest way to insulate the bottom is through joists. They are beams measuring 5x10 cm or more, on which the floor is subsequently laid.
Scheme of floor insulation using joists Source nehomesdeaf.org
Pros and cons of expanded polystyrene
It is necessary to understand that styrene, which is a by-product from the oil industry, is used to make the material. Therefore, it cannot be said to be an absolutely environmentally friendly material. It is produced only industrially; artisanal and home production of polystyrene foam boards is impossible.
However, extruded polystyrene has a number of significant advantages:
- low cost compared to other insulation materials;
- high thermal insulation rates due to the dense structure;
- low weight and good compression resistance;
- has excellent soundproofing qualities;
- moisture resistance;
- a wide choice depending on its characteristics: density, thickness, surface structure, end edges (straight or groove), color palette;
- able to interact with various adhesives, lime, gypsum, cement, salt, bleach, water-based paint;
- does not rot (decomposition of the material in the ground can exceed 10 years);
- fire resistant (fire temperature is 2 times higher than wood);
- durability (manufacturers guarantee a period of operation from 15 to 60 years);
- no need to use special tools for cutting and installation.
The material is created artificially and has no natural origin. It contains many chemical additives and compounds that are unknown to the average consumer, so in addition to its advantages, polystyrene foam has disadvantages:
- reacts negatively to ultraviolet radiation, from which the structure is destroyed over time and the original characteristics are lost;
- reacts negatively to gasoline, fuel oil and various types of solvents;
- susceptible to destruction by termites and rodents;
- in case of combustion, a gas is released, which is many times more dangerous than carbon dioxide (it is fatal for humans).
Important! When heated, polystyrene foam emits toxic fumes, so its use in baths, saunas and similar rooms is prohibited.
*
How to insulate insulation
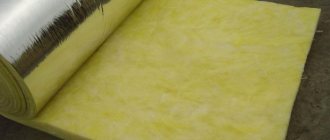
Environmental influences, moisture, temperature changes, cold have a certain effect on any materials. Areas where access is restricted require special attention. To protect wooden walls and house structures when insulating with polystyrene foam, it is necessary to pay attention to waterproofing and vapor barrier. For this purpose, special roll materials are used.
Vapor barrier film
During the insulation process, the waterproofing material must be fastened on the cold air side (street, ground, concrete base). The vapor barrier is installed on the side of the warm air flow (inside the room). An alternative vapor barrier option can be polyethylene film used to cover garden greenhouses.
Installation of expanded polystyrene
To insulate floors and walls with polystyrene foam in a wooden house, different technologies, features and recommendations are used. Laying on the floor is usually done using wooden joists. To do this, you need to make a base from the bottom. You can use 2 methods, one of which is to fasten boards or other material at the bottom of the joist, as a base for insulation.
The second option is to install slats on the left and right sides of the joists, onto which the base for the insulation is subsequently mounted.
The bars are fixed to the side of the lag, and a board is laid on top
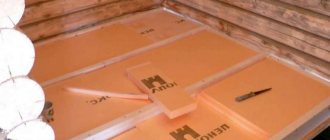
Before installing the insulation, it is necessary to lay waterproofing in the base, which will prevent the penetration of moisture from the ground or concrete (in the case of a monolithic slab foundation). Next, the polystyrene foam boards are laid. It is recommended to install the material in several layers (minimum 150 mm in height in 50 mm slabs). The layers must be laid so that the seams between the material are covered by the next layer. The principle of chess order.
It is imperative to leave a ventilation gap of about 20 mm between the top edge of the joist and the insulation. If the polystyrene foam is flush or higher, then you need to additionally raise the height over the entire area using lathing.
A layer of vapor barrier is laid on top to prevent the penetration of steam from the heated house. Next, you can begin installing the subfloor, where floorboards, plywood or OSB boards are used.
How to attach polystyrene foam to wooden walls of a house
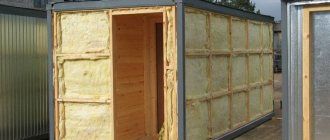
Insulation of the facade of a wooden house is carried out using frame technology. It consists of the construction of a frame into which the insulation is placed. All work is carried out in stages.
An example of a frame system for insulating a house
*
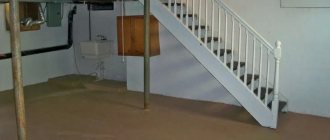
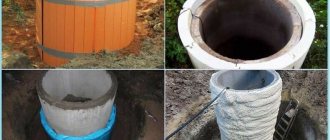
Insulation of the basement floor with extruded polystyrene foam over the ground under the screed
For any types of insulation associated with direct contact with the soil or ground surface, foam plastic, regardless of its density, is not used. The use of extruded polystyrene foam is allowed. This is due to the defrosting process, that is, the foam can be destroyed by severe watering, in low temperature conditions.
Preparing the backfill for laying thermal insulation
The soil base will need to be prepared for laying insulation. To do this, we dig up the floor in the basement and remove the soil, about the size of a shovel. We clean and compact the base; the easiest way to do this is with a sledgehammer mounted on a shovel shaft.
The next stage is to lay strips of extruded polystyrene foam, 25 cm high, around the perimeter of the basement floor. To prevent the tape from moving away from the concrete walls, it can be secured with pegs.
Next, we fill the floor with a layer of fine gravel; it’s even better to use screenings for insulation. The thickness of the fill is 10 cm. We lay an agrotextile fabric on top of the dry gravel and pour a layer of sand 5-7 cm thick.
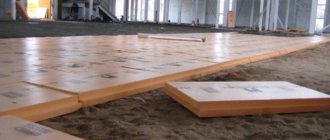
Laying EPS boards
We lay a polyethylene waterproofing film on top of the sand cushion, seal the joints with tape, wrap the edges onto the concrete walls and glue them to the upper edge of the previously laid extruded polystyrene foam insulation.
To insulate the floor in the basement, we use 50 mm thick slabs, join the sheets together in locks and lay the insulation on top of the film.
We glue the joints with tape, including the gap with the previously laid insulation of the lower part of the walls.
Final finishing
The face screed in a basement is always subject to soil pressure, so the concrete must be reinforced. We apply a deep penetration primer to the lower part of the walls and to the polystyrene foam and lay a mesh of reinforcement.
Next, we install leveling beacons or simply place chips of the same height on the EPS. We fill the screed with liquid concrete, after 6 hours we take out the beacons and seal the remaining holes in the concrete. The level of the screed should be at least 40 mm higher than the previously installed wall insulation.
Surface preparation
An important step before starting to insulate a wooden house is preparing the foundation. The reason for this is wood, which is very capricious to many factors. Old houses and new buildings are insulated. It is necessary that the surface is dry, the wood must be dried. If the house has been painted, then all paint must be removed. The joints between logs or beams must be well caulked. If additional caulking is necessary, this must be done before insulation. You should also fill up all potholes and remove any remaining bark if present.
As soon as the surface is ready, it is treated with antiseptic agents. The choice of composition is a responsible step, because in the future the contact between polystyrene foam and wood will not be visible. It is necessary to create such conditions so that the walls of a wooden house do not end up in conditions that expose them to rot and further destruction. It is recommended to read the instructions for use before purchasing.
Installation of sheathing
To install insulation, you need a frame that securely holds the material, does not allow it to slide down over time, and allows the material to be ventilated. It is necessary to use only dried wood, otherwise the bars may twist after installation. Expanded polystyrene suffers from this, gaps form (cold bridges), and the finishing and façade material may also be damaged. Before installation, it is recommended to treat the bars with an antifungal and antiseptic agent.
The bars are attached to wooden walls with self-tapping screws vertically and horizontally. To do this, the bars are sawn through at the junction points and a groove is made for the connection.
Connecting bars into half a tree
The distance between the bars should be approximately 5 mm less than the width of the insulation. This will allow the polystyrene foam to fit tightly into place, eliminating any gaps. If several layers are to be laid, the seams of the subsequent layer should overlap the seams of the previous one.
It is easy to insulate wooden houses made of timber, but log houses are more difficult. The surface is not flat, so special attention must be paid to its preparation. You can use spray foam or seam sealant to repair potholes and small uneven areas.
Video description
What is the best way to glue polystyrene?
Before directly applying the glue, the surface must be treated with antifungal and antiseptic drugs. It is important to choose the right composition, since subsequently access to the junction of materials will be very difficult.
The cheapest option is dry polystyrene foam adhesive, which is made from cement. For use, this product is diluted with liquid. The result is a reliable and durable compound for attaching foam to virtually any type of material.
Also recently, solutions based on polymer cement have become increasingly widespread. They are universal in use and are well suited for gluing insulation to any type of base. To work with facades, you can use products that contain various mineral fillers. Many companies produce products to increase the protective properties of polystyrene foam. After applying glue to the front surface, the material becomes resistant to various environmental factors. In addition to the advantages, such substances also have disadvantages - a long polymerization time, which is about 3 days.
There are also aerosol mixtures containing polyurethane. They can be used as glue or to fill gaps and seams between sheets. These are universal substances that behave equally well both indoors and outdoors. They can be applied to facades, roofs and walls of houses, flooring and other wooden surfaces. In all these cases, the products set quickly and hold the material securely for a long time. And although the prices for such mixtures are relatively high, they are justified by the convenience of applying the glue.
Expanded polystyrene sheets usually begin to fix within 2 hours after gluing the surface. For better stability, the material is secured with anchor bolts for facades.
The main advantages of polyurethane products are: fire resistance, good tolerance to changes in humidity and temperature, environmental friendliness and safety for health. Modern production technologies make it possible to obtain high-quality and easy-to-use compositions. When choosing an adhesive, it is important to consider its chemical reactions with the material. To prevent the destruction of polystyrene foam, you need to purchase products that do not contain acetone or gasoline.
Sometimes sheets of expanded polystyrene need to be glued together. For these purposes, use any wet or dry glue that does not contain solvents. When choosing products, a specific task is taken into account, and then the most suitable product is selected to solve it.
Waterproofing and installation of polystyrene foam
After installing the sheathing, a vapor barrier is laid out, and expanded polystyrene slabs are mounted on top of it. To secure the material, you can use special nails with a large washer. In the future, this will prevent the sheets from moving away from the wall over time.
The wide washer allows you to firmly hold the insulation boards
Then the polystyrene foam is attached to the wooden wall. A vapor barrier in the form of a diffuse membrane is laid on top. One type of waterproofing material is isospan.
The entire insulated area is covered with a vapor barrier
It is important to look at the instructions for use supplied with the vapor barrier. The sides are different in composition and purpose, therefore, in order for the material to perform its function, it must be laid on the desired side. The waterproofing is attached to the wall with a furniture stapler, and at the joints it is taped with construction tape. The film is overlapped over each other by approximately 10-15 cm.
How to stick polystyrene foam on a wall
It is possible to attach the insulation to wood using a special adhesive or polyurethane foam. Both options are expensive, making it costly when compared to using sheathing. It is better to use an adhesive composition, because it comes in the same containers as foam, but has more yield as a result.
Glue or foam must be applied to ensure a secure bond to the wood surface.
The technology consists of preparing the base, removing any coatings, protrusions, or potholes. Ideal for houses made of timber and completely inappropriate for insulating log houses. In the latter case, the points of contact of the material are small and the difference in the logs will not make it possible to create a flat surface.
Expanded polystyrene is laid over the entire surface after applying glue or foam to it. The problem lies in further finishing, because with the lathing the fastening process is clear. If glued, the house can be plastered, which is not ideal for a wooden structure. The second option could be the construction of an additional structure in the form of a frame for the construction of the facade.
Finishing after insulation
Thanks to polystyrene foam, an entire “thermos” is created, which retains heat inside and prevents cold air from penetrating inside. This significantly reduces the heat loss of the building, saving money on heating. The final stage is finishing the facade.
Finishing the facade after insulation with polystyrene allows you to realize any ideas
For this purpose, wooden products are used - lining, imitation timber, block house, as well as various types of siding. Depending on the type of finishing material and its method of fastening, a second frame is built on top of the sheathing with insulation. It is on this that the finishing material is installed.
Technological difference between internal and external wall decoration
Most often, interior wall finishing is done using wet technology, that is, using glue. To save space inside the house, you should not use an additional frame or anything else. The stages of work are as follows:
- Surface preparation and adhesive application.
- Installation of foam plastic boards and blowing out the joints between them.
- Applying the base layer of plaster.
- Applying the final layer of plaster.
Exterior finishing is also done using wet technology in most cases. There is almost no difference between them. External installation differs only in some details and the number of work processes. An insulating film is used here, since external factors act on the foam from the outside. Stages of work:
- Cleaning the base and priming it.
- Installation of the base profile.
- Layout of insulation placement and “fitting” on glue.
- Eliminate gaps with foam and fix them with dowels.
- Attaching the waterproofing film.
- Applying the first layer of plaster.
- Reapplying a layer of plaster.
- Final application of the third layer of plaster.
- Decorative finishing upon request.