The entrance door should be equipped with additional parts to make opening easier and increase human safety. Accessories include a door peephole, decorative details (wreath), and apartment number. Recently, it has become popular to use lighting for the front door. This allows you to create the most comfortable living conditions. Let's look at the main advantages of front door lighting and analyze the installation features.
Can be carried out both outside and inside the premises. It depends on its purpose, the characteristics of the home (it is an apartment or a private house).
Illuminated lock is convenient
Installation of such a system is appropriate for both a private house and an apartment. It is required if there is simply no lighting in the staircase or in the yard. Then, in complete darkness, you can quickly open the front door. There can be two power sources for the lock illumination: from electricity and installed batteries. This will help you get home without problems if there is a temporary power outage, a burnt out light bulb, or damaged wiring.
Illuminating a door is a great way to quickly open a lock and create visibility in the evening, both for an apartment and a private house. Lighting can be spot or diffuse, have different tones, and be turned on automatically or mechanically. Installation above the lock allows you not to scratch the canvas when opening it in the evening, and open it in the absence of light. This is an ideal solution for creating comfortable conditions.
Door fittings and structures in general are a sensitive topic. There are many different models available. They are made in antique, modern styles, in the form of gold items. There are doors and fittings that are equipped with lighting. This solution allows you to decorate the interior and highlight the details. Let's look at how to connect the power supply to the fittings.
Manufacturing procedure
The assembly of an interior door is carried out using different methods. But if the meaning of all operations is clear, then developing your own technology is not difficult.
Box
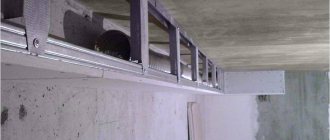
It’s quite simple with it - assemble a rectangular structure, and only then place it in the opening. But installation is recommended only after the fabric has been manufactured. This makes it easier to mark the places where the awnings and latch (lock) are attached. Doing this on a jamb already installed in the opening is much more difficult. In addition, it is necessary to select the grooves for the door. Therefore, after the box is knocked down, you still have to return to it.
Canvas
It all depends on the chosen design, and therefore where to start - with tying or cutting MDF boards - is decided based on the door drawing.
Frame making
The technology is simple - a rectangular shape is assembled according to the size of the sash. But there are options for filling it.
Stiffening ribs are installed in the form of vertical posts. This solution is advisable if the frame is planned to be sheathed with MDF or plywood - the strength of the coating will be ensured.
One horizontal jumper in the center. A good solution for insulating an interior door. For example, installed in a passage leading to a cold room (utility room). The canvas is filled with expanded polystyrene, and its slabs are foamed around the perimeter.
Leave one frame without additional elements (small-hollow design). How to fill it and whether to do it is decided depending on the specifics of the room. But this frame option is only suitable for interior doors that are covered with boards. Otherwise, there can be no talk of strength.
Fabrication
- Its dimensions are known; All that remains is to cut the MDF into 2 - 3 fragments, according to the drawn up drawing.
- The second stage is assembling the harness. That is, the frame is assembled using a ready-made canvas.
Door processing
- It is advisable to use the antiseptic again. Since material sampling and drilling were done, individual areas may be “exposed.” Secondary use of the anti-rot composition eliminates this disadvantage.
- Surface design. Options are marked: stain, varnish, veneer, film - depending on the design concept.
Preparation for installation
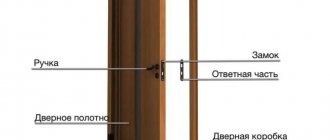
At this stage, latches, eyes, handles and hinges are installed on the canvas. The box is placed in the opening, aligned and securely fixed.
All that remains is to hang the door, align the second half of the canopy with the mounting holes and secure it with self-tapping screws (included in the kit).
“Finishing chord” - checking the correct operation of the canvas, tightness, absence of distortions; If deficiencies are identified, eliminate them. All further measures - insulation of the opening, installation of platbands, decorative design - are a slightly different topic.
Making an interior door at home is quite possible. Success largely depends on proper work planning, choosing the optimal design scheme and your own diligence. And quality is ensured by a good tool, the purchase of which is not worth regretting.
Illumination of the entrance door of a private household
The organization of illumination of the entrance door in the adjacent area is based on the style of the structure as a whole and should highlight the attractive features of a private house. The lighting market today offers all kinds of porch lighting options. Thanks to this, every owner of a city private house or country cottage can design the lighting of the main entrance in accordance with the exterior style and personal taste preferences.
It’s a good idea to illuminate the local area in front of the entrance using large garden lanterns with several shades, or you can install a lighting system consisting of powerful spotlights, the light fluxes of which will be directed onto the porch and front door. The ideal solution is complex lighting, which uses different light sources. This will give a unique image to the facade and emphasize its individuality and aesthetics.
Installation of wiring in a bathhouse or sauna
- Wooden walls and finishing elements, shelves are impregnated with substances that prevent fire.
- Cables are laid in straight lines, at a distance of 10-15 cm from the floor, ceiling, and water pipes. When turning, the angle should be 900.
- The distance to heating devices and stoves should be at least 50-60 cm.
- Switches are mounted at a height of 1.5 m from the floor, sockets - 0.5 m. For baths and saunas, choose products in waterproof cases. The wires are connected to them from below so that drops of water do not get inside the devices.
- All wire connections are carefully fixed with twists or soldered, the terminals are tightened well, after which the connection point is insulated.
In the steam room, the most dangerous area, only lamps are placed. All other devices and devices (transformers, dimmers, switches, sockets) are installed in the dressing room, rest room or washroom.
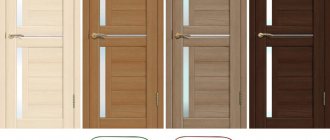
Illuminated fittings
A simple use of lighting in door fittings is to illuminate the keyhole with an LED bulb. This feature is used in entrance doors. The push handles on the bar are equipped with an LED light source. It is installed on the bottom at the base of the handle. Activated by pressing the lever. This solution helps when there is little lighting in the entrance.
Illuminated door handles
Illuminated door handles are widely used for interior doors. These are push-on types or knobs that are made from a combination of metal or plastic with glass. Equipped with various LEDs: white, blue, red, green and any other light. There are models that have several different LEDs in the housing. They burn together or separately for a certain period of time. Such fittings are convenient at night, when turning on the light in the room is painful for the eyes. They will help you find the door in the dark and decorate the design of the room, shimmering in different shades.
Arched structures are characterized by the use of doorway lighting. Light bulbs are installed in the body of the arched structure. This type of lighting allows the light to shine only onto the opening, illuminating the path, while maintaining a calm night light in the rest of the house.
Doors with frosted glass stakes use LED strips along the contour of the glass. Light shades highlight the design of the door and the image printed on the glass. Tapes are installed along the side parts of the glass; they are not noticeable, and the light penetrating the glass along its edges emphasizes the structure. There is an illusion that the glass produces light.
Colorful glass lighting
Classification of interior doors with glass inserts
Choosing the right door for a room is possible if you know all types of products and their parameters. In addition, you can ask the right questions in the store and evaluate the quality of the proposed model. Doors are classified according to the following criteria:
- manufacturing method;
- production material;
- type of coating.
Interior doors with glass are classified according to manufacturing method, material and type of coating
Types of interior doors by manufacturing method
According to the production method, the following types of doors are distinguished: panel and panel. Paneled structures are made either from solid wood or from combined raw materials. By design, they consist of a frame and thin panels inserted into the frame - panels. In the case of glazed doors, glass is inserted into the internal openings of the frame instead of some panels.
Such structures are embossed, and the door itself is very strong and reliable. However, the weight of the panel door is much greater than the mass of the panel model. For the manufacture of such interior structures, natural veneer or melamine is usually used. Also, various types of varnishes can be used as a coating.
The surface of panel doors is usually smooth, but there are models with a raised upper plane, which is created by finishing with baguette. The frame is often made of valuable wood.
Panel doors are the most common type of structure due to their reliability and low production price
The inside of panel doors can have a solid or small-hollow filling with slats made of natural wood or chipboard, MDF, NDF. The most durable, but at the same time heavy doors with solid filling are called reinforced. Products with fine-hollow filling are produced manually - and the quality of such doors is not the best. Doors with honeycomb filling are considered the optimal design in terms of price and quality.
Types of doors based on material of manufacture
For the production of doors, solid wood or wood substitutes with different coatings are used. In the first case, the product consists entirely of natural wood, often valuable species. These doors are very strong and durable. They look presentable, solid and respectable. The products provide excellent sound insulation, but, accordingly, this design is not cheap.
It is more practical to buy interior doors made from wood substitutes, which are covered with veneer of expensive wood species. They are cheaper than massive ones, weigh much less, and are also less susceptible to temperature changes and humidity. Only a professional can distinguish them from massive models by appearance. For the manufacture of such structures, chipboard, MDF and other wood-like materials are used. On top they can be covered with melamine or natural veneer.
Interior doors made from wood substitutes are cheaper and lighter than structures made from natural materials
Doors with honeycomb filling are made from cellulose and then impregnated with a special solution. The design consists of cells that are placed inside the canvas. These models weigh little, they are quite reliable and durable, and most importantly, they are inexpensive. The products are practically immune to temperature changes in the room.
Interior doors with glazing: their varieties by type of coating
Doors are usually covered with veneer or melamine. Very often, structures made from inexpensive types of wood or wood substitutes are finished with a thin layer of expensive wood - veneer. In terms of external characteristics, such products are difficult to distinguish from structures made from solid wood. They weigh less and cost less, but are less durable.
Thanks to veneer, interior doors retain the inherent wood grain
Melamine is decorative paper impregnated with resins. The thickness of the material is 0.1 mm. This surface looks beautiful and is quite resistant to mechanical stress. Melamine has a number of advantages:
- low price;
- a wide choice of patterns, colors and textures (matte, glossy, semi-glossy, with relief).
Often the pattern on the surface imitates natural wood. Canvases coated with melamine do not fade in the sun, they are difficult to scratch, and they are also less susceptible to moisture in the room than veneered ones.
Unlike doors with veneer, structures coated with melamine are less susceptible to moisture.
Street lighting: past, present and future.
Once upon a time in the Middle Ages, not only village residents, but also city residents had to think about street lighting and their own street lamps. You could often see the owner’s lantern above the front door, since there was practically no centralized lighting, and each owner of the house hung a street lamp above his door as a sign of welcoming the guest. In how many adventure novels does a street lamp appear as an indispensable companion for lovers! Now in cities, street lighting is connected to centralized power plants, so cozy street lamps are relevant primarily for country houses and dachas . It is the various street lighting lamps that make the evening world so cozy and homely. In late spring and summer, you can enjoy an excellent dinner and a glass of wine on the terrace under the soft light of the street lights.
In fall and winter, outdoor lanterns help illuminate the path home, illuminate the gold of foliage, or give snow crystals a brilliant shine. Street lighting lamps are truly indispensable if you want your country house or cottage to become a truly cozy little world for you and your family.
Fingerprint's scanner
The principle of operation of fingerprint entrance doors is the use of biometric technologies. You don't need to carry the key with you or worry about losing it, because access to the room is determined by your fingerprint. The papillary pattern of each person’s finger is unique, so no one except a certain list of people will be able to penetrate inside the room. Contrary to a common misconception, dirt or wounds on the fingers do not affect the identification of the user, since hundreds of points on the papillary pattern are read, after which the scanner compares their location with the information stored in memory. You won't need key fobs, forget about mobile gadgets and security cards. The only thing you need to do is to place your finger on the reader of the smart lock of the front door for a split second.
The unique interface of the biometric system allows you to store up to 99 fingerprints, so Guardian smart doors can be installed even in commercial facilities (offices, administrative complexes). The scanner also withstands aggressive environmental influences well, so it is suitable for outdoor use.
How to connect?
First of all, you need to understand how to supply light to electronic devices. It is necessary that opening the door does not disrupt their operation. This is achieved by connecting the door to the electrical network in the area of the door hinges. This area of the door leaf and door frame is in contact with each other.
DIY door lighting connections
Illuminated push handles are installed for metal entrance doors. Usually, they are already installed on the door. The door is sold together with the frame. The wire for connecting the LED goes to a loop inside the case and extends outside the box. All you need to consider when installing a door is how to connect the wire to the general electrical network. Since this is factory fittings, it has a special device for changing the voltage to the value required by the LED device.
Replacing Masterlight batteries
Most Outpost doors have Masterlight lock zone lighting.
By pressing the button located on the inside of the handle, you can illuminate the lock. This is very convenient in the absence of good lighting. After some time, the backlight batteries may need to be replaced.
1. To replace batteries, you need to remove the handles from the door. To do this, unscrew the 2 screws on the internal fittings and carefully remove the external handle.
2. Then remove the screw from the inside of the handle and open the trim strip. There is a backlight unit inside the handle.
3. To access the batteries, peel back the protective film on the right side and carefully replace them with similar ones, observing the polarity.
4. Check the operation of the backlight and reassemble the fittings in reverse order.
— The simultaneous use of new and discharged batteries is not allowed. — The simultaneous use of batteries of different types is not allowed. — When installing batteries, observe the correct polarity. — Do not throw used batteries into fire.
Battery life is reduced at temperatures below +5°C. Batteries are not covered by the warranty.
Street lighting fixtures, designer advice:
Of course, when choosing lanterns for street lighting, you need to pay attention to style .
For a classic brick house, street lamps are perfect, as if they have just been in the tiny alleys of old London. These are street wall lamps, as if created for the battle of Big Ben.
Such street lighting lamps in a seasoned English style will give a feeling of reliability, fundamentality of the house, and create an atmosphere of constant peace that cannot be disturbed by any problems or worries. If your house is built in the Art Nouveau style, then classic street lamps, on the contrary, will look alien and strange, as if these street lamps come from some other world. Which, in general, is really true, because classic and modern are very different styles in terms of sensations and visual images.
For ultra-modern buildings, there are quite interesting street lamps in the hi-tech style. As always, such representatives of street lighting are characterized by minimalism and a subtle combination of glass and metal, clarity and emphasized modernity of the forms and images of street lamps.
Make sure it's the right size
When choosing the size of the luminaires, consider in particular the following instructions:
- Remember that the light for an observer (guest) from the street or yard will not look as bright as for someone standing at the entrance.
- If you are choosing between two sizes, in most cases the larger size model will be the right choice.
- To install light on both sides of the entrance, the lights should be approximately 1/5 the height of the door (including the frame!).
- However, if you choose a light fixture on one side only, keep it about a quarter of the way up the door. The same rule applies to width.
Don't buy at random! Carefully measure the outer door frame and lighting model before making your final decision. To make sure your choice is truly perfect, cut a piece of cardboard to the shape and size of your chosen model and check how it fits into the entrance.
Decorate with stained glass
Stained glass a couple of centuries ago could only be found in the homes of aristocrats. Now this is a fairly common way to decorate a door or window opening.
Real stained glass is made from pieces of colored glass. Sometimes a ready-made fragment is installed on the door. But it is much easier to create an imitation of stained glass by painting using a stencil.
It is best to use acrylic paints; they are quite resistant to moisture. Lines are drawn separately to imitate the partition between the glasses.
How to arrange lighting in a small corridor and expand the space
Proper lighting will help to visually enlarge even small corridors and fill them with light. In small rooms, long chandeliers and models with a large number of shades should be avoided.
Using sconces for mirrors and on walls
A poorly lit mirror can change the appearance of the person reflected in it, so you should think about its lighting. The sconces on the sides of the mirror are suitable for this. Sconces can also be hung above a mirror to create uniform lighting. There are mirrors with built-in lights on sale. Wall sconces hung around the perimeter of the hallway will also help make the lighting uniform.
Hanging ceiling chandelier for a small room
For small rooms it is better to choose small, short chandeliers. An ornate chandelier will visually weigh down and reduce the space, so it is better to choose models of a calm design without unnecessary decorations and controls.
Lighting above the front door
Spotlights are an ideal option for lighting above the front door. The light source can be either mounted on the wall or mounted in the ceiling.
Bottom lighting
Illumination of the floor in the corridor is a rather non-standard solution, but recently it has begun to gain popularity. When choosing lamps, you need to pay attention to their protection from moisture, dust and mechanical damage. The most profitable option is to use LED lamps and luminaires.
Night lighting with motion sensors
Lights with motion sensors turn on when moving along the corridor at night. They should be dim so as not to be conspicuous, but at the same time it was clear where to go. Such lamps are usually installed in baseboards or along the edge of the ceiling. It is possible to install an additional LED lamp that will turn on automatically, but they shine too brightly.
Lighting in a narrow corridor in Khrushchev: what is worth remembering
A long and narrow corridor in old-type houses is a problem for all residents. It creates the feeling of a dark tunnel, so choosing the right lighting is important. Along the corridor you can install spots or other spotlights directed towards the walls or hanging frames and mirrors. In this case, the light will double and completely fill the room.
You can additionally highlight interior items - this will help visually shorten the length of the corridor.
Choosing a location for a fictitious window and design tips
When starting to create a false window structure, you need to select the type of structure, a suitable picture, and determine the location.
Living room or hall
This is the place where people most often gather: family, visiting guests. Because of this, there may be a feeling of lack of space, especially if the room is small.
Living room
The way out of this situation will be a false construction. The main thing is to choose the right image. How to do it?
- The picture should focus on distant objects.
- It is better if the image contains light colors - it will create the illusion of lighting.
- Try to make the picture contain fewer objects, animals, people - it will give the impression of fullness of the space.
Popular articles Envelope templates for printing on a printer
Children's room
The best options for simulating children's room windows are:
- In the first place you can put on the facade a window into a fairy-tale kingdom, a forest.
- The depths of the sea are for dreamers.
- If a child dreams of becoming an astronaut, then install a skylight with a starry sky in the room. Children's Image should be selected according to the child's wishes.
Children's
Bedroom
A bedroom is a place to relax, which means the selection of images must be appropriate. The picture should contain calm tones. It is not recommended to use bright colors.
Pictures with sunsets and seascapes will greatly help to calm you down. You can install the window structure opposite the bed - at the feet, and look at the landscapes before going to bed.
If the false window opening is located on the ceiling, then images of the starry sky and tree branches in the evening are recommended.
Workplace
In this case, everything depends on the nature of the work performed in the room. If you are busy with office work, it is better to install a large window with a plastic frame. Using a view of a big city as a background creates the illusion of an office in a high-rise building.
If the owner is engaged in gardening: growing seedlings, replanting house plants, then it is better to place a small window with shutters on the front wall and a view of the garden.
Bathroom
An original solution would be to design an open room, devoid of walls, but with windows on all sides. These techniques are used in large villas by the sea.
Bathroom
On all sides you need to attach photo wallpaper with a view of the sea beach and frame it with a false window structure. In such a room you can immerse yourself in a bath and imagine yourself on the seashore of a southern resort.
Kitchen
It is recommended to equip the kitchen with large windows, but window structures should be located on one or two walls.
The right picture can visually increase the space.
Types of lighting fixtures
There are a large number of models of lighting devices suitable for the needs of housing and communal services. They differ in technical characteristics, purpose, functionality and methods of operation.
Depending on where the lamp will be placed, there are:
- indoor lamps - suitable for installation inside entrances, staircases and landings. Despite the fact that they have a vandal-proof housing, their degree of protection is insufficient for outdoor conditions;
- street lamps - the degree of protection allows them to be placed outdoors; they are not afraid of small dust particles, rain splashes or low temperatures.
Depending on how the lamp is installed, there are:
- wall-mounted - mounted on a vertical surface;
- ceiling - mounted on the ceiling, they are considered the optimal solution for lighting the entrance, because they provide the largest area of illumination.
If we talk about the connection method, the lamp in the entrance can be:
- wired - connects to electrical wiring cables, which must be installed in advance and, preferably, laid in cable channels;
- wireless - works using a radio signal or batteries, used in cases where it is difficult to install wiring, for example on the street.
When considering different options for lighting sources in the entrance, you need to pay attention to their degree of protection. If this is a street lamp, then it must be at least IP64. The illumination level must comply with SanPiN standards. For staircases, lighting should be at least 6 lux, and for the courtyard next to the entrance to the entrance - at least 20 lux.
Lighting devices are distinguished depending on the type of inclusion. There are ordinary lamps, which at a certain time are turned on by the person in charge using a regular switch. There are lighting fixtures with a built-in timer that can be set to turn on and off at specific times. But the optimal, albeit expensive, option is a lamp with a motion sensor.
Choose only properly protected products.
Outdoor lighting is susceptible to many weather conditions and contaminants, so good protection against dust and moisture particles is critical when choosing a material.
- Manufacturers of lighting equipment also mark the level of this type of protection with the IP (Ingress Protection) sign.
- This marking tells us how safe the product is from water and dust particles.
- The IP rating is usually expressed as a two-digit number, with the first number indicating protection against particulate matter (dust, dirt) and the second indicating how well the product is protected against water entering the housing.
The higher the IP value, the better the protection. Outdoor lighting experts recommend values between 65 and 67.
Use special pads
A good way to make a door more durable and at the same time decorate it is with embossed overlays. They are quite expensive compared to other types of finishes, but they look quite presentable.
In online stores it is easy to choose the appropriate option from one or more alloys. You can install the overlays yourself or use the services of specialists.
Beautiful exclusive furniture to order
When a designer is working on the interior, it is difficult to find suitable furniture in the store. Most often, individual cabinet furniture is ordered to order. For this apartment we made: cabinets for children's rooms and hallways, cabinets and shelves for TV areas, furniture for the bathroom and laundry room, wooden wall panels with lighting and much more.
Also, according to the manufacturer’s special specifications, a decorative overlay was made for the front door. All products have a chic appearance and excellent quality. You will find a detailed description of all objects in our detailed video review.
Types of motion sensors
The result of the operation of lamps that react to movement is the same - they turn on when a person approaches them, and turn off when he moves away to a certain distance. The types of sensors are as follows:
- Infrared sensor. It is triggered by heat emanating from a living organism. It is considered one of the budget options. Such a device is best installed inside residential buildings, because on the street it will react not only to people, but also to animals.
- Ultrasonic sensor. The device constantly emits ultrasonic waves, which, when faced with an obstacle in the form of a person, signal the need to turn on the light. Humans do not perceive ultrasound, but most animals hear it, so they can behave restlessly.
- Microwave sensor. The principle of operation is similar to ultrasound, only radio waves are emitted.
A lamp with a motion sensor is the optimal solution for an apartment building. Despite the fact that it costs a little more than conventional lamps, the device allows you to significantly save energy, because it only works when it is really necessary.
The right material for the right look
Of course, for long life and a flawless appearance, the key materials are those that protect the outdoor light from UV rays, corrosion and other potentially harmful external influences.
For uncompromising quality, we highly recommend 316 grade stainless steel or copper, lacquered aluminum is also great for outdoor use. Slightly lower grades of stainless steel are cheaper, but after a certain time rust spots may begin to appear on it.
Choose an unusual pen
A uniquely shaped door handle always attracts attention. Forged products in the form of an elephant with a long trunk or a fish can be ordered from a private workshop or, if you have professional skills, you can make it yourself.
The classic handle of a huge size also looks good. It is especially convenient that small people or children can also reach it.
Assembly of a frameless solid wood door
For such doors, lumber of the required thickness is selected and preferably even in texture, without a large number of knots and defects on the surface. If possible, calibrate by thickness (discrepancy no more than 1 mm). The base is a sheet of plywood or other material. On it, a sheet of lumber sawn along the length is laid out so that it evenly covers the entire surface of the sheet.
The sheet on which the layout was made is smeared over the entire area with wood glue and selected pieces of lumber are laid out on it tightly to each other, while their end sides adjacent to each other are smeared with glue. After all the workpieces have been completely laid out, they must be tightened with clamps or a tie for floor boards (laminate) and a load placed on top, or the boards placed across the door must be tightened with short clamps.
After the glue has dried, the door is processed with a plane along the long side - excess lumber is removed to the required width, then sanded with a grinder to completely equalize any possible differences in the thickness of the lumber blanks.
This results in a door that has a base on one side, and a solid wood surface on the other side, which can be kept in its natural form or covered with some decorative material.