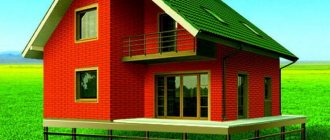
The change house is perfect for temporary living during the construction of a full-fledged house. But even after the completion of the main construction work, the change house will not remain out of use. It can be equipped as a budget country house, a place to store various equipment, work clothes, bicycles and other household supplies.
Ready-made cabins are relatively inexpensive. But why spend money if you can build such a structure on your own by purchasing only the necessary materials and tools? We present to your attention instructions for arranging a cabin made of wood, a finished trailer and a metal profile. Choose the option you like and get to work.
Planning Guidelines
The change house is a secondary utility room, but you should not take the process of its construction and arrangement too lightly.
First, prepare a drawing. You can make it yourself or find a ready-made version in available sources. The drawing will allow you to imagine how the finished building will fit into the surrounding landscape, as well as calculate the required amount of building materials.
Select the dimensions of the structure and its layout at your discretion. As a rule, industrial structures intended for living are about 5-6 m long, about 2.5 m high and similar in width. Otherwise, regarding the dimensions of the house and its layout, be guided by your needs and preferences.
Construction of houses
0 votes
+
Vote for!
—
Vote against!
During construction or simply for temporary residence in a country house, a simple-to-construct and unpretentious building is often required. As they say, cheap and cheerful. Often such temporary buildings are built from wood and have minimal functionality. But today a new type of temporary structure has become widespread - a block container. It can serve as both temporary housing for builders and completely permanent housing for summer residents. It is quite easy to build a block container with your own hands, and its functionality will allow you to fully enjoy the fruits of civilization outside the city.
- Types of block containers
- Self-assembled container block
- Block container converted from a shipping container
- Collapsible block container
- Installation of a block container
- Assembling a block container from scratch
- Conversion of a ready-made sea container
- Installation of a collapsible block container
Types of block containers
When planning to build a block container on a site, you need to decide in advance what it will be like. This determines how much money and effort will be spent on its installation. The fact is that block containers, according to the method of assembly, can be divided into three types: self-assembled block container, converted from a transport container, and collapsible block container. Each of these types of block containers has its own advantages and disadvantages. Which one will be preferred depends only on the wishes and financial capabilities of the owners.
Self-assembled container block
Most of these structures are built with your own hands from scratch and according to your own drawings. Metal corners are used for their frame, corrugated sheets are used for the external walls, interior finishing is done by covering with clapboard or plywood, and stone or mineral wool is used as insulation. A distinctive feature of such block containers is their non-standard sizes. In fact, such a block container can be made with your own hands of any size and shape. To erect the entire structure, you will need a welding machine and skill in working with it, which can be a decisive factor in favor of a self-assembled container.
Block container converted from a shipping container
Today, block containers converted from transport containers are especially popular. They have many advantages, but also a lot of disadvantages. The main advantage of such a container is the ready-made design, which only needs to be slightly modified. But such a disadvantage as standard sizes may not work in favor of a shipping container when choosing. Of course, it is quite suitable as temporary housing for workers, but as a seasonal country house it can turn out to be very inconvenient.
Collapsible block container
With the development of the market and technology in construction, block containers began to appear, which are easy to install and also easy to disassemble. Collapsible containers are very popular among construction companies. They can be disassembled and stored in a warehouse, fortunately, they take up little space, and if necessary, sheds can be quickly erected for workers at the construction site. The production of such block containers is carried out by specialized companies. The design itself is for the most part similar to a homemade block container, but the use of sandwich boards as walls, floors and ceilings clearly distinguishes a prefabricated block container. If you don’t want to bother with welding, then if you have a certain amount of money, you can purchase a ready-made block container and simply assemble it like a construction set. For a prefabricated block container the price ranges from 2,000 USD. up to 5,000 USD and depends on the internal area.
Installation of a block container
Having decided on the type of block container, you can begin installing it. As already noted, each type of block containers requires certain labor costs. The most labor-intensive is homemade. To create it, you will first have to complete a drawing, purchase materials, then assemble the frame and sheathe it. The simplest and least labor-intensive collapsible container. But the total cost may be higher. Let's look at how to assemble each of these types of block containers with your own hands.
Assembling a block container from scratch
When starting work on creating a homemade block container, the first thing you have to do is its drawing. To do this, you can use a computer program such as ArchiCad, or you can simply draw a simple drawing on a sheet of paper. The drawing must indicate all the dimensions of the future block container showing the installation location of the door and windows. For a self-made block container, you can choose almost any size convenient for you. But there is one important point. If in the future it is necessary to transport such a container, then its width should not exceed 2.5 m. To create a block container, the drawing must contain a description of all materials and dimensions. Particular attention should be paid to the frame, namely the installation location of the door and windows. The doorway and windows will require additional studs. Finally, we indicate the material for wall cladding and insulation. The materials will be required:
- for the frame, bent channel 100 mm;
- metal sheets 2 mm thick for the subfloor;
- galvanized corrugated sheeting for external cladding;
- wooden block 40x100 mm for joists and internal frame;
- 25x200 mm boards for the floor, as well as flooring, such as linoleum;
- superdiffusion membrane for vapor and moisture protection;
- insulation (mineral or stone wool) for walls, floors and ceilings;
- plywood or plastic lining for interior cladding;
- windows and door.
The tools you will need are a grinder, a welding machine, a tape measure, a drill, a hand-held circular saw, a hammer, and a screwdriver. As for wood fasteners, you can opt for screws or nails.
Having acquired everything necessary, we proceed to the construction of the block container. We start by preparing the site for the installation of a block container . To do this, we level the ground and compact it thoroughly. To prevent the container from standing on bare ground, it is necessary to create a simple foundation for it. To do this, you can build brick columns, lay concrete slabs or create a pile foundation.
Next, we move on to cutting pieces of channel for the frame using a grinder. Having received the required number of pieces of the required size, we proceed to welding them. First we create the bottom harness . To do this, we take channels corresponding to the length and width of the block container, lay them out on a previously prepared surface and weld them together into one continuous frame. During the welding process, corners can become loose, so to prevent this from happening, you need to grab the corner at several points, then check and, if everything is fine, then weld the entire seam to the end.
Important! To make a simple pitched roof, just cut several posts of greater length. Usually the racks on the door side are made longer. But this approach is justified if it is not planned to create a different type of roof.
Having welded the lower trim, we move on to the racks . They will be located in the corners of the trim, one or two on the back wall, as well as in the area of the doorway and windows. We start from the corners. After the stand is installed, it is necessary for a partner to hold it in a strictly vertical position while the welder grabs the stand in several places. And if we managed to do it without tilting, then we finally weld the stand. For additional stability, triangular spacers can be welded at the bottom of the post. We weld all the other racks in the same way.
Important! The distance between the doorway posts should be equal to the width of the door. Also, for reliability, a jumper is welded between them at the top. The height from the lintel to the corner should be equal to the height of the door. The same applies to window openings. But in addition to the upper one, they must also have a lower jumper.
The next step will be welding the top trim . Everything is quite simple here. Corners for the top trim are placed on top of the already welded perimeter racks and welded.
After the frame has been created, we proceed to arranging the floor for the block container. To do this, first create a subfloor from metal sheets. This is done in order to protect the finished wooden floor from exposure to moisture and the penetration of rodents into the block container. The sheets are laid out inside the frame. Their edges should be placed inside the bent channel and also rest on the foundation. When the sheets are laid out and their edges are fitted close to each other, we spot weld the sheets together. Then we place several narrow pieces of metal on top of the seam, so that they are placed perpendicular to the main seam, and weld them. Finally, we weld the sheets along the seam.
Next, we move on to covering the block container with galvanized corrugated sheeting . Everything is quite simple here. Sheets of corrugated sheets are installed from the inside of the frame. If the height of the sheets is slightly larger, then they can be trimmed with a grinder without much difficulty. The corrugated sheet is fixed to the frame in several ways. You can use short metal screws with a wide head, or you can fasten them with tear-off rivets.
Important! When installing sheets in window openings, you should allow the sheet to overlap the window opening by 3–4 cm. This is necessary in order to hide the cracks and places filled with foam after installing the windows.
Having finished with the walls, we move on to the roof of the block container . For the roof itself we use the same corrugated sheeting. The only thing that will need to be done is to weld a few more jumpers between the walls to securely fasten the corrugated sheeting. Next, we lay the corrugated sheet itself and fix it to the metal frame.
The next step is to create a wooden frame, insulate it and cover it . The frame itself is needed for laying insulation so that the latter does not fall out or crumble. For this we use a wooden beam. First we install the racks, then we make jumpers between them. The internal dimensions between the posts and lintels must correspond to the size of the insulation, minus 5 - 10 mm for reliable fastening inside. Now we lay a superdiffusion membrane over the frame and fasten it to the wooden frame with a stapler. Finally, insulation is placed inside the frame and a superdiffusion membrane is laid on top of it again. All that remains is to cover the walls with plywood or clapboard. We cover the ceiling in a similar way.
As for the floor, it will be on wooden joists laid on metal sheets. Its creation is similar to wall cladding. First we lay the joists. We choose the step between them so that the insulation fits there. Then we lay the insulation and lay the membrane on top. All that remains is to lay and secure the boards for the floor itself. The boards themselves need to be sharpened, fitted closely and secured to the joists with nails or self-tapping screws, and the finishing floor covering laid on top of them.
Now let's move on to the windows and doors . Since such a block container is intended for temporary residence, it would not be superfluous to take care of a strong and reliable door. It would be best to make it yourself from steel sheets. But creating such a door requires a lot of experience, so it’s easier to buy or make it to order. The door itself is installed on metal hinges, which are welded to bent channel posts. When installing hinges, you must strictly ensure that they are on the same line. For a metal door, three hinges are installed. Two on top, at a distance of 20 and 50 cm from the edge of the door, and one below, at a distance of 30 cm from the threshold. After which the doors are hung in place.
As for windows, there is one important point. Windows are vulnerable to break-ins, so they will need to be protected with bars. The grill itself is welded to a steel channel, which acts as a window opening. The windows themselves can be either wooden or metal-plastic. When installing, you need to check the verticality of the window so that it does not fall over. The gaps between the window frame and the channel post can be foamed. This completes the creation of a homemade block container. If desired, additional finishing work can be carried out inside.
Conversion of a ready-made sea container
The fashion for everything Western has also affected block containers. Today it has become popular to use block containers converted from sea shipping containers as cabins or even permanent housing. The cost of a block container converted from a transport container may be slightly higher compared to a home-made one, but the work required to equip it is an order of magnitude less.
To make a metal block container converted from a transport container, the first thing you have to do is select and purchase a used container itself. Ads for the sale of shipping containers can be found without problems. Such containers are produced in several sizes: standard and HC (High Cube). Respectively, 20 and 40 feet in length (6 and 12 meters), a width of 2.35 m and a height of 2.4 m and 2.7 m. A standard container can be found for an average of 1200 USD, and a HC container for 2100 USD. e. Such standard sizes impose certain restrictions, this is especially unpleasant with regard to the width of the container. But the solution to this situation can be the docking of two or more containers. To create a livable block container from a transport container , you need to do the following:
- purchase one or more containers and deliver them to the site;
- while the containers are on the way, prepare and level the area for its installation;
- as in the case of a homemade one, a simple lightweight foundation is created under the shipping container;
- After delivery, the container is installed in place. To do this, you need to order a crane in advance;
- if the containers will be joined, then after installing them we cut off the touching walls using a grinder;
- at the junction, where the lower and upper trims pass, as well as the vertical posts, we weld them together;
- if there is only one container, then we proceed to cutting out openings for windows and doors. We do this using an autogen or grinder;
- to secure the door in the doorway, you can install two vertical posts made from a metal corner;
- further work will consist of finishing the block container. They are identical to the work described for a homemade block container. The only important difference will be the need for external finishing, namely painting or cladding of metal walls.
Installation of a collapsible block container
Of all the block containers, the most expensive and at the same time the easiest to assemble is the collapsible block container. Such containers are made to order at a specialized enterprise. A prefabricated block container has a standard width of 2.5 m, and its length can vary from 2.5 m to 6 m. It is also possible to create a block container of a longer length. The assembly of such a container is carried out by two assemblers and resembles a regular construction set, the assembly time is from 4 to 6 hours. Such high assembly rates are due to the use of sandwich panels and pre-fitted parts. When doing the assembly yourself for the first time, the company can provide its own specialist and a full set of assembly documentation.
Prefabricated containers are assembled in several stages. At the first stage, the frame is assembled and connected using bolts. On the second floor, the floor is laid and the roof is mounted. At the third stage, the walls are installed. Finally, the windows and doors are installed. In the photo demonstrating a collapsible block container, you can see how easy and simple such containers are to install.
There are no special secrets or difficulties in creating block containers. The main thing that is needed is the ability to handle the tool. Since it depends on this whether you can assemble the entire structure with your own hands. For those who are not used to or do not know how to work with their own hands, we can recommend hiring specialists and purchasing a ready-made block container.
Choosing a place to build a shed
When choosing a location for our house, we take into account a couple of important points.
Firstly, we think about whether we will transport the structure somewhere in the future. For example, you are going to build a lightweight house for a couple of seasons, and then remove it to another place. If moving is part of your plans, it is best to place the change house as close as possible to the exit from the site.
Secondly, we decide on the purpose of the room. If the shed will be used only as a shed for storing various tools and other household supplies, it is best to install it approximately in the center of the long side of the main house so that it can be easily reached from any side of the site.
Helpful advice! If you do not rule out that in the future the shed will be converted into a bathhouse, build it in a remote, secluded corner of the site, keeping in mind the fire safety rules.
Advantages and disadvantages
The use of sandwich boards is widely used, and the material has characteristics that justify its use.
Among the advantages of sandwich panels are the following indicators::
- lightness of the material. This indicator is especially important when arranging a facade as a cladding coating. In this case, reinforcement of walls and other load-bearing structures is not required;
- ease of installation. When installing sandwich structures, no special skills or experience are required;
- environmental friendliness. The production of sandwich materials involves the use of environmentally friendly structural elements;
- fairly stable fire resistance indicators;
- possibility of modernization;
- good water-repellent properties;
- the range of color solutions provides for a certain decorativeness and aesthetics of the structure;
- providing sound insulation and thermal insulation;
- The time of year does not affect the installation of sandwich panel structures.
The disadvantages of the material include the following indicators:
- if the length of the slabs is less than 7 meters, then they are not able to withstand additional load;
- surface damage requires replacement of the element;
- improper installation in cold weather can lead to icing of the structure;
- fragility of sandwich panel construction.
IMPORTANT!
Sandwich slabs have different applications: some are used for the construction of residential walls, while others are produced for the purpose of arranging industrial buildings.
Therefore, when choosing, the most exact correspondence between the material and its application is required . In this case, a mandatory condition for selection is compliance with the GOST standard.
Making the base
Our foundation will be the same for all three cabins. The only exception would be a ready-made trailer on wheels - there is no need to build a foundation for it.
We make the basis as follows:
- we get rid of the top fertile layer of soil;
- compact the bottom and walls of the resulting pit;
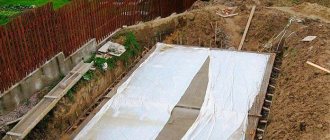
- cover the hole with geotextiles;
- pour a layer of sand over the geotextile and compact it thoroughly;
- We place the cinder blocks symmetrically on the resulting pillow;
- We wrap each support with a layer of roofing felt.
Important! If you plan to attach a small porch to the shed, consider installing supports for it at the same stage.
We are building a wooden cabin
Let's start building the frame of our cabin. First, we lay a wooden beam around the perimeter of the future structure, as well as in its center to further strengthen the structure.
We connect the opposite sides of the beam. To do this, we fasten the logs to the beam of the lower trim. You can connect in any suitable way. Connections using the tongue-and-groove method, using metal corners and anchors, have proven themselves well. We made preliminary selections to connect the elements and additionally strengthened the fastening points with nails.
We install vertical corner and intermediate posts. We install intermediate supports in meter increments. To do this, we use timber with a cross section of 15x15 mm. Don't forget to leave an opening for the door. To securely connect the frame elements, we use metal corners and self-tapping screws. At the same stage, we install support pillars for the future porch, if its presence is provided for by the design of the cabin.
Important! The height of the vertical supports on the rear and front sides of the cabin should differ by approximately 50 cm. Such a difference will ensure an optimal slope of the roof and precipitation will not linger on it.
We mount the beam of the upper trim. The support posts of our cabins have different heights, so we work as follows: first we lay the timber on the tops of the higher supports, then we connect the low posts and install the side crossbars perpendicular to them. We make connections using the already familiar method with samples and nails.
As a result, our frame will be divided into a number of rectangular sections. To strengthen the structure, we connect the opposite lower and upper corners of each such section with jibs made of boards.
We attach the rafter beams to the top roof sheathing. We use the boards that are as even as possible to make lathing easier in the future. We install the rafters in increments of about 500-600 mm. We pay special attention to the strength of connections on roof beams.
We construct the roof so that it protrudes slightly beyond the boundaries of the frame. This will allow us to arrange a base for drainage on the back side of the cabin, and mount a canopy on the front part.
We choose the material for the finishing roofing at our discretion. For example, ondulin is good. We lay it with an overlap, starting from the bottom of the slope. Before laying ondulin, you should lay out a continuous sheathing of boards and attach a waterproofing film on top of them. Instead of ondulin, you can use slate or other material of your choice.
Prices for various types of timber
timber
Ceiling and roof
A change house is a small structure that can be rationally covered with a pitched roof. It is easy to manufacture and economical in terms of material consumption.
To create a slope, one of the long walls needs to be made higher to provide a slope for water drainage. This is usually the front façade. To create the required drop, you can immediately make the front pillars longer when installing the frame, or attach a wooden panel of the required height to a ready-made box.
The elevation angle is determined by the type of roofing material and must be no less than:
- 3-5° - for rolled roofing, folded metal sheets;
- 7° - fiber-cement sheets, corrugated sheets;
- 12° - metal, ceramic or bitumen tiles.
The footpiles are laid on the mauerlat - the supporting beam of the strapping, secured with corners, overlays, and staples.
A sheathing of 25 mm thick boards is mounted on top of the rafters or a continuous flooring of OSB boards is laid on which a soft roof can be laid.
Change house from a construction trailer
Don’t want to bother with assembling the frame and other related activities? You can buy a ready-made trailer and equip it for a cabin. Such trailers do not even need their own foundation - you just need to carefully level the site and install the container (trailer).
If you equip a used trailer as a cabin, carefully examine its condition. Clean off traces of rust, replace heavily damaged cladding elements with similar ones, weld patches onto the through holes, coat the metal with a special primer and paint.
The installed structure must be insulated. The rest of the arrangement is at the discretion of the owner. These points will be discussed separately below.
You can also buy a trailer on wheels. The option is mobile and very easy to use. After completing all the measures for arranging such a trailer, it is installed on the frame of the trailer.
Chassis design for mobile cabins
Of all the existing options for mounting the chassis - on the load-bearing body, subframe and frame - only the last option is used for carriage houses.
The chassis design is as follows:
- rigid welded frame made of rolled metal or bent profile
- front axle swing type
- rear axle without turning mechanism
- shock absorbers made from springs
- tow hitch
- wiring with headlights
- mechanical parking and emergency brake
- hydraulic inertial service brake system
- safety rope.
The chassis and change house are assembled separately; they are combined into a single device at the last stage. For carriage houses, only high-frame off-road trailers are used. Transportation safety is ensured by duplicating the braking system.
The suspension of the cabin on wheels is dependent with longitudinal springs and forced steering.
Main operational characteristics of the wheeled chassis:
- platform/frame dimensions
- front/rear axle load
- ground clearance and wheelbase
- wheel and tire size
- wheel formula.
The design of a cabin on wheels has a multiple reserve of reliability - the operational and structural loads of the cabin chassis are much lower than those of cargo trailers and semi-trailers. Metal cabins made of corrugated sheet or sandwich have the longest service life.
We build a shed from metal profiles
The construction of a frame made of metal profiles will require more effort compared to the construction of a wooden analogue. But the iron change house will last much longer.
The set of necessary tools includes:
- hammer;
- welding machine;
- drill;
- screwdrivers;
- corner;
- grinder;
- tassels;
- construction stapler;
- roulette;
- hacksaw
We also buy the following materials:
- profiled pipe measuring 2x2 cm, 4x2 cm, 4x4 cm and 4x6 cm;
- mounting rail 2x4 cm;
- galvanized sheet steel;
- corrugated sheeting;
- primer for metal;
- self-tapping screws for fastening corrugated sheets;
- screws for metal;
- staples for a construction stapler;
- rivets;
- OSB boards;
- polyurethane foam.
Making the base
We will assemble the base of the frame from a pipe measuring 4x6 cm. We cut the pipes in accordance with the dimensions of the structure being built.
We weld the pipes according to their external dimensions and get a rectangular edging. In total we need to make 2 identical rectangles. We will make the floor from one, and the upper part of the cabin from the other.
To make the floor reliable, we create a grid inside the rectangle from the same profiled pipes. We are making a change house with a width of 250 cm. With such dimensions, it is enough to weld 2-3 longitudinal pipes along the entire length inside the edging. We weld cross pipes every 50 cm.
Next, we take a galvanized sheet and fix it with self-tapping screws to the base of our change house. We turn the base over and lay it with the galvanized sheet down on cinder block supports or simply a leveled area. The structure does not need to be attached to the cinder block - the cabin will be sufficiently supported by its own weight.
We mount the racks
We make vertical supports from a 4x4 cm pipe. We cut it into pieces in accordance with the planned height of the change house. Usually it is 250 cm.
We place the first supports in the corners of the foundation constructed at the previous stage. We check that the angle at the junction of the posts with the base is strictly straight.
We fix the leveled rack by welding. Similarly, we set up the racks in the remaining corners.
Additionally, we will need to install intermediate racks. To do this without disturbing the geometry of the structure, we take the second rectangular pipe base made in the previous step and lay it on top of the corner posts.
We scald the resulting “cube” with intermediate posts and spacers. First, we take pieces of corrugated pipe 4x4 cm along the height of the structure and weld them vertically between the lower and upper bases. The recommended installation step is 100 cm. At the same stage, we provide an opening for the door.
We weld the horizontal cross member around the support structure. The pipe must be welded to the vertical posts at a height equal to half the height of the change house.
We make the spacers from a 2x4 cm profiled pipe. We cut it into 30-centimeter pieces. We cut each edge of the workpiece at a 45-degree angle. We scald all the corners of the structure with the resulting spacers. Additionally, we can scald the floor with them.
We make the roof
We made the bottom part of the frame and the wall. Next we are engaged in the manufacture of the “skeleton” of the roof.
We make trusses in the form of isosceles triangles. We use a 2x4 cm pipe. The recommended installation step for the trusses is 1 m. We weld them along the length of the frame. We cover the roof with corrugated sheets. If you wish, you can use another material of your choice.
We cover all metal elements of the frame with a special primer, and after it dries, we apply paint of the desired color.
How to build a change house with your own hands - photo instructions
In order for the change house to be reliable, its manufacture should be taken seriously. But how to build a change house with your own hands? This step-by-step instruction will help you. If you make it yourself or order a summer cottage from a manufacturer, which will be assembled according to the scheme described below, rest assured that it will serve you for a very long time. Even after the need to use it as housing disappears, you can use it as a utility room.
To make a change house you will need the following tools:
- Welding machine
- Hammer
- Bulgarian big and small
- Drill with roofing attachment and drill bits
- Paint brushes
- Screwdrivers
- Carpentry corner large and small
- Welding mask
- 6 meter tape measure
- Stapler
- Wood hacksaw
Before you start making a change house with your own hands, prepare all the necessary tools.
Consumables you will need to make a frame cabin with your own hands:
- Profile pipe 40x60, 40x40, 40x20, 20x20
- Galvanized or colored corrugated sheeting
- Insulation Isover 50-100 mm.
- Hydrobarrier
- Vapor barrier
- Mounting rail 20x40
- Smooth galvanized sheet (can be illiquid)
- Primer for metal
- Roofing screws 19mm, in the color of the corrugated sheet
- Flea screws
- Hardened wood self-tapping screws 35mm
- Rivets
- Metal bending elements for corrugated sheets
- Staples
- OSB board 10mm and 20mm thick.
- Metal-plastic window
- Polyurethane foam
- Electrical wire 2x2.5
- Sockets, switches and machines.
- Entrance door
When starting to manufacture a country frame cabin , I would like to determine a certain sequence of the process itself:
- Frame making
- Interior work
- Waterproofing and insulation
- Electrical installation
- External cladding
- Installation of doors and windows
Making the floor
First, we construct a subfloor from boards treated with an antiseptic. We lay them out as tightly as possible to each other and attach them to the frame with self-tapping screws.
We spread a waterproofing film over the boards. We attach it to the joists using a construction stapler with staples.
We nail additional logs to the base for laying thermal insulation and attaching the second layer of boards. We fasten the logs in increments equal to the width of the selected thermal insulation material. Mineral wool, a relatively inexpensive and time-tested thermal insulation material, is well suited for floor insulation.
We lay insulation in the space between the joists. We fix a layer of vapor barrier material on top. A stapler with staples will help us with this again.
We lay the finished floor boards. We attach them to the joists using self-tapping screws. Finally, we varnish or paint the floor.
Sheathing and insulation of cabin walls
If polystyrene foam is used as insulation, no additional waterproofing is required. The material is not afraid of moisture and is practically waterproof. Mineral wool is more capricious because it has greater water absorption. In heated rooms, it must be protected from steam humidification using a vapor barrier, and waterproofing must be installed on the outside.
The thickness of polystyrene foam for winter use of the room must be at least 100 mm. To avoid the appearance of cold bridges and local freezing, it is recommended to lay 2 layers of insulation of 50 mm each with joints spaced apart.
Before covering and insulating, you need to install window and door frames, and additionally strengthen the openings with another row of boards.
To lay insulation, one of the skins - external or internal - must already be ready. The heat insulator is inserted into the grooves between the racks, the cracks are foamed, and covered with the top skin.
We carry out external cladding
The trailer cabin can be left without cladding, but a structure made of wood or metal will require mandatory external finishing. We won’t just leave the “bare” frame, will we?
We cover the frame with waterproofing film. Carefully seal the joints of the waterproofing strips with tape. Many different materials are suitable for external wall cladding:
- wooden boards;
- composite panels;
- siding, etc.
Choose at your own discretion. The cabins covered with a block house also look very nice.
Important! The area of the frame allocated for the porch is not sheathed.
Interior decoration
We place insulation in the space between the frame posts. We cover it with a layer of vapor barrier material. We attach the vapor barrier to the frame using a suitable method.
We fill transverse slats on top of the frame to secure the insulation. We attach the selected internal lining material to the same slats. Most often, lining is used for interior decoration. For the rest, focus on your preferences and available budget.
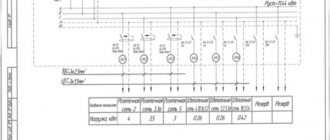
Electricity
We will not install full-fledged wiring into the change house. Such buildings are not permanent and do not require such equipment. But how, in this case, can at least organize lighting and heating? A good extension cord with a cord of suitable length will help us with this. We turn it on to the nearest available source of electricity and pull it into the change house.
In a change house, we can include a tee in such an extension cord for greater convenience and the ability to use several electrical appliances at once.
Lighting
We arrange it at our discretion. In general, a few simple lamps installed in the main functional areas will be enough for a change house.
Briefly about the main thing
A change house in a dacha often becomes the first home in which you will have to spend the night for several years before the construction of a real house. You can build it yourself in 1-2 days and save money. It is enough to make a simple foundation, weld or knock together a frame, install walls, floor and roof.
Companies offer ready-made houses of various sizes in the form of ready-made parts. It is enough to assemble the “constructor” in the right place. This is a good option for those for whom a standard house is enough, and who do not want to make calculations and purchase materials.
Question
Write in the comments what you think - is it worth making a metal frame in the change house or will a regular wooden frame suffice? Is there a change house at your dacha?
Water supply
For maximum ease of use of the cabin, we run water into it. We will not build a major expensive water supply system. It is enough to connect a flexible hose to a water supply source, insert it into the household through a pre-prepared hole in the wall and equip it with a tap to shut off the water.
We can install a compact water heater near the hose attachment point. Special bulk models are available on the market. It is enough to remove the top cover from such a tank, fill the container with water from a hose, plug in the heating unit, and after a short time use warm water at your discretion. If desired, a hose with a shower head can be easily connected to such a water heater.
A compact sink wouldn’t be out of place in your household. We attach it to the wall in a convenient place. We connect a corrugated pipe to the sink drain to drain water. We remove the corrugation through a pre-arranged hole in the floor and connect it to the sewer pipe. Water will flow through the sewer pipe into a drainage hole or other designated place.
Types of sandwich panels
For the construction of household temporary or permanent structures, wall sandwich slabs are used for walls and roofing slabs for the design of the roof of the cabin. Wall slabs can have a smooth or corrugated external design; roof slabs are most often smooth.
Standard sizes of multilayer slabs for wall construction:
- 300x115x3.2 cm;
- 300x115x2.4 cm;
- 300x115x1 cm.
For the construction of cabins, sandwich panels with a metal coating are used. Depending on the need for insulation, you can use panels with insulation made of polyurethane foam, mineral wool or polystyrene foam of various thicknesses.
CAREFULLY!
The thicker the insulation in a multilayer panel, the higher its thermal insulation characteristics and, accordingly, the greater its weight.
The locking connections that are used to fasten the panels to each other can be with closed or open fastening options . A hidden lock is the most effective: it is closed by the protruding part of the slab and is not exposed to wind and moisture, the joint of the panels is reliably protected from the cold.
Heating
The heating is done electrically. A budget option is a pair of fan heaters. More expensive and efficient - an oil heater or convector. We select the power of the heating unit in accordance with the area of our shed.
At the end, all we have to do is furnish the room. At this point, we focus entirely on our preferences and needs.
| Parameter | Wooden cabin | Metal shed |
| Parameter | Wooden cabin | Metal shed |
| Price | Cheaper. To further reduce the cost, natural wood can be replaced with wood boards. | Expensive. Metal has a higher cost. |
| Durability | Lasts less than metal ones. Wood does not tolerate moisture well. | Lasts for decades. |
| Mobility | It is easier to transport, but there is no guarantee that the wooden structure will withstand transportation normally. | Transporting is more difficult, but safer. |
| Possibility of installing communications and additional elements | Can. More difficult. | Can. Easier. |
| Environmental friendliness | Eco-friendly | Less environmentally friendly when compared with wooden cabins. |
Good luck!
Prices for popular models of electric heaters
Electric heaters