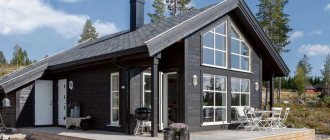
External cladding of a house solves several problems - improving the design of the facade, protecting walls from weather conditions and insulation. The value of any finishing material lies in the combination of several factors - durability, availability, decorative properties, ease of installation and maintenance. Finishing the house with siding meets these conditions. Therefore, this is one of the most popular technologies, especially considering that there are several types of facade panels, united by a common name.
Decorating a house with siding is a successful combination of tradition and modernity Source holds.ru
Types of siding and their features
Siding was invented by American settlers. It was made exclusively of wood and consisted of ordinary boards, which were mounted horizontally overlapping in such a way that the upper ones hung over the lower ones. Nowadays there are only several types of materials, and even more decorative forms.
Wood siding
In the classical interpretation, it is an edged board that is attached to the sheathing. Nowadays, facing the facade of a house with wooden siding is often called “American” in honor of the birthplace of the technology. And in its usual form, a house sheathed in this way looks good, albeit somewhat rustic.
This is exactly what the classic “American” trim looks like. Source hi.aviarydecor.com
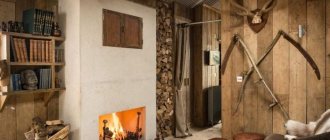
Fans of rustic style will certainly like the slightly rough appearance of the facade, made of unedged boards - it gives the house a unique flavor, despite the modern “filling” of the wall pie made of insulation and a protective membrane.
Brutal style for a wooden house Source pinterest.cl
This fastening method, which ensures that the cladding is impenetrable to wind and precipitation, gave impetus to the emergence of profiled facade boards. It greatly simplifies the installation process, since the geometry itself sets the exact step, and the inner side is mounted to the sheathing with a continuous flooring.
The beveled profile of the board with a tenon will make installation easier and faster Source notperfect.ru
Even better in this regard for finishing the facade of a wooden house with siding is “American” lining. To the beveled profile and the protruding edge of the front part, a tenon was added at the upper end and a groove at the lower end, which ensure complete tightness of the skin and protection of the facade from direct penetration of cold air in winter and hot air in summer.
Heat treatment of the “American” façade board significantly increases its service life Source parki48.ru
Metal
The name speaks for itself; stamped steel sheets are coated with primer and then a protective polymer coating. There are galvanized panels.
The advantages of this type of material are obvious: fire safety, durability, excellent appearance, mechanical strength. The disadvantages of metal siding are poor sound and heat insulation, as well as high cost.
Fiber cement siding
This type of siding for home decoration is artificial stone in composition. But unlike its closest “relatives” among facade panels (the surface of which is made to resemble slate, limestone or brick), it imitates cladding with wooden boards. And in terms of decorative abilities it is in no way inferior to the best examples of natural analogues.
Fiber cement panel is not inferior in “beauty” to wooden siding, but significantly exceeds it in service life Source 2gis.ru
See also: Catalog of companies that specialize in finishing and insulating houses.
Installation takes place according to the traditional scheme - with self-tapping screws in the upper part, so that the protruding edge of the overhanging panel covers the fastening points. And the inner side, unlike classic siding, is located on the sheathing as a continuous flooring, like a profiled facade board. Although on the front side the cladding resembles a traditional herringbone installation.
Although this is a relative of concrete, the fastening is no more difficult than that of wood. Source fibro-saiding.ru
In terms of durability and performance properties, fiber cement siding is one of the best in its class - it is a non-combustible material, when painted in the mass it practically does not fade in the sun, is absolutely resistant to high humidity and fluctuations in its level, and does not change its geometry when the temperature drops or rises.
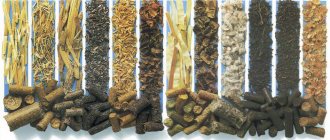
Wood polymer siding
This material is made from recycled wood and polymer and is commonly referred to by the acronym WPC, where the “k” stands for composite. Initially, the technology itself was planned as a way to recycle wood waste and produce boards (panels) for use outdoors - terraces, facades, small architectural forms in landscape design
WPC has the same “specialization” as wood, but is much more durable Source notperfect.ru
It turned out that the cost of production turned out to be higher than that of similar products made from natural raw materials of coniferous species (including larch). But given the long guaranteed service life (from 25 years) without fading, cracking and warping, such siding will pay for itself in the long run. Moreover, it does not require treatment with antiseptics, fire retardants or paint coating.
There are different types of WPC profile structures for cladding a house with siding. They differ in the thickness of the front part, the shape of the “lock”, the number and location of stiffeners. But they have one thing in common - an imitation of a high-quality wooden board.
Ideal surface quality is achieved already at the manufacturing stage Source woodexotic.ru
And although the type of front surface of the sheathing and the method of joining the panels are more similar to lining or imitation timber, they are still called “siding”.
Frame making
Before attaching the sheathing to a wooden house, it is necessary to remove the decor that protrudes beyond the walls (for example, window frames, drainpipes or ebbs). If there is a layer of finishing material, it should be carefully removed.
After preliminary preparation, the partitions are inspected, cracks are eliminated, as well as areas affected by rot are treated.
Do-it-yourself selection and installation of lathing
The location of the sheathing bars depends on the chosen installation scheme. For horizontal positioning, a vertical frame is used. If the home owner decides to install the products vertically, then horizontal beams should be mounted. In this case, the owner must take into account in advance the negative visual effect of narrowing the sheathed walls.
You can assemble a vertical frame for installing siding from wooden blocks.
To make the frame use:
- A wooden beam pre-impregnated with antibacterial liquids that reduce the rate of decay. It is necessary to take into account the curvature of the slats or the risk of bending the elements with a screw under the influence of external climatic factors.
- Metal profile with a galvanized surface, resistant to rotting, but having high thermal conductivity. An additional advantage is the stable geometry of the parts that do not bend during installation or during operation.
Algorithm of work when installing sheathing for horizontally directed siding:
- Mark the lines for installing the slats vertically with a gap of 400 to 500 mm.
- Screw metal U-shaped hangers (every 500-600 mm) using screws or dowels inserted into pre-drilled holes.
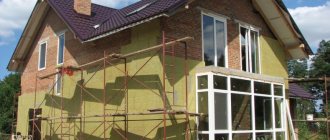
Insulation and waterproofing
To protect the house from cooling, a layer of thermal insulation is used, which has increased vapor permeability compared to the characteristics of the wall material. This requirement makes it possible to minimize the formation of condensation at the line of contact between layers of dissimilar substances, which causes rotting or deterioration of the protective properties of the insulation. For residential buildings, compacted mineral wool slabs are most often used, in which windows are cut to allow the suspension plates to exit.
The preferred insulation material is mineral wool, which allows water vapor to easily pass through.
After laying a layer of wool 5-10 cm thick in the openings between the frame beams, it is necessary to attach a waterproof membrane over the insulation, which allows steam to escape, but prevents the penetration of moisture from the air into the thermal insulation. The film strips are installed in a vertical direction, overlapping (layers overlap up to 15-20 cm) and additionally secured with adhesive tape.
Continuation of frame assembly
Step-by-step instructions for dummies for the further manufacture of the frame include the following steps:
- Mount the strips with screws in the corner areas, the outer surfaces of which should be located on the same vertical plane.
- Pull the cords diagonally to control the position of the frame.
- Install and secure in the hangers with screws pre-cut (if necessary) slats made of wooden or metal profiles.
If it is intended to install an insulating layer with increased thickness from polystyrene foam boards, then a double frame is used. The base strips are screwed horizontally, then the thermal insulation layer is laid and secured with disc-type dowels. After placing the waterproofing membrane on top of the main frame at an angle of 90°, a counter-lattice is mounted. The gap ranges from 300 to 600 mm. Additional strips provide ventilation of the space between the thermal insulation layer and the sheathing.
Technology for installing sheathing under siding.
When is the best time to install siding?
Facade cladding refers to “dry” construction technologies. The only stage when mortars can be used is preparing the surface for installation.
If the brick wall does not have cracks or crumbling areas, then before covering it you can simply treat it with a primer with antiseptic properties. And this is only necessary if the climate is humid, the house is surrounded by trees (or is located on the leeward side of a hill) and there is a high risk of mineral-based fungus or mold in conditions of poor ventilation of the facade.
If it is necessary to sheathe a wooden house, then treatment with an antiseptic is mandatory.
Therefore, when they say that siding installation can be carried out at any time of the year, they are lying a little - positive air temperatures are often required for the preparatory stage (the daily average should not be lower than +5°C).
Preparatory activities before finishing
Before starting installation work you must:
- calculate and deliver materials for the manufacture of sheathing to the plot;
- purchase a pre-calculated amount of finishing material and auxiliary parts (metal or wooden beams, screws and nails);
- prepare a tool for marking, cutting or installing material.
Calculation of the quantity of materials
Before sheathing a house, you should calculate the need based on design documentation or measurements of the dimensions of walls, window and door openings. To determine the amount of timber, you should take into account the installation step of metal or wooden guides, which is in the range of 400-500 mm.
When calculating the amount of material, the area of the openings is subtracted from the area of the walls, and 10-12% of the reserve is added to the resulting result in case of damage to the building material during delivery or errors during installation work.
Additional elements
By extensions we mean finishing and transition strips that allow you to decorate corners, door or window openings. The list and quantity of materials are calculated on the basis of a sketch drawing of the house indicating the dimensions of the walls and openings for window or door blocks. The material of the auxiliary profiles can match the characteristics of the main finish. It is allowed to use details of a different color to highlight the contours of the building.
Necessary tools: how to cut building materials
To carry out installation work you will need:
- hydraulic or laser level to determine the correct position of sheathing slats and slabs;
- metal scissors for cutting workpieces or guides;
- electric drill for tightening screws;
- set of replaceable heads for screws;
- construction marker for marking;
- a corner for checking the correctness of the angles between the beams;
- plumb line for additional control of the vertical position of the frame;
- pliers and a nail puller for preparing the surface of the walls of the house.
Siding installation
Each type of facade panel and each profile has its own installation technology.
There are several general mandatory conditions:
- the cladding uses the technology of a suspended ventilated facade with simultaneous insulation of the walls;
Insulation for siding is a mandatory layer of the façade “pie” for our climate Source dekoriko.ru
- it is necessary to calculate the materials as accurately as possible so that there are no large residues left when there is “overkill” and there is no need to buy more if there is a shortage (painted panels from different batches may not have the same shades);
- there must be a precisely calibrated zero level at the starting strip or the first panel from the bottom - it is this that is responsible for the “simplicity” and correctness of the cladding of the entire wall;
- if the panels have a connecting groove, it should be at the bottom so that moisture does not collect in it;
- all openings and corner connections must be framed with appropriate profiles.
How to install panels correctly
During all preparatory work, it is better to store siding panels in a covered, dry room, protected from direct sunlight, in a horizontal position on a flat surface, at a temperature of –30 to +50 °C.
Fastening sequence.
Siding panels are mounted on previously installed connecting structures: starting, connecting and corner strips. Facing starts from bottom to top from left to right. First, the starting bar is attached. It must be mounted absolutely horizontally: the evenness of laying all subsequent layers depends on this.
The first front panel is inserted into the starting bar and slightly pulled up until it snaps into place. Then the panel is screwed to the sheathing through special mounting holes: the first screw is screwed into the middle of the siding panel to avoid its deformation in the future. When screwing in the screws, the panel should not be pulled up - it should hang freely under its own weight.
After fixing the first siding panel, the next one is installed on it using exactly the same technology. In order to cladding the facade evenly and accurately, it is recommended to assemble the panels simultaneously along the entire perimeter of the house - in a circle, visually monitoring the evenness of the installation and checking the horizontality of every third layer of panels with a building level. This way there will be less waste during installation - you can immediately see where the cut pieces can be used.
The finishing strip is attached after the last layer of siding panels is installed. In the very top panel you need to make hooks - for this you will need a punch. These hooks are then snapped into the finishing strip clamp.
Thermal expansion gap.
The main installation rule is that siding and accessories must move freely and not rest against anything. Due to natural temperature changes throughout the year, siding is subject to expansion and contraction. Therefore, when rigidly fixed to the sheathing, it becomes deformed and moves in waves.
This is what errors look like when calculating gaps for thermal expansion. Photo No. 7.
Be sure to leave 5–8 mm free between the siding panel and the side fastener. After installing the panel, it should move freely left and right, but not dangle.
Fastening elements.
The most convenient way to fasten the siding to the sheathing is with galvanized self-tapping screws with a sharp tip and a wide head. They are not subject to corrosion and over time will not leave unpleasant rusty stains on the facade.
There should be a distance of 1.5 mm between the screw head and the panel. The easiest way is to tighten the screw completely and then loosen it one turn. Photo No. 8.
The screws are screwed exactly in the middle of the mounting holes so that the panels can move. Photo No. 9.
Extension of panels.
Often the building is longer than the siding panel. In such cases, a connecting strip is used. In this case, panels of standard length have to be cut. When calculating their length, it is important to remember the temperature gaps.
Installation of siding panels with a connecting strip (left) and extension of panels with an overlap (right). Photo No. 10.
The second way to lengthen panels is overlapping installation. So that the junction points are not noticeable, the joints of the next layers are made offset. But still, after a few years, due to thermal expansion between panels mounted overlapping, gaps will appear and the joints will become noticeable.
Dismantling process
To disassemble the structure (for example, to replace several panels or install new trim), you must:
- Using a factory unpacker or a homemade tool made from 3 mm thick sheet, remove the edge of the bottom siding plate from the guide. The tip must be inserted into the gap and pulled towards you, while simultaneously moving the tip along the panel.
- Bend the edge of the top strip, and then use a nail puller to remove the fasteners (or unscrew the screws with a screwdriver). It is not recommended to make sudden movements, which could lead to damage to the panel.
- Remove the siding strip and lay it on the ground, and then continue dismantling the structure.
Restoring corner profiles does not require siding removal. It is necessary to cut off the front part of the part while preserving the base attached with screws or nails to the sheathing. In place of the cut out part, a fragment of the profile is mounted and fastened to the remaining base using aluminum blind rivets.
Do-it-yourself technology for dismantling siding.
Lathing for corrugated sheets
In a situation with corrugated sheeting, the choice of material for the sheathing depends more on the purpose of the future structure. For example, if you plan to build a fence, and especially a gate, it is better to pay attention to a square metal pipe. If it is a roof frame, a wooden beam will be more preferable.
The pitch of the sheathing under the corrugated sheet depends on the requirements for the future structure and the thickness of the metal. The standard distance is 20-30 cm (for roofing), while the fastening step on each profile depends on its cross-section and is usually 40-50 cm. A distance of 30-40 cm between each batten will be sufficient even for relatively thin corrugated sheeting ( 0.35 mm).
If the material is used as a covering for walls or arranging a fence, you need to use thicker grades of corrugated sheeting (0.5 mm). The distance between the beam or profile, as well as the step for fastening, in this case will be 50-60 cm.
H-profile fastening
The H-profile is designed to connect siding planes in the longitudinal direction. Its installation is no different from the installation of internal or external corners, it is carried out simultaneously with them and is subject to similar requirements .
The only caveat may be the location of the H-panels, which can be installed symmetrically, distributing the length of the panels into equal sections, or, to save material, using the full size of the panels on one side and trimmed parts on the other.
Most often, the first option is used on the front sides of the house, and the second - on the reverse, invisible sides .
Carrying out work in winter
When performing work at subzero air temperatures, the fragility of the plastic increases. The brought material should not be stored near heating appliances. Vinyl panels should be cut in a heated room. Since the material contracts when cooled, a thermal gap of 6 mm is provided between the ends. Other actions are performed by analogy with the work algorithm described above. If the technology is followed, the siding strips will not warp when the air temperature rises.
Vinyl siding should only be cut indoors.
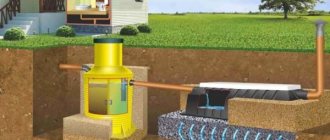
Digging a cesspool
In fact, the pit of an outdoor toilet is nothing more than a single-chamber anaerobic septic tank. With a relatively small volume of incoming waste, it is possible to effectively clarify it and discharge it into the soil without the prospect of involving a sewage disposal machine. The drainage field of such a septic tank is located along the contour of the walls and at the same time, the ingress of waste into the high water is prevented. However, in addition to the correct design of the pit itself, two specific issues need to be resolved.
The first is determining sufficient capacity. The calculation of the volume should be carried out in depth from the line of occurrence of the upper waterproof layer, because under normal conditions the level of waste in the pit should not rise above this mark. It is believed that forced cleaning of the toilet pit can be eliminated if its capacity is 1–1.5 m3 per person. This is a very rough approximation, because the intensity of toilet use in a country house can vary widely.
The second issue is placing the toilet cabin at least halfway above the pit. For this reason, it is much easier to first build a foundation - a thin strip with a cross-section of about 20x20 cm. The toilet foundation is rectangular in plan, it can be square or slightly elongated along. Instead of reinforced concrete strip, you can use brickwork in 3-4 rows. The part of the masonry located directly above the pit is reinforced with steel corners.
The pit itself does not have to have the correct shape. In order to reduce the size of the cabin, it is possible to make a narrow protrusion under the seat, and then dig out the expanded outer part. The hole must be dug in such a way that a pillar of soil of at least 30–35 cm remains at the corners of the tape; these areas must be supported during the digging process from collapse with panel formwork. Keep in mind that the dimensions of the pit will eventually be reduced by about 40 cm on each side.
Installing the finishing strip
The finishing strip is installed before installing the top siding panel. It is usually placed close to the cornice or soffit; the top siding panel is cut along the nail strip and placed under the curl of the finishing strip profile .
From below, the top panel snaps into the lock of the previous panel in a standard manner, thus completing the installation of the section of the canvas.
Installation of external corner strips
Installation of external corner strips is carried out in the same way as internal ones; it is necessary to ensure the same clearances and tolerances.
If the height of the wall exceeds the length of the corner strip, they should be connected with an overlap of 25 mm , for which the nail strips of the upper profile should be cut to the required height, taking into account the temperature gap. The connection is made in the direction of water flow - the upper profile on the lower one.
Are you planning to insulate your facade?
In order for the house to maintain its ability to breathe, it is recommended to choose mineral wool. This is especially true for wooden buildings. The thickness of the heat insulator is selected depending on the climatic region.
Insulating a house with mineral wool implies the presence of a ventilation layer between the wool and the siding. If the height of the sheathing is not enough to provide a gap of 1-3 cm, then a counter-lattice is provided.
Installation of insulation with a counter-lattice to create a ventilation gap
A hydro-windproof film is attached on top of the insulation using a construction stapler. Wall cladding will breathe well if you use modern vapor diffusion windproof membranes. You should be careful with insulation, since the wrong choice of materials at this stage can lead to problems with room temperature and ventilation.
If you plan to combine the cladding of a house with its insulation, we recommend going to the article about installing siding with insulation.