Today, even outside the city, you need to live, enjoying the fruits of civilization. In this article we will talk about cesspools for toilets in the country - we will analyze their varieties, the materials used for construction and the stages of construction. For a modern autonomous sewer system, just a pit is not enough. After reading the article, you will learn which design and materials are best to choose, and in what order the installation will be carried out.
Classic cesspool for a toilet in the ground Source kolodecgrad.ru
Let's start with the fact that the variety of sewerage structures offered for country houses is surprising. These are various types of septic tanks and dry closets. But we must pay tribute to the classic cesspools - this is still a fairly relevant structure.
Where to place the toilet on the site
When designing a cesspool for a country toilet, you should carefully approach the issue of choosing a place for it in the garden. First of all, measurements are carried out in accordance with the requirements of SNiP 2.04.03-85 “Sewerage. External networks and structures" (in particular, you are interested in table No. 1; further we will provide figures based on it).
The cesspool must be located at a distance of at least 8 m from your own residential building and at least 10 m from neighboring ones. You need to retreat at least 20 m from the centralized water supply, and at least 5 m from the gas supply pipes. The distance from the fence with the neighboring plot should be at least 1 m, and from outbuildings and fruit trees - at least 5 m.
Before starting excavation work, a drawing of the site and neighboring buildings is drawn up. The location for the future pit is selected taking into account the above standards, after which the selected point from the diagram is marked on the territory.
In some cases (when the site is located next to an open reservoir), the placement of a cesspool should be coordinated with the State Sanitary and Epidemiological Supervision and environmental authorities.
Also, before digging a pit, you should find out the location of groundwater in the area. It is especially important to carry out this activity if you plan to install a container with natural filtration of waste into the soil. The lower part of such a well should not cross the groundwater level.
Practical fencing
Until recently, slate was the most common roofing material, with a large number of operational advantages. Today its popularity has fallen slightly; more modern materials have appeared on the market: bitumen shingles and metal tiles. It’s a pity to throw away the old covering, which is why many people have warehouses of old slate sheets in their dachas. It’s a shame to throw it away, and there’s no need to do it.
You can easily assemble and make a temporary toilet, an outdoor shower from slate sheets, you can build fences from it, covering a fence made from a chain-link mesh, for example. This solution will protect the garden plot from the prying eyes of passers-by and the penetration of neighboring dogs.
A standard slate sheet has a length of 175 cm, the sheet is cut in half and simply, with an overlap on the chain-link, is dug into the ground with its lower edge to a depth of 40 cm. If the soil is thoroughly compacted after this, no additional fastenings are needed to stabilize the fence. If desired, slate can be easily painted by choosing the right color; it is not difficult to easily integrate it into the style of your site.
Note! Such a partition can protect a personal plot from the spread of weeds, which with their roots try to gain a foothold on the edge of the neighbor’s plot.
Cesspool options
There are two main options for sump design:
- without bottom;
- with bottom.
When constructing a cesspool with your own hands without pumping, it means that waste is absorbed through the open bottom into the soil. To assemble such a cesspool, concrete rings, old tires, metal barrels, bricks, monolithic concrete or concrete blocks can be used. In the case of a cesspool that needs to be pumped out periodically, ready-made plastic containers are used.
To choose the appropriate option for the site, you need to understand the features and key differences between the two systems.
Sump with natural filtration
Most often, cesspools without a bottom are assembled from reinforced concrete rings. This material is durable, not afraid of aggressive environments, and is easy to install.
This system is suitable for both seasonal and permanent residence. The rings are installed on a sand and gravel bed, which filters wastewater, passing it through itself into the soil. To improve the quality of cleaning, it is recommended to pour solutions with anaerobic microorganisms into such cesspools.
A pit with an open bottom is placed at a distance of at least 5 m from the foundation of the building and 20 m from the water supply. The depth of the pit depends on the groundwater level; the lower part must be at least 0.5 m below the groundwater level.
Open-bottom cesspools must be approved by the relevant services, otherwise the owners risk receiving a fine.
We have already compared a cesspool and a septic tank in this article.
Sump with bottom
Systems with a bottom are installed in areas with clay soils and low groundwater level. In this case, filtration of wastewater through the ground is impossible, and therefore a storage option is used. The size of the container must correspond to the level of water consumption in the house, but if more than 4 people permanently live, you will need to purchase special sewer systems.
To dispose of accumulated waste, you have to call a sewer truck, therefore, when placing a cesspool on a site, you should take into account the possibility of access by special vehicles.
Cesspools with a bottom require the mandatory organization of ventilation pipes that remove gases formed during the work of microorganisms during wastewater treatment.
Slate beds
If you have a vegetable garden at your dacha, it’s easy to assemble neat garden beds using slate. It's easy to make them yourself. Look at the photo to see how decorative a garden like this looks. The use of slate has quite practical purposes. Such structures help to keep the soil within one bed.
Such a partition is a reliable barrier to rodents and the spread of weeds. The slate laying process itself consists of several stages:
- First the slate needs to be cut. This can be done along the plates or across the waves, as shown in the photo.
- Then the boundaries of the bed are outlined.
- Trenches are dug along the entire perimeter. Their depth should be half of the prepared fencing product.
- Slate blanks are placed in the prepared trenches.
- All that remains is to dig the trenches and compact the soil around the installed sheet parts.
- In order to give the walls of the bed greater stability, metal pegs are buried in the ground.
Note! The installation of the described fence has certain nuances. If the waves in the beds are horizontal, plant shoots and their roots can easily grow along the depressions.
Any digging of the earth in this case will lead to the death of the plant. Vertically located waves will not become an obstacle to weeding the beds.
It is best to cut slate with a grinder. When performing such work, experienced craftsmen point the grinder in the direction opposite to the wind. In this case, the dust will be blown away from the cutting person. Since asbestos dust is dangerous to humans, it is necessary to protect yourself from it while working by wearing safety glasses over your eyes and covering your nose with a gauze bandage. Do not use a wood saw to cut slate. This is a traumatic job; one wrong move can cause you to lose your arm.
Required materials and tools
To independently install a country toilet with an odorless pit cesspool, you will need the following tools:
- angle grinder;
- shovel;
- building level;
- buckets;
- perforator;
- drill with a set of drills.
Materials you will need:
- container for accumulating waste (metal barrels, bricks, concrete rings, tires);
- sewer pipes, diameter 100-110 mm;
- a set of pipes and couplings;
- geotextiles;
- sealant;
- slate;
- sand;
- fine gravel;
- cement;
- waterproofing mastic.
Homemade septic tanks
A septic tank, or sump tank, is a container consisting of a single sealed body (usually plastic), divided into several sections (for example, as in the figure - A, B, C), an intersection separator, a wastewater supply pipe and a pipe for purified discharge.
Such septic tanks are complex cesspools, but they can not only serve as a vessel for collecting wastewater, but also process dirty liquid into fertilizer for the garden. Homemade septic tanks are a design of 2 or 3 tanks. In the first, only rough purification of wastewater from large debris occurs, but in the second or third, bacteria will work - they process contaminated water into fertilizer.
You can build such a complex structure with your own hands, but this will require considerable financial investments. The essence of the work on arranging a septic tank cesspool:
- You need to buy two or three containers made of special plastic - they must be sealed with outlet holes to the outside.
- You will need to install overflow pipes between these containers - they must also be available. Moreover, they will need to be installed at an angle.
- The first container of the septic tank will contain a small filter - they are sold in stores and have a special marking “for a country septic tank.” This filter will be located at the outlet of the pipe leading to the second container.
- In the second compartment of a complex cesspool, bacteria will live that process waste and turn dirty water into practically clean water - at least, it can be used for watering the garden and washing the car.
- The third compartment is installed at will - it is needed to collect already purified water, but even without it the septic tank will be fully functional. The only clarification: in this case, you will need to install a drain valve in the second container - you will need to extract purified water somehow!
Experts say that the most practical thing is to invite professionals to install a cesspool. But it is quite possible to do it yourself, which will save significant financial resources. If you don’t have a construction/engineering education, and you have minimal or no experience in carrying out any construction work, then it’s better not to risk installing a septic tank yourself - specialists will do it with a quality guarantee.
Calculation of the cesspool
Before starting work, it is necessary to calculate the volume of the container into which the family’s waste will fall.
When calculating, the following standards should be taken into account:
- Almost 200 liters of waste water per person per day. Thus, the monthly volume of wastewater in a family of four will be at least 20 m3 (this indicator is important when calculating the volume of a sealed container);
- when constructing pits with an open bottom, it should be taken into account that the filtration of wastewater in sandy soils is 15% faster than in loams;
- a one-time volume of sewage removal does not exceed 10 m3, which is equal to the volume of approximately four concrete rings with a diameter of 2000 mm;
- When calculating the volume of a container, you should take a safety margin of at least 10%, since it is not always possible to quickly call a sewer truck.
Pros of using slate fencing
Experienced gardeners today not only make beds from slate sheets, they use it to assemble flower beds and lay slate in greenhouses. A garden path covered with flat sheets is durable and reliable. Practicality and decorativeness are not the only advantages of such a solution.
- Slate is a material that quickly heats up in the sun, heats up and easily transfers excess heat to the soil. This has a beneficial effect on the growth of any plant.
- A fencing for a garden bed assembled using asbestos-cement sheets is difficult to destroy.
- In the future, there is no need to carry out any other work with such a fence. Set it and forget it for a long time.
- By using old slate sheets, there is no need to spend money on purchasing wooden beams.
- If desired, the sheets can be easily painted in any color; painting increases the decorative properties of the fence.
If you want to repeat a similar experiment in your garden, it is useful to study in advance the disadvantages of asbestos-cement products. On hot summer days, such a fence will contribute to overheating of the soil, so the plants will need to be watered more often. In places where long rains are a common occurrence, the soil under the fence is often washed away, so they constantly tilt. This forces the garden owner to constantly straighten the fence. For many, this procedure will seem tedious.
Marking and excavation work
When preparing a pit for a cesspool, the following rules and recommendations must be observed and taken into account:
- The marking is carried out according to the plan for linking the cesspool to the buildings on the site.
- The diameter of the pit should exceed the diameter of the concrete rings, tires or barrels by 300-400 mm, so that the walls do not interfere with installation.
- The depth of the pit should exceed the height of the rings by 200-300 mm, which will be required to create a sand and gravel cushion.
- If a non-filtering well made of concrete rings is being installed, a monolithic slab is poured at the bottom or ready-made slabs are laid, after which the joints between them are carefully sealed. You can put rings in the well after the concrete base has fully gained strength.
Instructions for constructing a cesspool
Let's consider the procedure for constructing cesspools made of various materials.
Concrete rings
The design of this structure resembles an ordinary well.
How to dig a pit for concrete rings? To a given depth (at least 0.5 m below the ground level), with a width slightly larger than the size of the ring. Depending on the type of pit, the bottom can act as a filter or be completely monolithic.
To connect the pit to the toilet, a trench is dug into which sewer pipes are laid. In the summer, the pipes will work without interference, but in order to prevent the drains from freezing in winter, the pipes are insulated.
The well is closed with a concrete lid with a hatch for pumping out sewage.
Car tires
The pit is dug with a width exceeding the diameter of the tires by 300-400 mm. A sand and gravel cushion 200 mm thick is placed at the bottom. The tires are laid one on top of the other with the joints sealed with plumbing sealant. The lid is made of boards or plywood with mandatory treatment with antiseptic agents.
Monolithic concrete
The pit is made with a margin of 500 mm in width. The formwork is being prepared, inside which the reinforcing mesh is laid. Cement-sand mortar for pouring is prepared from M300 cement in a 1:2 ratio with sand.
After pouring concrete, you need to wait at least 10 days for sufficient strength to develop. The finished concrete ring is coated with waterproofing mastic. A sand and gravel cushion 200 mm thick is placed at the bottom of the pit. The cesspool cover with a hole for pumping can also be cast from concrete.
Metal barrel
This option is suitable for houses with no more than 2 inhabitants and for sandy soils with low groundwater levels.
Holes with a diameter of 10-15 mm are made in the walls of a metal barrel with a volume of 200 liters in increments of 200 mm, and the outside is wrapped in geotextile along the height, securing it with wire.
The lid is hermetically secured along the diameter and a hole is cut for the inlet sewer pipe.
The pit is dug to a depth exceeding the height of the barrel by 300 mm; the bottom of the pit should be filled 200 mm with fine gravel. The side voids are also filled with gravel.
Brick
Let's look at the step-by-step organization of a brick pit:
- a pit is dug to the size of the future cesspool;
- a sand and gravel cushion 200 mm thick is made at the bottom of the pit;
- along the perimeter of the pit, according to the size of the masonry, formwork is arranged and a monolithic concrete slab is poured;
- After the foundation has gained strength, they begin laying brick walls. The easiest way is to make a well in a square or rectangular shape. The thickness of the wall is one brick;
- the outside and inside of the walls are plastered with clay mortar;
- a sewer pipe is laid in the trench connecting the pit and the toilet in the house;
- the cesspool cover is made of boards or cast from concrete, providing a hole for a hatch with a diameter of 500 mm.
Shelves in the cellar
Another way to use old slate was suggested by experienced summer residents and gardeners. To store supplies, they propose to build comfortable and durable shelves using slate, allowing you to organize a convenient storage system for existing supplies. The shelves are constructed as follows:
- In the corners of the pantry, brick racks are laid, the length of which should match the width of the slate sheet. The height of the racks is 90 cm.
- A sheet of slate is laid on the racks.
- Formwork is constructed around it.
- Reinforcement pipes are laid into the slate ribs.
- The solution is mixed as for a cement screed.
- A sheet of slate is poured with it; the layer of mortar should be 10 cm.
- The result should be monolithic concrete - a fairly strong, spacious shelf that can easily accommodate any container for storing vegetables and fruits.
If the cellar is large, such shelves can be placed around the perimeter, made short or long. Many will think that using boards in this case is easier than slate, but the use of the described material, as practice shows, helps to save significantly. In addition, the slate does not need to be removed from the formwork. It can be painted or whitewashed with lime. Then the shelves will look quite neat.
Recommendations for cleaning a cesspool
After installing a country toilet with a cesspool, you should consider a sewage pumping system, even if natural filtration into the soil is assumed.
When using anaerobic microorganisms, feces are processed directly inside the container, but it will not be possible to filter and process waste in a filtration well without residue. From time to time, such systems need to be completely pumped out to clean the walls and replace the drainage.
If a pit with a bottom is installed in a private house, pumping will have to be done much more often. A sewer truck is ordered as the pit is filled with sewage, since there is simply nowhere for the liquid to go. Therefore, when owners plan to install a cesspool for a toilet in a country house, they need to provide convenient access for the machine to the well, taking into account that the length of the sewer hose is usually from 10 to 20 m.
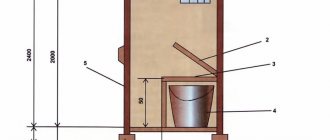
Toilet stall drawings
The toilet stall may have a different design, but the principle of construction is identical for all. Here are some examples.
Fig.40.
Fig.41.
Fig.42.
Fig.43.
Fig.44.
The toilet is made on a wooden frame and covered with clapboard.
Fig.45.
The simplest one is a wooden outdoor toilet.
Fig.46.
Original toilets for a summer residence photo.
Fig.47.
Beautiful toilet in the countryside photo. A barrel-shaped toilet is a very original idea.
Fig.48.
How to build an interesting toilet in the country? Make it an unusual shape.
Fig.49.
How to disguise a toilet in a country house photo. Cover its block with house and paint it the color of tree bark.
Fig.50.
A toilet in a dacha made of logs.
Fig.51.
How to paint a toilet in the country. Original idea.
Fig.52.
Toilet in the country house made of siding.